说明:先添加weapon到点的约束,位置,方向约束都调整好了后再建立点到手,hip的父子关系,注意这个顺序
加点的方法
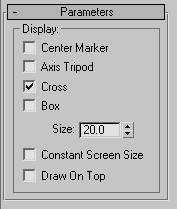
点设置成box的方法:
http://hewiki.heroengine.com/wiki/Rigging_a_Versatile_Weapon_Bone_for_3ds_Max
This is an advanced-level tutorial for artists, which explains how to configure a character-held item such as a weapon or some other prop. This item could be attached to a character at multiple locations (not just one hand), and then animated to change positions from one location to the next.
Goal
The goal of this tutorial is to build a weapon rig that allows the character to hold and manipulate the weapon with different grips, and even different hands. We also want to be able to sheath the weapon either on the hip or the back. We will achieve this by skinning the weapon to a weapon bone, and then use a series of point helpers, position, and orient constraints to achieve fluid motion.
Although this tutorial was done in 3ds Max, the concepts translate directly to Maya.
See Rigging a Versatile Weapon Bone for Maya page for Maya tutorial.
Tutorial
In 3ds Max, start off with the character in a relaxed root pose. 
Create a small bone and name it Weapon Bone, color it if you like. There are 2 ways to parent this bone, either is ok, what matters is that you pick one and stay consistent.
Orient the bone so that it is laying flat at (0,0,0) degrees.
- The first way is to just parent the weapon bone to the hand that the weapon will be in most often, in this case, the right.
- The other is to parent it to the Bip01 node. You may want to do this especially if your character has long limbs. Longer limbs means there will be more floating point errors in all the bones of the limb, resulting in jittery motions. If you parent directly to the bip01, that's less to go through resulting in more accurate motion.
You will never animate this bone directly, it will be driven by other things. This relationship is strictly for the engine to read the hierarchy, and for granny to figure out the baked down curves.
Also, build a stand-in weapon, and parent it to the weapon bone, make sure your axis alignment is the same. 
Next, create 4 point helpers. Sometimes it's easier to select them if you change there shape to box. Roughly place one in each hand, these will be used for holding weapons. Place one on his hip so the weapon can be sheathed. The other one will remain free. This is handy in case you want to animate the weapon free of the character rig. Place it on the ground temporarily, or what ever you may come up with. Some times it's good to have more than 1 free point helper for some extra freedom.
- For best results, name your point helpers appropriately
Now we want to add a position constraint to the weapon bone so that we can control its motion with the point helpers. Select the Weapon Bone, go: Animation/Constraints/Position Constraint. Select the Right_weapon_control with the tool. The weapon bone should snap to the controller location.
- Ensure the weapon bone is still selected.
- From the main menu, go: Animation/Constraints/Orientation Constraint. Select the Right_weapon_control with the tool. The weapon bone should orient to the controllers orientation. Select the right_weapon_controller and rotate it so that it's an appropriate rotation for the weapon itself.
Next, select the weapon bone again, on your control panel, open the Motion tab. Under PRS parameters, make sure you haveRotation selected, then under Orientation Constraint select Add Orientation Target. Select the other weapon controls. The result should be an oddly rotated weapon bone, that's okay, we'll get to that later.
Do the same procedure, except this time, add positional targets. The weapon should now be in between all the controls.
Now adjust the weight on the position and orientation targets so that only the left_weapon_control is 100% and the other are all 0%. The weapon should now be on the left hand. Adjust the left_weapon_control to have the correct orientation with the rotate tool
Repeat the last step and adjust each positional and orientation constraint so that it is 100% for 1 control at a time, adjust the controllers rotation.
- parent the right_weapon_control to the right hand
- parent the left_weapon_control to the left hand
- parent the hip_control to the pelvis bone
- keep the free_control unparented.
Now to finesse this a little bit, select the hip control and do an orientation constraint on it. select the Right thigh bone. Select Keep initial offset on the orientation panel. Now the sheathed weapon maintains its position to the pelvis, but rotates with the leg as it walks.
The last thing to do is to create a selection set for the controls. The controls should not be a part of the exported skeleton or animation files. That way you don't have to manually select them each time to hide and unhide them.
- Now you can effectively transition the weapon between the hands and various other parts of the rig just by animating the controls and the constraint weighting on the weapon bone


