java selenium 开发环境搭建
很多同学问我java selenium的开发环境怎么搭建,在这里简要说明一下。
安装jdk
这个自己一定要会
下载IDE
对于初学者来说java IDE无疑是消除初学者恐惧症的绝佳工具。很诚实的说intellij比eclipse要好用,不过对于初学者来说eclipse已经够用了。所以首先下载安装eclipse就好。这里是下载地址,解压以后就可以用了。注意,如果你的系统是64位的,请下载64位的版本。
下载selenium的jar包
点击这里下载,本文写作的时候,最新版本是2.48.2。
新建项目并引入jar包
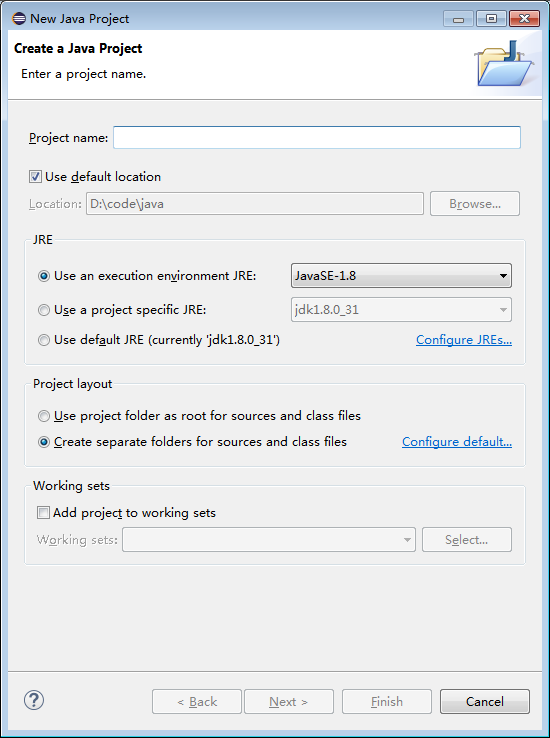
打开Eclpse,选择菜单File-New-Java Project,然后出现如下图所示:
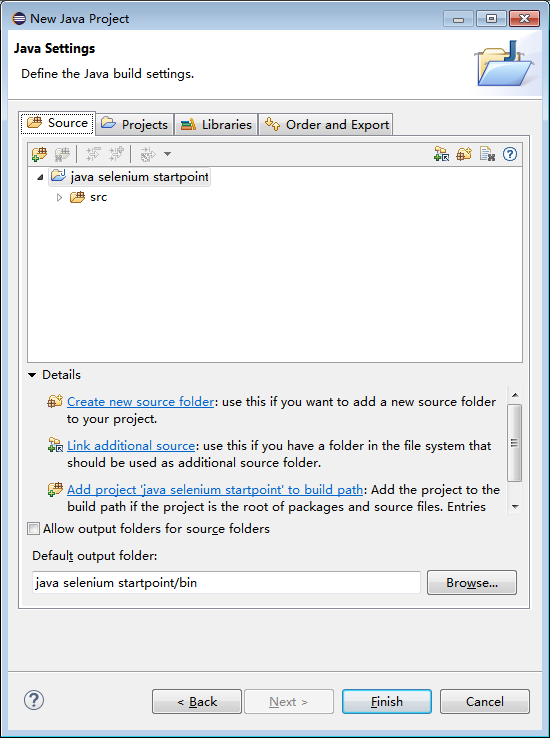
Project Name我们输入java webdriver startpoint,点击Next,结果如下图所示
点击Add External JARs,选择刚才下载的selenium jar包。
然后点击Finish就好。
新建java类文件并测试安装情况
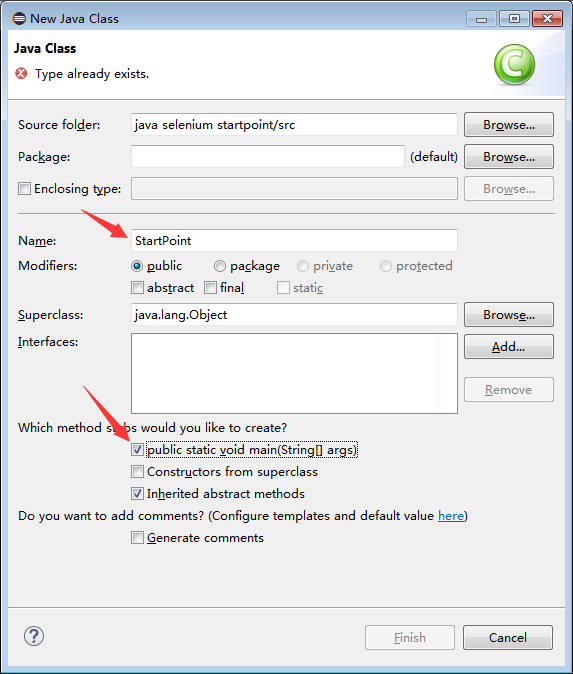
接下来在src目录下点击右键,选择New-Class
class name里写StartPoint,注意大小写,然后勾选上public static void main(String args[]),如图所示
接下来键入下面的代码:
-
import java.io.File;


import java.io.IOException;

import org.openqa.selenium.OutputType;
import org.openqa.selenium.firefox.*;
import org.openqa.selenium.phantomjs.*;
import org.openqa.selenium.remote.RemoteWebDriver;
import org.apache.commons.io.FileUtils;

public class StartPoint {

	public static void main(String[] args) throws IOException {
		// 启动firefox
		File whereIsFF = new File("D:\Program Files\Mozilla Firefox\firefox.exe");
		FirefoxBinary ffBin= new FirefoxBinary(whereIsFF);
		FirefoxProfile profile = new FirefoxProfile();
		FirefoxDriver dr = new FirefoxDriver(ffBin, profile);
		dr.get("http://www.qq.com");
		takeScreenShot(dr, "./qq.png");
		dr.quit();

		// 如果你安装了phantomjs
		// PhantomJSDriver phantom_dr = new PhantomJSDriver();
		// phantom_dr.get("http://www.baidu.com");
		// takeScreenShot(phantom_dr, "./baidu.png");
		// phantom_dr.quit();

	}

	public static void takeScreenShot(RemoteWebDriver dr, String fileName) throws IOException {
		File tmpFile = dr.getScreenshotAs(OutputType.FILE);
		FileUtils.copyFile(tmpFile, new File(fileName));
	}
}
敲不动就直接复制粘贴吧。
注意,请将代码中的File whereIsFF = new File("D:\Program Files\Mozilla Firefox\firefox.exe");这一行替换成你的firefox的安装路径!
接下来按ctrl+F11或者是点击运行图标来运行一下,如果你安装了firefox(这里其实有点麻烦,最好安装firefox国际版,并且版本不要太高,我的版本是windows 41.02版本)的话,那么你会看到firefox打开并访问qq.com,然后截图留念。
总结
总结一下,其实只要做下面几件事情就可以搞定selenium的环境搭建了
- 安装jdk
- 安装eclipse
- 安装firefox
- 下载selenium jar包
- 按照上面的教程配置项目
- 运行测试代码
- Done