
前言
在 Springboot 系列文章第十一篇里(使用 Mybatis(自动生成插件) 访问数据库),实验了 Springboot 结合 Mybatis 以及 Mybatis-generator 生成插件的开发过程,其实对于 Mybatis 来讲还有很多优秀方便好用的插件,比如这次要演示的 通用 Mapper 生成插件和分页插件。
数据库准备
既然是持久层框架,先准备一个用于实验操作的数据表,这次还是使用上一个实验使用的 mysql 数据库中的 springboot.book 数据表。
未创建的可以在 mysql 数据库的 springboot 库中创建表 book 用于演示。
CREATE TABLE `book` (
  `id` int(11) NOT NULL AUTO_INCREMENT,
  `author` varchar(255) DEFAULT NULL COMMENT '书籍作者',
  `name` varchar(255) DEFAULT NULL COMMENT '书籍名称',
  `price` float NOT NULL COMMENT '书籍价格',
  `create_time` datetime NOT NULL COMMENT '创建时间',
  `description` varchar(255) DEFAULT NULL COMMENT '书籍描述',
  PRIMARY KEY (`id`)
) ENGINE=InnoDB AUTO_INCREMENT=15 DEFAULT CHARSET=utf8;
增加测试数据。
INSERT INTO `springboot`.`book`(`id`, `author`, `name`, `price`, `create_time`, `description`) VALUES (2, '金庸', '笑傲江湖', 12, '2018-09-01 10:10:12', '是作家金庸创作的一部长篇武侠小说');
INSERT INTO `springboot`.`book`(`id`, `author`, `name`, `price`, `create_time`, `description`) VALUES (3, '罗贯中', '三国演义', 22, '2018-09-01 10:10:16', '是作家罗贯中创作的一部长篇历史小说');
INSERT INTO `springboot`.`book`(`id`, `author`, `name`, `price`, `create_time`, `description`) VALUES (4, '吴承恩', '西游记', 17, '2018-09-01 10:10:19', '是作家吴承恩创作的一部长篇小说');
INSERT INTO `springboot`.`book`(`id`, `author`, `name`, `price`, `create_time`, `description`) VALUES (5, '金庸1535767819284', '笑傲江湖1535767819284', 43, '2018-09-01 10:10:19', '是作家金庸创作的一部长篇武侠小说1535767819284');
INSERT INTO `springboot`.`book`(`id`, `author`, `name`, `price`, `create_time`, `description`) VALUES (6, '金庸1535767819679', '笑傲江湖1535767819679', 24, '2018-09-01 10:10:20', '是作家金庸创作的一部长篇武侠小说1535767819679');
INSERT INTO `springboot`.`book`(`id`, `author`, `name`, `price`, `create_time`, `description`) VALUES (7, '罗贯中1535769035138', '三国演义1535769035138', 20, '2018-09-01 10:30:35', '是罗贯中创作的一部小说1535769035138');
INSERT INTO `springboot`.`book`(`id`, `author`, `name`, `price`, `create_time`, `description`) VALUES (9, '金庸1535783613226', '笑傲江湖1535783613226', 30, '2018-09-01 14:33:33', '是作家金庸创作的一部长篇武侠小说1535783613226');
INSERT INTO `springboot`.`book`(`id`, `author`, `name`, `price`, `create_time`, `description`) VALUES (10, '金庸1535783618455', '笑傲江湖1535783618455', 30, '2018-09-01 14:33:38', '是作家金庸创作的一部长篇武侠小说1535783618455');
INSERT INTO `springboot`.`book`(`id`, `author`, `name`, `price`, `create_time`, `description`) VALUES (11, '金庸1535783620634', '笑傲江湖1535783620634', 30, '2018-09-01 14:33:41', '是作家金庸创作的一部长篇武侠小说1535783620634');
INSERT INTO `springboot`.`book`(`id`, `author`, `name`, `price`, `create_time`, `description`) VALUES (12, '金庸1535783672457', '笑傲江湖1535783672457', 30, '2018-09-01 14:34:32', '是作家金庸创作的一部长篇武侠小说1535783672457');
INSERT INTO `springboot`.`book`(`id`, `author`, `name`, `price`, `create_time`, `description`) VALUES (13, '金庸1535783673664', '笑傲江湖1535783673664', 30, '2018-09-01 14:34:34', '是作家金庸创作的一部长篇武侠小说1535783673664');
INSERT INTO `springboot`.`book`(`id`, `author`, `name`, `price`, `create_time`, `description`) VALUES (14, '金庸1535783939262', '笑傲江湖1535783939262', 30, '2018-09-01 14:38:59', '是作家金庸创作的一部长篇武侠小说1535783939262');
引入依赖
创建 Springboot 项目不提,引入 maven 依赖,主要是 mybastis 核心依赖以及 mybatis mapper 自动生成插件、分页插件、通用 Mapper 插件。依赖中的 druid 数据源部分,可以参考系列文章第九篇。
 <dependencies>
        <!-- Spring Boot web 开发整合 -->
        <dependency>
            <groupId>org.springframework.boot</groupId>
            <artifactId>spring-boot-starter-web</artifactId>
            <exclusions>
                <exclusion>
                    <artifactId>spring-boot-starter-json</artifactId>
                    <groupId>org.springframework.boot</groupId>
                </exclusion>
            </exclusions>
        </dependency>

        <dependency>
            <groupId>org.springframework.boot</groupId>
            <artifactId>spring-boot-starter-test</artifactId>
            <scope>test</scope>
        </dependency>

        <!-- 阿里 fastjson -->
        <dependency>
            <groupId>com.alibaba</groupId>
            <artifactId>fastjson</artifactId>
            <version>1.2.47</version>
        </dependency>

        <!-- Lombok 工具 -->
        <dependency>
            <groupId>org.projectlombok</groupId>
            <artifactId>lombok</artifactId>
            <optional>true</optional>
        </dependency>

        <!-- 导入配置文件处理器,在配置springboot相关文件时候会有提示 -->
        <dependency>
            <groupId>org.springframework.boot</groupId>
            <artifactId>spring-boot-configuration-processor</artifactId>
            <optional>true</optional>
        </dependency>

        <!--添加数据库链接 -->
        <dependency>
            <groupId>mysql</groupId>
            <artifactId>mysql-connector-java</artifactId>
        </dependency>

        <!-- Druid 数据源 -->
        <dependency>
            <groupId>com.alibaba</groupId>
            <artifactId>druid-spring-boot-starter</artifactId>
            <version>1.1.10</version>
        </dependency>

        <!-- mybatis -->
        <dependency>
            <groupId>org.mybatis.spring.boot</groupId>
            <artifactId>mybatis-spring-boot-starter</artifactId>
            <version>1.3.2</version>
        </dependency>

        <!-- mybatis mapper自动生成插件 -->
        <dependency>
            <groupId>org.mybatis.generator</groupId>
            <artifactId>mybatis-generator-core</artifactId>
            <version>1.3.7</version>
            <scope>compile</scope>
            <optional>true</optional>
        </dependency>

        <!-- mybatis pagehelper 分页插件 -->
        <dependency>
            <groupId>com.github.pagehelper</groupId>
            <artifactId>pagehelper-spring-boot-starter</artifactId>
            <version>1.2.10</version>
        </dependency>
        <dependency>
            <groupId>tk.mybatis</groupId>
            <artifactId>mapper-spring-boot-starter</artifactId>
            <version>2.1.5</version>
        </dependency>

        <!-- mybatis 通用 Mapper -->
        <dependency>
            <groupId>tk.mybatis</groupId>
            <artifactId>mapper</artifactId>
            <version>4.0.4</version>
        </dependency>

    </dependencies>
简单说明一下几个不常见依赖的作用。
- mybatis-generator-core 用于自动生成 model、mapper 接口、mapper xml。
- pagehelper-spring-boot-starter 用于分页
- mapper 用于增强增删改查功能,集成了很多常用操作。
增加配置
关于 Druid 数据源的配置不再说明,可以参考系列文章第九篇。配置中主要配置了项目编码、数据源信息、durid 数据源和 mybatis 的 mapper 位置以及 mybatis 映射别名的包路径。还有 pagehelper 分页插件部分。
############################################################
# 服务启动端口号
server.port=8080
spring.profiles.active=dev
# 编码
server.tomcat.uri-encoding=utf-8
spring.http.encoding.force=true
spring.http.encoding.charset=UTF-8
spring.http.encoding.enabled=true
############################################################
spring.datasource.url=jdbc:mysql://127.0.0.1:3306/springboot?characterEncoding=utf-8&serverTimezone=GMT%2B8
spring.datasource.driver-class-name=com.mysql.jdbc.Driver
spring.datasource.username=root
spring.datasource.password=123
# 使用 druid 数据源
spring.datasource.type:com.alibaba.druid.pool.DruidDataSource
spring.datasource.initialSize:5
spring.datasource.minIdle:5
spring.datasource.maxActive:20
spring.datasource.maxWait:60000
spring.datasource.timeBetweenEvictionRunsMillis:60000
spring.datasource.minEvictableIdleTimeMillis:300000
spring.datasource.validationQuery:SELECT 1 FROM DUAL
spring.datasource.testWhileIdle:true
spring.datasource.testOnBorrow:false
spring.datasource.testOnReturn:false
spring.datasource.poolPreparedStatements:true
spring.datasource.filters:stat
spring.datasource.maxPoolPreparedStatementPerConnectionSize:20
spring.datasource.useGlobalDataSourceStat:true
spring.datasource.connectionProperties:druid.stat.mergeSql=true;druid.stat.slowSqlMillis=500
############################################################
# mybatis
mybatis.mapper-locations=classpath:mapper/*.xml
mybatis.type-aliases-package=net.codingme.boot.domain
############## mybatis page配置#######################
# restart 类加载加载 include 进去的 jar 包。
restart.include.mapper=/mapper-[\w-\.]+jar
restart.include.pagehelper=/pagehelper-[\w-\.]+jar
# mappers 多个接口时逗号隔开
mapper.mappers=net.codingme.boot.util.MybatisMapper
mapper.not-empty=false
mapper.identity=MYSQL
# pagehelper
pagehelper.helperDialect=mysql
pagehelper.reasonable=true
pagehelper.supportMethodsArguments=true
pagehelper.params=count=countSql
# 输出 mybatis SQL 日志
logging.level.net.codingme.boot.domain.mapper=debug
一些说明。
mapper.mappers=net.codingme.boot.util.MybatisMapper用于包含一个自己编写的 mapper。restart.include热部署logging.level.net.codingme.boot.domain.mapper=debug输出 Mybatis SQL 这里要指定自己 mapper 所在的包路径
通用 Mapper
在上一篇文章中也演示了自动生成,那是通用的一种生成方式,这次我们引入通用 Mapper 再进行生成,这样生成的代码更加简洁。
为了方便理解,先看一下项目最终结构。

自动生成配置
自动生成通用接口分为两步,第一步是编写生成配置文件,注释已经添加了,直接看代码。
<?xml version="1.0" encoding="UTF-8"?>
<!DOCTYPE generatorConfiguration
PUBLIC "-//mybatis.org//DTD MyBatis Generator Configuration 1.0//EN"
"http://mybatis.org/dtd/mybatis-generator-config_1_0.dtd">
<generatorConfiguration>
<context id="MysqlContext" targetRuntime="MyBatis3Simple" defaultModelType="flat">
<property name="beginningDelimiter" value="`"/>
<property name="endingDelimiter" value="`"/>
<property name="javaFileEncoding" value="UTF-8"/>
<!-- 是否使用通用 Mapper 提供的注释工具,默认 true 使用,这样在生成代码时会包含字段的注释(目前只有 mysql 和 oracle 支持)-->
<property name="useMapperCommentGenerator" value="true"/>
<plugin type="tk.mybatis.mapper.generator.MapperPlugin">
<!-- 配置后生成的 Mapper 接口都会自动继承这个接口-->
<property name="mappers" value="tk.mybatis.mapper.common.MySqlMapper"/>
</plugin>
<plugin type="tk.mybatis.mapper.generator.MapperPlugin">
<!-- 配置后生成的 Mapper 接口都会自动继承这个接口 -->
<property name="mappers" value="tk.mybatis.mapper.common.Mapper"/>
<!-- 是否区分大小写,默认 false -->
<property name="caseSensitive" value="true"/>
</plugin>
<jdbcConnection driverClass="com.mysql.cj.jdbc.Driver"
connectionURL="jdbc:mysql://127.0.0.1:3306/springboot?characterEncoding=utf-8&serverTimezone=GMT%2B8&nullCatalogMeansCurrent=true"
userId="root"
password="123">
</jdbcConnection>
<!-- 对于生成的pojo所在包 -->
<javaModelGenerator targetPackage="net.codingme.boot.domain" targetProject="src/main/java"/>
<!-- 对于生成的mapper所在目录 -->
<sqlMapGenerator targetPackage="mapper" targetProject="src/main/resources"/>
<!-- 配置mapper对应的java映射 -->
<javaClientGenerator targetPackage="net.codingme.boot.domain.mapper" targetProject="src/main/java"
type="XMLMAPPER"/>
<!-- 要生成那些表(更改tableName和domainObjectName就可以) -->
<table tableName="book" domainObjectName="Book"/>
</context>
</generatorConfiguration>
与上次不同的是这次增加了两个 plugin,后面生成的 Mapper 接口都会自动继承这些类。
自动生成代码
写好配置文件之后,还需要写一个生成程序,用于加载配置文件,运行就可以生成相关的实体类、Mapper 接口、Mapper xml .
import org.mybatis.generator.api.MyBatisGenerator;
import org.mybatis.generator.config.Configuration;
import org.mybatis.generator.config.xml.ConfigurationParser;
import org.mybatis.generator.internal.DefaultShellCallback;
import java.io.File;
import java.util.ArrayList;
/**
 * <p>
 * Mybatis generator的逆向生成工具类
 *
 * @Author niujinpeng
 */
public class MybatisGenerator {

    public void generator() throws Exception {
        ArrayList<String> warnings = new ArrayList<>();
        boolean overwrite = true;
        // 指定你想工程配置文件
        File configFile = new File("generatorConfig.xml");
        System.out.println(configFile.getAbsolutePath());
        ConfigurationParser cp = new ConfigurationParser(warnings);
        Configuration config = cp.parseConfiguration(configFile);
        DefaultShellCallback callback = new DefaultShellCallback(overwrite);
        MyBatisGenerator myBatisGenerator = new MyBatisGenerator(config, callback, warnings);
        myBatisGenerator.generate(null);
        for (String warning : warnings) {
            System.out.println(warning);
        }
    }

    public static void main(String[] args) throws Exception {
        MybatisGenerator mybatisGenerator = new MybatisGenerator();
        mybatisGenerator.generator();
    }
}
自动生成结果
运行完毕上面程序之后,自动生成了 Book.java.
@Table(name = "book")
@ToString // 手动添加的 tostring 注解
public class Book {
    @Id
    private Integer id;

    /**
     * 书籍作者
     */
    private String author;

    /**
     * 书籍名称
     */
    private String name;

    /**
     * 书籍价格
     */
    private Float price;

    // 省略下面的自动生成代码
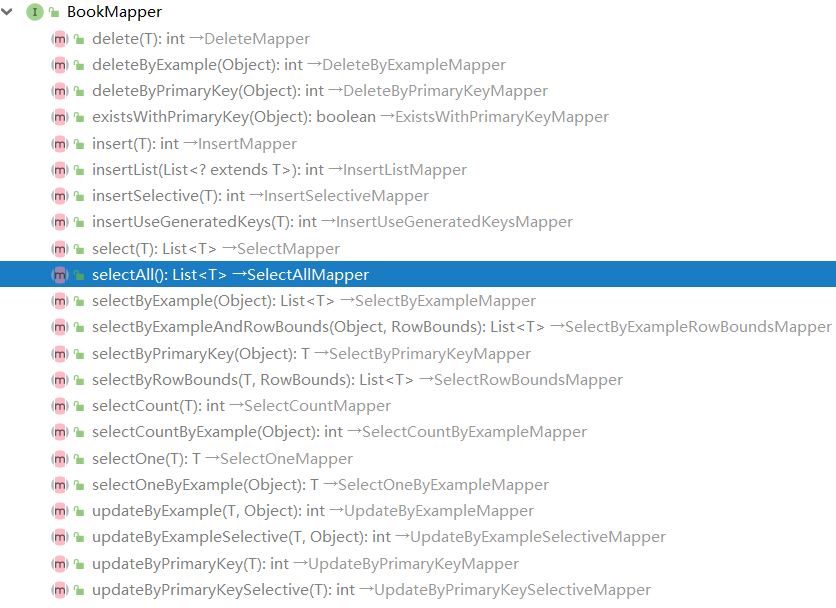
通用 Mapper
上面的程序也自动生成了 BookMapper 接口,且继承了配置的 MySqlMapper 和 Mapper 接口。
import net.codingme.boot.domain.Book;
import org.springframework.stereotype.Repository;
import tk.mybatis.mapper.common.Mapper;
import tk.mybatis.mapper.common.MySqlMapper;

@Repository
public interface BookMapper extends MySqlMapper<Book>, Mapper<Book> {
}
这两个接口里实现了很多常用操作。
生成完成之后要在 Springboot 启动器上添加 MapperScan 注解指定要扫描的 mapper 位置。
@tk.mybatis.spring.annotation.MapperScan(basePackages = "net.codingme.boot.domain.mapper")
@SpringBootApplication
public class BootApplication {

    public static void main(String[] args) {
        SpringApplication.run(BootApplication.class, args);
    }
}
单元测试和分页测试
编写 BookMapperTest 单元测试用于测试 BookMapper 的方法。
package net.codingme.boot.domain.mapper;

import com.github.pagehelper.Page;
import com.github.pagehelper.PageHelper;
import com.github.pagehelper.PageInfo;
import net.codingme.boot.domain.Book;
import org.junit.Assert;
import org.junit.Test;
import org.junit.runner.RunWith;
import org.springframework.beans.factory.annotation.Autowired;
import org.springframework.boot.test.context.SpringBootTest;
import org.springframework.test.context.junit4.SpringRunner;

import java.util.List;

@RunWith(SpringRunner.class)
@SpringBootTest
public class BookMapperTest {

    @Autowired
    private BookMapper bookMapper;

    @Test
    public void testSelectOne() {
        Book book = new Book();
        book.setId(2);
        Book selectOne = bookMapper.selectOne(book);
        Assert.assertNotNull(selectOne);
        System.out.println(selectOne);
    }

    @Test
    public void testSelectByPrimaryKey() {
        Book book = bookMapper.selectByPrimaryKey(2);
        Assert.assertNotNull(book);
        System.out.println(book);
    }

    /**
     * 分页测试
     */
    @Test
    public void testSelectPageInfo() {
        PageHelper.startPage(2, 3);
        List<Book> bookList = bookMapper.selectAll();
        Assert.assertNotNull(bookList);
        System.out.println("查询出数量:" + bookList.size());
        PageInfo<Book> pageInfo = PageInfo.of(bookList);
        System.out.println("总数量:" + pageInfo.getTotal());
        System.out.println("总页数:" + pageInfo.getPages());
        System.out.println("页大小:" + pageInfo.getPageSize());
        System.out.println("第几页:" + pageInfo.getPageNum());
        System.out.println("当前量:" + pageInfo.getSize());
    }

    /**
     * 分页测试
     */
    @Test
    public void testSelectPage() {
        PageHelper.startPage(2, 3);
        List<Book> bookList = bookMapper.selectAll();
        Assert.assertNotNull(bookList);
        System.out.println("查询出数量:" + bookList.size());
        System.out.println("总数量:" + ((Page)bookList).getTotal());
        System.out.println("总页数:" + ((Page)bookList).getPages());
        System.out.println("第几页:" + ((Page)bookList).getPageNum());
    }

}
从代码中可以看到分页的实现主要是 PageHelper 的设置,在设置 PageHelper 之后的第一个查询会进行分页。像上面的例子会查询第二页,每页三条这样。
PageHelper.startPage(2, 3);
List<Book> bookList = bookMapper.selectAll();
其实使用了分页插件之后返回的数据类型是一个 Page 类,总数等分页信息都已经返回,如果要取出来使用就需要强制转换类型然后取出,上面也是演示了两种方式。
// 方式 1
PageInfo<Book> pageInfo = PageInfo.of(bookList);
System.out.println("总数量:" + pageInfo.getTotal());
System.out.println("总页数:" + pageInfo.getPages());
System.out.println("页大小:" + pageInfo.getPageSize());
System.out.println("第几页:" + pageInfo.getPageNum());
System.out.println("当前量:" + pageInfo.getSize());

// 方式 2
System.out.println("查询出数量:" + bookList.size());
System.out.println("总数量:" + ((Page)bookList).getTotal());
System.out.println("总页数:" + ((Page)bookList).getPages());
System.out.println("第几页:" + ((Page)bookList).getPageNum());
运行 BookMapperTest 类测试所有的单元测试。
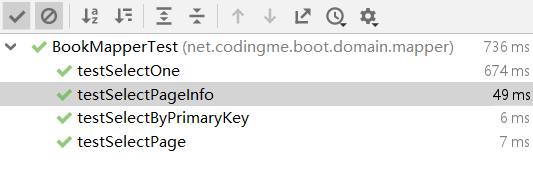
发现单元测试全部通过,查看一个分页查询(testSelectPageInfo)输出情况。
2019-03-08 16:07:52.226 DEBUG 26764 --- [           main] n.c.b.d.m.BookMapper.selectAll_COUNT     : ==>  Preparing: SELECT count(0) FROM book
2019-03-08 16:07:52.227 DEBUG 26764 --- [           main] n.c.b.d.m.BookMapper.selectAll_COUNT     : ==> Parameters:
2019-03-08 16:07:52.229 DEBUG 26764 --- [           main] n.c.b.d.m.BookMapper.selectAll_COUNT     : <==      Total: 1
2019-03-08 16:07:52.231 DEBUG 26764 --- [           main] n.c.b.d.mapper.BookMapper.selectAll      : ==>  Preparing: SELECT id,author,name,price,create_time,description FROM book LIMIT ?, ?
2019-03-08 16:07:52.233 DEBUG 26764 --- [           main] n.c.b.d.mapper.BookMapper.selectAll      : ==> Parameters: 3(Integer), 3(Integer)
2019-03-08 16:07:52.236 DEBUG 26764 --- [           main] n.c.b.d.mapper.BookMapper.selectAll      : <==      Total: 3
查询出数量:3
总数量:12
总页数:4
页大小:3
第几页:2
当前量:3
再查看一个普通查询(testSelectByPrimaryKey)输出情况。
2019-03-08 16:07:52.241 DEBUG 26764 --- [           main] n.c.b.d.m.BookMapper.selectByPrimaryKey  : ==>  Preparing: SELECT id,author,name,price,create_time,description FROM book WHERE id = ?
2019-03-08 16:07:52.242 DEBUG 26764 --- [           main] n.c.b.d.m.BookMapper.selectByPrimaryKey  : ==> Parameters: 2(Integer)
2019-03-08 16:07:52.244 DEBUG 26764 --- [           main] n.c.b.d.m.BookMapper.selectByPrimaryKey  : <==      Total: 1
Book(id=2, author=金庸, name=笑傲江湖, price=12.0, createTime=Sat Sep 01 10:10:12 GMT+08:00 2018, description=是作家金庸创作的一部长篇武侠小说)
文中代码已经上传到 Github Spring Boot 连接数据库 - Mybatis 插件
想要了解这几个插件的其他信息,可以查看官方文档。
我的微信:wn8398
原文出处:www.codingme.net