一、前言
任何程序都无法保证上线后不会出现紧急bug,选择的修复方式不同,其代价也大不相同。所谓热修复,是相对于正常的版本迭代修复而言的,它可以及时在应用内下载补丁更新程序逻辑,修复bug;而不需要等到下一个版本发布。举个简单的例子,假如有一行代码的逻辑写错了,并且已经编译出APK,安装到了用户的手机上,此时有两种处理方式:
- 等待下一个版本发布,其中修复了错误代码,即迭代修复
- 给用户推送补丁,及时修复错误代码,即热修复
下图对比两者区别:

从上图可以看出热修复相对于迭代修复有很大优势:
- 成本优势——避免了重新向渠道更新APK版本
- 时间优势——几乎是即时修复,不必等待版本覆盖时间
- 体验优势——避免重新安装版本,用户无感修复
热修复技术可以为应用增加一份安全保障,也为程序更新提供了一种新的可能途径。
二、热修复技术原理
从技术角度来说,我们的目的是非常明确的:把错误的代码替换成正确的代码。注意这里的替换,并不是直接擦写dx文件,而是提供一份新的正确代码,让应用运行时绕过错误代码,执行新的正确代码。

想法简单直接,但实现起来并不容易。目前主要有三类技术方案:
- native底层替换方案
- 类加载方案
- Instant Run方案
(1)native底层替换方案
Android/Java代码的最小组织方式是方法(Method,实际上,每一个dex文件最多可以包含65536(0xffff)个方法),每个方法在ART虚拟机中都有一个ArtMethod结构体指针与之对应,ArtMethod结构体中包含了Java方法的所有信息,包括执行入口、访问权限、所属类和代码执行地址等等。换句话说,虚拟机就是通过ArtMethod结构体来操纵Java方法的。ArtMethod结构如下:


class ArtMethod FINAL {
...
protected:
  GcRoot<mirror::Class> declaring_class_;

  std::atomic<std::uint32_t> access_flags_;

  // Offset to the CodeItem.
  uint32_t dex_code_item_offset_;

  // Index into method_ids of the dex file associated with this method.
  uint32_t dex_method_index_;

  uint16_t method_index_;

  uint16_t hotness_count_;

  struct PtrSizedFields {
    // Depending on the method type, the data is
    //   - native method: pointer to the JNI function registered to this method
    //                    or a function to resolve the JNI function,
    //   - conflict method: ImtConflictTable,
    //   - abstract/interface method: the single-implementation if any,
    //   - proxy method: the original interface method or constructor,
    //   - other methods: the profiling data.
    void* data_;

    // Method dispatch from quick compiled code invokes this pointer which may cause bridging into
    // the interpreter.
    void* entry_point_from_quick_compiled_code_;
  } ptr_sized_fields_;
...
}
其中有一个关键指针,它是方法的执行入口:
entry_point_from_quick_compiled_code_
也就是说,这个指针指向方法体编译后对应的汇编指令。那么,如果我们能hook这个指针,由原来指向有bug的方法,变成指向正确的方法,就达到了修复的目的。这就是native层替换方案的核心原理。具体实现方案可以是改变指针指向(AndFix),也可以直接替换整个结构体(Sophix)。
需要注意的是,底层替换方案虽然是即使生效的,但是因为不会加载新类,而是直接修改原类,所以修改的代码不能增加新的方法,否则会造成索引数与方法数不匹配,无法通过索引找到正确方法,字段同理。
(2)类加载方案
native底层替换方案hook的是method指针,类加载方案则将目标定在类上。我们写的.java代码,最终是由ClassLoader加载的。

上面提到过每一个dex文件最多可以包含65536(0xffff)个方法,超过了就需要用到分包方案,也就是说,每个APK中可能包含多个dex文件。而每个dex文件,最终对应DexPathList中的一个Element实例:
static class Element {
        private final File path;
        private final DexFile dexFile;
        private ClassPathURLStreamHandler urlHandler;
        private boolean initialized;

        public Element(DexFile dexFile, File dexZipPath) {
            this.dexFile = dexFile;
            this.path = dexZipPath;
        }

        ......
}
如果加载一个类,会调用DexPathList中的findClass函数:
    public Class<?> findClass(String name, List<Throwable> suppressed) {
        DexPathList.Element[] var3 = this.dexElements; //多个dex文件对应Element数组
        int var4 = var3.length;

        for(int var5 = 0; var5 < var4; ++var5) {
            DexPathList.Element element = var3[var5];
            Class<?> clazz = element.findClass(name, this.definingContext, suppressed);  //以此从dex文件中查找目标Class
            if (clazz != null) {
                return clazz;
            }
        }

        if (this.dexElementsSuppressedExceptions != null) {
            suppressed.addAll(Arrays.asList(this.dexElementsSuppressedExceptions));
        }

        return null;
    }
如上代码,当需要加载一个类时,会依次从dex文件检索,直至找到目标类后停止:
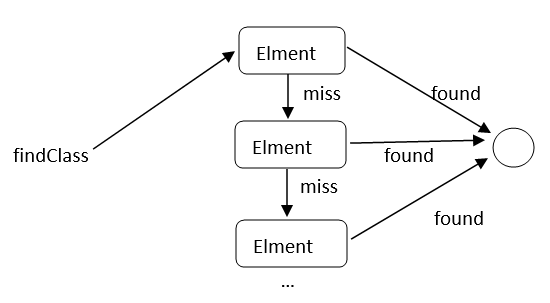
实际上,类替换方案的核心思想就是:将修改后的patch(包含bug类文件)打包成dex文件,然后hook ClassLoader加载流程,将这个dex文件插入到Element数组的第一个元素。因为加载类是依次进行的,所以虚拟机从第一个Element找到类后,就不会再加载bug类了。
类加载方案也有缺点,因为类加载后无法卸载,所以类加载方案必须重启App,让bug类重新加载后才能生效。
(3)Instant Run方案
Instant Run 方案的核心思想是——插桩,在编译时通过插桩在每一个方法中插入代码,修改代码逻辑,在需要时绕过错误方法,调用patch类的正确方法。
首先,在编译时Instant Run为每个类插入IncrementalChange变量:
IncrementalChange $change;
为每一个方法添加类似如下代码:
public void onCreate(Bundle savedInstanceState) {
        IncrementalChange var2 = $change;
        //$change不为null,表示该类有修改,需要重定向
        if(var2 != null) {
            //通过access$dispatch方法跳转到patch类的正确方法
            var2.access$dispatch("onCreate.(Landroid/os/Bundle;)V", new Object[]{this, savedInstanceState});
        } else {
            super.onCreate(savedInstanceState);
            this.setContentView(2130968601);
            this.tv = (TextView)this.findViewById(2131492944);
        }
    }
如上代码,当一个类被修改后,Instant Run会为这个类新建一个类,命名为xxx&override,且实现IncrementalChange接口,并且赋值给原类的$change变量。
public class MainActivity$override implements IncrementalChange {
}
此时,在运行时原类中每个方法的var2 != null,通过access$dispatch(参数是方法名和原参数)定位到patch类MainActivity$override中修改后的方法。
Instant Run是google在AS2.0时用来实现“热部署”的,同时也为“热修复”提供了一个绝佳的思路。美团的Robust就是基于此。
总结:
以上是三种方案的基本原理,每种方案又有不同的实现方案,导致目前热修复出现百家争鸣的现象。无论哪种热修复方案,都不是一蹴而就的,需要在长期的实战中不断完善。
众方案各有所长,且基于自家业务不断更新迭代。统计如下:
| 特性 | Dexposed | AndFix | Tinker/Amigo | QQ Zone | Robust/Aceso | Sophix |
|---|---|---|---|---|---|---|
| 技术原理 | native底层替换 | 类加载 | Instant Run | 混合 | ||
| 所属 | 阿里 | 微信/饿了么 | QQ空间 | 美团/蘑菇街 | 阿里 | |
| 即时生效 | YES | YES | NO | NO | YES | 混合 |
| 方法替换 | YES | YES | YES | YES | YES | YES |
| 类替换 | NO | NO | YES | YES | YES | YES |
| 类结构修改 | NO | NO | YES | NO | NO | YES |
| 资源替换 | NO | NO | YES | YES | NO | YES |
| so替换 | NO | NO | YES | NO | NO | YES |
| 支持gradle | NO | NO | YES | YES | YES | YES |
| 支持ART | NO | YES | YES | YES | YES | YES |
可以看出,阿里系多采用native底层方案,腾讯系多采用类加载机制。其中,Sophix是商业化方案;Tinker/Amigo支持特性较多,同时也更复杂,如果需要修复资源和so,可以选择;如果仅需要方法替换,且需要即时生效,Robust是不错的选择。
三、自定义热修复方案
以类加载机制为例,自定义一个简单的热修复demo,核心代码如下(尚未验证通过,待研究插件化技术之后补齐):
public class Hotfix {

    public static void patch(Context context, String patchDexFile, String patchClassName)
            throws ClassNotFoundException, NoSuchFieldException, IllegalAccessException, InstantiationException, NoSuchMethodException, InvocationTargetException {
        //获取系统PathClassLoader的"dexElements"属性值
        PathClassLoader pathClassLoader = (PathClassLoader) context.getClassLoader();
        Object origDexElements = getDexElements(pathClassLoader);

        //新建DexClassLoader并获取“dexElements”属性值
        String otpDir = context.getDir("dex", 0).getAbsolutePath();
        Log.i("hotfix", "otpdir=" + otpDir);
        DexClassLoader nDexClassLoader = new DexClassLoader(patchDexFile, otpDir, patchDexFile, context.getClassLoader());
        Object patchDexElements = getDexElements(nDexClassLoader);

        //将patchDexElements插入原origDexElements前面
        Object allDexElements = combineArray(origDexElements, patchDexElements);

        //将新的allDexElements重新设置回pathClassLoader
        setDexElements(pathClassLoader, allDexElements);

        //重新加载类
        pathClassLoader.loadClass(patchClassName);
    }

    private static Object getDexElements(ClassLoader classLoader) throws ClassNotFoundException, NoSuchFieldException, IllegalAccessException {
        //首先获取ClassLoader的“pathList”实例
        Field pathListField = Class.forName("dalvik.system.BaseDexClassLoader").getDeclaredField("pathList");
        pathListField.setAccessible(true);//设置为可访问
        Object pathList = pathListField.get(classLoader);

        //然后获取“pathList”实例的“dexElements”属性
        Field dexElementField = pathList.getClass().getDeclaredField("dexElements");
        dexElementField.setAccessible(true);

        //读取"dexElements"的值
        Object elements = dexElementField.get(pathList);
        return elements;
    }

    //合拼dexElements
    private static Object combineArray(Object obj, Object obj2) {
        Class componentType = obj2.getClass().getComponentType();
        //读取obj长度
        int length = Array.getLength(obj);
        //读取obj2长度
        int length2 = Array.getLength(obj2);
        Log.i("hotfix", "length=" + length + ",length2=" + length2);
        //创建一个新Array实例,长度为ojb和obj2之和
        Object newInstance = Array.newInstance(componentType, length + length2);
        for (int i = 0; i < length + length2; i++) {
            //把obj2元素插入前面
            if (i < length2) {
                Array.set(newInstance, i, Array.get(obj2, i));
            } else {
                //把obj元素依次放在后面
                Array.set(newInstance, i, Array.get(obj, i - length2));
            }
        }
        //返回新的Array实例
        return newInstance;
    }

    private static void setDexElements(ClassLoader classLoader, Object dexElements) throws ClassNotFoundException, NoSuchFieldException, IllegalAccessException {
        //首先获取ClassLoader的“pathList”实例
        Field pathListField = Class.forName("dalvik.system.BaseDexClassLoader").getDeclaredField("pathList");
        pathListField.setAccessible(true);//设置为可访问
        Object pathList = pathListField.get(classLoader);

        //然后获取“pathList”实例的“dexElements”属性
        Field declaredField = pathList.getClass().getDeclaredField("dexElements");
        declaredField.setAccessible(true);

        //设置"dexElements"的值
        declaredField.set(pathList, dexElements);
    }
}
四、Robust方案对接
Robust是美团团队基于Instant Run 技术开发的开源(dian zan)热修复框架,Github地址:https://github.com/Meituan-Dianping/Robust
下面以Robust 4.9版本为例,详细介绍一下其对接流程,主要步骤如下:
- 添加robust插件
- 配置插件特性——robust.xml
- 配置补丁加载方法——自定义PatchManipulate和RobustCallback子类
- 编译基础版本(生成mapping.txt,methodMap.robust)
- 修复代码
- 生成补丁——patch.jar
- 补丁下载/推送
- 调用修复命令
(1)添加robust插件
共有两处需要添加,在项目外层build.gradle添加:
    dependencies {
        classpath 'com.meituan.robust:gradle-plugin:0.4.90'
        classpath 'com.meituan.robust:auto-patch-plugin:0.4.90'
    }
在app module的build.gradle添加:
apply plugin: 'com.android.application'
//此两项紧跟com.android.application,生成补丁时打开auto-patch-plugin插件
//apply plugin: 'auto-patch-plugin'
apply plugin: 'robust'
(2)配置插件特性——robust.xml
将robust.xml配置文件拷贝到app根目录下,并按需求配置插件特性:
<?xml version="1.0" encoding="utf-8"?>
<resources>

    <switch>
        <!--true代表打开Robust,请注意即使这个值为true,Robust也默认只在Release模式下开启-->
        <!--false代表关闭Robust,无论是Debug还是Release模式都不会运行robust-->
        <turnOnRobust>true</turnOnRobust>
        <!--<turnOnRobust>false</turnOnRobust>-->

        <!--是否开启手动模式,手动模式会去寻找配置项patchPackname包名下的所有类,自动的处理混淆,然后把patchPackname包名下的所有类制作成补丁-->
        <!--这个开关只是把配置项patchPackname包名下的所有类制作成补丁,适用于特殊情况,一般不会遇到-->
        <!--<manual>true</manual>-->
        <manual>false</manual>

        <!--是否强制插入插入代码,Robust默认在debug模式下是关闭的,开启这个选项为true会在debug下插入代码-->
        <!--但是当配置项turnOnRobust是false时,这个配置项不会生效-->
        <!--<forceInsert>true</forceInsert>-->
        <forceInsert>false</forceInsert>

        <!--是否捕获补丁中所有异常,建议上线的时候这个开关的值为true,测试的时候为false-->
        <catchReflectException>true</catchReflectException>
        <!--<catchReflectException>false</catchReflectException>-->

        <!--是否在补丁加上log,建议上线的时候这个开关的值为false,测试的时候为true-->
        <!--<patchLog>true</patchLog>-->
        <patchLog>false</patchLog>

        <!--项目是否支持progaurd-->
        <proguard>true</proguard>
        <!--<proguard>false</proguard>-->

        <!--项目是否支持ASM进行插桩,默认使用ASM,推荐使用ASM,Javaassist在容易和其他字节码工具相互干扰-->
        <useAsm>true</useAsm>
        <!--<useAsm>false</useAsm>-->
    </switch>

    <!--需要热补的包名或者类名,这些包名下的所有类都被会插入代码-->
    <!--这个配置项是各个APP需要自行配置,就是你们App里面你们自己代码的包名,
    这些包名下的类会被Robust插入代码,没有被Robust插入代码的类Robust是无法修复的-->
    <packname name="hotfixPackage">
        <name>com.xibeixue.hotfix</name>
        <!--<name>com.sankuai</name>-->
        <!--<name>com.dianping</name>-->
    </packname>

    <!--不需要Robust插入代码的包名,Robust库不需要插入代码,如下的配置项请保留,还可以根据各个APP的情况执行添加-->
    <exceptPackname name="exceptPackage">
        <name>com.meituan.robust</name>
        <name>com.meituan.sample.extension</name>
    </exceptPackname>

    <!--补丁的包名,请保持和类PatchManipulateImp中fetchPatchList方法中设置的补丁类名保持一致( setPatchesInfoImplClassFullName("com.meituan.robust.patch.PatchesInfoImpl")),
    各个App可以独立定制,需要确保的是setPatchesInfoImplClassFullName设置的包名是如下的配置项,类名必须是:PatchesInfoImpl-->
    <patchPackname name="patchPackname">
        <name>com.xibeixue.hotfix</name>
    </patchPackname>

    <!--自动化补丁中,不需要反射处理的类,这个配置项慎重选择-->
    <noNeedReflectClass name="classes no need to reflect">

    </noNeedReflectClass>
</resources>
注意:如果是调试,请打开forceInsert,关闭proguard。一般packname和patchPackname需要自行配置,其他选项保持默认即可。
(3)配置补丁加载方法
第(2)步配置的是插件的工作方式,为了生成补丁patch.jar;程序还需要知道如何加载补丁,比如补丁在哪里,要解压到哪里等。这就需要自定义PatchManipulate子类:
public class PatchManipulateImp extends com.meituan.robust.PatchManipulate {
    @Override
    protected List<Patch> fetchPatchList(Context context) {
        //将app自己的robustApkHash上报给服务端,服务端根据robustApkHash来区分每一次apk build来给app下发补丁
        //apkhash is the unique identifier for  apk,so you cannnot patch wrong apk.
        //String robustApkHash = RobustApkHashUtils.readRobustApkHash(context);
        Patch patch = new Patch();
        patch.setName("123");
        //we recommend LocalPath store the origin patch.jar which may be encrypted,while TempPath is the true runnable jar
        patch.setLocalPath(Environment.getExternalStorageDirectory().getAbsolutePath() + File.separator + "patch");
        /*上面的路径看似设置的是目录,其实不是,在get方法中默认追加了.jar;temp默认则追加_temp.jar.可以理解为设置补丁的文件名.建议放在程序内部目录,提高安全性*/
        /*com.xibeixue.hotfix.PatchesInfoImpl要和robut.xml中patchPackname节点里面的包名保持一致*/
        patch.setPatchesInfoImplClassFullName("com.xibeixue.hotfix.PatchesInfoImpl");
        List patches = new ArrayList<Patch>();
        patches.add(patch);
        return patches;
    }

    @Override

    protected boolean verifyPatch(Context context, Patch patch) {
        patch.setTempPath(context.getCacheDir() + File.separator + "robust" + File.separator + "patch");
        //in the sample we just copy the file
        try {
            copy(patch.getLocalPath(), patch.getTempPath());
        } catch (Exception e) {
            e.printStackTrace();
            throw new RuntimeException("copy source patch to local patch error, no patch execute in path " + patch.getTempPath());
        }


        return true;
    }

    @Override
    protected boolean ensurePatchExist(Patch patch) {
        return true;
    }

    public void copy(String srcPath, String dstPath) throws IOException {
        Log.i("hotfix","srcPath=" + srcPath);
        File src = new File(srcPath);
        if (!src.exists()) {
            throw new RuntimeException("source patch does not exist ");
        }
        File dst = new File(dstPath);
        if (!dst.getParentFile().exists()) {
            dst.getParentFile().mkdirs();
        }
        InputStream in = new FileInputStream(src);
        try {
            OutputStream out = new FileOutputStream(dst);
            try {
                // Transfer bytes from in to out
                byte[] buf = new byte[1024];
                int len;
                while ((len = in.read(buf)) > 0) {
                    out.write(buf, 0, len);
                }
            } finally {
                out.close();
            }
        } finally {
            in.close();
        }
    }

}
注意:setPatchesInfoImplClassFullName时需要和robust.xml中的patchPackname包名保持一致。
如果要对补丁加载过程监听,需要自定义RobustCallback子类:
public class RobustCallBackSample implements com.meituan.robust.RobustCallBack {
    @Override
    public void onPatchListFetched(boolean result, boolean isNet, List<Patch> patches) {
        Log.d("RobustCallBack", "onPatchListFetched result: " + result);
        Log.d("RobustCallBack", "onPatchListFetched isNet: " + isNet);
        for (Patch patch : patches) {
            Log.d("RobustCallBack", "onPatchListFetched patch: " + patch.getName());
        }
    }

    @Override
    public void onPatchFetched(boolean result, boolean isNet, Patch patch) {
        Log.d("RobustCallBack", "onPatchFetched result: " + result);
        Log.d("RobustCallBack", "onPatchFetched isNet: " + isNet);
        Log.d("RobustCallBack", "onPatchFetched patch: " + patch.getName());
    }

    @Override
    public void onPatchApplied(boolean result, Patch patch) {
        Log.d("RobustCallBack", "onPatchApplied result: " + result);
        Log.d("RobustCallBack", "onPatchApplied patch: " + patch.getName());

    }

    @Override
    public void logNotify(String log, String where) {
        Log.d("RobustCallBack", "logNotify log: " + log);
        Log.d("RobustCallBack", "logNotify where: " + where);
    }

    @Override
    public void exceptionNotify(Throwable throwable, String where) {
        Log.e("RobustCallBack", "exceptionNotify where: " + where, throwable);
    }
}
(4)编译基础版本
到目前为止,就可以编译基础版本了,这时插件会生成两个文件
//方法记录文件,该文件在打补丁的时候用来区别到底哪些方法需要被修复
build/outputs/robust/methodsMap.robust
//该文件列出了原始的类、方法和字段名与混淆后代码间的映射,需要开启proguard配置项后才会出现
build/outputs/mapping/mapping.txt
将这两个文件拷贝到app根目录下的robust文件夹下(没有就自行创建),后面生成补丁时会用到。
(5)修复代码
    //修复代码,需要添加Modify注释或者调用RobustModify.modify()方法,作为修复标记
    @Modify
    public void run() {
//        Log.i("hotfix", "我有一个严重Bug需要修复!");
        Log.i("hotfix", "我的Bug已经被修复!");
    }

    //添加代码需要添加Add注释,作为标记
    @Add
    public void run2(){
        Log.i("hotfix", "我是一个新添加的方法!");
    }
(6)生成补丁
生成补丁,只需要打开auto-patch-plugin补丁插件,重新编译即可:
//打开补丁插件
apply plugin: 'auto-patch-plugin'
apply plugin: 'robust'
此时,会在app根目录下的robust文件夹下生成patch.jar补丁文件。
(7)补丁下载、推送
Robust热修复框架并没有补丁下载模块,需要自行和后台服务协商下载或推送方案。但是patch.jar必须下载到PatchManipulateImp指定的localPath。另外,如果下载到sd卡,一定要申请sd卡读写权限!
(8)调用修复命令
在合适的时机,调用修复命令,一般下载后尽早调用:
new PatchExecutor(getApplicationContext(), new PatchManipulateImp(), new RobustCallBackSample()).start();
调用修复命令后,不用重启进程,再次调用被修复方法时,发现已经开始执行修复逻辑了!
Demo源码:https://github.com/JiaxtHome/hotfix
五、总结
尽管热修复(或热更新)相对于迭代更新有诸多优势,市面上也有很多开源方案可供选择,但目前热修复依然无法替代迭代更新模式。有如下原因:
- 热修复框架多多少少会增加性能开销,或增加APK大小
- 热修复技术本身存在局限,比如有些方案无法替换so或资源文件
- 热修复方案的兼容性,有些方案无法同时兼顾Dalvik和ART,有些深度定制系统也无法正常工作
- 监管风险,比如苹果系统严格限制热修复
所以,对于功能迭代和常规bug修复,版本迭代更新依然是主流。一般的代码修复,使用Robust可以解决,如果还需要修复资源或so库,可以考虑Tinker。