作者: MarkLin
学习目标:
- 原生 node 封装
- 中间件
- 路由
Koa 原理
一个 nodejs 的入门级 http 服务代码如下,
// index.js
const http = require('http')
const server = http.createServer((req, res) => {
  res.writeHead(200)
  res.end('hello nodejs')
})

server.listen(3000, () => {
  console.log('server started at port 3000')
})
koa 的目标是更简单化、流程化、模块化的方式实现回调,我们希望可以参照 koa 用如下方式来实现代码:
// index.js
const Moa = require('./moa')
const app = new Moa()

app.use((req, res) => {
  res.writeHeader(200)
  res.end('hello, Moa')
})

app.listen(3000, () => {
  console.log('server started at port 3000')
})
所以我们需要创建一个 moa.js 文件,该文件主要内容是创建一个类 Moa, 主要包含 use() 和 listen() 两个方法
// 创建 moa.js
const http = require('http')

class Moa {

  use(callback) {
    this.callback = callback
  }

  listen(...args) {
    const server = http.createServer((req, res) => {
      this.callback(req, res)
    })

    server.listen(...args)
  }
}

module.exports = Moa
Context
koa 为了能够简化 API,引入了上下文 context 的概念,将原始的请求对象 req 和响应对象 res 封装并挂载到了 context 上,并且设置了 getter 和 setter ,从而简化操作
// index.js
// ...

// app.use((req, res) => {
//   res.writeHeader(200)
//   res.end('hello, Moa')
// })

app.use(ctx => {
  ctx.body = 'cool moa'
})

// ...
为了达到上面代码的效果,我们需要分装 3 个类,分别是 context, request, response , 同时分别创建上述 3 个 js 文件,
// request.js
module.exports = {
  get url() {
    return this.req.url
  }
  get method() {
    return this.req.method.toLowerCase()
  }
}

// response.js
module.exports = {
  get body() {
    return this._body
  }

  set body(val) = {
    this._body = val
  }
}

// context.js
module.exports = {
  get url() {
    return this.request.url
  }
  get body() = {
    return this.response.body
  }
  set body(val) {
    this.response.body = val
  }
  get method() {
    return this.request.method
  }
}
接着我们需要给 Moa 这个类添加一个 createContext(req, res) 的方法, 并在 listen() 方法中适当的地方挂载上:
// moa.js
const http = require('http')

const context = require('./context')
const request = require('./request')
const response = require('./response')

class Moa {
  // ...
  listen(...args) {
    const server = http.createServer((req, res) => {
      // 创建上下文
      const ctx = this.createContext(req, res)

      this.callback(ctx)

      // 响应
      res.end(ctx.body)
    })
    server.listen(...args)
  }

  createContext(req, res) {
    const ctx = Object.create(context)
    ctx.request = Object.create(request)
    ctx.response = Object.create(response)

    ctx.req = ctx.request.req = req
    ctx.res = ctx.response.res = res
  }
}
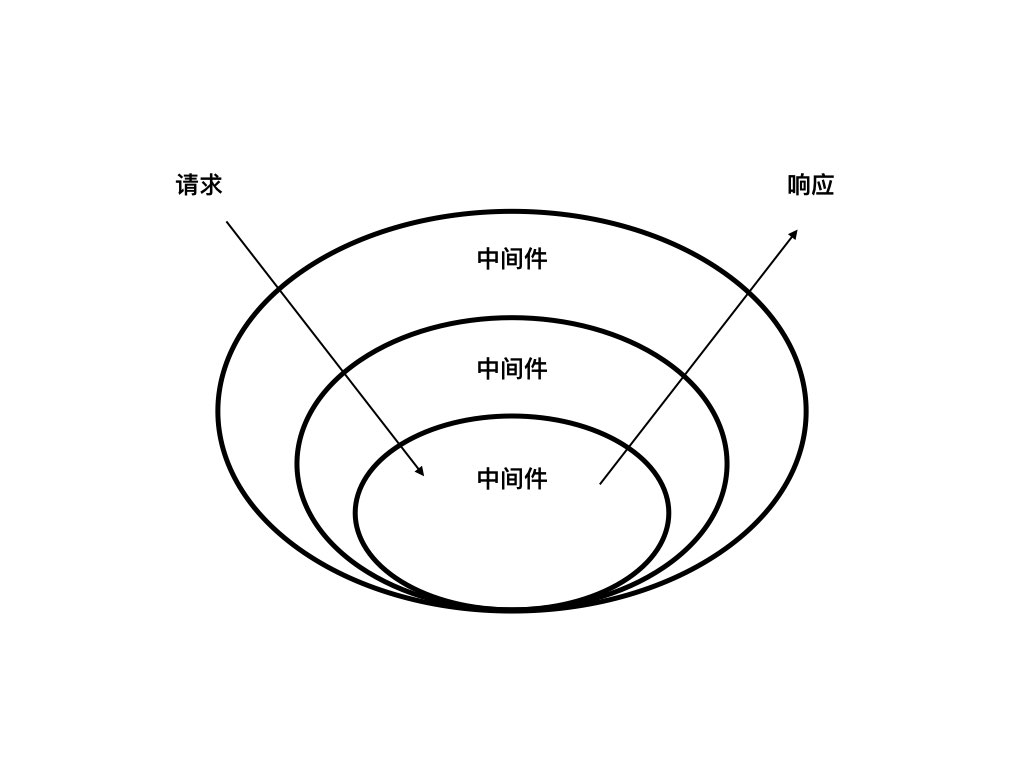
中间件
Koa 中间键机制:Koa 中间件机制就是函数组合的概念,将一组需要顺序执行的函数复合为一个函数,外层函数的参数实际是内层函数的返回值。洋葱圈模型可以形象表示这种机制,是 Koa 源码中的精髓和难点。
同步函数组合
假设有 3 个同步函数:
// compose_test.js
function fn1() {
  console.log('fn1')
  console.log('fn1 end')
}

function fn2() {
  console.log('fn2')
  console.log('fn2 end')
}

function fn3() {
  console.log('fn3')
  console.log('fn3 end')
}
我们如果想把三个函数组合成一个函数且按照顺序来执行,那通常的做法是这样的:
// compose_test.js
// ...
fn3(fn2(fn1()))
执行 node compose_test.js 输出结果:
fn1
fn1 end
fn2
fn2 end
fn3
fn3 end
当然这不能叫做是函数组合,我们期望的应该是需要一个 compose() 方法来帮我们进行函数组合,按如下形式来编写代码:
// compose_test.js
// ...
const middlewares = [fn1, fn2, fn3]
const finalFn = compose(middlewares)
finalFn()
让我们来实现一下 compose() 函数,
// compose_test.js
// ...
const compose = (middlewares) => () => {
  [first, ...others] = middlewares
  let ret = first()
  others.forEach(fn => {
    ret = fn(ret)
  })
  return ret
}

const middlewares = [fn1, fn2, fn3]
const finalFn = compose(middlewares)
finalFn()
可以看到我们最终得到了期望的输出结果:
fn1
fn1 end
fn2
fn2 end
fn3
fn3 end
异步函数组合
了解了同步的函数组合后,我们在中间件中的实际场景其实都是异步的,所以我们接着来研究下异步函数组合是如何进行的,首先我们改造一下刚才的同步函数,使他们变成异步函数,
// compose_test.js
async function fn1(next) {
  console.log('fn1')
  next && await next()
  console.log('fn1 end')
}

async function fn2(next) {
  console.log('fn2')
  next && await next()
  console.log('fn2 end')
}

async function fn3(next) {
  console.log('fn3')
  next && await next()
  console.log('fn3 end')
}
//...
现在我们期望的输出结果是这样的:
fn1
fn2
fn3
fn3 end
fn2 end
fn1 end
同时我们希望编写代码的方式也不要改变,
// compose_test.js
// ...
const middlewares = [fn1, fn2, fn3]
const finalFn = compose(middlewares)
finalFn()
所以我们只需要改造一下 compose() 函数,使他支持异步函数就即可:
// compose_test.js
// ...

function compose(middlewares) {
  return function () {
    return dispatch(0)
    function dispatch(i) {
      let fn = middlewares[i]
      if (!fn) {
        return Promise.resolve()
      }
      return Promise.resolve(
        fn(function next() {
          return dispatch(i + 1)
        })
      )
    }
  }
}

const middlewares = [fn1, fn2, fn3]
const finalFn = compose(middlewares)
finalFn()
运行结果:
fn1
fn2
fn3
fn3 end
fn2 end
fn1 end
完美!!!
完善 Moa
我们直接把刚才的异步合成代码移植到 moa.js 中, 由于 koa 中还需要用到 ctx 字段,所以我们还要对 compose() 方法进行一些改造才能使用:
// moa.js
// ...
class Moa {
  // ...
  compose(middlewares) {
    return function (ctx) {
      return dispatch(0)
      function dispatch(i) {
        let fn = middlewares[i]
        if (!fn) {
          return Promise.resolve()
        }
        return Promise.resolve(
          fn(ctx, function () {
            return dispatch(i + 1)
          })
        )
      }
    }
  }
}
实现完 compose() 方法之后我们继续完善我们的代码,首先我们需要给类在构造的时候,添加一个 middlewares,用来记录所有需要进行组合的函数,接着在use() 方法中把我们每一次调用的回调都记录一下,保存到middlewares 中,最后再在合适的地方调用即可:
// moa.js
// ...
class Moa {
  constructor() {
    this.middlewares = []
  }

  use(middleware) {
    this.middlewares.push(middleware)
  }

  listen(...args) {
    const server = http.createServer(async (req, res) => {
      // 创建上下文
      const ctx = this.createContext(req, res)
      const fn = this.compose(this.middlewares)
      await fn(ctx)
      // 响应
      res.end(ctx.body)
    })

    server.listen(...args)
  }
  // ...
}
我们加一小段代码测试一下:
// index.js
//...
const delay = () => new Promise(resolve => setTimeout(() => resolve()
  , 2000))
app.use(async (ctx, next) => {
  ctx.body = "1"
  await next()
  ctx.body += "5"
})
app.use(async (ctx, next) => {
  ctx.body += "2"
  await delay()
  await next()
  ctx.body += "4"
})
app.use(async (ctx, next) => {
  ctx.body += "3"
})
运行命令 node index.js 启动服务器后,我们访问页面 localhost:3000 查看一下,发现页面显示 12345 !
到此,我们简版的 Koa 就已经完成实现了。让我们庆祝一下先!!!
Router
Koa 还有一个很重要的路由功能,感觉缺少路由就缺少了他的完整性,所以我们简单介绍下如何实现路由功能。
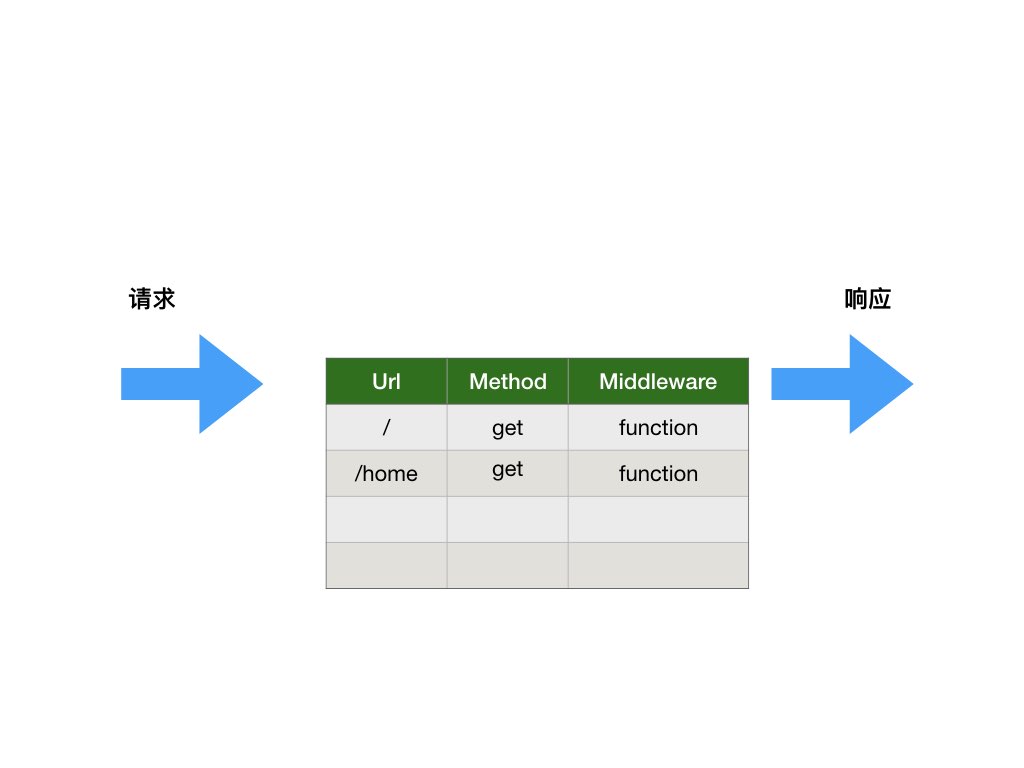
其实,路由的原理就是根据地址和方法,调用相对应的函数即可,其核心就是要利用一张表,记录下注册的路由和方法,原理图如下所示:
使用方式如下:
// index.js
// ...
const Router = require('./router')
const router = new Router()

router.get('/', async ctx => { ctx.body = 'index page' })
router.get('/home', async ctx => { ctx.body = 'home page' })
router.post('/', async ctx => { ctx.body = 'post index' })
app.use(router.routes())

// ...
我们来实现下 router 这个类,先在根目录创建一个 router.js 文件,然后根据路由的原理,我们实现下代码:
// router.js
class Router {
  constructor() {
    this.stacks = []
  }

  register(path, method, middleware) {
    this.stacks.push({
      path, method, middleware
    })
  }

  get(path, middleware) {
    this.register(path, 'get', middleware)
  }

  post(path, middleware) {
    this.register(path, 'post', middleware)
  }

  routes() {
    return async (ctx, next) => {
      let url = ctx.url === '/index' ? '/' : ctx.url
      let method = ctx.method
      let route
      for (let i = 0; i < this.stacks.length; i++) {
        let item = this.stacks[i]
        if (item.path === url && item.method === method) {
          route = item.middleware
          break
        }
      }

      if (typeof route === 'function') {
        await route(ctx, next)
        return
      }

      await next()
    }
  }
}

module.exports = Router
启动服务器后,测试下 loacalhost:3000, 返回页面上 index page 表示路由实现成功!
本文源码地址: https://github.com/marklin2012/moa/
欢迎关注凹凸实验室博客:aotu.io
或者关注凹凸实验室公众号(AOTULabs),不定时推送文章: