刚开始学习Halcon,需要使用Halcon与C++联合开发软件,查了网上的资料都是Halcon10的,我用的是Halcon11和VS2010的开发环境,实践了一下发现有一些问题,于是把自己的配置的过程写出来共享一下。
首先新建一个Halcon工程,这里用个读入图片的简单例子。
新建一个Halcon 程序,输入以下代码:
read_image (Image, 'C:/Users/lenovo/Desktop/test.jpg')
dev_open_window_fit_image (Image, 0, 0, -1, -1, WindowHandle)
dev_clear_window ()
dev_display (Image)
其实就是打开一个窗口并显示桌面上的一幅画
然后将Halcon程序导出为C++程序
在halcon中点击菜单栏的文件->导出。
导出之后就能在桌面上看到一个Halcon.cpp文件,这个文件的内容如下:
先声明并给出了函数dev_open_window_fit_image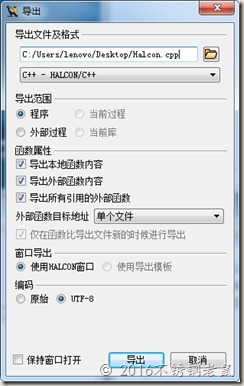 的定义:
的定义:
void dev_open_window_fit_image (HObject ho_Image, HTuple hv_Row, HTuple hv_Column,
HTuple hv_WidthLimit, HTuple hv_HeightLimit, HTuple *hv_WindowHandle);
然后是函数Action的定义,Action里的代码对应着刚才Halcon中的代码,简单地说,就是把Halcon语言翻译成C++了。
// Main procedure
void action()
{
  // Local iconic variables
  HObject  ho_Image;
  // Local control variables
  HTuple  hv_WindowHandle;
  ReadImage(&ho_Image, "C:/Users/lenovo/Desktop/test.jpg");
  dev_open_window_fit_image(ho_Image, 0, 0, -1, -1, &hv_WindowHandle);
  if (HDevWindowStack::IsOpen())
    ClearWindow(HDevWindowStack::GetActive());
  if (HDevWindowStack::IsOpen())
    DispObj(ho_Image, HDevWindowStack::GetActive());
}
配置VS2010
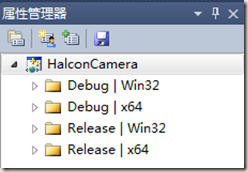
为了一劳永逸的配置好VS2010,让我们在以后每次新建工程的时候都不用重新添加这些乱七八糟的配置项,需要采用以下的技巧。首先新建一个基于对话框的MFC程序,然后点击菜单栏的视图->属性管理器,在左侧的属性管理器中,默认会有32位的Debug和Release属性。对64位的系统(现在电脑一般都是64位系统),需要点击菜单栏的生成->配置管理器,把平台选项改为x64,这样生成的文件就可以在64位系统下运行了。
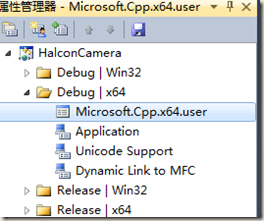
改完之后,属性管理器还不会立马变化,关闭项目再重新开启就能看到新增的x64属性了。
下面以64位的Debug属性为例,介绍一下halcon 11的配置。
在User属性上点击右键,选择属性,进入属性页面。
向通用属性下的VC++目录中的包含目录中添加如下目录,据说halcon11需要包含halconcpp这个文件夹就够了,halcon10则是cpp。我用的是halcon11,打开安装目录之后发现两个文件夹都有,于是就把俩目录都添加进去了。
下一步是VC++目录中的库目录。
目录中的环境变量HALCONROOT是安装Halcon时自动写入到系统环境变量中的。
继续,在C/C++目录中,为附加包含目录添加下面两项(当然也可以添加$(HALCONROOT)includecpp这一项,并无影响)
最有一项,配置链接器。在常规项的附加库目录中添加$(HALCONROOT)lib$(HALCONARCH),同样,HALCONARCH是环境变量。
为输入的附加依赖项添加halconcpp.lib。
至此,配置完毕。
注意,采用这种方式配置,以后新建的工程都会继承这些配置,无需重新配置,非常方便。
MFC程序
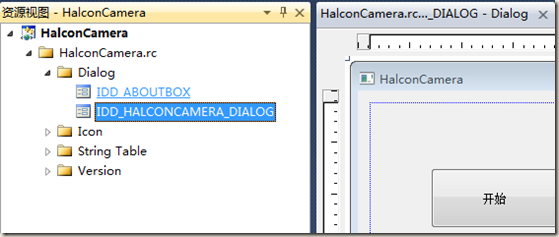
点击菜单栏中的视图->资源视图,并在资源视图中打开对话框。
为了实现显示图片的功能,在对话框中添加一个按钮,并双击按钮进入事件响应函数,空空如也,待我们填写。
void CHalconVCDlg::OnBnClickedButton1()
{
	// TODO: 在此添加控件通知处理程序代码
}
首先在HalconVCDlg.h中添加头文件及命名空间,因为等会要在这个头文件里添加halcon函数的声明。然后在HalconVCDlg.cpp中也添加上述头文件及命名空间,因为要在这里调用halcon的函数。
#include "halconcpp.h"
using namespace HalconCpp;
打开刚刚导出的Halcon.cpp,为了能够在MFC中调用dev_open_window_fit_image 这个函数,需要把它的声明和定义都放进MFC程序中。声明拷贝到HalconVCDlg.h中,注意要放在对话框类声明外面,定义拷贝到HalconVCDlg.cpp中。
下面进行最重要的一部,把Action中的代码拷贝到OnBnClickedButton1() 中,这样点击按钮就会执行在halcon中实现的显示图片功能了。
Action函数中定义了两个变量
HObject ho_Image;
HTuple hv_WindowHandle;
为了在Button1的响应函数中使用这两个变量,之前博文中的作法是将其定义为HalconVCDlg.h中对话框类的成员变量,事实上,直接定义在void CHalconVCDlg::OnBnClickedButton1() 函数中或者是HalconVCDlg.cpp文件中也是没有问题的,但是定义在HalconVCDlg.h中作为HalconVCDlg的类外变量却不行。
了解到这一点,我们就可以直接把Action函数中所有东西一起拷贝进OnBnClickedButton1()了。
  // Local iconic variables
  HObject  ho_Image;
  // Local control variables
  HTuple  hv_WindowHandle;
  ReadImage(&ho_Image, "C:/Users/lenovo/Desktop/test.jpg");
  dev_open_window_fit_image(ho_Image, 0, 0, -1, -1, &hv_WindowHandle);
  if (HDevWindowStack::IsOpen())
    ClearWindow(HDevWindowStack::GetActive());
  if (HDevWindowStack::IsOpen())
    DispObj(ho_Image, HDevWindowStack::GetActive());
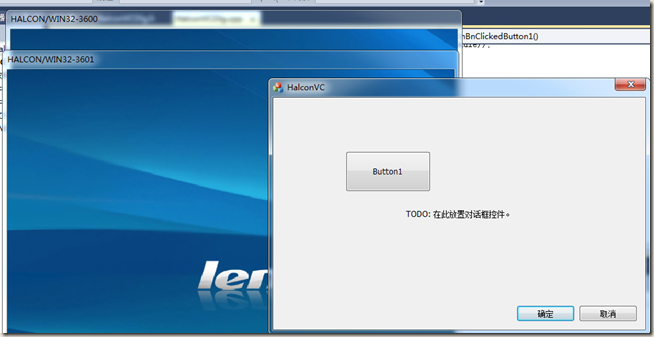
运行结果
每点击一次Button1就会弹出一个窗口显示我们的图片(没错,这是一张我桌面的截图)
全部程序代码
MFC程序中HalconVCDlg.h
// HalconVCDlg.h : 头文件
#pragma once

//与halcon有关的头文件
#include "halconcpp.h"
using namespace HalconCpp;

// CHalconVCDlg 对话框
class CHalconVCDlg : public CDialogEx
{
// 构造
public:
	CHalconVCDlg(CWnd* pParent = NULL);	// 标准构造函数
	//Halcon中用到的变量,为何要定义为类中的变量
	//HObject  ho_Image;
	//HTuple  hv_WindowHandle;
// 对话框数据
	enum { IDD = IDD_HALCONVC_DIALOG };

	protected:
	virtual void DoDataExchange(CDataExchange* pDX);	// DDX/DDV 支持

// 实现
protected:
	HICON m_hIcon;

	// 生成的消息映射函数
	virtual BOOL OnInitDialog();
	afx_msg void OnSysCommand(UINT nID, LPARAM lParam);
	afx_msg void OnPaint();
	afx_msg HCURSOR OnQueryDragIcon();
	DECLARE_MESSAGE_MAP()
public:
	afx_msg void OnBnClickedButton1();
};
void dev_open_window_fit_image (HObject ho_Image, HTuple hv_Row, HTuple hv_Column,
    HTuple hv_WidthLimit, HTuple hv_HeightLimit, HTuple *hv_WindowHandle);
MFC程序中HalconVCDlg.cpp
// HalconVCDlg.cpp : 实现文件
#include "stdafx.h"
#include "HalconVC.h"
#include "HalconVCDlg.h"
#include "afxdialogex.h"
//与halcon有关的头文件
#include "halconcpp.h"

#ifdef _DEBUG
#define new DEBUG_NEW
#endif

using namespace HalconCpp;
中间省略一堆系统生成的函数,下面是我们主要的改动
// Procedures
// Chapter: Develop
// Short Description: Open a new graphics window that preserves the aspect ratio of the given image.
void dev_open_window_fit_image (HObject ho_Image, HTuple hv_Row, HTuple hv_Column,
    HTuple hv_WidthLimit, HTuple hv_HeightLimit, HTuple *hv_WindowHandle)
{

  // Local control variables
  HTuple  hv_MinWidth, hv_MaxWidth, hv_MinHeight;
  HTuple  hv_MaxHeight, hv_ResizeFactor, hv_ImageWidth, hv_ImageHeight;
  HTuple  hv_TempWidth, hv_TempHeight, hv_WindowWidth, hv_WindowHeight;

  //This procedure opens a new graphics window and adjusts the size
  //such that it fits into the limits specified by WidthLimit
  //and HeightLimit, but also maintains the correct image aspect ratio.
  //
  //If it is impossible to match the minimum and maximum extent requirements
  //at the same time (f.e. if the image is very long but narrow),
  //the maximum value gets a higher priority,
  //
  //Parse input tuple WidthLimit
  if (0 != (HTuple((hv_WidthLimit.TupleLength())==0).TupleOr(hv_WidthLimit<0)))
  {
    hv_MinWidth = 500;
    hv_MaxWidth = 800;
  }
  else if (0 != ((hv_WidthLimit.TupleLength())==1))
  {
    hv_MinWidth = 0;
    hv_MaxWidth = hv_WidthLimit;
  }
  else
  {
    hv_MinWidth = ((const HTuple&)hv_WidthLimit)[0];
    hv_MaxWidth = ((const HTuple&)hv_WidthLimit)[1];
  }
  //Parse input tuple HeightLimit
  if (0 != (HTuple((hv_HeightLimit.TupleLength())==0).TupleOr(hv_HeightLimit<0)))
  {
    hv_MinHeight = 400;
    hv_MaxHeight = 600;
  }
  else if (0 != ((hv_HeightLimit.TupleLength())==1))
  {
    hv_MinHeight = 0;
    hv_MaxHeight = hv_HeightLimit;
  }
  else
  {
    hv_MinHeight = ((const HTuple&)hv_HeightLimit)[0];
    hv_MaxHeight = ((const HTuple&)hv_HeightLimit)[1];
  }
  //
  //Test, if window size has to be changed.
  hv_ResizeFactor = 1;
  GetImageSize(ho_Image, &hv_ImageWidth, &hv_ImageHeight);
  //First, expand window to the minimum extents (if necessary).
  if (0 != (HTuple(hv_MinWidth>hv_ImageWidth).TupleOr(hv_MinHeight>hv_ImageHeight)))
  {
    hv_ResizeFactor = (((hv_MinWidth.TupleReal())/hv_ImageWidth).TupleConcat((hv_MinHeight.TupleReal())/hv_ImageHeight)).TupleMax();
  }
  hv_TempWidth = hv_ImageWidth*hv_ResizeFactor;
  hv_TempHeight = hv_ImageHeight*hv_ResizeFactor;
  //Then, shrink window to maximum extents (if necessary).
  if (0 != (HTuple(hv_MaxWidth<hv_TempWidth).TupleOr(hv_MaxHeight<hv_TempHeight)))
  {
    hv_ResizeFactor = hv_ResizeFactor*((((hv_MaxWidth.TupleReal())/hv_TempWidth).TupleConcat((hv_MaxHeight.TupleReal())/hv_TempHeight)).TupleMin());
  }
  hv_WindowWidth = hv_ImageWidth*hv_ResizeFactor;
  hv_WindowHeight = hv_ImageHeight*hv_ResizeFactor;
  //Resize window
  SetWindowAttr("background_color","black");
  OpenWindow(hv_Row,hv_Column,hv_WindowWidth,hv_WindowHeight,0,"","",&(*hv_WindowHandle));
  HDevWindowStack::Push((*hv_WindowHandle));
  if (HDevWindowStack::IsOpen())
    SetPart(HDevWindowStack::GetActive(),0, 0, hv_ImageHeight-1, hv_ImageWidth-1);
  return;
}

void CHalconVCDlg::OnBnClickedButton1()
{
	// TODO: 在此添加控件通知处理程序代码
	HObject  ho_Image;
	HTuple  hv_WindowHandle;
	ReadImage(&ho_Image, "C:/Users/lenovo/Desktop/test.jpg");
   dev_open_window_fit_image(ho_Image, 0, 0, -1, -1, &hv_WindowHandle);
	//open_window(0,0,600,600,0,"","",&hv_WindowHandle);
  if (HDevWindowStack::IsOpen())
    ClearWindow(HDevWindowStack::GetActive());
  if (HDevWindowStack::IsOpen())
    DispObj(ho_Image, HDevWindowStack::GetActive());
}

