原文:https://www.tutorialspoint.com/rust/rust_modules.htm
--------------------------------------
A logical group of code is called a Module. Multiple modules are compiled into a unit called crate. Rust programs may contain a binary crate or a library crate. A binary crate is an executable project that has a main() method. A library crate is a group of components that can be reused in other projects. Unlike a binary crate, a library crate does not have an entry point (main() method). The Cargo tool is used to manage crates in Rust. For example, the network module contains networking related functions and the graphics module contains drawing-related functions. Modules are similar to namespaces in other programming languages. Third-party crates can be downloaded using cargo from crates.io.
| Sr.No | Term & Description |
|---|---|
| 1 |
crate Is a compilation unit in Rust; Crate is compiled to binary or library. |
| 2 |
cargo The official Rust package management tool for crates. |
| 3 |
module Logically groups code within a crate. |
| 4 |
The official Rust package registry. |
Syntax
//public module
pub mod a_public_module {
   pub fn a_public_function() {
      //public function
   }
   fn a_private_function() {
      //private function
   }
}
//private module
mod a_private_module {
   fn a_private_function() {
   }
}
Modules can be public or private. Components in a private module cannot be accessed by other modules. Modules in Rust are private by default. On the contrary, functions in a public module can be accessed by other modules. Modules should be prefixed with pub keyword to make it public. Functions within a public module must also be made public.
Illustration: Defining a Module
The example defines a public module − movies. The module contains a function play() that accepts a parameter and prints its value.
pub mod movies {
   pub fn play(name:String) {
      println!("Playing movie {}",name);
   }
}
fn main(){
   movies::play("Herold and Kumar".to_string());
}
Output
Playing movie Herold and Kumar
Use Keyword
The use keyword helps to import a public module.
Syntax
use public_module_name::function_name;
Illustration
pub mod movies {
   pub fn play(name:String) {
      println!("Playing movie {}",name);
   }
}
use movies::play;
fn main(){
   play("Herold and Kumar ".to_string());
}
Output
Playing movie Herold and Kumar
Nested Modules
Modules can also be nested. The comedy module is nested within the english module, which is further nested in the movies module. The example given below defines a function play inside the movies/english/comedy module.
pub mod movies {
   pub mod english {
      pub mod comedy {
         pub fn play(name:String) {
            println!("Playing comedy movie {}",name);
         }
      }
   }
}
use movies::english::comedy::play;
// importing a public module

fn main() {
   // short path syntax
   play("Herold and Kumar".to_string());
   play("The Hangover".to_string());

   //full path syntax
   movies::english::comedy::play("Airplane!".to_string());
}
Output
Playing comedy movie Herold and Kumar
Playing comedy movie The Hangover
Playing comedy movie Airplane!
Illustration - Create a Library Crate and Consume in a Binary Crate
Let us create a library crate named movie_lib, which contains a module movies. To build the movie_lib library crate, we will use the tool cargo.
Step 1 - Create Project folder
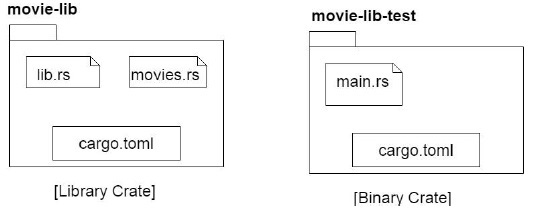
Create a folder movie-app followed by a sub-folder movie-lib. After the folder and sub-folder are created, create an src folder and a Cargo.toml file in this directory. The source code should go in the src folder. Create the files lib.rs and movies.rs in the src folder. The Cargo.toml file will contain the metadata of the project like version number, author name, etc.
The project directory structure will be as shown below −
movie-app
   movie-lib/
      -->Cargo.toml
      -->src/
         lib.rs
         movies.rs
Step 2 - Edit the Cargo.toml file to add project metadata
[package]
name = "movies_lib"
version = "0.1.0"
authors = ["Mohtashim"]
Step 3 - Edit the lib.rs file.
Add the following module definition to this file.
pub mod movies;
The above line creates a public module − movies.
Step 4 - Edit the movies.rs file
This file will define all functions for the movies module.
pub fn play(name:String){
   println!("Playing movie {} :movies-app",name);
}
The above code defines a function play() that accepts a parameter and prints it to the console.
Step 5 - Build the library crate
Build app using the cargo build command to verify if the library crate is structured properly. Make sure you are at root of project − the movie-app folder. The following message will be displayed in the terminal if the build succeeds.
D:\Rust\movie-lib> cargo build
   Compiling movies_lib v0.1.0 (file:///D:/Rust/movie-lib)
   Finished dev [unoptimized + debuginfo] target(s) in 0.67s
Step 6 - Create a test application
Create another folder movie-lib-test in the movie-app folder followed by a Cargo.toml file and the src folder. This project should have main method as this is a binary crate, which will consume the library crate created previously. Create a main.rs file in the src folder. The folder structure will be as shown.
movie-app
   movie-lib
   // already completed

   movie-lib-test/
      -->Cargo.toml
      -->src/
         main.rs
Step 7 - Add the following in the Cargo.toml file
[package]
name = "test_for_movie_lib"
version = "0.1.0"
authors = ["Mohtashim"]

[dependencies]
movies_lib = { path = "../movie-lib" }
NOTE − The path to the library folder is set as dependencies. The following diagram shows the contents of both the projects.
Step 8 - Add the following to main.rs file
extern crate movies_lib;
use movies_lib::movies::play;
fn main() {
   println!("inside main of test ");
   play("Tutorialspoint".to_string())
}
The above code imports an external package called movies_lib. Check the Cargo.toml of current project to verify the crate name.
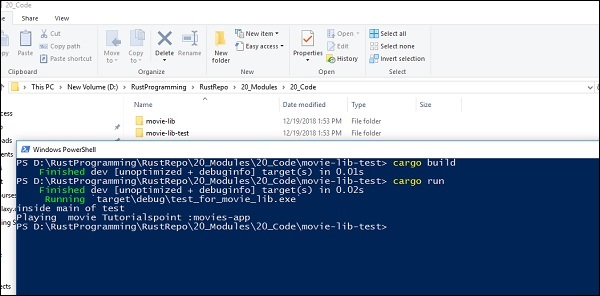
Step 9 - Use of cargo build and cargo run
We will use the cargo build and cargo run to build the binary project and execute it as shown below −