布局解析
Android中布局有两种方式:静态布局和动态布局,所谓静态布局也就是我们常见的在xml中编写,而动态布局是直接通过代码进行布局。
静态布局
布局可以分为六大类:LinerLayout、RelativeLayout、AbsoluteLayout、FrameLayout、TableLayout和GridLayout。
| 名称 | 描述 |
|---|---|
| LinerLayout | 线性布局 |
| RelativeLayout | 相对布局 |
| AbsoluteLayout | 绝对布局 |
| FrameLayout | 帧布局 |
| TableLayout | 表格布局 |
| GridLayout | 网格布局 |
其中最常用的只有LinerLayout、RelativeLayout和FrameLayout。
LinerLayout
LinerLayout是线性布局,所有的控件按单一方向线性排列,只有两个方向:水平方向和垂直方向。
LinerLayout常用的属性如下所示:
| 属性名称 | 描述 |
|---|---|
| orientation | 线性布局的排列方向:horizontal(水平) | vertical(垂直)。 |
| gravity | 用于指定当前控件的内容位置。 |
| layout_gravity | 指定当前空间在父元素的位置。 |
| layout_weightSum | 把线性布局中剩余空间分成N份。 |
| layout_weight | 指定当前空间在父元素(线性布局)中占N份。 |
| visibility | 属性是控制布局是否显示:visible | invisible | gone。 |
gravity和layout_gravity一个是和子控件相关,一个是和父控件相关。
LinerLayout的使用非常简单,这里需要注意的是weight权重的使用。
<LinearLayout xmlns:android="http://schemas.android.com/apk/res/android"
    xmlns:tools="http://schemas.android.com/tools"
    android:id="@+id/LinearLayout1"
    android:layout_width="match_parent"
    android:layout_height="match_parent"
    android:orientation="horizontal">

    <LinearLayout
        android:layout_width="0dp"
        android:layout_height="match_parent"
        android:background="#ADFF2F"
        android:layout_weight="1"/>

    <LinearLayout
        android:layout_width="0dp"
        android:layout_height="match_parent"
        android:background="#DA70D6"
        android:layout_weight="2"/>

</LinearLayout>
LinerLayout线性布局是使用比较多的一种布局方式,权重可以让它实现等比例划分,但是在复杂的布局中线性布局需要嵌套多层而导致性能问题。
RelativeLayout
RelativeLayout可以通过相对定位的方式让控件出现在布局的任何位置。可以设定相对同级别控件或相对父容器的位置。
RelativeLayout常用的属性如下所示:
| 属性名称 | 描述 |
|---|---|
| android:layout_toRightOf | 在指定控件的右边 |
| android:layout_toLeftOf | 在指定控件的左边 |
| android:layout_above | 在指定控件的上边 |
| android:layout_below | 在指定控件的下边 |
| android:layout_alignBaseline | 跟指定控件水平对齐 |
| android:layout_alignLeft | 跟指定控件左对齐 |
| android:layout_alignRight | 跟指定控件右对齐 |
| android:layout_alignTop | 跟指定控件顶部对齐 |
| android:layout_alignBottom | 跟指定控件底部对齐 |
| android:layout_alignParantLeft | 是否跟父布局左对齐 |
| android:layout_alignParentTop | 是否跟父布局顶部对齐 |
| android:layout_alignParentRight | 是否跟父布局右对齐 |
| android:layout_alignParentBottom | 是否跟父布局底部对齐 |
| android:layout_centerVertical | 在父布局中垂直居中 |
| android:layout_centerHorizontal | 在父布局中水平居中 |
| android:layout_centerInParent | 在父布局中居中 |
RelativeLayout相对布局的简单使用如下所示:
<?xml version="1.0" encoding="utf-8"?>
<RelativeLayout xmlns:android="http://schemas.android.com/apk/res/android"
    android:layout_width="match_parent"
    android:layout_height="match_parent">

    <Button
        android:id="@+id/button_one"
        android:layout_width="wrap_content"
        android:layout_height="wrap_content"
        android:layout_alignParentLeft="true"
        android:layout_alignParentTop="true"
        android:text="button 1"/>

    <Button
        android:id="@+id/button_two"
        android:layout_width="wrap_content"
        android:layout_height="wrap_content"
        android:layout_alignParentRight="true"
        android:layout_alignParentTop="true"
        android:text="button 2"/>

    <Button
        android:id="@+id/button_three"
        android:layout_width="wrap_content"
        android:layout_height="wrap_content"
        android:layout_centerInParent="true"
        android:text="button 3"/>

    <Button
        android:id="@+id/button_four"
        android:layout_width="wrap_content"
        android:layout_height="wrap_content"
        android:layout_alignParentLeft="true"
        android:layout_alignParentBottom="true"
        android:text="button 4"/>

    <Button
        android:id="@+id/button_five"
        android:layout_width="wrap_content"
        android:layout_height="wrap_content"
        android:layout_alignParentRight="true"
        android:layout_alignParentBottom="true"
        android:text="button 5"/>
</RelativeLayout>
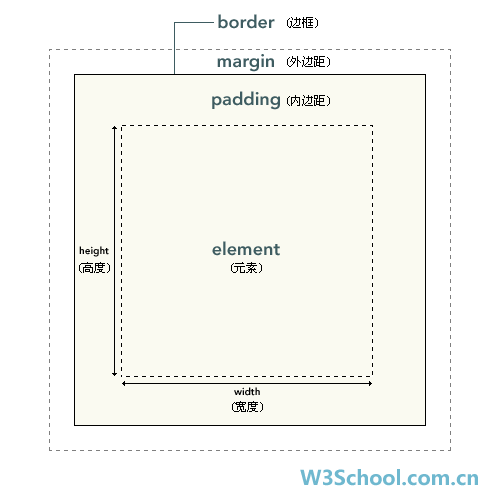
Magin与Padding
顾名思义。padding为内边距;margin为外边距。
某个View指定为padding是针对该View里面的子View距离该View距离而言的。某个View指定为margin是针对该View本身距离别人或者父View而言的。

注意:在使用过程中,设置margin都习惯使用正数,其实是可以实用负数的。
AbsoluteLayout
AbsoluteLayout是绝对布局,在开发过程中我们都不会使用,因为我们开发的应用需要在很多的机型上面进行适配,使用了这个绝对布局的话,可能在不同的手机上表现效果不尽相同。
AbsoluteLayout常用的属性如下所示:
| 属性名称 | 描述 |
|---|---|
| android:layout_x | 指定控件在父布局的X轴坐标 |
| android:layout_y | 指定控件在父布局的Y轴坐标 |
AbsoluteLayout绝对布局的简单使用如下所示:
<?xml version="1.0" encoding="utf-8"?>
<AbsoluteLayout xmlns:android="http://schemas.android.com/apk/res/android"
    android:layout_width="match_parent"
    android:layout_height="match_parent" >

    <Button
        android:id="@+id/button1"
        android:layout_width="wrap_content"
        android:layout_height="wrap_content"
        android:layout_x="32dp"
        android:layout_y="53dp"
        android:text="Button" />

    <Button
        android:id="@+id/button2"
        android:layout_width="wrap_content"
        android:layout_height="wrap_content"
        android:layout_x="146dp"
        android:layout_y="53dp"
        android:text="Button" />

    <Button
        android:id="@+id/button3"
        android:layout_width="wrap_content"
        android:layout_height="wrap_content"
        android:layout_x="85dp"
        android:layout_y="135dp"
        android:text="Button" />

</AbsoluteLayout>
FrameLayout
FrameLayout帧布局是最干净的布局,内部实现的逻辑比较少,一般用作频繁切换视图的需求和影音播放等。帧布局每次添加的控件都显示在最上面,
最后显示在界面上的是最后添加的一个控件。
| 属性名称 | 描述 |
|---|---|
| android:foreground | 设置改帧布局容器的前景图像 |
| android:foregroundGravity | 设置前景图像显示的位置 |
FrameLayout帧布局的基本使用如下所示:
<FrameLayout xmlns:android="http://schemas.android.com/apk/res/android"
    xmlns:tools="http://schemas.android.com/tools"
    android:id="@+id/FrameLayout1"
    android:layout_width="match_parent"
    android:layout_height="match_parent"
    tools:context=".MainActivity"
    android:foreground="@drawable/logo"
    android:foregroundGravity="right|bottom">

    <TextView
        android:layout_width="200dp"
        android:layout_height="200dp"
        android:background="#FF6143" />
    <TextView
        android:layout_width="150dp"
        android:layout_height="150dp"
        android:background="#7BFE00" />
     <TextView
        android:layout_width="100dp"
        android:layout_height="100dp"
        android:background="#FFFF00" />

</FrameLayout>
TableLayout
Android中也允许我们使用表格的方式来排列组件,就是行与列的方式,区别于GridLayout。
TableLayout常用的属性如下所示:
| 属性名称 | 描述 |
|---|---|
| android:shrinkColumns | 收缩列 |
| android:stretchColumns | 拉伸列 |
| android:collapseColumns | 隐藏列 |
| android:layout_column | 指定列(作用在列身上) |
| android:layout_span | 合并列(作用在列的身上) |
| TableRow | 单元行里的单元格的宽度小于默认的宽度时就不起作用。 |
<?xml version="1.0" encoding="utf-8"?>
<TableLayout xmlns:android="http://schemas.android.com/apk/res/android"
 android:layout_width="match_parent"
 android:layout_height="match_parent"
 android:stretchColumns="*">
     <TableRow
      android:id="@+id/tablerow1"
      android:layout_width="match_parent"
      android:layout_height="match_parent">
          <Button
           android:id="@+id/button4"
           android:layout_width="wrap_content"
           android:layout_height="wrap_content"
           android:text="Button1" />

          <Button
           android:id="@+id/button5"
           android:layout_width="wrap_content"
           android:layout_height="wrap_content"
           android:text="Button2" />

          <Button
           android:id="@+id/button6"
           android:layout_width="wrap_content"
           android:layout_height="wrap_content"
           android:text="Button3" />
     </TableRow>
</TableLayout>
GridLayout
GridLayout是Android 4.0以后引入的一个新的布局,和TableLayout(表格布局) 有点类似,但是更加的实用。
可以自己设置布局中组件的排列方式
可以自定义网格布局有多少行,多少列
可以直接设置组件位于某行某列
可以设置组件横跨几行或者几列
GridLayout常用的属性如下所示:
| 属性名称 | 描述 |
|---|---|
| orientation | 布局的排列方向:horizontal(水平) | vertical(垂直)。 |
| layout_gravity | 指定当前空间在父元素的位置。 |
| rowCount | 设置网格布局的行数 |
| columnCount | 设置网格布局的列数 |
| layout_row | 设置组件位于第几行 |
| layout_column | 设置组件位于第几列 |
| layout_rowSpan | 纵向横跨几行 |
| layout_columnSpan | 纵向横跨几列 |
GridView基本使用如下所示:
<?xml version="1.0" encoding="utf-8"?>
<GridLayout xmlns:android="http://schemas.android.com/apk/res/android"
    android:layout_width="wrap_content"
    android:layout_height="wrap_content"
    android:orientation="horizontal"
    android:rowCount="2"
    android:columnCount="3" >
  <Button
        android:id="@+id/one"
        android:layout_column="0"
        android:layout_columnSpan="2"
        android:text="1"/>
  <Button
        android:id="@+id/two"
        android:text="2"/>
   <Button
        android:id="@+id/three"
        android:text="3"/>
  <Button
        android:id="@+id/devide"
        android:text="/"/>
</GridLayout>
动态布局
Android中可以实用xml进行静态布局的同时,也可以使用静态布局来完成控件的布局操作。
LayoutParams
每个ViewGroup都有一个LayoutParams,它表示的是子视图(View)向父视图(ViewGroup)传达自己的期望,它封装了View的位置和宽高信息。
当然,LayoutParams其实仅仅是简单的描述了位置和宽高信息,它可以声明为下列三种情况:
一个确定的值。
FILL_PARENT,即填满(和父容器一样大小)。
WRAP_CONTENT,即自动包含。
在Java中动态构建的布局,常常这样写:第一个参数的宽度,第二个参数是高度
setLayoutParams(new LayoutParams(LayoutParams.FILL_PARENT, LayoutParams.FILL_PARENT));
这个代码其实表示子视图对父视图的期望,所以需要在子视图处进行设置。
1、FrameLayout下动态设置子控件居中,动态用JAVA代码要这样实现:
FrameLayout.LayoutParams lytp = new FrameLayout.LayoutParams(80,LayoutParams.WRAP_CONTENT);
lytp.gravity = Gravity.CENTER;
btn.setLayoutParams(lytp);
2、RelativeLayout下动态设置子控件居中:
RelativeLayout.LayoutParams lp = new RelativeLayout.LayoutParams(LayoutParams.WRAP_CONTENT,LayoutParams.WRAP_CONTENT);
lp.addRule(RelativeLayout.ALIGN_PARENT_RIGHT, RelativeLayout.TRUE);
lp.addRule(RelativeLayout.ALIGN_PARENT_TOP, RelativeLayout.TRUE);
btn1.setLayoutParams(lp);
布局填充器
常用的布局填充器有三种,三种方式分别如下:
// 第一种
LayoutInflater inflater = LayoutInflater.from(this);
View view = inflater.inflate(R.layout.activity_main,null);
// 第二种
View view = View.inflate(this,R.layout.activity_main,null);
// 第三种
LayoutInflater inflater = (LayoutInflater)getSystemService(LAYOUT_INFLATER_SERVICE);
View view = inflater.inflate(R.layout.activity_main,null);
第一种方式:LayoutInflater是用来找layout文件夹下的xml布局文件实例化,而findViewById()是找具体某一个xml下的具体widget控件(如:Button,TextView等)。
第二种方式:该方式内部其实就是调用了第一种,我们可以看一下源码:
/**
 * Inflate a view from an XML resource.  This convenience method wraps the {@link
 * LayoutInflater} class, which provides a full range of options for view inflation.
 *
 * @param context The Context object for your activity or application.
 * @param resource The resource ID to inflate
 * @param root A view group that will be the parent.  Used to properly inflate the
 * layout_* parameters.
 * @see LayoutInflater
 */
public static View inflate(Context context, @LayoutRes int resource, ViewGroup root) {
    LayoutInflater factory = LayoutInflater.from(context);
    return factory.inflate(resource, root);
}
从代码中可以看出调用了第一种方式,然后返回factory.inflatr()方法,该方法最终调用了LayoutInflater的inflater()方法,该方法实现如下:
public View inflate(@LayoutRes int resource, @Nullable ViewGroup root, boolean attachToRoot) {
    final Resources res = getContext().getResources();
    if (DEBUG) {
        Log.d(TAG, "INFLATING from resource: "" + res.getResourceName(resource) + "" ("
                + Integer.toHexString(resource) + ")");
    }
    final XmlResourceParser parser = res.getLayout(resource);
    try {
        return inflate(parser, root, attachToRoot);
    } finally {
        parser.close();
    }
}
可以看出,该方法其实就是获取到布局文件后,进行一个pull解析。
第三种方式:getSystemService()是Activity的一个方法,根据传入参数Name的值来产生相应的Object,然后转化为相应的服务对象。
LayoutInflater其实就是使用Android提供的pull解析方式来解析布局文件的,同时setContentView()方法内部也是使用LayoutInflater加载布局的。
获取屏幕的宽高
在Android中获取屏幕的宽高信息有三种方式:
1、通过WindowManager获取
DisplayMetrics dm = new DisplayMetrics();
this.getWindowManager().getDefaultDisplay().getMetrics(dm);
int width = dm.widthPixels;
int height = dm.heightPixels;
2、通过Resources获取
DisplayMetrics dm = getResources().getDisplayMetrics();
int width = dm.widthPixels;
int height= dm.heightPixels;
3、获取屏幕的默认分辨率
Display display = getWindowManager().getDefaultDisplay();
int width = display.getWidth();
int height = display.getHeight();
其他布局
ConstraintLayout