1、Mat结构
1.1、Mat数据
Mat本质上是由两个数据部分组成的类:
矩阵头:包含信息有矩阵的大小,用于存储的方法,矩阵存储的地址等
数据矩阵指针:指向包含了像素值的矩阵。
矩阵头部的大小是恒定的,矩阵本身的大小因图像的不同而不同,通常是较大的数量级。
在程序中传递图像并在有些时候创建图像副本需要花费很大的代价生成图像矩阵本身,而不是图像的头部。为了解决这一问题 OpenCV 使用引用计数系统。其思想是Mat的每个对象具有其自己的头,但可能他们通过让他们矩阵指针指向同一地址的两个实例之间共享该矩阵。此外,拷贝运算符将只能复制矩阵头部,也还将复制指针到大型矩阵,但不是矩阵本身。如果需要复制矩阵的本身,要使用 clone() 或 copyTo() 函数。
其中 Mat 类中有一些基本属性:
cols :矩阵列数
rows:矩阵行数
channels:通道数
type:数据类型
total:矩阵总元素数
data:指向矩阵数据块的指针
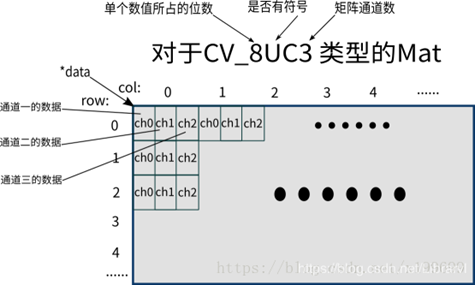
1.2、Mat数据类型定义
其中 Mat 排列方式如下:
CV_[位数][带符号与否][类型前缀]C[通道数]
带符号与否:S为符号整型,U为无符号整型,F为浮点型
例如CV_8UC3
多通道数据类型的定义如下:
#define CV_8U   0
#define CV_8S   1
#define CV_16U  2
#define CV_16S  3
#define CV_32S  4
#define CV_32F  5
#define CV_64F  6
#define CV_USRTYPE1 7

#define CV_MAT_DEPTH_MASK       (CV_DEPTH_MAX - 1)
#define CV_MAT_DEPTH(flags)     ((flags) & CV_MAT_DEPTH_MASK)
#define CV_MAKETYPE(depth,cn) (CV_MAT_DEPTH(depth) + (((cn)-1) << CV_CN_SHIFT))
#define CV_MAKE_TYPE CV_MAKETYPE

#define CV_8UC1 CV_MAKETYPE(CV_8U,1)
#define CV_8UC2 CV_MAKETYPE(CV_8U,2)
#define CV_8UC3 CV_MAKETYPE(CV_8U,3)
#define CV_8UC4 CV_MAKETYPE(CV_8U,4)
2、Mat应用
2.1 构造函数
(1) Mat::Mat()
(2) Mat::Mat(int rows, int cols, int type)
(3) Mat::Mat(Size size, int type)
(4) Mat::Mat(int rows, int cols, int type, const Scalar& s)
(5) Mat::Mat(Size size, int type, const Scalar& s)
(6) Mat::Mat(const Mat& m)
(7) Mat::Mat(int rows, int cols, int type, void* data, size_t step = AUTO_STEP)
(8) Mat::Mat(Size size, int type, void* data, size_t step = AUTO_STEP)
(9) Mat::Mat(const Mat& m, const Range& rowRange, const Range& colRange)
(10) Mat::Mat(const Mat& m, const Rect& roi)
(11) Mat::Mat(const CvMat* m, bool copyData = false)
(12) Mat::Mat(const IplImage* img, bool copyData = false)
(13) template<typename T, int n>explicit Mat::Mat(const Vec<T, n>& vec, bool copyData = true)
(14) template<typename T, int m, int n> explicit Mat::Mat(const Matx<T, m, n>& vec, bool copyData = true)
(15) template explicit Mat::Mat(const vector& vec, bool copyData = false)
(16) Mat::Mat(const MatExpr& expr)
(17) Mat::Mat(int ndims, const int* sizes, int type)
(18) Mat::Mat(int ndims, const int* sizes, int type, const Scalar& s)
(19) Mat::Mat(int ndims, const int* sizes, int type, void* data, const size_t* steps = 0)
2.2 创建Mat类型数据
1)使用Mat构造函数创建
Mat mat = Mat(2, 3, CV_8UC1);

cout << "rows="<<mat.rows << ",cols=" << mat.cols << endl;

cout << mat << endl;
输出:
|
rows=2,cols=3 [205, 205, 205; 205, 205, 205] |
创建三通道矩阵Mat mat(2, 3, CV_8UC3);输出如下。
|
rows=2,cols=3 [205, 205, 205, 205, 205, 205, 205, 205, 205; 205, 205, 205, 205, 205, 205, 205, 205, 205] |
创建三通道矩阵Mat mat(2, 3, CV_8UC3, Scalar(0,0,255)
|
rows=2,cols=3 [ 0, 0, 255, 0, 0, 255, 0, 0, 255; 0, 0, 255, 0, 0, 255, 0, 0, 255] |
2)使用Create函数进行初始化
Mat M;
M.create(2, 3, CV_8UC1);
cout << "M = " << endl << " " << M << endl << endl;
输出如下。
|
M = [205, 205, 205; 205, 205, 205] |
3)使用标准函数进行特定矩阵初始化
Mat M;
M = Mat::eye(4, 4, CV_8U);
Mat M1 = Mat::ones(4, 4, CV_8U);
Mat M2= Mat::zeros(4, 4, CV_8U);
cout << "M = " << endl << " " << M << endl << endl;
cout << "M1 = " << endl << " " << M1 << endl << endl;
cout << "M2 = " << endl << " " << M2 << endl << endl;
输出如下。
|
M = [ 1, 0, 0, 0; 0, 1, 0, 0; 0, 0, 1, 0; 0, 0, 0, 1] M1 = [ 1, 1, 1, 1; 1, 1, 1, 1; 1, 1, 1, 1; 1, 1, 1, 1] M2 = [ 0, 0, 0, 0; 0, 0, 0, 0; 0, 0, 0, 0; 0, 0, 0, 0] |
输出Mat矩阵可以格式化不同的形式,如下所示。
cout <<"M = "<< endl <<" "<< format( M, Formatter::FMT_PYTHON) << endl << endl;
M =
[[ 1, 0, 0, 0],
[ 0, 1, 0, 0],
[ 0, 0, 1, 0],
[ 0, 0, 0, 1]]
2.3 Mat操作像素
1. at定位符访问
2、指针访问
3.迭代器iterator访问
1)Mat::at
Mat数据结构,操作灰度图像像素点:
int gray_value = (int) image.at<uchar>(i , j) ;
操作彩色图像像素点:
int color_value = (int) image.at<Vec3b>(i , j) [k];
其中:
gray_value中存放灰度值,image是读入的图像,i表示行,j表示列;
color_value中存放彩色像素值,image是读入的图像,i表示行,j表示列,k表示通道,即R、G、B,取值范围为2、1、0.
template<typename T> T& Mat::at(int i)const
template<typename T> const T&Mat::at(int i) const
template<typename T> T& Mat::at(int i,int j)
template<typename T> const T&Mat::at(int i, int j) const
template<typename T> T& Mat::at(Pointpt)
template<typename T> const T&Mat::at(Point pt) const
template<typename T> T& Mat::at(int i,int j, int k)
template<typename T> const T&Mat::at(int i, int j, int k) const
template<typename T> T& Mat::at(constint* idx)
template<typename T> const T&Mat::at(const int* idx) const
参数
i –索引 0 维度
j – 1 维度的索引
k – 沿 2 维度的索引
pt – Point(j,i) 作为指定元素的位置。
idx – Mat::dims 数组的索引
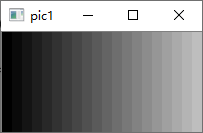
int main() {
    Mat M= Mat::eye(100, 200, CV_8U);
    for(int i=0; i<M.rows; i++)
        for (int j = 0; j < M.cols; j++)
        {
            M.at<uchar>(i, j) = j / 10 * 10;
        }

    imshow("pic1", M);
    waitKey(0);
}
2)指针访问
Mat mat = Mat(10, 15, CV_8UC1);
cout << "rows=" << mat.rows << ",cols=" << mat.cols << endl;
for (int i = 0; i < mat.rows; i++)
{
    uchar* row = mat.ptr<uchar>(i); // 行指针
    for (int j = 0; j < mat.cols; j++) // 遍历每一行
    {
        row[j] = (uchar)((j / 5) * 10);
    }
}
cout << "M = " << endl << " " << format(mat, Formatter::FMT_PYTHON) << endl << endl;
waitKey(0);
输出如下。
|
rows=10,cols=15 |
3)迭代器iterator访问
Mat M = Mat(100, 150, CV_8UC3);
cout << "rows=" << M.rows << ",cols=" << M.cols << endl;

Mat_<Vec3b>::iterator it = M.begin<Vec3b>();//初始位置的迭代器
Mat_<Vec3b>::iterator itend = M.end<Vec3b>();//终止位置的迭代器
for (; it != itend; it++)
{
    //处理BGR三个通道
    (*it)[0] = 182;//B
    (*it)[1] = 194;//G
    (*it)[2] = 154;//R
}
imshow("pic1", M);
使用下面配色表实验:
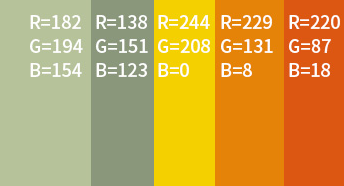
配色1: RGB(182,194,154)

配色2:RGB(229,131, 8)

2.4 其他数据结构
1)点的表示:Point
Point p1 = { 2,3 };
Point p2 = Point2i(3, 4);
Point2f p3;
p3.x = 1.1;
p3.y = 1.2;
cout << "p1=" << p1 << endl;
cout << "p2=" << p2 << endl;
cout << "p3=" << p3 << endl;
waitKey(0);
输出为:
p1=[2, 3]
p2=[3, 4]
p3=[1.1, 1.2]
2)颜色表示:Scalar
Scalar(r, g, b)分别表示红绿蓝颜色。
3)尺寸的表示:Size
Size a = Size(5, 6);
cout <<"a.width=" << a.width << ":a.height=" << a.height;
输出为:
a.width=5:a.height=6
4)矩形的表示:Rect
Rect rect = Rect(100, 50, 10, 20); // 参数:x、y、width、height
cout << rect.area() << endl;     //返回rect的面积 200
cout << rect.size() << endl;     //返回rect的尺寸 [10 × 20]
cout << rect.tl() << endl;       //返回rect的左上顶点的坐标 [100, 50]
cout << rect.br() << endl;       //返回rect的右下顶点的坐标 [110, 70]
cout << rect.width << endl;    //返回rect的宽度 10
cout << rect.height << endl;   //返回rect的高度 20
cout <<  rect.contains(Point(101, 51) ) << endl;  //返回布尔变量,判断是否包含Point点
输出为:
|
200 [10 x 20] [100, 50] [110, 70] 10 20 1 |
3、参考文献
1、Mat - The Basic Image Container
https://docs.opencv.org/master/d6/d6d/tutorial_mat_the_basic_image_container.html
2、cv::Mat Class Reference
https://docs.opencv.org/3.1.0/d3/d63/classcv_1_1Mat.html
3、OpenCV Mat 常用的基础知识
https://blog.csdn.net/Librarvl/article/details/89892352
4、OpenCV Mat类详解和用法
https://blog.csdn.net/Mason_Mao/article/details/82254285
5、《OpenCV3 编程入门》 , 电子工业出版社,毛星雨著
尊重原创技术文章,转载请注明。