一、网卡的正常化配置
1、修改头文件调用关系
在原配的smdk6400.h中(因为是复制过来的),网卡配置为CS8900,而手头开发板上的网卡为DM9000,所以第一步来修改网卡驱动程序。
修改/include/configs/smdk6410.h
找到如下字段,更改如下
/*
 * Hardware drivers
 */
#define CONFIG_NET_MULTI
//#define CONFIG_CS8900                 /* we have a CS8900 on-board    */
//#define CONFIG_CS8900_BASE            0x18800300
//#define CONFIG_CS8900_BUS16           /* follow the Linux driver      */
#define CONFIG_DRIVER_DM9000    1       /* we have a DM9000 on-board    */
#define CONFIG_DM9000_BASE              0x18000000
#define DM9000_IO               CONFIG_DM9000_BASE
#define DM9000_DATA             (CONFIG_DM9000_BASE+4)
#define CONFIG_DM9000_USE_16BIT

#define CONFIG_ETHADDR          00:40:5c:26:0a:5b
#define CONFIG_NETMASK          255.255.255.0
#define CONFIG_IPADDR           10.0.2.20
#define CONFIG_SERVERIP         10.0.2.2
#define CONFIG_GATEWAYIP        2.2.0.10
2、修改dm9000x.c文件
文件为drivers/net/dm9000x.c
在for(;;)之前加入两句
DM9000_ior(DM9000_MRRH);
DM9000_ior(DM9000_MRRL);
修改函数为dm9000_halt
static void dm9000_halt(struct eth_device *netdev)
{
        DM9000_DBG("%s\n", __func__);

        /* RESET devie */
//      phy_write(0, 0x8000);   /* PHY RESET */
//      DM9000_iow(DM9000_GPR, 0x01);   /* Power-Down PHY */
//      DM9000_iow(DM9000_IMR, 0x80);   /* Disable all interrupt */
//      DM9000_iow(DM9000_RCR, 0x00);   /* Disable RX */

}
3、修改net配置文件
文件一 /net/eth.c
增加启动属性,在int eth_initialize(bd_t *bis)函数中,增加一段
        /* for DM9000 init */
#if defined(CONFIG_DRIVER_DM9000)
        dm9000_initialize(bis);
#endif
        /*------------------------------*/
文件二 /net/net.c
修改ARP_TIMEOUT
#ifndef CONFIG_ARP_TIMEOUT
//# define ARP_TIMEOUT          5000UL  /* Milliseconds before trying ARP again */
# define ARP_TIMEOUT            5       /* Milliseconds before trying ARP again */
#else
# define ARP_TIMEOUT            CONFIG_ARP_TIMEOUT
#endif
修改NetArpWaitTimerStart
//      if ((t - NetArpWaitTimerStart) > ARP_TIMEOUT) {
        if ((t - NetArpWaitTimerStart) > ARP_TIMEOUT*CONFIG_SYS_HZ) {
修改NetSetTimeout
//      NetSetTimeout (10000UL, PingTimeout);
        NetSetTimeout (10*CONFIG_SYS_HZ, PingTimeout);
文件三/net/tftp.c
修改 TftpStart (void)
注释如下函数段
        /*
         * Allow the user to choose TFTP blocksize and timeout.
         * TFTP protocol has a minimal timeout of 1 second.
         */
/*      if ((ep = getenv("tftpblocksize")) != NULL)
 *              TftpBlkSizeOption = simple_strtol(ep, NULL, 10);
 *
 *      if ((ep = getenv("tftptimeout")) != NULL)
 *              TftpTimeoutMSecs = simple_strtol(ep, NULL, 10);
 *
 *      if (TftpTimeoutMSecs < 1000) {
 *              printf("TFTP timeout (%ld ms) too low, "
 *                      "set minimum = 1000 ms\n",
 *                      TftpTimeoutMSecs);
 *              TftpTimeoutMSecs = 1000;
 *      }
 *
 *      debug("TFTP blocksize = %i, timeout = %ld ms\n",
 *              TftpBlkSizeOption, TftpTimeoutMSecs);
 */
至此,网卡驱动修改完成,可以编译试一试了。
如果在局域网中,可以尝试ping一下其他主机的ip,此处我不再尝试。
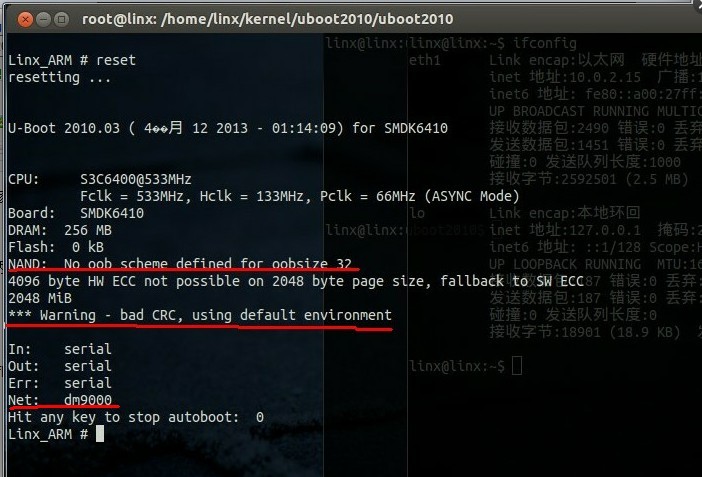
接着是解决如下问题,NAND读取错误,CRC验证错误。

二、修复NAND flash
1、/include/linux/mtd/mtd.h
修改erase_info结构体,注意了是u_int32_t,而不是uint32_t
struct erase_info {
        struct mtd_info *mtd;
/*      uint64_t addr;
 *      uint64_t len;
 *      uint64_t fail_addr;
 */
        u_int32_t addr;
        u_int32_t len;
        u_int32_t fail_addr;
        u_long time;
        u_long retries;
        u_int dev;
        u_int cell;
        void (*callback) (struct erase_info *self);
        u_long priv;
        u_char state;
        struct erase_info *next;
};
2、修改 mtd_erase_region_info
struct mtd_erase_region_info {
//      uint64_t offset;                        /* At which this region starts, from the beginning of the MTD */
        u_int32_t offset;                        /* At which this region starts, from the beginning of the MTD */
        u_int32_t erasesize;            /* For this region */
        u_int32_t numblocks;            /* Number of blocks of erasesize in this region */
        unsigned long *lockmap;         /* If keeping bitmap of locks */
};
3、修改mtd_info
struct mtd_info {
        u_char type;
        u_int32_t flags;
//      uint64_t size;   /* Total size of the MTD */
        u_int32_t size;   /* Total size of the MTD */
……
}
4、修改两个函数参量
        /* Chip-supported device locking */
/*      int (*lock) (struct mtd_info *mtd, loff_t ofs, uint64_t len);
 *      int (*unlock) (struct mtd_info *mtd, loff_t ofs, uint64_t len);
 */
        int (*lock) (struct mtd_info *mtd, loff_t ofs, uint32_t len);
        int (*unlock) (struct mtd_info *mtd, loff_t ofs, uint32_t len);
5、最后修改/drivers/mtd/nand/nand_ids.c
        /* 16 Gigabit */
        {"NAND 2GiB 1,8V 8-bit",        0xA5, 0, 2048, 0, LP_OPTIONS},
//      {"NAND 2GiB 3,3V 8-bit",        0xD5, 0, 2048, 0, LP_OPTIONS},
        {"NAND 2GiB 3,3V 8-bit",        0xD5, 4096, 2048, 512*1024, LP_OPTIONS},
        {"NAND 2GiB 1,8V 16-bit",       0xB5, 0, 2048, 0, LP_OPTIONS16},
        {"NAND 2GiB 3,3V 16-bit",       0xC5, 0, 2048, 0, LP_OPTIONS16},
6、修改/includes/asm/arch-s3c64xx/s3c6410.h
/*-----------------------------------------------------------------------
 * Physical Memory Map
 */
//#define DMC1_MEM_CFG  0x00010012      /* burst 4, 13-bit row, 10-bit col */
#define DMC1_MEM_CFG    0x0001001A      /* burst 4, 13-bit row, 10-bit col */
#define DMC1_MEM_CFG2   0xB45
//#define DMC1_CHIP0_CFG        0x150F8         /* 0x5000_0000~0x57ff_ffff (128 MiB) */
#define DMC1_CHIP0_CFG  0x150F0         /* 0x5000_0000~0x57ff_ffff (128 MiB) */
#define DMC_DDR_32_CFG  0x0             /* 32bit, DDR */
然后可以看到下图

此时的NAND flash已经正确读写了,只剩下CRC验证问题还有NAND无法识别zImage的问题。
三、CRC error
……这个我暂时没有解决成功…、日后再说。
四、zImage识别
uboot默认只能识别uImage。
所以要在commom目录下增加一个cmd_bootzImage.c文件
#include <common.h>
#include <command.h>

#ifdef CONFIG_CMD_BOOTZIMAGE
#define LINUX_PAGE_SHIFT 12
#define LINUX_PAGE_SIZE (1<<LINUX_PAGE_SHIFT)
#define LINUX_MACHINE_ID  1099          //根据平台修改

void do_bootzImage(cmd_tbl_t *cmdtp, int flag, int argc, char *argv[])
{
        int i;
        u32 addr;
        char *cmdline = getenv("bootargs");
        void(*run)(int zero, int arch);
        struct param_struct *params = (struct param_struct*)0x20000100;
        //这里要注意根据平台的不同改,一般 约定俗成是内存首地址+100dex

        if(argc < 2){
                addr = load_addr;       //默认加载地址
        }
        else{
                addr = simple_strtoul(argv[1], NULL, 16);
        }

        for(i=0; i<(sizeof(struct param_struct)>>2); i++){
                ((u32 *)params)[i] = 0;
        }

        params->u1.s.page_size = LINUX_PAGE_SIZE;
        params->u1.s.nr_pages = (0x04000000 >> LINUX_PAGE_SHIFT);

        memcpy(params->commandline, cmdline, strlen(cmdline));
        run = (void(*)(int, int))addr;
        printf("start kernel.../n");
        run(0, LINUX_MACHINE_ID);

}

U_BOOT_CMD( bootzImage, 2, 1, do_bootzImage,"bootzImage --boot zImage from ram./n","[addr] boot zImage directoly.");

#endif
在common/Makefile增加规则
COBJS-$(CONFIG_CMD_BOOTZIMAGE) +=cmd_bootzImage.o
在include/configs/smdk6410.h文件中添加
#define CONFIG_CMD_BOOTZIMAGE
但是在我的板子上是运行不成功的。
现在来做最后一种尝试,见下一篇详解。