xml:
介绍:包含关于可扩展标记语言xml的函数
使用:
- python有三种方法解析XML--SAX,DOM,以及ElementTree,由于xml技术落后,所以这里不对sax,dom介绍:
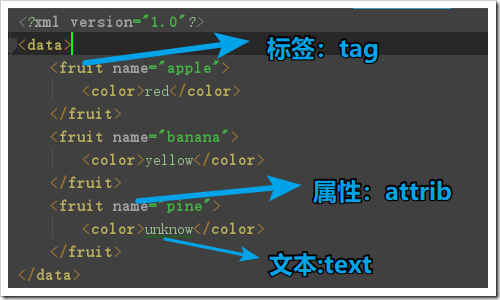
xml文本:
<?xml version="1.0"?>
<data>
    <fruit name="apple">
        <color>red</color>
    </fruit>
    <fruit name="banana">
        <color>yellow</color>
    </fruit>
    <fruit name="pine">
        <color>unknow</color>
    </fruit>
</data>
ElementTree的使用:导入模块--》获取解析对象--》获取结点--》操作结点
#导入模块
import xml.etree.ElementTree as ET
#创建对应解析对象
tree=ET.parse('data.xml')
#获取结点
root=tree.getroot()#获取根节点
print(root.tag)
# print(root.getchildren())#获取子结点
#通过迭代获取子结点,“建议”
for child in root:
    print(child.tag)#获取子结点的标签
    print(child.attrib)#获取子结点的属性
    print(child.text)#获取子结点的文本
    for cc in child:#孙子结点
        print(cc.tag)
        print(cc.attrib)
        print(cc.text)
    print("-----------------")

#通过标签名查找结点:
for i in root.findall('fruit'):#这个只能找子结点
    print(i.tag)
    print(i.attrib)
    print(i.text)


print("*********************")
for i in root.iter('color'):
    print(i.tag)
    print(i.text)


###查找结点并修改
print("*********************")
for i in root.iter('color'):
    print(i.text)
    if i.text=='unknow':
        i.text='unknowd'#修改text

        #设置属性用set: i.set(属性名,属性值)
tree.write("data2.xml")#可写回原文件,也可新写来另外的文件

###查找结点并删除
for i in root.findall('fruit'):
    if i.attrib['name'] == 'pine':
        root.remove(i)#从父结点删除子结点
tree.write("data3.xml")#可写回原文件,也可新写来另外的文件

###新建结点

new_xml = ET.Element("new parent")#新建父结点 注:只能有唯一一个父结点,这相当于新建xml
son_name = ET.SubElement(new_xml, "name", attrib={"att": "yes"})#新建子结点
son_color = ET.SubElement(son_name, "color", attrib={"att": "no"})
son_color.text = 'unknow'

name2 = ET.SubElement(new_xml, "name", attrib={"att": "no"})
color2 = ET.SubElement(name2, "color")

et = ET.ElementTree(new_xml)  # 生成文档对象
et.write("test.xml", encoding="utf-8", xml_declaration=True)#写入文件,确定格式
configparser:
介绍:包括关于配置文件的函数
初始文本内容:
[DEFAULT]
ip = 192.168.1.1
hostname=aotuman


[african]
color = black
luck = no
用法:
#导入模块
import configparser
#创建解析器
con=configparser.ConfigParser()


print("-------读-------------")
con.read('config.ini')

print(con.default_section)#默认标签的标签名
print(con.defaults())#默认标签的结果
print(con.sections())#默认标签以外的标签名
print(con['african']['color'])#获取对应标签属性


print("-------------写的方式------------")
con["DEFAULT"] = {'root':'yes'}#覆盖式修改

con['Europe'] = {'color':'white','luck':'super'}#
con['Europe']['life']='0'#增加式修改

with open('example.ini', 'w') as configfile:
    con.write(configfile)#写回,或写到新文件

print("-------------增加------------")
#先判断是否存在
if con.has_section('superman')==False:
    con.add_section('superman')
    con['superman']={'size':'big'}
    with open('example2.ini', 'w') as configfile:
        con.write(configfile)  # 写回,或写到新文件

print("-------------删除------------")
# con.remove_option('Europe','life')#删除选项
con.remove_section('Europe')#删除标签
with open('example3.ini', 'w') as configfile:
    con.write(configfile)  # 写回,或写到新文件
注意:所有的赋值都要使用字符串
hashlib:
介绍:包括关于hash加密的函数【hmac 和hashlib都是python中常用的加密模块】
用法:
#导入模块
import hashlib

my_md5=hashlib.md5()##选择加密方式,创建对象
my_md5.update(b'123')#添加加密文本
my_md5.update('中文'.encode())#需要转换成bytes才能加密
print(my_md5.hexdigest())#以十六进制格式显示加密信息(常用)

# ######## sha1 ########

hash = hashlib.sha1()
hash.update(b'123')
print(hash.hexdigest())

# ######## sha256 ########

hash = hashlib.sha256()
hash.update(b'123')
print(hash.hexdigest())

# ######## sha384 ########

hash = hashlib.sha384()
hash.update(b'123')
print(hash.hexdigest())

# ######## sha512 ########

hash = hashlib.sha512()
hash.update(b'123')
print(hash.hexdigest())

