前言
继上两篇简单介绍了Activity之后,我们开始学习同样是Android四大应用程序组件之一的Service。
本文要点:
1.Service概述
2.Service生命周期
3.创建并启动Service
一、Service概述
Service和Activity有些类似,都继承自Context,但Service有以下特点:
(1)Service没有界面,在后台长时间运行,即使用户已经切换到其他的应用程序;
(2)Service不能自行启动,需要借助Activity,其他Service,或者其他Context对象;
(3)Service有两种模式:Started和Bound。启动方式分别为调用Context.startService()和Context.bindService();
(4)我们创建的Service也可以被其他应用访问,除非将Service声明为Private;
(5)Service和当前运行的应用是同一个进程,它会阻塞当前应用的其他操作。如果不希望Service阻塞其他操作,可以在调用时创建一个线程去启动Service。
二、Service生命周期
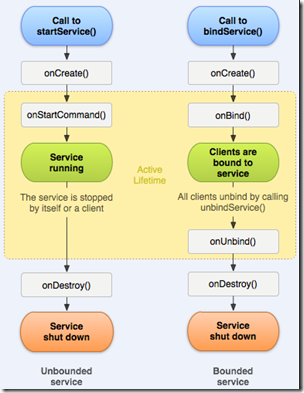
和Activity一样,这里也有一张图:
针对上图中几个重要方法的说明:
(1)onStartCommand(),当使用startService()启动时,系统会调用该方法。程序中实现(重写)该方法后,需要显示的调用stopService()。如果Service仅仅支持Bound模式,则不需要实现该方法。
(2)onBind(),通过bindService()启动时,需要实现该方法。如果不允许绑定这里可以返回null。
(3)onCreated(),在服务第一次创建时调用。在onStartCommand()和onBind()之前。
(4)onDestroy(),调用stopService()或者unbindService()时,系统会调用该方法,我们这一在这里释放资源。
两种不同形式(Started和Bound)下,Service的生命周期是有差别的:
1.Started模式:
Context.startService() -> onCreate() -> onStartCommand() -> onStart() -> Running;
Context.stopService() -> onDestroy() -> Stoped。
2.Bound模式:
Context.bindService() -> onCreate() -> onBind()-> Running;
Context.unbindService() -> onDestroy() -> Stoped。
注:本文下面给出的例子,能够很直观的看出这个调用过程。
三、创建Service
1.打开Eclipse创建一个project,命名为HelloService;
2.新建类MyService,使其继承Service;
 1 package com.wZhang.helloservice.service;
 2
 3 import android.app.Service;
 4 import android.content.Intent;
 5 import android.os.IBinder;
 6 import android.util.Log;
 7
 8 public class MyService extends Service {
 9
10     @Override
11     public IBinder onBind(Intent intent) {
12         // TODO Auto-generated method stub
13         Log.i("MyService", "onBind()");
14         return null;
15     }
16 }
3.在AndroidManifest.xml中声明MyService:
 1     <application
 2         android:allowBackup="true"
 3         android:icon="@drawable/ic_launcher"
 4         android:label="@string/app_name"
 5         android:theme="@style/AppTheme" >
 6         <activity
 7             android:name="com.wZhang.helloservice.MainActivity"
 8             android:label="@string/app_name" >
 9             <intent-filter>
10                 <action android:name="android.intent.action.MAIN" />
11
12                 <category android:name="android.intent.category.LAUNCHER" />
13             </intent-filter>
14         </activity>
15         <service
16             android:name="com.wZhang.helloservice.service.MyService" >
17         </service>
18     </application>
Service和Activity是在同一级配置的。这样,我们就创建了一个service。接下来我们尝试使用不同方式启动这个Service。
四、启动Service
1.我们在Activity中添加几个Button,并为其绑定click事件。
main.xml代码:
 View Code
 1 <LinearLayout xmlns:android="http://schemas.android.com/apk/res/android"
 2     xmlns:tools="http://schemas.android.com/tools"
 3     android:layout_width="fill_parent"
 4     android:layout_height="fill_parent"
 5     tools:context=".MainActivity" >
 6     <Button
 7         android:id="@+id/btnStartService"
 8         android:layout_width="wrap_content"
 9         android:layout_height="wrap_content"
10         android:layout_marginTop="10dp"
11         android:onClick="startService"
12         android:text="Start"
13         android:textSize="20sp" />
14         <Button
15         android:id="@+id/btnStopService"
16         android:layout_width="wrap_content"
17         android:layout_height="wrap_content"
18         android:layout_marginTop="10dp"
19         android:onClick="stopService"
20         android:text="Stop"
21         android:textSize="20sp" />
22
23     <Button android:id="@+id/btnBindService"
24         android:text="Bind"
25         android:onClick="bindService"
26         android:layout_width="wrap_content"
27         android:layout_height="wrap_content"
28         android:textSize="20sp"
29         android:layout_marginTop="10dp"/>
30
31     <Button android:id="@+id/btnUnbindService"
32         android:text="Unbind"
33         android:onClick="unbindService"
34         android:layout_width="wrap_content"
35         android:layout_height="wrap_content"
36         android:textSize="20sp"
37         android:layout_marginTop="10dp"/>
38 </LinearLayout>
MainActivity.java代码:
 View Code
 1 package com.wZhang.helloservice;
 2
 3  import com.wZhang.helloservice.service.MyService;
 4
 5  import android.os.Bundle;
 6  import android.app.Activity;
 7  import android.content.Intent;
 8  import android.view.Menu;
 9  import android.view.View;
10
11  public class MainActivity extends Activity {
12
13      @Override
14      protected void onCreate(Bundle savedInstanceState) {
15          super.onCreate(savedInstanceState);
16          setContentView(R.layout.main);
17      }
18
19      @Override
20      public boolean onCreateOptionsMenu(Menu menu) {
21          // Inflate the menu; this adds items to the action bar if it is present.
22          getMenuInflater().inflate(R.menu.main, menu);
23          return true;
24      }
25
26      //Start方式启动服务
27      public void startService(View view) {
28          //TODO:Start Service
29      }
30
31      //Start方式停止服务
32      public void stopService(View view){
33          //TODO:Start Service
34      }
35
36      //Bind方式启动服务
37      public void bindService(View view) {
38          //TODO:Bind Service
39      }
40
41      //unbind服务
42      public void unbindService(View view){
43          //TODO:Unbind Service
44      }
45  }
2.修改MyService类,重写(override)相关方法,并增加log:
 View Code
 1 package com.wZhang.helloservice.service;
 2
 3 import android.app.Service;
 4 import android.content.Intent;
 5 import android.os.IBinder;
 6 import android.util.Log;
 7
 8 public class MyService extends Service {
 9
10     @Override
11     public void onCreate() {
12         // TODO Auto-generated method stub
13         super.onCreate();
14         Log.i("MyService", "onCreate()");
15     }
16
17     @Override
18     public IBinder onBind(Intent intent) {
19         // TODO Auto-generated method stub
20         Log.i("MyService", "onBind()");
21         return null;
22     }
23
24     @Override
25     public void onStart(Intent intent, int startId) {
26         // TODO Auto-generated method stub
27         super.onStart(intent, startId);
28         Log.i("MyService", "onStart()");
29     }
30
31     @Override
32     public int onStartCommand(Intent intent, int flags, int startId) {
33         // TODO Auto-generated method stub
34         Log.i("MyService", "onStartCommand()");
35         return super.onStartCommand(intent, flags, startId);
36     }
37
38     @Override
39     public boolean onUnbind(Intent intent) {
40         // TODO Auto-generated method stub
41         Log.i("MyService", "onUnbind()");
42         return super.onUnbind(intent);
43     }
44
45     @Override
46     public void onDestroy() {
47         // TODO Auto-generated method stub
48         super.onDestroy();
49         Log.i("MyService", "onDestroy()");
50     }
51
52 }
3.实现startService,stopService,bindService,unbindService方法:
 1     //Define ServiceConnection
 2     private ServiceConnection conn =new ServiceConnection() {
 3         @Override
 4         public void onServiceConnected(ComponentName arg0, IBinder arg1) {
 5             // TODO Auto-generated method stub
 6             Log.i("MyService", "连接成功!");
 7         }
 8
 9         @Override
10         public void onServiceDisconnected(ComponentName arg0) {
11             // TODO Auto-generated method stub
12             Log.i("MyService", "断开连接!");
13         }
14     };
15
16     //Start方式启动服务
17     public void startService(View view) {
18         Intent intent = new Intent(this,MyService.class);
19         startService(intent);
20     }
21
22     //Start方式停止服务
23     public void stopService(View view){
24         Intent intent = new Intent(this,MyService.class);
25         stopService(intent);
26     }
27
28     //Bind方式启动服务
29     public void bindService(View view) {
30         Intent intent = new Intent(this,MyService.class);
31         bindService(intent,conn,Service.BIND_AUTO_CREATE);
32     }
33
34     //Unbind服务
35     public void unbindService(View view){
36         unbindService(conn);
37     }
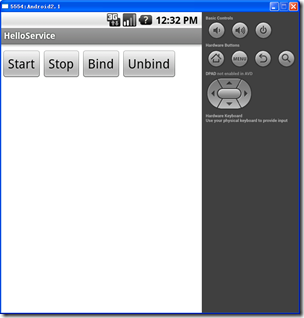
4.运行HelloService,界面如下:
(1)点击Start按钮,Logcat信息:
(2)点击stop按钮:
(3)点击Bind按钮:
(4)点击Unbind按钮:
至此,我们发现:Started和Bound方式都可以启动、停止Service;同时也能直观的看到两种方式下Service生命周期中的方法调用过程。
源码下载:HelloService.rar


