JSON Web Token 入门教程:http://www.ruanyifeng.com/blog/2018/07/json_web_token-tutorial.html
后端代码地址:https://github.com/lison16/vue-cource/commit/c0341e8ea79d876ae552281ad8c1f1da5049434f
代码结构:
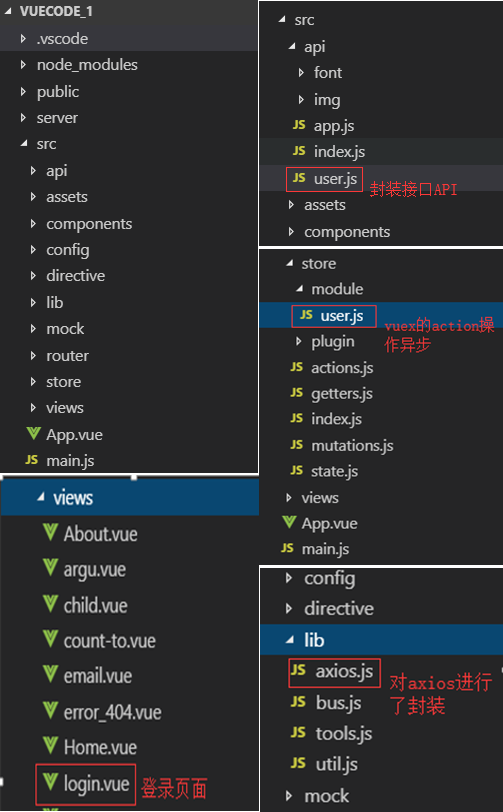
uer.js:封装了登录和授权两个接口。
import axios from "./index";

export const getUserInfo = ({ userId }) => {
  debugger;
  return axios.request({
    url: "/getUserInfo",
    method: "post",
    data: {
      userId
    }
  });
};

export const login = ({ userName, password }) => {
  return axios.request({
    url: "/index/login",
    method: "post",
    data: {
      userName,
      password
    }
  });
};

export const authorization = () => {
  return axios.request({
    url: "/users/authorization",
    method: "get"
  });
};
/src/store/module/user.js:由于是异步操作,所以都放在了actions中。
import { login, authorization } from "@/api/user";
import { setToken } from "@/lib/util";

const state = {
  //
  userName: "Caoqi"
};
const getters = {
  firstLetter: state => {
    return state.userName.substr(0, 1);
  }
};
const mutations = {
  //
  SET_USER_NAME(state, params) {
    state.userName = params.userName;
  }
};
const actions = {
  login({ commit }, { userName, password }) {
    return new Promise((resolve, reject) => {
      login({ userName, password })
        .then(res => {
          debugger;
          if (res.data.code === 200 && res.data.data.token) {
            setToken(res.data.data.token);
            resolve();
          } else {
            reject(new Error("错误"));
          }
        })
        .catch(error => {
          reject(error);
        });
    });
  },
  authorization({ commit }, token) {
    return new Promise((resolve, reject) => {
      authorization()
        .then(res => {
          if (parseInt(res.data.code) === 401) {
            reject(new Error("token error"));
          } else {
            setToken(res.data.data.token);
            resolve();
          }
        })
        .catch(error => {
          reject(error);
        });
    });
  },
  logout() {
    setToken("");
  }
};
export default {
  //namespaced:true,//有利于模块更加密闭,不受外界的干扰
  state,
  getters,
  mutations,
  actions
};
/src/lib/axios.js:
import axios from "axios";
import { baseURL } from "@/config";
import { getToken } from '@/lib/util';
//ES6类的写法
class HttpRequest {
  //ES6默认参数
  constructor(baseUrl = baseURL) {
    this.baseUrl = baseUrl;
    this.queue = {}; //将请求都放到队列中
  }
  getInsideConfig() {
    const config = {
      baseURL: this.baseUrl,
      hearders: {
        //
      }
    };
    return config;
  }
  //封装拦截器
  interceptors(instance, url) {
    instance.interceptors.request.use(
      config => {
        //添加全局的loading
        //Object.keys() 方法会返回一个由一个给定对象的自身可枚举属性组成的数组
        if (!Object.keys(this.queue).length) {
          //spin.show
        }
        this.queue[url] = true;
        config.headers['Authorization'] = getToken();
      return config;
      },
      error => {
        return Promise.reject(error);
      }
    );
    instance.interceptors.response.use(
      res => {
        delete this.queue[url];
        const { data, status } = res;
        return { data, status };
      },
      error => {
        delete this.queue[url];
        return Promise.reject(error);
      }
    );
  }

  request(options) {
    const instance = axios.create();
    /**
     * Object.assign() 方法用于将所有可枚举属性的值从一个或多个源对象复制到目标对象。它将返回目标对象。
     * const target = { a: 1, b: 2 };
     * const source = { b: 4, c: 5 };
     * const returnedTarget = Object.assign(target, source);
     * console.log(target);
     * expected output: Object { a: 1, b: 4, c: 5 }
     */
    options = Object.assign(this.getInsideConfig(), options);
    this.interceptors(instance, options.url);
    return instance(options);
  }
}

export default HttpRequest;
login.vue:
<template>
  <div>
    <div>
      <input v-model="userName">
    </div>
    <div>
      <input type="password" v-model="password">
    </div>
    <div>
      <button @click="handleSubmit">登录</button>
    </div>
  </div>
</template>
<script>
import { mapActions } from "vuex";
export default {
  name: "login_page",
  data() {
    return {
      userName: "",
      password: ""
    };
  },
  methods: {
    ...mapActions(["login"]),
    handleSubmit() {
      this.login({
        userName: this.userName,
        password: this.password
      })
        .then(() => {
          console.log("success!!");
          this.$router.push({
            name: "home"
          });
        })
        .catch(error => {
          console.log(error);
        });
    }
  }
};
</script>
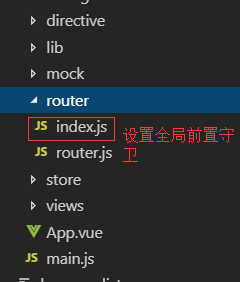
/src/router/index.js:跳转到任何页面前都要验证token
import Vue from "vue";
import Router from "vue-router";
import routes from "./router";
import store from "@/store";
import { setTitle, setToken, getToken } from "@/lib/util";

Vue.use(Router);

const router = new Router({
  routes
});

const HAS_LOGINED = false;
//全局前置守卫
/*
to: Route: 即将要进入的目标 路由对象
from: Route: 当前导航正要离开的路由
next: Function: 一定要调用该方法来 resolve 这个钩子
 */
//模拟登陆验证逻辑:当跳转页面为登陆页面且已经登陆时,直接跳转到home页面,如果跳转页面不为登录页且已经登陆,则继续执行,否则直接跳转到登录页
router.beforeEach((to, from, next) => {
  to.meta && setTitle(to.meta.title);
  debugger
  const token = getToken();
  if (token) {
    store
      .dispatch("authorization", token)
      .then(() => {
        if (to.name == "login") {
          next({ name: "home" });
        } else {
          next();
        }
      })
      .catch(() => {
        setToken("");
        next({ name: "login" });
      });
  } else {
    if (to.name === "login") next();
    else next({ name: "login" });
  }
});

export default router;
src/views/Home.vue:包含登出效果:清除cookie,页面跳转到login.vue
  <template>
  <div class="home">
    <b>{{ food }}</b>
    <button @click="handleClick('back')">返回上一页</button>
    <button @click="handleClick('push')">跳转到parent</button>
    <button @click="handleClick('replace')">替换到parent</button>
    <button @click="getInfo">请求数据</button>
    <button @click="handleLogout">退出登录</button>
  </div>
</template>

  <script>
// @ is an alias to /src
import HelloWorld from "@/components/HelloWorld.vue";
import { getUserInfo } from '@/api/user'
import { mapActions } from 'vuex'
export default {
  name: "home",
  components: {
    HelloWorld
  },
  props: {
    food: {
      type: String,
      default: "apple"
    }
  },
  beforeRouteEnter(to, from, next) {
    // 在渲染该组件的对应路由被 confirm 前调用
    // 不!能!获取组件实例 `this`
    // 因为当守卫执行前,组件实例还没被创建
    next(vm => {
      //若想使用实例,可使用这种方法
      console.log(vm);
    });
  },
  beforeRouteLeave(to, from, next) {
    // const leave = confirm('您确定要离开吗?')
    // if (leave) next()
    // else next(false)
    next();
  },
  methods: {
    ...mapActions([
      'logout'
    ]),
    handleClick(type) {
      if (type === "back") {
        //this.$router.back();
        this.$router.go(-1);
      } else if (type === "push") {
        const name = "caoqi";
        //使用push会在浏览器中加入一个记录
        //使用路径跳转
        //this.$router.push("/parent");
        //还可以使用命名路由的方式:
        this.$router.push({
          // name: "parent",
          // //加入name参数,http://localhost:8080/#/parent?name=caoqi
          // query: {
          //   name: 'caoqi'
          // }

          // name: "argu",
          // //加入name参数,http://localhost:8080/#/argu/caoqi
          // params: {
          //   name: 'caoqi'
          // }

          //ES6写法:
          path: `/argu/${name}`
        });
      } else if (type === "replace") {
        //使用replace不会在浏览历史中加入记录
        this.$router.replace({
          name: "parent"
        });
      }
    },
    getInfo() {
      getUserInfo({ userId: 21 }).then(res => {
        console.log("res: ", res);
      });
    },
    handleLogout () {
      this.logout()
      this.$router.push({
        name: 'login'
      })
   }
  }
};
</script>
效果图:(一开始登录失败,因为后台设置了密码为123,登录成功后,如果在cookie有效的时间段内,登录系统其它页面则无需登录,若把cookie清除则再查看系统其它页面,则直接跳转到登录页进行登录操作)