手动计算球面顶点的坐标,纹理坐标,来画球并贴纹理
其中createSphereGeom()函数的的二个参数为18,意思是在经纬度上每10度设一个点,因为经度一共是180度,180/18=10,相当于横着把球分为18份,每一份相当于一个圆盘,然后再把圆盘分为18*2=36份,每一份相当于一个扇形。
由于要贴纹理,所以在实现的时候,最上面的一个顶点是36+1=37个顶点重合了,最下面的一个顶点一样,中间每一圈的最开始的顶点和最后一个顶点重合,每一圈都有36+1=37个顶点,总共有(36+1)*(18+1)=703个顶点。
为什么每一圈是37个顶点而不是36,其实如果不贴纹理就只是画球,那36个顶点就可以了,但是纹理是一张矩形的图片,你要把一个矩形上的每个点映射到球面上,那每一圈就需要多一个点。
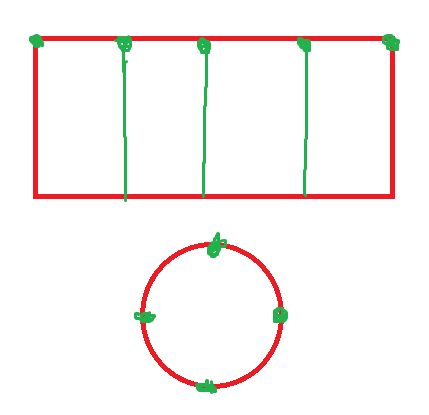
如下图,把一张纸分为4份,上面有5个点,再把这张纸卷成圆筒,最左边和最右边的点重合了,看起来就只有4个点了。当然如果不需要贴纹理,那就不用重合的点了。
纹理的坐标原点是在左下角,为了和物体位置的坐标xyz区分,纹理坐标叫做str,s相当于x,t相当y。s是横坐标,t是纵坐标。
下面看完整的代码,想要运行,你需要安装好osg
#include <math.h>
#include <osg/Geode>
#include <osg/Group>
#include <osg/Vec3>
#include <osg/Geometry>
#include <osg/ref_ptr>
#include <osg/Vec2>
#include <osg/Texture2D>
#include <osgDB/ReadFile>
#include <osgViewer/Viewer>
#include <osgViewer/ViewerEventHandlers>
#include <osgGA/StateSetManipulator>
/**
@brief : 创建一个球的几何节点
@param : [in] dRadius 球的半径
@param : [in] iHint 每180/iHint度设置一个点,默认18
@return: 一个球的osg::Geometry*
*/
osg::Geometry* createSphereGeom(double dRadius = 1., int iHint = 18)
{
osg::ref_ptr<osg::Geometry> rpGeom = new osg::Geometry;
osg::ref_ptr<osg::Vec3Array> rpVertexes = new osg::Vec3Array;//顶点数组
osg::ref_ptr<osg::Vec3Array> rpNormal = new osg::Vec3Array;//法线数组
osg::ref_ptr<osg::Vec2Array> rpTexCoord = new osg::Vec2Array;//纹理数组
for (int i = 0; i <= iHint; i++)//从上到下添加点,有等于号是为了之后贴纹理时可以和图片的点一一对应
{
for (int j = 0; j <= iHint * 2; j++)//逆时针添加点
{
osg::Vec3 vec3VertexT(
sin(osg::PI*i / iHint)*cos(osg::PI*j / iHint),
sin(osg::PI*i / iHint)*sin(osg::PI*j / iHint),
cos(osg::PI*i / iHint));//球面坐标公式
rpVertexes->push_back(vec3VertexT * dRadius);//添加顶点
rpNormal->push_back(vec3VertexT);//添加法线
rpTexCoord->push_back(osg::Vec2(double(j) / 2.0 / iHint
, 1 - double(i) / iHint));//添加纹理坐标
}
}
osg::ref_ptr<osg::Vec4Array> rpColors = new osg::Vec4Array;
rpColors->push_back(osg::Vec4(1.0, 1.0, 1.0, 1.0));
rpGeom->setVertexArray(rpVertexes);
rpGeom->setNormalArray(rpNormal);
rpGeom->setNormalBinding(osg::Geometry::BIND_PER_VERTEX);
rpGeom->setColorArray(rpColors);
rpGeom->setColorBinding(osg::Geometry::BIND_OVERALL);
rpGeom->setTexCoordArray(0, rpTexCoord);
//添加图元
osg::ref_ptr<osg::DrawElementsUInt> rpFace = new osg::DrawElementsUInt(osg::PrimitiveSet::TRIANGLE_STRIP);
for (int i = 0; i < iHint; i++) {
for (int j = 0; j <= iHint * 2; j++) {
rpFace->push_back(i*(iHint * 2 + 1) + j);
rpFace->push_back((i + 1)*(iHint * 2 + 1) + j);
}
}
rpGeom->addPrimitiveSet(rpFace);
return rpGeom.release();
}
/**
@brief : 给球贴纹理
@param : [in/out] pNode 球的节点
@return:
*/
void setTex(osg::Node* pNode)
{
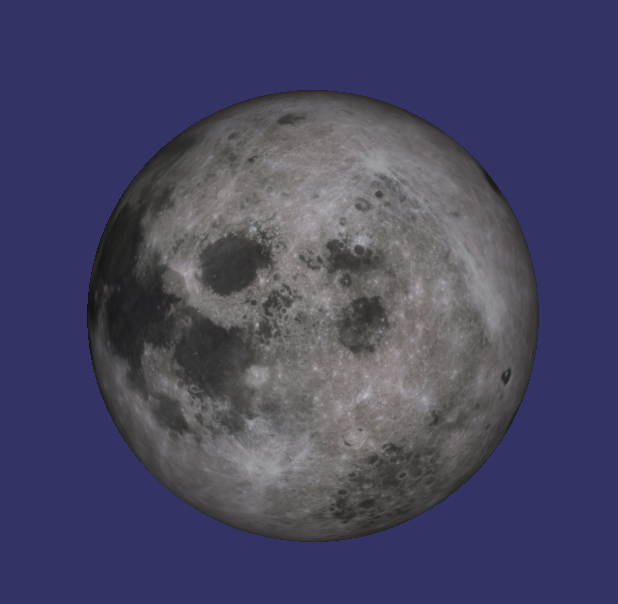
osg::ref_ptr<osg::Image> rpImage = osgDB::readImageFile("../star/moon.jpg");
osg::ref_ptr<osg::Texture2D> rpTexture = new osg::Texture2D();
rpTexture->setImage(rpImage);
rpTexture->setWrap(osg::Texture::WRAP_S, osg::Texture::CLAMP_TO_EDGE);//设置S方向的环绕模式
rpTexture->setWrap(osg::Texture::WRAP_T, osg::Texture::CLAMP_TO_EDGE);//设置R方向的环绕模式
//rpTextureT->setFilter(osg::Texture::MIN_FILTER, osg::Texture::LINEAR_MIPMAP_NEAREST);
//rpTextureT->setFilter(osg::Texture::MAG_FILTER, osg::Texture::LINEAR);
osg::ref_ptr<osg::StateSet> pState = pNode->getOrCreateStateSet();
pState->setTextureAttributeAndModes(0, rpTexture, osg::StateAttribute::ON);
}
int main(int argc, char** argv)
{
osg::ref_ptr<osgViewer::Viewer> rpViewer = new osgViewer::Viewer();
osg::ref_ptr<osg::Group> rpRoot = new osg::Group();
osg::ref_ptr<osg::Geode> rpGeode = new osg::Geode;
rpGeode->addChild(createSphereGeom(1., 45));
setTex(rpGeode);//在球上贴纹理
rpRoot->addChild(rpGeode);
rpViewer->setSceneData(rpRoot);
rpViewer->addEventHandler(new osgGA::StateSetManipulator(rpViewer->getCamera()->getOrCreateStateSet()));//添加w事件处理
rpViewer->addEventHandler(new osgViewer::StatsHandler);//添加s事件处理
rpViewer->run();
return 0;
}
程序运行截图
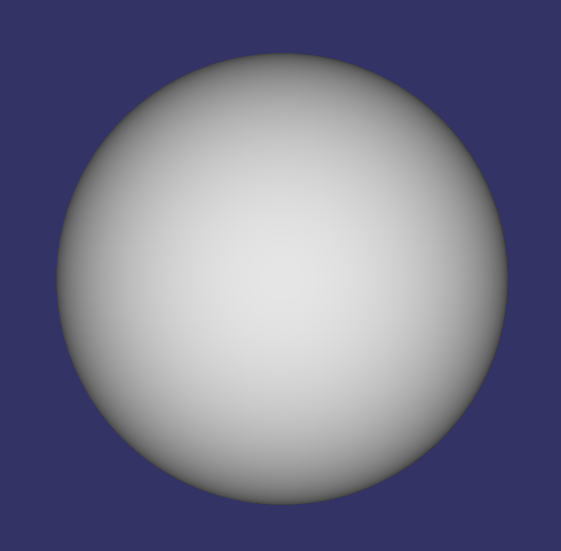
未贴纹理的球:
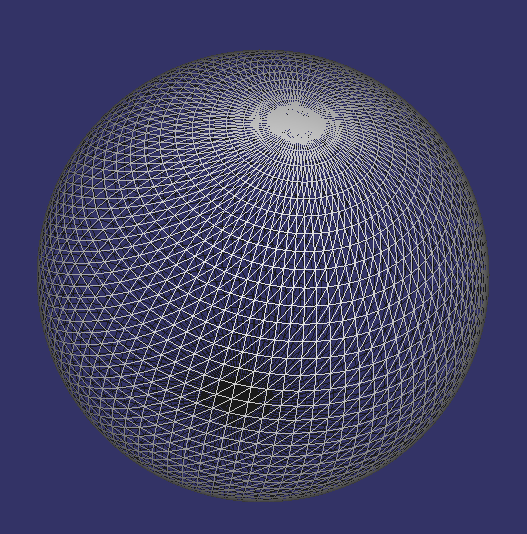
隐藏表面,只显示线的球,即按w键后的球:
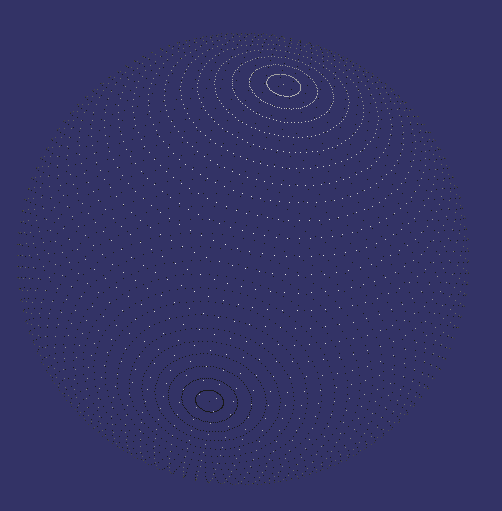
只显示点的球: