1、简述lvs四种集群特点及使用场景
LVS集群有4种类型,分别是NAT、DR、TUN、FULLNAT
从工作方式来讲,NAT和FULLNAT都要修改请求报文的目标IP和目标端口(NAT)或源IP目标IP或源端口目标端口(FULLNAT),通常情况下,不建议修改源端口。这两种集群的特点是,请求报文和响应报文都要经由DIRECTOR(调度器),在NAT类型的集群中,后端real server一般都是和director在同一网段,且为私网地址。director应该是后端各real server 的网关。而FULLNAT各real server 的ip未必都在同一IP网络,但后端主机必须能与director通信即可。通常这两种类型的集群应用比较多的是NAT,FULLNAT应用比较少,且FULLNAT是非标准应用,所以我们要在使用FULLNAT时还需要额外的给Linux内核打补丁才能使用;NAT通常应用在一些请求流量没有太大的集群环境中,且director和各后端real server在同一IP网网络,一般用于隐藏后端主机的真实地址;FULLNAT常用于后端主机和director不再同一IP网络,但他们又可以正常通行的跨网段的内网集群环境中使用;
DR和TUN这两种类型的集群在用户请求报文上都没有修改操作,只是在原来的请求报文上各自封装了一个新的mac首部(DR)或ip首部(TUN);这两种类型的集群都有这样的特点,请求报文经由director,响应报文则由各real server各自响应给客户端,这样一来,各real server上就必须配置VIP地址;DR类型的集群的director必须同后端各real server在同一物理网络,简单说就是他们之间不能有路由器,原因是DR是基于在原来的请求报文前封装一个MAC首部,源MAC为DIP,目标MAC为后端real server 中的其中一个RS的MAC;通常这种集群应用在流量特别大,用来做进站流量接收器来用,通常情况LVS把前端流量接进来交给后端的调度器(这种调度器是基于更好的匹配算法来调度,比如基于请求报文的URL做调度),这种常用于多级调度的集群环境中;而TUN类型的集群,它和DR类似,都是请求报文经由director 响应报文由各real server 自己响应给客户端,响应报文不经由director,这种类型的集群DIP和各后端real server都不在同一机房或同一局域网,通常都是各real server在一个公网环境中(对real server来讲 出口地址都不是同一个);这种集群的实现是通过在原请求报文的外边封装IP首部,其中源IP是DIP目标IP是RIP,且这种集群环境中各real server必须能够支持并识别tun类型的报文(简单说就是双IP首部的报文);通常这种集群应用在多个real server 不同一公网ip地址下,且各real server相距很远时(跨机房、跨地市州等);
2、描述LVS-DR工作原理,并配置实现。

如上图所示,LVS-DR类型的集群它的工作逻辑上这样的,客户端请求vip,当报文到达LVS服务器时,LVS服务器会对收到的报文进行查看,它看到目标IP是VIP,且自己有VIP,然后它就把报文送到INPUT链上去,在INPUT链上进行规则匹配,这时我们在LVS上写的规则,定义的集群,当匹配到该报文是集群服务时,它会把原来的请求报文原封不动的,然后在该报文外边封装一个MAC首部,这个MAC首部的源MAC就是DIP所在的接口MAC地址,目标MAC是经过调度算法得到一个RIP,然后通过ARP广播拿到对应RIP对应接口上的MAC,然后把这个封装好的报文直接转发出去。当报文从LVS服务器的DIP所在接口发出后,交换机会通过目标MAC把这个报文送到对应的RIP接口上去,RIP收到封装后的报文后,一看目标MAC是自己,然后它就把MAC首部给拆了,然后拿到客户端的请求报文,一看目标IP也是自己,然后它就拆IP首部,然后拿到客户端的请求信息,然后它会根据客户端的请求信息给出对应的响应;在RS封装响应报文时,它会把VIP封装成源IP,把客户端IP封装成目标IP,然后通过VIP所在接口发送出去(这是因为它收到报文时,是从VIP所在接口拿到的请求报文,响应报文会从请求报文进来的接口发送出去);这时的响应报文会根据目标IP,层层路由最后送到客户端;客户端收到报文后,看目标IP是自己的IP,然后它就拆除IP首部拿到服务端给出的响应;
以上就是LVS-DR类型处理报文的过程,接下来我们搭建一个以上面top图为例的实验环境
环境说明:
客户端:192.168.0.99 LVS服务器:VIP是192.168.0.222 DIP是:192.168.0.10 后端RS1的IP是:192.168.0.20 RS2的IP是192.168.0.30 VIP是192.168.0.222
1)准备2台RS并安装配置好web服务(2台RS目前IP是192.168.0.20和30先配置好web服务,并提供一个测试页面,这两个测试页面有意不同,方便我们看出调度到那台RS上去了)
[root@dr ~]# curl http://192.168.0.20/test.html
<h1>RS1,192.168.0.20</h1>
[root@dr ~]# curl http://192.168.0.30/test.html
<h1>RS2,192.168.0.30</h1>
[root@dr ~]#
提示:配置好web服务后,dr是能够访问得到
2)修改内核参数,让其两个RS配置的VIP不对局域网做ARP通报和ARP请求响应,同时配置路由,目标IP为VIP的报文转发至VIP所在接口,并在各RS上配置好VIP
为了配置方便我们可以写脚本,然后执行脚本即可
[root@rs1 ~]# cat setparam.sh
#/bin/bash


vip='192.168.0.222'
mask='255.255.255.255'
interface='lo:0'

case $1 in
start)
        echo 2 > /proc/sys/net/ipv4/conf/all/arp_announce
        echo 2 > /proc/sys/net/ipv4/conf/lo/arp_announce
        echo 1 > /proc/sys/net/ipv4/conf/all/arp_ignore
        echo 1 > /proc/sys/net/ipv4/conf/lo/arp_ignore
        ifconfig $interface  $vip netmask $mask broadcast $vip up
        route add -host $vip dev $interface
        ;;
stop)
        ifconfig $interface down
        echo 0 >/proc/sys/net/ipv4/conf/all/arp_announce
        echo 0 >/proc/sys/net/ipv4/conf/lo/arp_announce
        echo 0 >/proc/sys/net/ipv4/conf/all/arp_ignore
        echo 0 >/proc/sys/net/ipv4/conf/lo/arp_ignore
        ;;
*)
        echo "Usage:bash $0 start|stop"
        exit 1
        ;;
esac
[root@rs1 ~]#
提示:以上脚本的意思就是设置内核参数,然后把VIP绑定到lo:0,添加主机路由
[root@rs1 ~]# ifconfig
ens33: flags=4163<UP,BROADCAST,RUNNING,MULTICAST>  mtu 1500
        inet 192.168.0.20  netmask 255.255.255.0  broadcast 192.168.0.255
        ether 00:0c:29:96:23:23  txqueuelen 1000  (Ethernet)
        RX packets 31990  bytes 42260814 (40.3 MiB)
        RX errors 0  dropped 0  overruns 0  frame 0
        TX packets 23112  bytes 1983590 (1.8 MiB)
        TX errors 0  dropped 0 overruns 0  carrier 0  collisions 0

lo: flags=73<UP,LOOPBACK,RUNNING>  mtu 65536
        inet 127.0.0.1  netmask 255.0.0.0
        inet6 ::1  prefixlen 128  scopeid 0x10<host>
        loop  txqueuelen 1  (Local Loopback)
        RX packets 259  bytes 21752 (21.2 KiB)
        RX errors 0  dropped 0  overruns 0  frame 0
        TX packets 259  bytes 21752 (21.2 KiB)
        TX errors 0  dropped 0 overruns 0  carrier 0  collisions 0

[root@rs1 ~]# bash -x setparam.sh start
+ vip=192.168.0.222
+ mask=255.255.255.255
+ interface=lo:0
+ case $1 in
+ echo 2
+ echo 2
+ echo 1
+ echo 1
+ ifconfig lo:0 192.168.0.222 netmask 255.255.255.255 broadcast 192.168.0.222 up
+ route add -host 192.168.0.222 dev lo:0
[root@rs1 ~]# cat /proc/sys/net/ipv4/conf/all/arp_announce
2
[root@rs1 ~]# cat /proc/sys/net/ipv4/conf/all/arp_ignore
1
[root@rs1 ~]# cat /proc/sys/net/ipv4/conf/lo/arp_announce
2
[root@rs1 ~]# cat /proc/sys/net/ipv4/conf/lo/arp_ignore
1
[root@rs1 ~]# route -n
Kernel IP routing table
Destination     Gateway         Genmask         Flags Metric Ref    Use Iface
0.0.0.0         192.168.0.1     0.0.0.0         UG    100    0        0 ens33
192.168.0.0     0.0.0.0         255.255.255.0   U     100    0        0 ens33
192.168.0.222   0.0.0.0         255.255.255.255 UH    0      0        0 lo
[root@rs1 ~]# ifconfig
ens33: flags=4163<UP,BROADCAST,RUNNING,MULTICAST>  mtu 1500
        inet 192.168.0.20  netmask 255.255.255.0  broadcast 192.168.0.255
        ether 00:0c:29:96:23:23  txqueuelen 1000  (Ethernet)
        RX packets 32198  bytes 42279504 (40.3 MiB)
        RX errors 0  dropped 0  overruns 0  frame 0
        TX packets 23266  bytes 2001218 (1.9 MiB)
        TX errors 0  dropped 0 overruns 0  carrier 0  collisions 0

lo: flags=73<UP,LOOPBACK,RUNNING>  mtu 65536
        inet 127.0.0.1  netmask 255.0.0.0
        inet6 ::1  prefixlen 128  scopeid 0x10<host>
        loop  txqueuelen 1  (Local Loopback)
        RX packets 259  bytes 21752 (21.2 KiB)
        RX errors 0  dropped 0  overruns 0  frame 0
        TX packets 259  bytes 21752 (21.2 KiB)
        TX errors 0  dropped 0 overruns 0  carrier 0  collisions 0

lo:0: flags=73<UP,LOOPBACK,RUNNING>  mtu 65536
        inet 192.168.0.222  netmask 255.255.255.255
        loop  txqueuelen 1  (Local Loopback)

[root@rs1 ~]#
提示:可以看到我们执行脚本后,对应的内核参数都已经设置好,VIP和相关路由也都添加成功;同样RS2也只需要把上面的脚本拿过去运行一遍即可
3)在LVS服务器上配置VIP,定义集群服务
3.1)首先给director绑定VIP
[root@dr ~]# ifconfig
ens33: flags=4163<UP,BROADCAST,RUNNING,MULTICAST>  mtu 1500
        inet 192.168.0.10  netmask 255.255.255.0  broadcast 192.168.0.255
        inet6 fe80::20c:29ff:fef2:820c  prefixlen 64  scopeid 0x20<link>
        ether 00:0c:29:f2:82:0c  txqueuelen 1000  (Ethernet)
        RX packets 11135  bytes 9240712 (8.8 MiB)
        RX errors 0  dropped 0  overruns 0  frame 0
        TX packets 7705  bytes 754318 (736.6 KiB)
        TX errors 0  dropped 0 overruns 0  carrier 0  collisions 0

lo: flags=73<UP,LOOPBACK,RUNNING>  mtu 65536
        inet 127.0.0.1  netmask 255.0.0.0
        inet6 ::1  prefixlen 128  scopeid 0x10<host>
        loop  txqueuelen 1  (Local Loopback)
        RX packets 70  bytes 5804 (5.6 KiB)
        RX errors 0  dropped 0  overruns 0  frame 0
        TX packets 70  bytes 5804 (5.6 KiB)
        TX errors 0  dropped 0 overruns 0  carrier 0  collisions 0

[root@dr ~]# ifconfig ens33:0 192.168.0.222 netmask 255.255.255.255 broadcast 192.168.0.222 up
[root@dr ~]# ifconfig
ens33: flags=4163<UP,BROADCAST,RUNNING,MULTICAST>  mtu 1500
        inet 192.168.0.10  netmask 255.255.255.0  broadcast 192.168.0.255
        inet6 fe80::20c:29ff:fef2:820c  prefixlen 64  scopeid 0x20<link>
        ether 00:0c:29:f2:82:0c  txqueuelen 1000  (Ethernet)
        RX packets 11277  bytes 9253418 (8.8 MiB)
        RX errors 0  dropped 0  overruns 0  frame 0
        TX packets 7800  bytes 765238 (747.3 KiB)
        TX errors 0  dropped 0 overruns 0  carrier 0  collisions 0

ens33:0: flags=4163<UP,BROADCAST,RUNNING,MULTICAST>  mtu 1500
        inet 192.168.0.222  netmask 255.255.255.255  broadcast 192.168.0.222
        ether 00:0c:29:f2:82:0c  txqueuelen 1000  (Ethernet)

lo: flags=73<UP,LOOPBACK,RUNNING>  mtu 65536
        inet 127.0.0.1  netmask 255.0.0.0
        inet6 ::1  prefixlen 128  scopeid 0x10<host>
        loop  txqueuelen 1  (Local Loopback)
        RX packets 70  bytes 5804 (5.6 KiB)
        RX errors 0  dropped 0  overruns 0  frame 0
        TX packets 70  bytes 5804 (5.6 KiB)
        TX errors 0  dropped 0 overruns 0  carrier 0  collisions 0

[root@dr ~]#
3.2)添加集群服务
[root@dr ~]# ipvsadm -Ln
IP Virtual Server version 1.2.1 (size=4096)
Prot LocalAddress:Port Scheduler Flags
  -> RemoteAddress:Port           Forward Weight ActiveConn InActConn
[root@dr ~]# ipvsadm -A -t 192.168.0.222:80 -s rr
[root@dr ~]# ipvsadm -a -t 192.168.0.222:80 -r 192.168.0.20 -g
[root@dr ~]# ipvsadm -a -t 192.168.0.222:80 -r 192.168.0.30 -g
[root@dr ~]# ipvsadm -Ln
IP Virtual Server version 1.2.1 (size=4096)
Prot LocalAddress:Port Scheduler Flags
  -> RemoteAddress:Port           Forward Weight ActiveConn InActConn
TCP  192.168.0.222:80 rr
  -> 192.168.0.20:80              Route   1      0          0
  -> 192.168.0.30:80              Route   1      0          0
[root@dr ~]#
提示:以上规则表示添加一个集群服务192.168.0.222:80,调度算法是rr(轮询),在集群服务下添加了2个real server 分别是192.168.0.20和192.168.0.30,并且添加为DR类型
4)测试
用客户端192.168.0.99 去访问VIP

提示:可以看到客户端是能够访问的,并且是轮询的方式访问后端服务器。我们更换一个调度算法,再来试试
[root@dr ~]# ipvsadm -Ln
IP Virtual Server version 1.2.1 (size=4096)
Prot LocalAddress:Port Scheduler Flags
  -> RemoteAddress:Port           Forward Weight ActiveConn InActConn
TCP  192.168.0.222:80 rr
  -> 192.168.0.20:80              Route   1      0          5
  -> 192.168.0.30:80              Route   1      0          5
[root@dr ~]# ipvsadm -E -t 192.168.0.222:80 -s sh
[root@dr ~]# ipvsadm -Ln
IP Virtual Server version 1.2.1 (size=4096)
Prot LocalAddress:Port Scheduler Flags
  -> RemoteAddress:Port           Forward Weight ActiveConn InActConn
TCP  192.168.0.222:80 sh
  -> 192.168.0.20:80              Route   1      0          0
  -> 192.168.0.30:80              Route   1      0          0
[root@dr ~]#
提示:以上规则表示更改集群服务192.168.0.222:80的调度算法为sh
提示:可以看到我们更换了算法后,也就立刻生效了。以上就是LVS-DR类型的集群实现,这里需要提醒一点的是如果VIP和DIP不再同一网段,需要考虑后端real server 怎么将响应报文送出去;
3、实现LVS+Keepalived高可用。
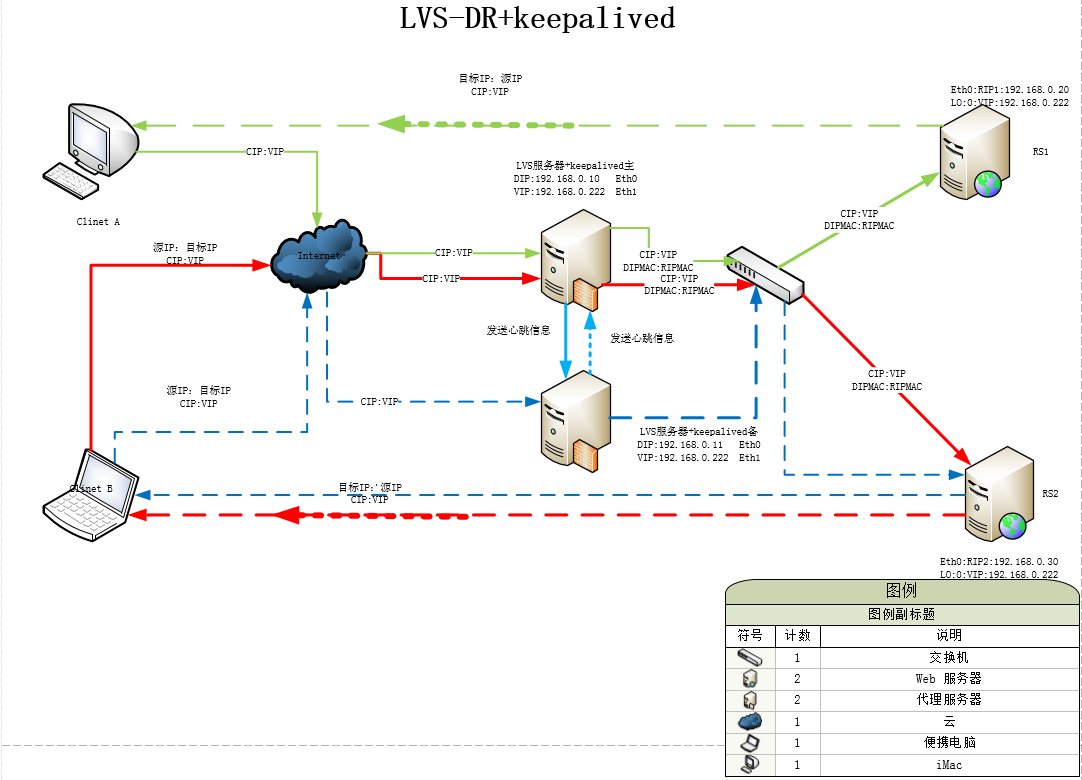
首先来解释下上面的图,当keepalived主节点正常时,数据报文会和原来LVS集群的数据报文流向一样,如图中红色或绿色实线是请求报文的走向,红色或绿色虚线是响应报文的走向;当keepalived主节点宕机后,备份节点会通过心跳信息去判断主节点是否在线,如果在规定的时间探测到主节点没在线后,备份节点会立刻把VIP抢过来,然后提供服务。这时新来的请求就会通过备份节点去处理新的请求,从而实现,服务高可用,避免单点失败的问题;图上蓝色虚线表示主节点宕机后,备份节点处理请求和响应报文的过程。
按照上图,我们需要在LVS集群上加一台服务器,并且需要在原有的LVS集群的调度器上安装配置keepalived服务,如上图
1)在两个调度器上安装keepalived
[root@dr1 ~]# yum install -y keepalived
Loaded plugins: fastestmirror
epel                                                                       | 5.4 kB  00:00:00
my_base                                                                    | 3.6 kB  00:00:00
(1/2): epel/x86_64/updateinfo                                              | 1.0 MB  00:00:00
(2/2): epel/x86_64/primary_db                                              | 6.7 MB  00:00:01
Loading mirror speeds from cached hostfile
Resolving Dependencies
--> Running transaction check
---> Package keepalived.x86_64 0:1.3.5-1.el7 will be installed
--> Processing Dependency: libnetsnmpmibs.so.31()(64bit) for package: keepalived-1.3.5-1.el7.x86_64
--> Processing Dependency: libnetsnmpagent.so.31()(64bit) for package: keepalived-1.3.5-1.el7.x86_64
--> Processing Dependency: libnetsnmp.so.31()(64bit) for package: keepalived-1.3.5-1.el7.x86_64
--> Running transaction check
---> Package net-snmp-agent-libs.x86_64 1:5.7.2-28.el7 will be installed
--> Processing Dependency: libsensors.so.4()(64bit) for package: 1:net-snmp-agent-libs-5.7.2-28.el7.x86_64
---> Package net-snmp-libs.x86_64 1:5.7.2-28.el7 will be installed
--> Running transaction check
---> Package lm_sensors-libs.x86_64 0:3.4.0-4.20160601gitf9185e5.el7 will be installed
--> Finished Dependency Resolution

Dependencies Resolved

==================================================================================================
 Package                   Arch         Version                               Repository     Size
==================================================================================================
Installing:
 keepalived                x86_64       1.3.5-1.el7                           my_base       327 k
Installing for dependencies:
 lm_sensors-libs           x86_64       3.4.0-4.20160601gitf9185e5.el7        my_base        41 k
 net-snmp-agent-libs       x86_64       1:5.7.2-28.el7                        my_base       704 k
 net-snmp-libs             x86_64       1:5.7.2-28.el7                        my_base       748 k

Transaction Summary
==================================================================================================
Install  1 Package (+3 Dependent packages)

Total download size: 1.8 M
Installed size: 6.0 M
Downloading packages:
(1/4): lm_sensors-libs-3.4.0-4.20160601gitf9185e5.el7.x86_64.rpm           |  41 kB  00:00:00
(2/4): keepalived-1.3.5-1.el7.x86_64.rpm                                   | 327 kB  00:00:00
(3/4): net-snmp-agent-libs-5.7.2-28.el7.x86_64.rpm                         | 704 kB  00:00:00
(4/4): net-snmp-libs-5.7.2-28.el7.x86_64.rpm                               | 748 kB  00:00:00
--------------------------------------------------------------------------------------------------
Total                                                             1.9 MB/s | 1.8 MB  00:00:00
Running transaction check
Running transaction test
Transaction test succeeded
Running transaction
  Installing : 1:net-snmp-libs-5.7.2-28.el7.x86_64                                            1/4
  Installing : lm_sensors-libs-3.4.0-4.20160601gitf9185e5.el7.x86_64                          2/4
  Installing : 1:net-snmp-agent-libs-5.7.2-28.el7.x86_64                                      3/4
  Installing : keepalived-1.3.5-1.el7.x86_64                                                  4/4
  Verifying  : 1:net-snmp-libs-5.7.2-28.el7.x86_64                                            1/4
  Verifying  : 1:net-snmp-agent-libs-5.7.2-28.el7.x86_64                                      2/4
  Verifying  : lm_sensors-libs-3.4.0-4.20160601gitf9185e5.el7.x86_64                          3/4
  Verifying  : keepalived-1.3.5-1.el7.x86_64                                                  4/4

Installed:
  keepalived.x86_64 0:1.3.5-1.el7

Dependency Installed:
  lm_sensors-libs.x86_64 0:3.4.0-4.20160601gitf9185e5.el7
  net-snmp-agent-libs.x86_64 1:5.7.2-28.el7
  net-snmp-libs.x86_64 1:5.7.2-28.el7

Complete!
[root@dr1 ~]#
提示:keepalived包来自base包,不需要额外配置epel源,在DR2上也是同样的操作安装好keepalived包
2)编写邮件通知脚本
[root@dr1 ~]# cat /etc/keepalived/notify.sh
#!/bin/bash
#
contact='root@localhost'
notify() {
local mailsubject="$(hostname) to be $1, vip floating"
local mailbody="$(date +'%F %T'): vrrp transition, $(hostname) changed to be $1"
echo "$mailbody" | mail -s "$mailsubject" $contact
}

case $1 in
master)
        notify master
        ;;
backup)
        notify backup
        ;;
fault)
        notify fault
        ;;
*)
        echo "Usage: $(basename $0) {master|backup|fault}"
        exit 1
        ;;
esac
[root@dr1 ~]# chmod +x /etc/keepalived/notify.sh
[root@dr1 ~]# ll /etc/keepalived/notify.sh
-rwxr-xr-x 1 root root 405 Feb 21 19:52 /etc/keepalived/notify.sh
[root@dr1 ~]#
提示:以上脚本主要思想是通过传递不同状态的参数,然后相应的发送不同状态的邮件
3)在DR上面安装sorry_sever
[root@dr1 ~]# yum install -y nginx
Loaded plugins: fastestmirror
Loading mirror speeds from cached hostfile
Resolving Dependencies
--> Running transaction check
---> Package nginx.x86_64 1:1.16.1-1.el7 will be installed
--> Processing Dependency: nginx-all-modules = 1:1.16.1-1.el7 for package: 1:nginx-1.16.1-1.el7.x86_64
--> Processing Dependency: nginx-filesystem = 1:1.16.1-1.el7 for package: 1:nginx-1.16.1-1.el7.x86_64
--> Processing Dependency: nginx-filesystem for package: 1:nginx-1.16.1-1.el7.x86_64
……省略部分信息
Installed:
  nginx.x86_64 1:1.16.1-1.el7

Dependency Installed:
  centos-indexhtml.noarch 0:7-9.el7.centos     fontconfig.x86_64 0:2.10.95-11.el7
  fontpackages-filesystem.noarch 0:1.44-8.el7  gd.x86_64 0:2.0.35-26.el7
  gperftools-libs.x86_64 0:2.4-8.el7           libX11.x86_64 0:1.6.5-1.el7
  libX11-common.noarch 0:1.6.5-1.el7           libXau.x86_64 0:1.0.8-2.1.el7
  libXpm.x86_64 0:3.5.12-1.el7                 libjpeg-turbo.x86_64 0:1.2.90-5.el7
  libpng.x86_64 2:1.5.13-7.el7_2               libunwind.x86_64 2:1.2-2.el7
  libxcb.x86_64 0:1.12-1.el7                   libxslt.x86_64 0:1.1.28-5.el7
  lyx-fonts.noarch 0:2.2.3-1.el7               nginx-all-modules.noarch 1:1.16.1-1.el7
  nginx-filesystem.noarch 1:1.16.1-1.el7       nginx-mod-http-image-filter.x86_64 1:1.16.1-1.el7
  nginx-mod-http-perl.x86_64 1:1.16.1-1.el7    nginx-mod-http-xslt-filter.x86_64 1:1.16.1-1.el7
  nginx-mod-mail.x86_64 1:1.16.1-1.el7         nginx-mod-stream.x86_64 1:1.16.1-1.el7

Complete!
[root@dr1 ~]#
提示:在RS2上也是同样的操作
给sorry server 一个测试主页
[root@dr1 ~]# cat /usr/share/nginx/html/index.html
<h1>sorry server 192.168.0.10</h1>
[root@dr1 ~]#
[root@dr2 ~]# cat /usr/share/nginx/html/index.html
<h1>sorry server 192.168.0.11<h1>
[root@dr2 ~]#
提示:这两个页面可以是一样的内容,我们为了区分,故意给出不一样的页面。
启动服务
[root@dr1 ~]# systemctl start nginx
[root@dr1 ~]# curl http://127.0.0.1
<h1>sorry server 192.168.0.10</h1>
[root@dr1 ~]#
[root@dr2 ~]# systemctl start nginx
[root@dr2 ~]# curl http://127.0.0.1
<h1>sorry server 192.168.0.11<h1>
[root@dr2 ~]#
提示:可以看到两个DR上面各自的sorry server都启动,并能够访问
4)配置主节点keepalived
1)在配置前需要确认服务器的各时间是否同步,通常情况下,我们会把一个集群的所有主机都指向一台时间服务器,用来同步时间,有关时间服务器搭建可参考本人博客https://www.cnblogs.com/qiuhom-1874/p/12079927.html
[root@dr1 ~]# grep "^server" /etc/chrony.conf
server 192.168.0.99 iburst
[root@dr1 ~]#

[root@dr2 ~]#  grep "^server" /etc/chrony.conf
server 192.168.0.99 iburst
[root@dr2 ~]#

[root@rs1 ~]#  grep "^server" /etc/chrony.conf
server 192.168.0.99 iburst
[root@rs1 ~]#

[root@rs2 ~]#  grep "^server" /etc/chrony.conf
server 192.168.0.99 iburst
[root@rs2 ~]#
提示:把时间服务器地址执行同一个时间服务器,然后重启服务即可同步时间
2)确保iptables及selinux不会成为阻碍;
[root@dr1 ~]# getenforce
Disabled
[root@dr1 ~]# iptables -nvL
Chain INPUT (policy ACCEPT 0 packets, 0 bytes)
 pkts bytes target     prot opt in     out     source               destination

Chain FORWARD (policy ACCEPT 0 packets, 0 bytes)
 pkts bytes target     prot opt in     out     source               destination

Chain OUTPUT (policy ACCEPT 0 packets, 0 bytes)
 pkts bytes target     prot opt in     out     source               destination
[root@dr1 ~]#
提示:我们可以选择关闭selinux和iptables,在centos7上可能会有很多规则,我们可以选择添加IPTABLES或者直接将规则情况,把默认的处理动作改为ACCEPT也行;
3)各节点之间可通过主机名互相通信(对KA并非必须),建议使用/etc/hosts文件实现;
[root@dr1 ~]# cat /etc/hosts
127.0.0.1   localhost localhost.localdomain localhost4 localhost4.localdomain4
::1         localhost localhost.localdomain localhost6 localhost6.localdomain6
192.168.0.10 dr1.ilinux.io dr1
192.168.0.11 dr2.ilinux.io dr2
192.168.0.20 rs1.ilinux.io rs1
192.168.0.30 rs2.ilinux.io rs2
[root@dr1 ~]# scp /etc/hosts 192.168.0.11:/etc/
The authenticity of host '192.168.0.11 (192.168.0.11)' can't be established.
ECDSA key fingerprint is SHA256:EG9nua4JJuUeofheXlgQeL9hX5H53JynOqf2vf53mII.
ECDSA key fingerprint is MD5:57:83:e6:46:2c:4b:bb:33:13:56:17:f7:fd:76:71:cc.
Are you sure you want to continue connecting (yes/no)? yes
Warning: Permanently added '192.168.0.11' (ECDSA) to the list of known hosts.
root@192.168.0.11's password:
hosts                                                           100%  282    74.2KB/s   00:00
[root@dr1 ~]# scp /etc/hosts 192.168.0.20:/etc/
root@192.168.0.20's password:
hosts                                                           100%  282   144.9KB/s   00:00
[root@dr1 ~]# scp /etc/hosts 192.168.0.30:/etc/
root@192.168.0.30's password:
hosts                                                           100%  282    85.8KB/s   00:00
[root@dr1 ~]# ping dr1
PING dr1.ilinux.io (192.168.0.10) 56(84) bytes of data.
64 bytes from dr1.ilinux.io (192.168.0.10): icmp_seq=1 ttl=64 time=0.031 ms
64 bytes from dr1.ilinux.io (192.168.0.10): icmp_seq=2 ttl=64 time=0.046 ms
^C
--- dr1.ilinux.io ping statistics ---
2 packets transmitted, 2 received, 0% packet loss, time 1000ms
rtt min/avg/max/mdev = 0.031/0.038/0.046/0.009 ms
[root@dr1 ~]# ping dr2
PING dr2.ilinux.io (192.168.0.11) 56(84) bytes of data.
64 bytes from dr2.ilinux.io (192.168.0.11): icmp_seq=1 ttl=64 time=1.36 ms
64 bytes from dr2.ilinux.io (192.168.0.11): icmp_seq=2 ttl=64 time=0.599 ms
64 bytes from dr2.ilinux.io (192.168.0.11): icmp_seq=3 ttl=64 time=0.631 ms
^C
--- dr2.ilinux.io ping statistics ---
3 packets transmitted, 3 received, 0% packet loss, time 2003ms
rtt min/avg/max/mdev = 0.599/0.865/1.366/0.355 ms
[root@dr1 ~]# ping rs1
PING rs1.ilinux.io (192.168.0.20) 56(84) bytes of data.
64 bytes from rs1.ilinux.io (192.168.0.20): icmp_seq=1 ttl=64 time=0.614 ms
64 bytes from rs1.ilinux.io (192.168.0.20): icmp_seq=2 ttl=64 time=0.628 ms
^C
--- rs1.ilinux.io ping statistics ---
2 packets transmitted, 2 received, 0% packet loss, time 1001ms
rtt min/avg/max/mdev = 0.614/0.621/0.628/0.007 ms
[root@dr1 ~]# ping rs2
PING rs2.ilinux.io (192.168.0.30) 56(84) bytes of data.
64 bytes from rs2.ilinux.io (192.168.0.30): icmp_seq=1 ttl=64 time=0.561 ms
64 bytes from rs2.ilinux.io (192.168.0.30): icmp_seq=2 ttl=64 time=0.611 ms
64 bytes from rs2.ilinux.io (192.168.0.30): icmp_seq=3 ttl=64 time=0.653 ms
^C
--- rs2.ilinux.io ping statistics ---
3 packets transmitted, 3 received, 0% packet loss, time 2002ms
rtt min/avg/max/mdev = 0.561/0.608/0.653/0.042 ms
[root@dr1 ~]#
提示:配置好的hosts文件可以通过scp拷贝到各节点即可
4)确保各节点的用于集群服务的接口支持MULTICAST通信;

以上4点没有问题的情况下,我们可以来配置keepalived
[root@dr1 ~]# cat /etc/keepalived/keepalived.conf
! Configuration File for keepalived

global_defs {
   notification_email {
        root@localhost
   }
   notification_email_from keepalived@localhost
   smtp_server 127.0.0.1
   smtp_connect_timeout 30
   router_id LVS_DR1
   vrrp_mcast_group4 224.10.10.222
}

vrrp_instance VI_1 {
    state MASTER
    interface ens33
    virtual_router_id 51
    priority 100
    advert_int 1
    authentication {
        auth_type PASS
        auth_pass Yc15tnWa
    }
    virtual_ipaddress {
        192.168.0.222/24 dev ens33 label ens33:0
    }
    notify_master "/etc/keepalived/notify.sh master"
    notify_backup "/etc/keepalived/notify.sh backup"
    notify_fault "/etc/keepalived/notify.sh fault"
}

virtual_server 192.168.0.222 80 {
    delay_loop 2
    lb_algo rr
    lb_kind DR
    protocol TCP
    sorry_server 127.0.0.1 80

    real_server 192.168.0.20 80 {
        weight 1
        TCP_CHECK {
            connect_timeout 3
        }
    }
    real_server 192.168.0.30 80 {
        weight 1
        HTTP_GET {
                url {
                path /test.html
                status_code 200
        }
            connect_timeout 3
            nb_get_retry 3
            delay_before_retry 3
        }
    }
}


[root@dr1 ~]#
提示:多播地址是用来传递心跳信息的,我们在配置时需要配置成一个D类地址。
5)复制邮件发送脚本,并配置备份节点keepalived
[root@dr1 ~]# scp /etc/keepalived/notify.sh 192.168.0.11:/etc/keepalived/
root@192.168.0.11's password:
notify.sh                                                       100%  405   116.6KB/s   00:00
[root@dr1 ~]# scp /etc/keepalived/keepalived.conf 192.168.0.11:/etc/keepalived/keepalived.conf.bak
root@192.168.0.11's password:
keepalived.conf                                                 100% 1162   506.4KB/s   00:00
[root@dr1 ~]#
提示:我们可以把主节点配置文件发送到备份节点上,然后改下就可以了
[root@dr2 ~]# ls /etc/keepalived/
  epalived.conf  keepalived.conf.bak  notify.sh
[root@dr2 ~]# cp /etc/keepalived/keepalived.conf{,.backup}
[root@dr2 ~]# ls /etc/keepalived/
keepalived.conf  keepalived.conf.backup  keepalived.conf.bak  notify.sh
[root@dr2 ~]# mv /etc/keepalived/keepalived.conf.bak /etc/keepalived/keepalived.conf
mv: overwrite ‘/etc/keepalived/keepalived.conf’? y
[root@dr2 ~]# vim /etc/keepalived/keepalived.conf
! Configuration File for keepalived

global_defs {
   notification_email {
        root@localhost
   }
   notification_email_from keepalived@localhost
   smtp_server 127.0.0.1
   smtp_connect_timeout 30
   router_id LVS_DR2
   vrrp_mcast_group4 224.10.10.222
}

vrrp_instance VI_1 {
    state BACKUP
    interface ens33
    virtual_router_id 51
    priority 99
    advert_int 1
    authentication {
        auth_type PASS
        auth_pass Yc15tnWa
    }
    virtual_ipaddress {
        192.168.0.222/24 dev ens33 label ens33:0
    }
    notify_master "/etc/keepalived/notify.sh master"
    notify_backup "/etc/keepalived/notify.sh backup"
    notify_fault "/etc/keepalived/notify.sh fault"
}

virtual_server 192.168.0.222 80 {
    delay_loop 2
    lb_algo rr
    lb_kind DR
    protocol TCP
    sorry_server 127.0.0.1 80

    real_server 192.168.0.20 80 {
        weight 1
        TCP_CHECK {
            connect_timeout 3
        }
    }
    real_server 192.168.0.30 80 {
        weight 1
        HTTP_GET {
                url {
                path /test.html
                status_code 200
        }
            connect_timeout 3
            nb_get_retry 3
            delay_before_retry 3
        }
    }
}

"/etc/keepalived/keepalived.conf" 60L, 1161C written
[root@dr2 ~]#
提示:如果我们是从主节点复制配置文件到备份节点上去,我们只需要更改global_defs里面的route_id;vrrp_instances里更改state 为BACKUP,priority 为99,这个值表示优先级,数字越小优先级越低
6)启动主备节点,看启VIP是否都已配,以及LVS规则是否生成
[root@dr1 ~]# ifconfig
ens33: flags=4163<UP,BROADCAST,RUNNING,MULTICAST>  mtu 1500
        inet 192.168.0.10  netmask 255.255.255.0  broadcast 192.168.0.255
        inet6 fe80::20c:29ff:fef2:820c  prefixlen 64  scopeid 0x20<link>
        ether 00:0c:29:f2:82:0c  txqueuelen 1000  (Ethernet)
        RX packets 16914  bytes 14760959 (14.0 MiB)
        RX errors 0  dropped 1  overruns 0  frame 0
        TX packets 12058  bytes 1375703 (1.3 MiB)
        TX errors 0  dropped 0 overruns 0  carrier 0  collisions 0

lo: flags=73<UP,LOOPBACK,RUNNING>  mtu 65536
        inet 127.0.0.1  netmask 255.0.0.0
        inet6 ::1  prefixlen 128  scopeid 0x10<host>
        loop  txqueuelen 1  (Local Loopback)
        RX packets 15  bytes 1304 (1.2 KiB)
        RX errors 0  dropped 0  overruns 0  frame 0
        TX packets 15  bytes 1304 (1.2 KiB)
        TX errors 0  dropped 0 overruns 0  carrier 0  collisions 0

[root@dr1 ~]# ipvsadm -Ln
IP Virtual Server version 1.2.1 (size=4096)
Prot LocalAddress:Port Scheduler Flags
  -> RemoteAddress:Port           Forward Weight ActiveConn InActConn
[root@dr1 ~]# systemctl start keepalived
[root@dr1 ~]# ifconfig
ens33: flags=4163<UP,BROADCAST,RUNNING,MULTICAST>  mtu 1500
        inet 192.168.0.10  netmask 255.255.255.0  broadcast 192.168.0.255
        inet6 fe80::20c:29ff:fef2:820c  prefixlen 64  scopeid 0x20<link>
        ether 00:0c:29:f2:82:0c  txqueuelen 1000  (Ethernet)
        RX packets 17003  bytes 14768581 (14.0 MiB)
        RX errors 0  dropped 1  overruns 0  frame 0
        TX packets 12150  bytes 1388509 (1.3 MiB)
        TX errors 0  dropped 0 overruns 0  carrier 0  collisions 0

ens33:0: flags=4163<UP,BROADCAST,RUNNING,MULTICAST>  mtu 1500
        inet 192.168.0.222  netmask 255.255.255.0  broadcast 0.0.0.0
        ether 00:0c:29:f2:82:0c  txqueuelen 1000  (Ethernet)

lo: flags=73<UP,LOOPBACK,RUNNING>  mtu 65536
        inet 127.0.0.1  netmask 255.0.0.0
        inet6 ::1  prefixlen 128  scopeid 0x10<host>
        loop  txqueuelen 1  (Local Loopback)
        RX packets 15  bytes 1304 (1.2 KiB)
        RX errors 0  dropped 0  overruns 0  frame 0
        TX packets 15  bytes 1304 (1.2 KiB)
        TX errors 0  dropped 0 overruns 0  carrier 0  collisions 0

[root@dr1 ~]# ipvsadm -Ln
IP Virtual Server version 1.2.1 (size=4096)
Prot LocalAddress:Port Scheduler Flags
  -> RemoteAddress:Port           Forward Weight ActiveConn InActConn
TCP  192.168.0.222:80 rr
  -> 192.168.0.20:80              Route   1      0          0
  -> 192.168.0.30:80              Route   1      0          0
[root@dr1 ~]#
提示:可看到keepalived启动后,VIP和LVS规则就自动生成了,接下我们在备份几点抓包看看主节点是否在向组播地址发送心跳信息

提示:可看到主节点在向组播地址通告自己的心跳信息
启动备份节点
[root@dr2 ~]# systemctl start keepalived
[root@dr2 ~]# ifconfig
ens33: flags=4163<UP,BROADCAST,RUNNING,MULTICAST>  mtu 1500
        inet 192.168.0.11  netmask 255.255.255.0  broadcast 192.168.0.255
        inet6 fe80::20c:29ff:fe50:13f1  prefixlen 64  scopeid 0x20<link>
        ether 00:0c:29:50:13:f1  txqueuelen 1000  (Ethernet)
        RX packets 12542  bytes 14907658 (14.2 MiB)
        RX errors 0  dropped 1  overruns 0  frame 0
        TX packets 7843  bytes 701839 (685.3 KiB)
        TX errors 0  dropped 0 overruns 0  carrier 0  collisions 0

lo: flags=73<UP,LOOPBACK,RUNNING>  mtu 65536
        inet 127.0.0.1  netmask 255.0.0.0
        inet6 ::1  prefixlen 128  scopeid 0x10<host>
        loop  txqueuelen 1  (Local Loopback)
        RX packets 10  bytes 879 (879.0 B)
        RX errors 0  dropped 0  overruns 0  frame 0
        TX packets 10  bytes 879 (879.0 B)
        TX errors 0  dropped 0 overruns 0  carrier 0  collisions 0

[root@dr2 ~]# tcpdump -i ens33 -nn host 224.10.10.222
tcpdump: verbose output suppressed, use -v or -vv for full protocol decode
listening on ens33, link-type EN10MB (Ethernet), capture size 262144 bytes
20:59:33.620661 IP 192.168.0.10 > 224.10.10.222: VRRPv2, Advertisement, vrid 51, prio 100, authtype simple, intvl 1s, length 20
20:59:34.622645 IP 192.168.0.10 > 224.10.10.222: VRRPv2, Advertisement, vrid 51, prio 100, authtype simple, intvl 1s, length 20
20:59:35.624590 IP 192.168.0.10 > 224.10.10.222: VRRPv2, Advertisement, vrid 51, prio 100, authtype simple, intvl 1s, length 20
20:59:36.626588 IP 192.168.0.10 > 224.10.10.222: VRRPv2, Advertisement, vrid 51, prio 100, authtype simple, intvl 1s, length 20
20:59:37.628675 IP 192.168.0.10 > 224.10.10.222: VRRPv2, Advertisement, vrid 51, prio 100, authtype simple, intvl 1s, length 20
20:59:38.630562 IP 192.168.0.10 > 224.10.10.222: VRRPv2, Advertisement, vrid 51, prio 100, authtype simple, intvl 1s, length 20
20:59:39.632673 IP 192.168.0.10 > 224.10.10.222: VRRPv2, Advertisement, vrid 51, prio 100, authtype simple, intvl 1s, length 20
20:59:40.634658 IP 192.168.0.10 > 224.10.10.222: VRRPv2, Advertisement, vrid 51, prio 100, authtype simple, intvl 1s, length 20
20:59:41.636699 IP 192.168.0.10 > 224.10.10.222: VRRPv2, Advertisement, vrid 51, prio 100, authtype simple, intvl 1s, length 20
^C
9 packets captured
9 packets received by filter
0 packets dropped by kernel
[root@dr2 ~]#
提示:可以看到备份节点启动后,它不会去拿VIP,这是因为主节点的优先级要比备份节点高,同时主节点在向组播地址通告自己的心跳信息
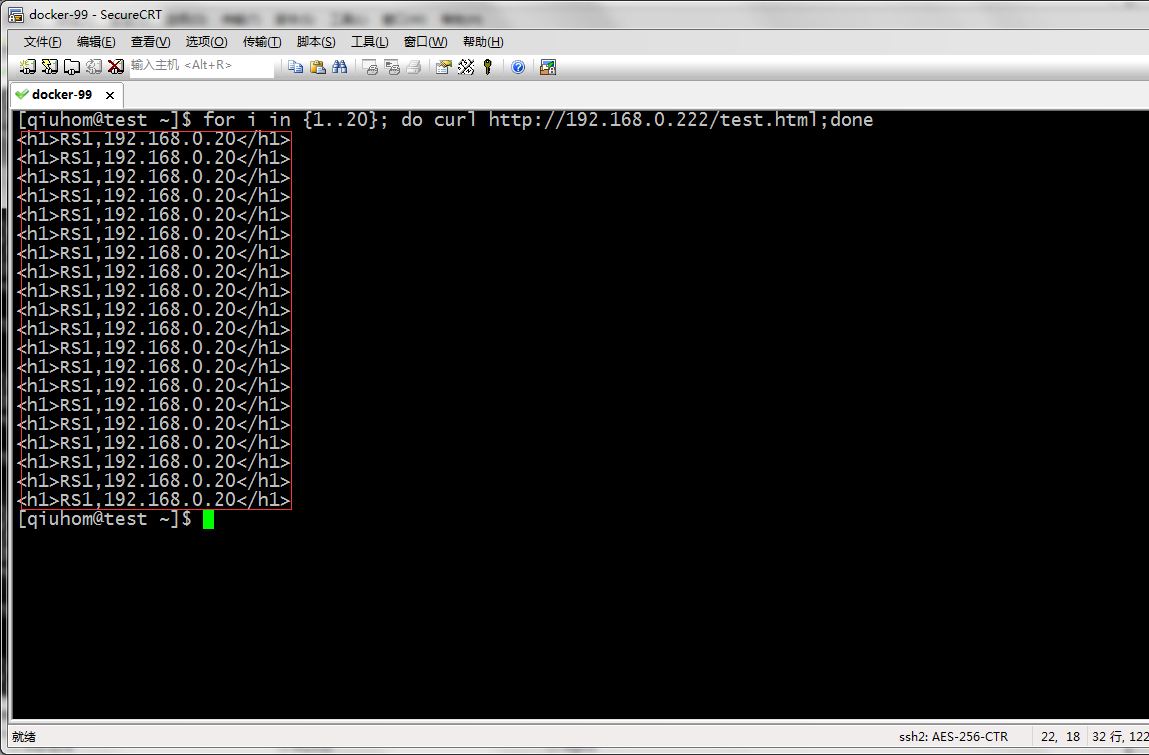
用客户端192.168.0.99 去访问集群服务
[qiuhom@test ~]$ ip a s enp2s0
2: enp2s0: <BROADCAST,MULTICAST,UP,LOWER_UP> mtu 1500 qdisc pfifo_fast state UP group default qlen 1000
    link/ether 00:30:18:51:af:3c brd ff:ff:ff:ff:ff:ff
    inet 192.168.0.99/24 brd 192.168.0.255 scope global noprefixroute enp2s0
       valid_lft forever preferred_lft forever
    inet 172.16.1.2/16 brd 172.16.255.255 scope global noprefixroute enp2s0:0
       valid_lft forever preferred_lft forever
    inet6 fe80::230:18ff:fe51:af3c/64 scope link
       valid_lft forever preferred_lft forever
[qiuhom@test ~]$ curl http://192.168.0.222/test.html
<h1>RS2,192.168.0.30</h1>
[qiuhom@test ~]$ curl http://192.168.0.222/test.html
<h1>RS1,192.168.0.20</h1>
[qiuhom@test ~]$ curl http://192.168.0.222/test.html
<h1>RS2,192.168.0.30</h1>
[qiuhom@test ~]$
提示:现在主节点正常的情况,集群服务是可以正常访问的
把主节点停掉,看看集群服务是否能够正常访问
[root@dr1 ~]# systemctl stop keepalived
[root@dr1 ~]# ifconfig
ens33: flags=4163<UP,BROADCAST,RUNNING,MULTICAST>  mtu 1500
        inet 192.168.0.10  netmask 255.255.255.0  broadcast 192.168.0.255
        inet6 fe80::20c:29ff:fef2:820c  prefixlen 64  scopeid 0x20<link>
        ether 00:0c:29:f2:82:0c  txqueuelen 1000  (Ethernet)
        RX packets 18001  bytes 15406859 (14.6 MiB)
        RX errors 0  dropped 1  overruns 0  frame 0
        TX packets 14407  bytes 1548635 (1.4 MiB)
        TX errors 0  dropped 0 overruns 0  carrier 0  collisions 0

lo: flags=73<UP,LOOPBACK,RUNNING>  mtu 65536
        inet 127.0.0.1  netmask 255.0.0.0
        inet6 ::1  prefixlen 128  scopeid 0x10<host>
        loop  txqueuelen 1  (Local Loopback)
        RX packets 15  bytes 1304 (1.2 KiB)
        RX errors 0  dropped 0  overruns 0  frame 0
        TX packets 15  bytes 1304 (1.2 KiB)
        TX errors 0  dropped 0 overruns 0  carrier 0  collisions 0

[root@dr1 ~]# ipvsadm -Ln
IP Virtual Server version 1.2.1 (size=4096)
Prot LocalAddress:Port Scheduler Flags
  -> RemoteAddress:Port           Forward Weight ActiveConn InActConn
[root@dr1 ~]#
提示:可以看到当我们停掉了主节点后,vip和lvs规则也就自动删除了,接下来,我们再用客户端来访问下集群服务,看看是否可访问?
[qiuhom@test ~]$ curl http://192.168.0.222/test.html
<h1>RS2,192.168.0.30</h1>
[qiuhom@test ~]$ curl http://192.168.0.222/test.html
<h1>RS1,192.168.0.20</h1>
[qiuhom@test ~]$ curl http://192.168.0.222/test.html
<h1>RS2,192.168.0.30</h1>
[qiuhom@test ~]$ curl http://192.168.0.222/test.html
<h1>RS1,192.168.0.20</h1>
[qiuhom@test ~]$ curl http://192.168.0.222/test.html
<h1>RS2,192.168.0.30</h1>
[qiuhom@test ~]$
提示:可看到在主节点宕机的情况,集群服务是不受影响的,这是因为备份节点接管了主节点的工作,把VIP和LVS规则在自己的节点上应用了
我们再看看备份节点上的IP信息和LVS规则
[root@dr2 ~]# ifconfig
ens33: flags=4163<UP,BROADCAST,RUNNING,MULTICAST>  mtu 1500
        inet 192.168.0.11  netmask 255.255.255.0  broadcast 192.168.0.255
        inet6 fe80::20c:29ff:fe50:13f1  prefixlen 64  scopeid 0x20<link>
        ether 00:0c:29:50:13:f1  txqueuelen 1000  (Ethernet)
        RX packets 13545  bytes 15227354 (14.5 MiB)
        RX errors 0  dropped 1  overruns 0  frame 0
        TX packets 9644  bytes 828542 (809.1 KiB)
        TX errors 0  dropped 0 overruns 0  carrier 0  collisions 0

ens33:0: flags=4163<UP,BROADCAST,RUNNING,MULTICAST>  mtu 1500
        inet 192.168.0.222  netmask 255.255.255.0  broadcast 0.0.0.0
        ether 00:0c:29:50:13:f1  txqueuelen 1000  (Ethernet)

lo: flags=73<UP,LOOPBACK,RUNNING>  mtu 65536
        inet 127.0.0.1  netmask 255.0.0.0
        inet6 ::1  prefixlen 128  scopeid 0x10<host>
        loop  txqueuelen 1  (Local Loopback)
        RX packets 10  bytes 879 (879.0 B)
        RX errors 0  dropped 0  overruns 0  frame 0
        TX packets 10  bytes 879 (879.0 B)
        TX errors 0  dropped 0 overruns 0  carrier 0  collisions 0

[root@dr2 ~]# ipvsadm -Ln
IP Virtual Server version 1.2.1 (size=4096)
Prot LocalAddress:Port Scheduler Flags
  -> RemoteAddress:Port           Forward Weight ActiveConn InActConn
TCP  192.168.0.222:80 rr
  -> 192.168.0.20:80              Route   1      0          0
  -> 192.168.0.30:80              Route   1      0          0
[root@dr2 ~]#
我们把主节点恢复,再看看备份节点是否把VIP和LVS规则删除?
[root@dr1 ~]# systemctl start keepalived
[root@dr1 ~]# ifconfig
ens33: flags=4163<UP,BROADCAST,RUNNING,MULTICAST>  mtu 1500
        inet 192.168.0.10  netmask 255.255.255.0  broadcast 192.168.0.255
        inet6 fe80::20c:29ff:fef2:820c  prefixlen 64  scopeid 0x20<link>
        ether 00:0c:29:f2:82:0c  txqueuelen 1000  (Ethernet)
        RX packets 18533  bytes 15699933 (14.9 MiB)
        RX errors 0  dropped 1  overruns 0  frame 0
        TX packets 14808  bytes 1589148 (1.5 MiB)
        TX errors 0  dropped 0 overruns 0  carrier 0  collisions 0

ens33:0: flags=4163<UP,BROADCAST,RUNNING,MULTICAST>  mtu 1500
        inet 192.168.0.222  netmask 255.255.255.0  broadcast 0.0.0.0
        ether 00:0c:29:f2:82:0c  txqueuelen 1000  (Ethernet)

lo: flags=73<UP,LOOPBACK,RUNNING>  mtu 65536
        inet 127.0.0.1  netmask 255.0.0.0
        inet6 ::1  prefixlen 128  scopeid 0x10<host>
        loop  txqueuelen 1  (Local Loopback)
        RX packets 17  bytes 1402 (1.3 KiB)
        RX errors 0  dropped 0  overruns 0  frame 0
        TX packets 17  bytes 1402 (1.3 KiB)
        TX errors 0  dropped 0 overruns 0  carrier 0  collisions 0

[root@dr1 ~]# ipvsadm -Ln
IP Virtual Server version 1.2.1 (size=4096)
Prot LocalAddress:Port Scheduler Flags
  -> RemoteAddress:Port           Forward Weight ActiveConn InActConn
TCP  192.168.0.222:80 rr
  -> 192.168.0.20:80              Route   1      0          0
  -> 192.168.0.30:80              Route   1      0          0
[root@dr1 ~]#
提示:可以看到主节点启动keepalived后,VIP和LVS规则都自动生成,我们再来看看备份节点上的VIP和LVS是否存在?
[root@dr2 ~]# ifconfig
ens33: flags=4163<UP,BROADCAST,RUNNING,MULTICAST>  mtu 1500
        inet 192.168.0.11  netmask 255.255.255.0  broadcast 192.168.0.255
        inet6 fe80::20c:29ff:fe50:13f1  prefixlen 64  scopeid 0x20<link>
        ether 00:0c:29:50:13:f1  txqueuelen 1000  (Ethernet)
        RX packets 13773  bytes 15243276 (14.5 MiB)
        RX errors 0  dropped 1  overruns 0  frame 0
        TX packets 10049  bytes 857748 (837.6 KiB)
        TX errors 0  dropped 0 overruns 0  carrier 0  collisions 0

lo: flags=73<UP,LOOPBACK,RUNNING>  mtu 65536
        inet 127.0.0.1  netmask 255.0.0.0
        inet6 ::1  prefixlen 128  scopeid 0x10<host>
        loop  txqueuelen 1  (Local Loopback)
        RX packets 12  bytes 977 (977.0 B)
        RX errors 0  dropped 0  overruns 0  frame 0
        TX packets 12  bytes 977 (977.0 B)
        TX errors 0  dropped 0 overruns 0  carrier 0  collisions 0

You have mail in /var/spool/mail/root
[root@dr2 ~]# ipvsadm -Ln
IP Virtual Server version 1.2.1 (size=4096)
Prot LocalAddress:Port Scheduler Flags
  -> RemoteAddress:Port           Forward Weight ActiveConn InActConn
TCP  192.168.0.222:80 rr
  -> 192.168.0.20:80              Route   1      0          0
  -> 192.168.0.30:80              Route   1      0          0
[root@dr2 ~]#
提示:可以看到主节点启动后,备份节点上的VIP没有了,但是LVS规则还存在;我们看看备份节点上是否有邮件呢?
[root@dr2 ~]# mail
Heirloom Mail version 12.5 7/5/10.  Type ? for help.
"/var/spool/mail/root": 1 message 1 new
>N  1 root                  Fri Feb 21 08:13  18/673   "dr2.ilinux.io to be backup, vip floatin"
& 1
Message  1:
From root@dr2.ilinux.io  Fri Feb 21 08:13:00 2020
Return-Path: <root@dr2.ilinux.io>
X-Original-To: root@localhost
Delivered-To: root@localhost.ilinux.io
Date: Fri, 21 Feb 2020 08:13:00 -0500
To: root@localhost.ilinux.io
Subject: dr2.ilinux.io to be backup, vip floating
User-Agent: Heirloom mailx 12.5 7/5/10
Content-Type: text/plain; charset=us-ascii
From: root@dr2.ilinux.io (root)
Status: R

2020-02-21 08:13:00: vrrp transition, dr2.ilinux.io changed to be backup

&
提示:可看到有一封邮件,告诉我们DR2切换至backup状态了,按理说,主节点上也有邮件,不妨我们也去看看吧
[root@dr1 ~]# mail
Heirloom Mail version 12.5 7/5/10.  Type ? for help.
"/var/spool/mail/root": 1 message 1 new
>N  1 root                  Fri Feb 21 08:13  18/673   "dr1.ilinux.io to be master, vip floatin"
& 1
Message  1:
From root@dr1.ilinux.io  Fri Feb 21 08:13:01 2020
Return-Path: <root@dr1.ilinux.io>
X-Original-To: root@localhost
Delivered-To: root@localhost.ilinux.io
Date: Fri, 21 Feb 2020 08:13:01 -0500
To: root@localhost.ilinux.io
Subject: dr1.ilinux.io to be master, vip floating
User-Agent: Heirloom mailx 12.5 7/5/10
Content-Type: text/plain; charset=us-ascii
From: root@dr1.ilinux.io (root)
Status: R

2020-02-21 08:13:01: vrrp transition, dr1.ilinux.io changed to be master

&
提示:在主节点上也收到了一封邮件,说dr1切换成master状态了
到此LVS+keepalived高可用LVS测试没有问题,接下来我们在测试,当一个real server宕机后,DR上的LVS是否能够及时的把对应的RS下线?
[root@rs1 ~]# systemctl stop nginx
[root@rs1 ~]# ss -ntl
State      Recv-Q Send-Q    Local Address:Port                   Peer Address:Port
LISTEN     0      128                   *:22                                *:*
LISTEN     0      100           127.0.0.1:25                                *:*
LISTEN     0      128                  :::22                               :::*
LISTEN     0      100                 ::1:25                               :::*
[root@rs1 ~]#
[root@dr1 ~]# ipvsadm -Ln
IP Virtual Server version 1.2.1 (size=4096)
Prot LocalAddress:Port Scheduler Flags
  -> RemoteAddress:Port           Forward Weight ActiveConn InActConn
TCP  192.168.0.222:80 rr
  -> 192.168.0.30:80              Route   1      0          0
[root@dr1 ~]#
提示:可以看到当一个RS1故障时,DR会马上把rs1从集群服务下线
再把RS2都停掉看看 对应的sorry server是否能够正常加到集群服务
[root@rs2 ~]# systemctl stop nginx
[root@rs2 ~]# ss -ntl
State      Recv-Q Send-Q    Local Address:Port                   Peer Address:Port
LISTEN     0      128                   *:22                                *:*
LISTEN     0      100           127.0.0.1:25                                *:*
LISTEN     0      128                  :::22                               :::*
LISTEN     0      100                 ::1:25                               :::*
[root@rs2 ~]#
[root@dr1 ~]# ipvsadm -Ln
IP Virtual Server version 1.2.1 (size=4096)
Prot LocalAddress:Port Scheduler Flags
  -> RemoteAddress:Port           Forward Weight ActiveConn InActConn
TCP  192.168.0.222:80 rr
  -> 127.0.0.1:80                 Route   1      0          0
[root@dr1 ~]#
提示:可看到当后端两个RS都宕机后,sorry server 会立刻加到集群来,如果这时客户端再访问集群服务,就会把sorry server 的页面响应给用户
[qiuhom@test ~]$ curl http://192.168.0.222/
<h1>sorry server 192.168.0.10</h1>
[qiuhom@test ~]$
提示:这个页面主要是告诉用户,网站正在维护等信息,专用于给用户说sorry的,所以叫sorry server ;当然我们也可以把它配置成和集群服务页面一模一样的也是可以的,一般不建议这样做
我们把RS1 启动起来,再看看集群是否把sorry server 下线把RS1加到集群?
[root@rs1 ~]# systemctl start nginx
[root@rs1 ~]# ss -ntl
State      Recv-Q Send-Q    Local Address:Port                   Peer Address:Port
LISTEN     0      128                   *:80                                *:*
LISTEN     0      128                   *:22                                *:*
LISTEN     0      100           127.0.0.1:25                                *:*
LISTEN     0      128                  :::80                               :::*
LISTEN     0      128                  :::22                               :::*
LISTEN     0      100                 ::1:25                               :::*
[root@rs1 ~]#
[root@dr1 ~]# ipvsadm -Ln
IP Virtual Server version 1.2.1 (size=4096)
Prot LocalAddress:Port Scheduler Flags
  -> RemoteAddress:Port           Forward Weight ActiveConn InActConn
TCP  192.168.0.222:80 rr
  -> 192.168.0.20:80              Route   1      0          0
You have new mail in /var/spool/mail/root
[root@dr1 ~]#
提示:可看到当后端real server 正常后,sorry server会从集群服务里下线,然后real server继续提供服务
到此LVS集群+keepalived高可用搭建和测试就完毕了!!!