为什么需要读写分离
当项目越来越大和并发越来大的情况下,单个数据库服务器的压力肯定也是越来越大,最终演变成数据库成为性能的瓶颈,而且当数据越来越多时,查询也更加耗费时间,当然数据库数据过大时,可以采用数据库分库分表,同时数据库压力过大时,也可以采用Redis等缓存技术来降低压力,但是任何一种技术都不是万金油,很多时候都是通过多种技术搭配使用,而本文主要就是介绍通过读写分离来加快数据库读取速度
实现方式
读写分离实现的方式有多种,但是多种都需要配置数据库的主从复制
方式一
数据库中间件实现,如Mycat等数据库中间件,对于项目本身来说,只有一个数据源,就是链接到Mycat,再由mycat根据规则去选择从哪个库获取数据
方式二
代码中配置多数据源,通过代码控制使用哪个数据源,本文也是主要介绍这种方式
优点
1.降低数据库读取压力,尤其是有些需要大量计算的实时报表类应用
2.增强数据安全性,读写分离有个好处就是数据近乎实时备份,一旦某台服务器硬盘发生了损坏,从库的数据可以无限接近主库
3.可以实现高可用,当然只是配置了读写分离并不能实现搞可用,最多就是在Master(主库)宕机了还能进行查询操作,具体高可用还需要其他操作
缺点
1.增大成本,一台数据库服务器和多台数据库的成本肯定是不一样的
2.增大代码复杂度,不过这点还比较轻微吧,但是也的确会一定程度上加重
3.增大写入成本,虽然降低了读取成本,但是写入成本却是一点也没有降低,毕竟还有从库一直在向主库请求数据
实践:
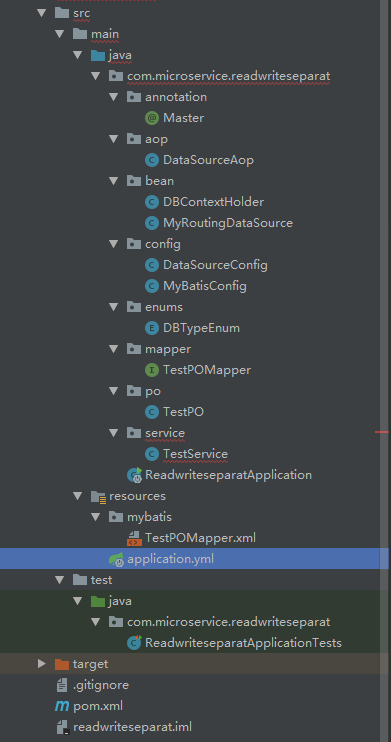
项目结构:
application.yml
spring:
  datasource:
    master: # 写账户
      jdbc-url: jdbc:mysql://localhost:3306/otadb?useUnicode=true&characterEncoding=utf8&serverTimezone=GMT%2B8&useSSL=false
      username: root
      password: 123456
    slave1: # 只读账户
      jdbc-url: jdbc:mysql://localhost:3306/otadb1?useUnicode=true&characterEncoding=utf8&serverTimezone=GMT%2B8&useSSL=false
      username: root
      password: 123456
    slave2: # 只读账户
      jdbc-url: jdbc:mysql://localhost:3306/otadb2?useUnicode=true&characterEncoding=utf8&serverTimezone=GMT%2B8&useSSL=false
      username: root
      password: 123456
多数据源配置
import com.microservice.readwriteseparat.bean.MyRoutingDataSource;
import com.microservice.readwriteseparat.enums.DBTypeEnum;
import org.springframework.beans.factory.annotation.Qualifier;
import org.springframework.boot.context.properties.ConfigurationProperties;
import org.springframework.boot.jdbc.DataSourceBuilder;
import org.springframework.context.annotation.Bean;
import org.springframework.context.annotation.Configuration;

import javax.sql.DataSource;
import java.util.HashMap;
import java.util.Map;

@Configuration
public class DataSourceConfig {

    /**
     * 写库
     * @return
     */
    @Bean
    @ConfigurationProperties("spring.datasource.master")
    public DataSource masterDataSource() {
        return DataSourceBuilder.create().build();
    }

    /**
     * 读库
     * @return
     */
    @Bean
    @ConfigurationProperties("spring.datasource.slave1")
    public DataSource slave1DataSource() {
        return DataSourceBuilder.create().build();
    }

    /**
     * 读库
     * @return
     */
    @Bean
    @ConfigurationProperties("spring.datasource.slave2")
    public DataSource slave2DataSource() {
        return DataSourceBuilder.create().build();
    }

    @Bean
    public DataSource myRoutingDataSource(@Qualifier("masterDataSource") DataSource masterDataSource,
                                          @Qualifier("slave1DataSource") DataSource slave1DataSource,
                                          @Qualifier("slave2DataSource") DataSource slave2DataSource) {
        Map<Object, Object> targetDataSources = new HashMap<>();
        targetDataSources.put(DBTypeEnum.MASTER, masterDataSource);
        targetDataSources.put(DBTypeEnum.SLAVE1, slave1DataSource);
        targetDataSources.put(DBTypeEnum.SLAVE2, slave2DataSource);
        MyRoutingDataSource myRoutingDataSource = new MyRoutingDataSource();
        myRoutingDataSource.setDefaultTargetDataSource(masterDataSource);
        myRoutingDataSource.setTargetDataSources(targetDataSources);
        return myRoutingDataSource;
    }

}
这里,我们配置了4个数据源,1个master,2两个slave,1个路由数据源。前3个数据源都是为了生成第4个数据源,而且后续我们只用这最后一个路由数据源myRoutingDataSource。
MyBatis配置
import org.apache.ibatis.session.SqlSessionFactory;
import org.mybatis.spring.SqlSessionFactoryBean;
import org.springframework.context.annotation.Bean;
import org.springframework.context.annotation.Configuration;
import org.springframework.core.io.support.PathMatchingResourcePatternResolver;
import org.springframework.jdbc.datasource.DataSourceTransactionManager;
import org.springframework.transaction.PlatformTransactionManager;
import org.springframework.transaction.annotation.EnableTransactionManagement;

import javax.annotation.Resource;
import javax.sql.DataSource;

@EnableTransactionManagement
@Configuration
public class MyBatisConfig {
    @Resource(name = "myRoutingDataSource")
    private DataSource myRoutingDataSource;

    /**
     * 扫描mybatis下的xml文件
     * @return
     * @throws Exception
     */
    @Bean
    public SqlSessionFactory sqlSessionFactory() throws Exception {
        SqlSessionFactoryBean sqlSessionFactoryBean = new SqlSessionFactoryBean();
        sqlSessionFactoryBean.setDataSource(myRoutingDataSource);
        sqlSessionFactoryBean.setMapperLocations(new PathMatchingResourcePatternResolver().getResources("classpath:mybatis/*.xml"));
        return sqlSessionFactoryBean.getObject();
    }

    @Bean
    public PlatformTransactionManager platformTransactionManager() {
        return new DataSourceTransactionManager(myRoutingDataSource);//由于Spring容器中现在有4个数据源,所以我们需要为事务管理器和MyBatis手动指定一个明确的数据源。
    }
}
定义一个枚举来代表这三个数据源
public enum DBTypeEnum {
    MASTER,SLAVE1,SLAVE2
}
通过ThreadLocal将数据源设置到每个线程上下文中
import com.microservice.readwriteseparat.enums.DBTypeEnum;

import java.util.concurrent.atomic.AtomicInteger;

public class DBContextHolder {
    private static final ThreadLocal<DBTypeEnum> contextHolder = new ThreadLocal<>();
    private static final AtomicInteger counter = new AtomicInteger(-1);

    public static void set(DBTypeEnum dbType) {
        contextHolder.set(dbType);
    }

    public static DBTypeEnum get() {
        return contextHolder.get();
    }

    public static void master() {
        set(DBTypeEnum.MASTER);
        System.out.println("切换到master");
    }

    public static void slave() {
        //  轮询
        int index = counter.getAndIncrement() % 2;
        if (counter.get() > 9999) {
            counter.set(-1);
        }
        if (index == 0) {
            set(DBTypeEnum.SLAVE1);
            System.out.println("切换到slave1");
        }else {
            set(DBTypeEnum.SLAVE2);
            System.out.println("切换到slave2");
        }
    }

}
获取路由key
import org.springframework.jdbc.datasource.lookup.AbstractRoutingDataSource;
import org.springframework.lang.Nullable;

public class MyRoutingDataSource extends AbstractRoutingDataSource {
    @Nullable
    @Override
    protected Object determineCurrentLookupKey() {
        return DBContextHolder.get();
    }
}
默认情况下,所有的查询都走从库,插入/修改/删除走主库。我们通过方法名来区分操作类型(CRUD)
import com.microservice.readwriteseparat.bean.DBContextHolder;
import org.aspectj.lang.annotation.Aspect;
import org.aspectj.lang.annotation.Before;
import org.aspectj.lang.annotation.Pointcut;
import org.springframework.stereotype.Component;

@Aspect
@Component
public class DataSourceAop {
    /**
     * 只读:
     * 不是Master注解的对象或方法  && select开头的方法  ||  get开头的方法
     */
    @Pointcut("!@annotation(com.microservice.readwriteseparat.annotation.Master) " +
            "&& (execution(* com.microservice.readwriteseparat.service..*.select*(..)) " +
            "|| execution(* com.microservice.readwriteseparat.service..*.get*(..)))")
    public void readPointcut() {

    }

    /**
     * 写:
     * Master注解的对象或方法 || insert开头的方法  ||  add开头的方法 || update开头的方法
     * || edlt开头的方法 || delete开头的方法 || remove开头的方法
     */
    @Pointcut("@annotation(com.microservice.readwriteseparat.annotation.Master) " +
            "|| execution(* com.microservice.readwriteseparat.service..*.insert*(..)) " +
            "|| execution(* com.microservice.readwriteseparat.service..*.add*(..)) " +
            "|| execution(* com.microservice.readwriteseparat.service..*.update*(..)) " +
            "|| execution(* com.microservice.readwriteseparat.service..*.edit*(..)) " +
            "|| execution(* com.microservice.readwriteseparat.service..*.delete*(..)) " +
            "|| execution(* com.microservice.readwriteseparat..*.remove*(..))")
    public void writePointcut() {

    }

    @Before("readPointcut()")
    public void read() {
        DBContextHolder.slave();
    }

    @Before("writePointcut()")
    public void write() {
        DBContextHolder.master();
    }
}
有一般情况就有特殊情况,特殊情况是某些情况下我们需要强制读主库,针对这种情况,我们定义一个主键,用该注解标注的就读主库
public @interface Master {
}
mapper:
import com.microservice.readwriteseparat.po.TestPO;
import org.apache.ibatis.annotations.Mapper;

@Mapper
public interface TestPOMapper {
    int deleteByPrimaryKey(Long id);

    int insert(TestPO record);

    int insertSelective(TestPO record);

    TestPO selectByPrimaryKey(Long id);

    int updateByPrimaryKeySelective(TestPO record);

    int updateByPrimaryKey(TestPO record);
}
po:
public class TestPO {
    private Long id;

    private String name;

    public Long getId() {
        return id;
    }

    public void setId(Long id) {
        this.id = id;
    }

    public String getName() {
        return name;
    }

    public void setName(String name) {
        this.name = name == null ? null : name.trim();
    }
}
service:
import com.microservice.readwriteseparat.annotation.Master;
import com.microservice.readwriteseparat.mapper.TestPOMapper;
import com.microservice.readwriteseparat.po.TestPO;
import org.springframework.beans.factory.annotation.Autowired;
import org.springframework.stereotype.Service;

@Service
public class TestService{

    @Autowired
    private TestPOMapper testPOMapper;

    public int insert(TestPO aaa) {
        return testPOMapper.insert(aaa);
    }

    @Master
    public int save(TestPO aaa) {
        return testPOMapper.insert(aaa);
    }

    public TestPO selectByPrimaryKey(Long id) {
        return testPOMapper.selectByPrimaryKey(id);
    }

    @Master
    public TestPO getById(Long id) {
        //  有些读操作必须读主数据库
        //  比如,获取微信access_token,因为高峰时期主从同步可能延迟
        //  这种情况下就必须强制从主数据读
        return testPOMapper.selectByPrimaryKey(id);
    }
}
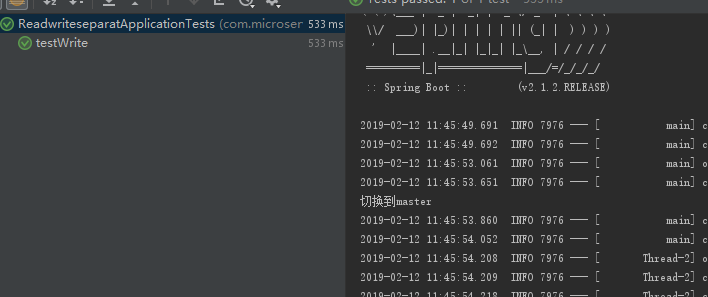
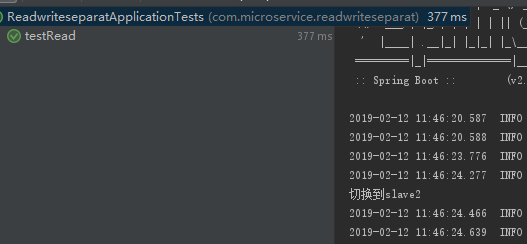
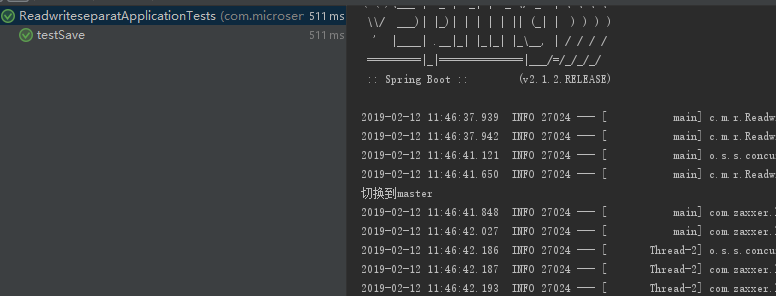
测试:
import com.microservice.readwriteseparat.po.TestPO;
import com.microservice.readwriteseparat.service.TestService;
import org.junit.Test;
import org.junit.runner.RunWith;
import org.slf4j.Logger;
import org.slf4j.LoggerFactory;
import org.springframework.beans.factory.annotation.Autowired;
import org.springframework.boot.test.context.SpringBootTest;
import org.springframework.test.context.junit4.SpringRunner;

@RunWith(SpringRunner.class)
@SpringBootTest
public class ReadwriteseparatApplicationTests {
    private static final Logger logger = LoggerFactory.getLogger(ReadwriteseparatApplicationTests.class);

    @Autowired
    private TestService aaaService;

    /**
     * 写库进行写入
     */
    @Test
    public void testWrite() {
        TestPO aaa = new TestPO();
        aaaService.insert(aaa);
    }

    /**
     * 读库(otadb1和otadb2随机)进行读取
     */
    @Test
    public void testRead() {
        TestPO aaa = aaaService.selectByPrimaryKey(1l);
        logger.info("aaa="+aaa.toString());
    }

    /**
     * 写库进行写入
     */
    @Test
    public void testSave() {
        TestPO aaa = new TestPO();
        aaaService.save(aaa);
    }

    /**
     * 写库进行读取
     */
    @Test
    public void testReadFromMaster() {
        aaaService.getById(10001l);
    }

}
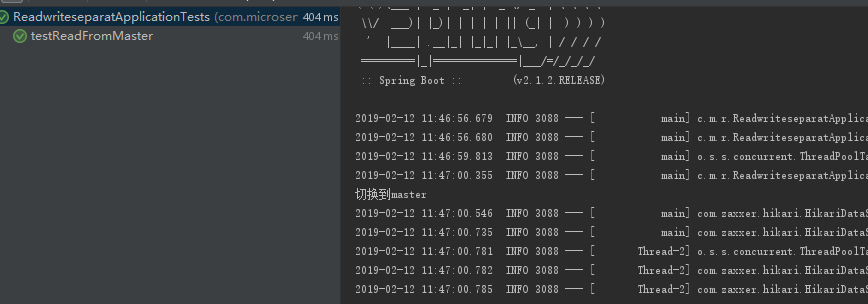
查看控制台:
源码地址:https://github.com/qjm201000/micro_service_readwriteseparat.git
参考资料:https://www.cnblogs.com/cjsblog/p/9712457.html