一、Spring Security 简介
所有的业务系统都需要鉴权、授权的步骤,通过鉴权,授权提高系统的安全性,只有合法的用户才能对系统进行操作,外部系统通过鉴权后才能调用本系统的接口等。鉴权、授权的实现有很多种,常见的有apache shiro 以及今天我们介绍的Spring Security,它们都属于安全框架,帮助业务系统实现鉴权、授权的功能,让我们有更多的经历实现业务功能。
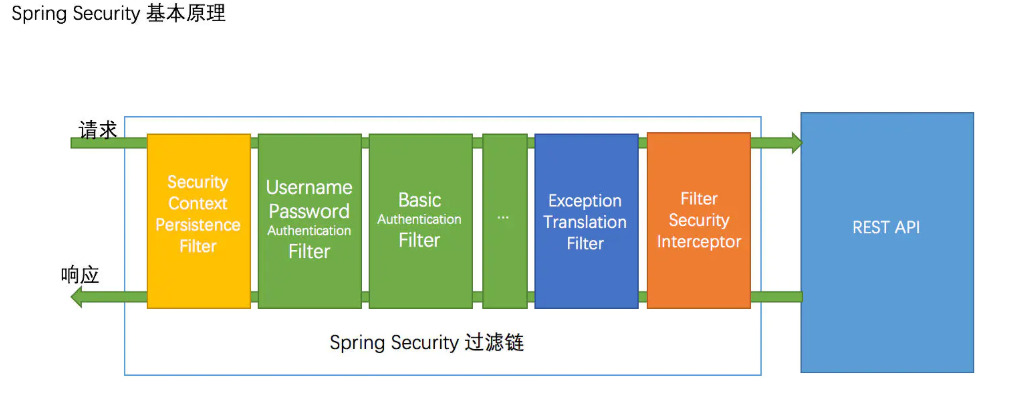
Spring Security 核心是一组过滤器链,通过过滤器来验证用户是否登录、是否有权限访问后台接口,我们也可以通过自定义过滤器实现不同方式的登录,比如通过手机号+验证码的方式。
二、简单使用Spring Security
本篇文章的demo是基于SpringBoot 2.2.5+tkmybatis+themlefy+mysql开发,security的版本是5.2.2.RELEASE;
(一)搭建项目
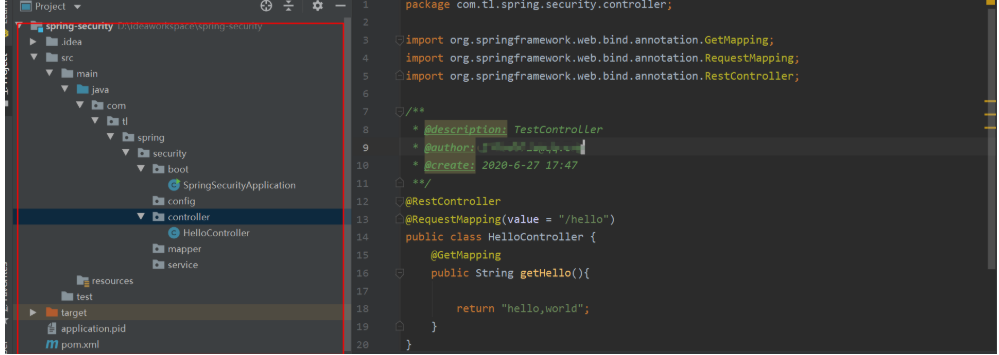
项目是标准的maven项目结构,具体的目录如下图所示,新建启动类SpringSecurityApplication及测试类HelloController,只有一个简单的测试方法返回字符串"hello,world"
@SpringBootApplication
@EnableAsync
@ComponentScan(value = "com.tl.spring.security")
public class SpringSecurityApplication  extends SpringBootServletInitializer {

    @Override
    protected SpringApplicationBuilder configure(SpringApplicationBuilder application) {
        return application.sources(SpringSecurityApplication.class);
    }

    @Override
    public void onStartup(ServletContext servletContext)
            throws ServletException {
        servletContext.getSessionCookieConfig().setName("SESSIONID");
    }
    public static void main(String[] args) {
        SpringApplication springApplication = new SpringApplication(SpringSecurityApplication.class);
        springApplication.addListeners(new ApplicationPidFileWriter());
        springApplication.run(args);
    }
}
(二)引入依赖
<?xml version="1.0" encoding="UTF-8"?>
<project xmlns="http://maven.apache.org/POM/4.0.0" xmlns:xsi="http://www.w3.org/2001/XMLSchema-instance"
         xsi:schemaLocation="http://maven.apache.org/POM/4.0.0 http://maven.apache.org/xsd/maven-4.0.0.xsd">
    <modelVersion>4.0.0</modelVersion>
    <parent>
        <groupId>org.springframework.boot</groupId>
        <artifactId>spring-boot-starter-parent</artifactId>
        <version>2.2.5.RELEASE</version>
    </parent>
    <groupId>com.tl</groupId>
    <artifactId>spring-security</artifactId>
    <version>1.0.0-SNAPSHOT</version>
    <packaging>pom</packaging>
    <url>http://www.xxx.com</url>
        <dependencies>
                <dependency>
                    <groupId>org.springframework.boot</groupId>
                    <artifactId>spring-boot-starter-web</artifactId>
                </dependency>
                <dependency>
                    <groupId>org.springframework.boot</groupId>
                    <artifactId>spring-boot-starter-test</artifactId>
                </dependency>
            <dependency>
                <groupId>org.springframework.boot</groupId>
                <artifactId>spring-boot-starter-security</artifactId>
            </dependency>
        </dependencies>
</project>
(三)使用默认的配置
使用spring默认配置,不新建配置文件application.yml
(四)运行程序
运行程序,在控制台上回打印出来,此次生成的密码,如下图所示:

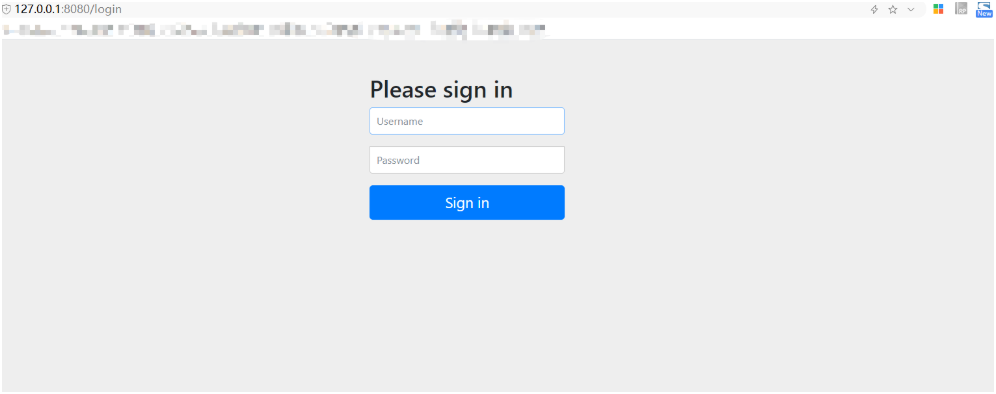
通过浏览器访问127.0.0.1:8080/hello跳转到登录页面(security5.2版本默认好像不再使用http basic 认证),如下图所示,输入默认用户名user及控制台打印的密码,登录成功后,可正常访问后台接口,并返回字符串hello,world

(五)使用内存用户登录
新建配置类AuthConfiguration继承WebSecurityConfigurerAdapter重写configure方法
@Configuration
@EnableWebSecurity
public class AuthConfiguration   extends WebSecurityConfigurerAdapter {


    @Override
    protected void configure(HttpSecurity http) throws Exception {
        http
                .authorizeRequests()
                .antMatchers("/hello/admin").hasAnyRole("ROOT").anyRequest().permitAll()
                .antMatchers("/hello").hasRole("USER").anyRequest().permitAll()
                .and()
                .csrf().disable().
                formLogin().and().httpBasic().disable()
                .sessionManagement().disable()
                .cors()
                .and()
                .logout();
    }

    @Override
    public void configure(WebSecurity web) throws Exception {
        // 设置拦截忽略文件夹,可以对静态资源放行包括css,js等
        web.ignoring().antMatchers("/static/**");
    }


   /**
     * 新建两个用户root 和user 分别拥有"ROLE_ROOT", "ROLE_USER" 和"ROLE_USER" 角色
     * @param auth
     * @throws Exception
     */
    @Override
    protected void configure(AuthenticationManagerBuilder auth) throws Exception {
        auth.inMemoryAuthentication()
                .passwordEncoder(getPasswordEncoder())
                .withUser("root")
                .password(getPasswordEncoder().encode("root@123456"))
                .roles("ROLE_ROOT", "ROLE_USER")
                .and()
                .withUser("user")
                .password(getPasswordEncoder().encode("user@123456"))
                .roles("ROLE_USER");
    }


    /**
     * 加密方式  security 5.0以后必须要求使用加密方式对明文密码进行加密
     * @return
     */
    @Bean
    private BCryptPasswordEncoder  getPasswordEncoder(){
        return new BCryptPasswordEncoder();
    }
或者使用重写userDetailsService()方法新建内存用户
@Override
    @Bean
    protected UserDetailsService userDetailsService() {
        InMemoryUserDetailsManager manager = new InMemoryUserDetailsManager();
       manager.createUser(User.withUsername("root").password(getPasswordEncoder().encode("root@123456")).roles("ROOT").build());
        manager.createUser(User.withUsername("user").password(getPasswordEncoder().encode("user@123456")).roles("USER").build());
        return manager;
    }
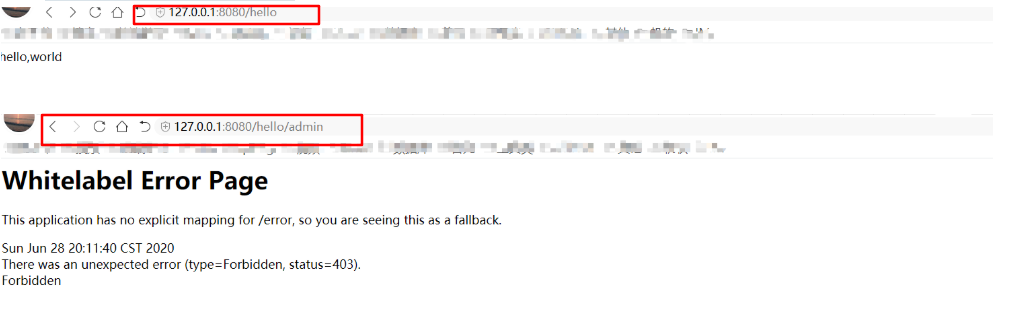
使用user/user@123456登录后,可正常访问/hello接口,但是访问/hello/admin接口时前台报403无权访问错误,说明我们的配置已经生效。
(六)使用数据库用户登录
在实际应用开发中,我们不会使用以上方式(把用户信息放到内存中),用户信息应该存储在DB中,通过查询DB获取用户信息,Security提供有相应的接口,因我们自己的业务系统一般使用自己设计的权限模型,所以经常使用的方案是实现UserDetailService接口中的loadUserByUsername方法,根据用户名返回UserDetails对象。在使用自定义的登录逻辑实现登录之前,我们先看下security登录验证的整体流程。
1 .登录验证流程
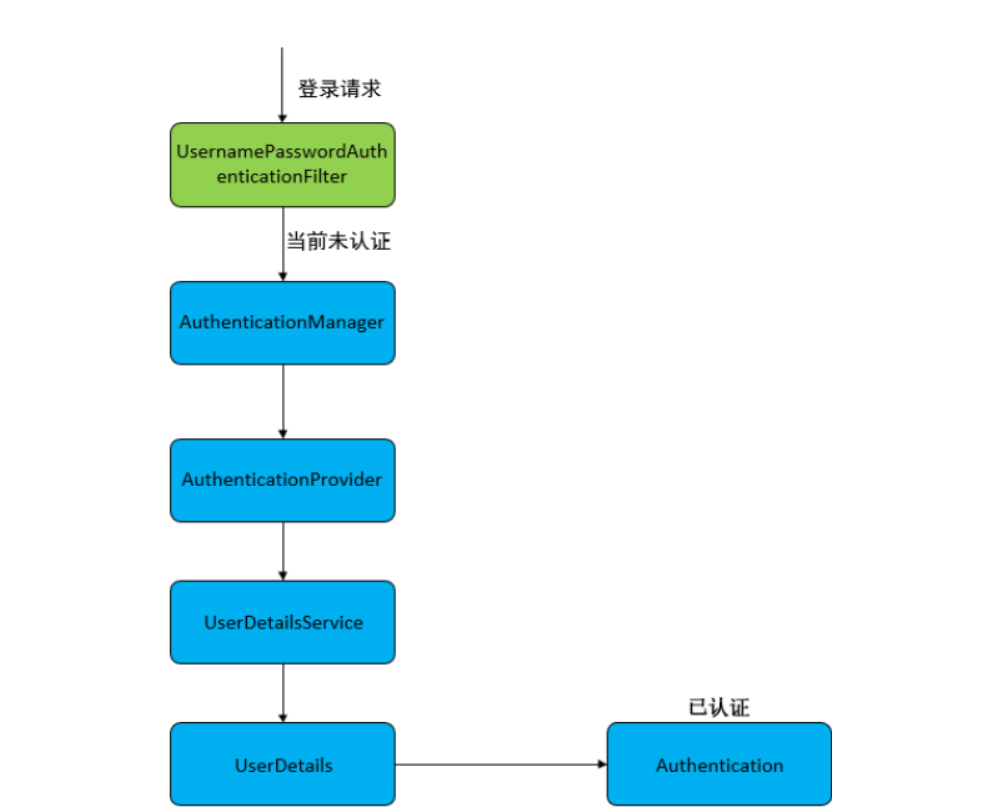
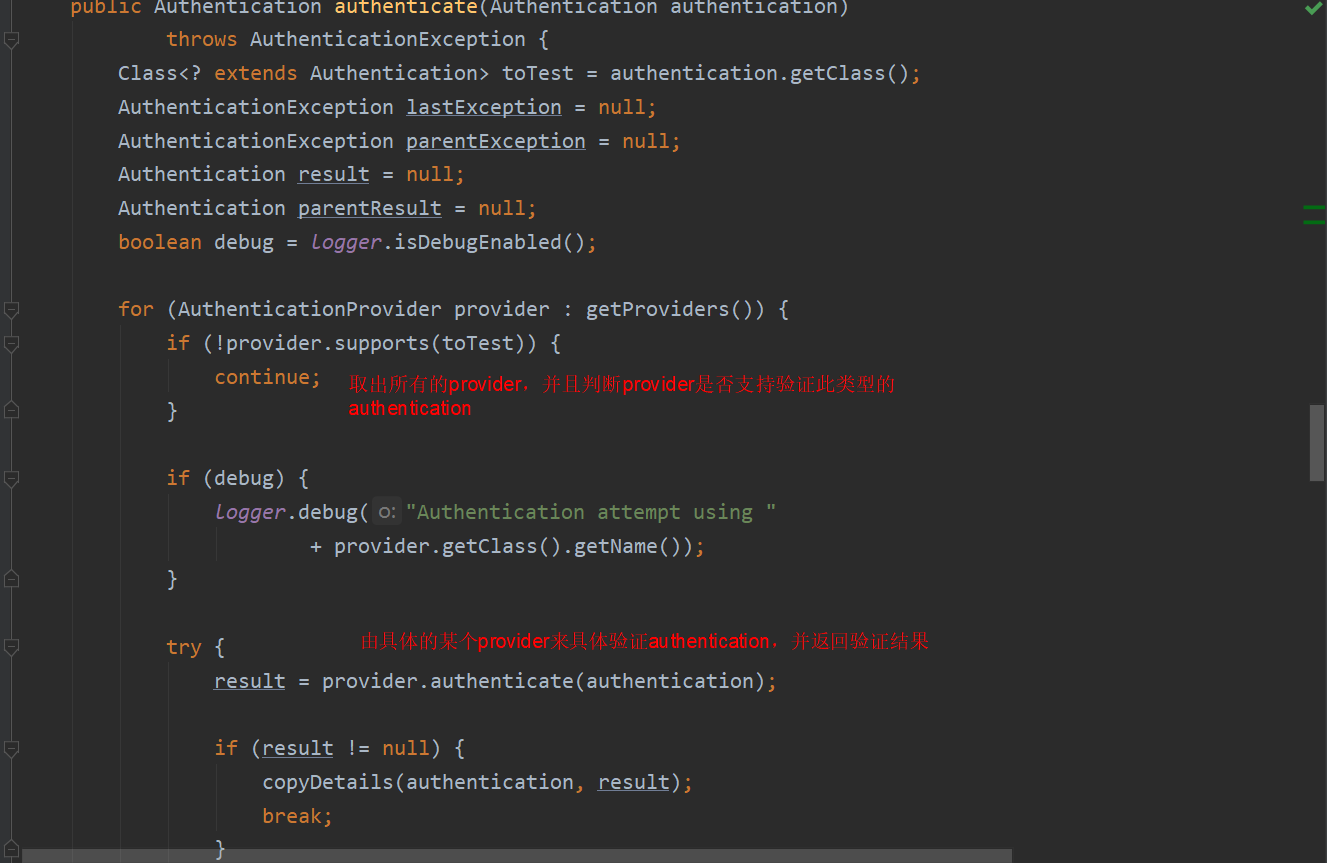
(1) .用户通过前台页面发起登录请求后,请求会被UsernamePasswordAuthenticationFilter拦截,执行attemptAuthentication方法,构建token对象,具体构建的token对象的过程比较简单,可自行查看源码。token生成后并交由AuthenticationManager的实现类ProviderManager的authenticate方法来处理

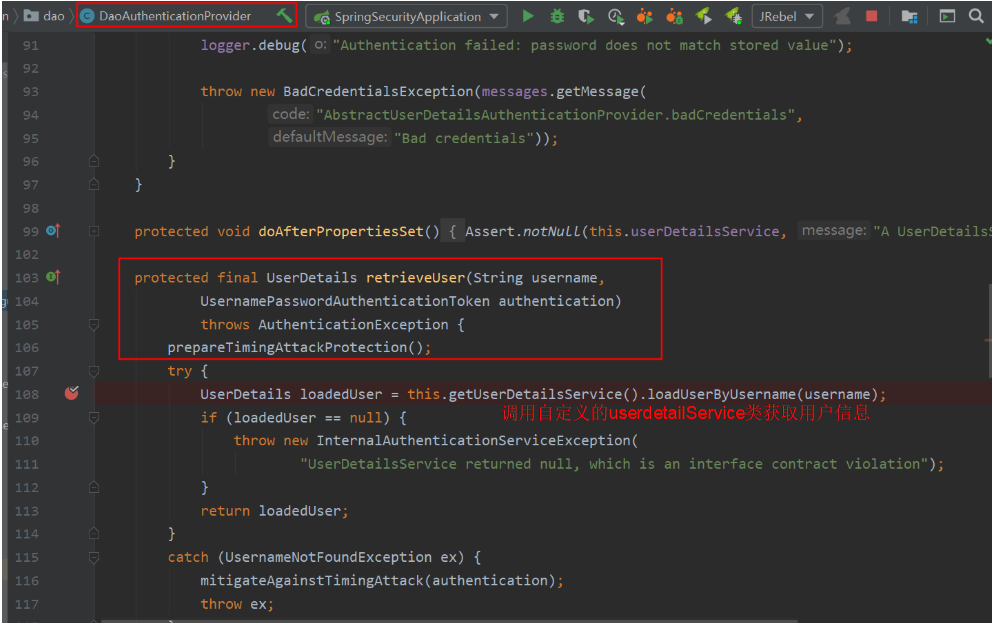
(2) 用户名密码登录流程所使用DaoAuthenticationProvider继承自AbstractUserDetailsAuthenticationProvider,并实现了抽象方法retrieveUser,获取userDetailService获取用户信息后,对用户进行认证。

(3).认证成功后调用createSuccessAuthentication()方法,并返回认证信息,在此方法中 ,它重新 new 了一个 UsernamePasswordAuthenticationToken,因为到这里认证已经通过了,所以将 authorities 注入进去,并设置 authenticated 为 true,即已通过认证。


(4)到此为止认证信息会返回到UsernamePasswordAuthenticationFilter 中,在 UsernamePasswordAuthenticationFilter 的父类 AbstractAuthenticationProcessingFilter 的 doFilter() 中,会根据认证的成功或者失败调用相应的 handler,此handler可通过

2. 自定义类
根据登录流程,需要自定义类实现UserDetailsService接口,重写loadUserByUsername实现从自己的数据库查询用户信息逻辑
@Component
public class SecurityUserDetailsService implements UserDetailsService {

	private Logger log = LoggerFactory.getLogger(SecurityUserDetailsService.class);

	@Autowired
	private UserMapper userMapper ;

	/**
	 * 根据用户名称查询用户信息,并返回UserDetails对象
	 * @param username
	 * @return
	 * @throws UsernameNotFoundException
	 */
	@Override
	public UserDetails loadUserByUsername(String username) throws UsernameNotFoundException {
        //自定义实现查找用户的方式,这里不是重点,不再贴具体实现代码
		User user = userMapper.getUserByName(username);
		if (user == null) {
			log.error("Can not find user by name: {}", username);
			throw new UsernameNotFoundException("Can not find user by name:"+username);
		}
			//返回User 对象
		return org.springframework.security.core.userdetails.User
				.withUsername(username)
				.password(user.getPassword())
				.roles("USER","ROOT").accountExpired(false)
				.accountLocked(false)
				.credentialsExpired(false)
				.disabled(false)
				.build();
	}
}
3. 修改配置
修改上面AuthConfiguration 的配置类,配置自定义的UserDetailsService类及密码加密方式
   @Override
    protected void configure(AuthenticationManagerBuilder auth) throws Exception {
        auth.userDetailsService(securityUserDetailsService).
                passwordEncoder(getPasswordEncoder());
    }
4. 自定义加密
通过实现PasswordEncoder接口中的两个方法,实现自定义的加密方式
	//加密
	String encode(CharSequence rawPassword);

	//判断密码是否匹配
	boolean matches(CharSequence rawPassword, String encodedPassword);