1、HC-SR501人体红外感应模块 测试

//红外感应
//信号接 7 端口
int ledpin = 7;
void setup()
{
pinMode(ledpin, INPUT);
Serial.begin(9600); // 打开串口,设置波特率为9600 bps
}
void loop()
{
int in = digitalRead(ledpin);
Serial.println(in); //有人的时候输出高电平1 无人0
delay(2000);
//信号接 7 端口
int ledpin = 7;
void setup()
{
pinMode(ledpin, INPUT);
Serial.begin(9600); // 打开串口,设置波特率为9600 bps
}
void loop()
{
int in = digitalRead(ledpin);
Serial.println(in); //有人的时候输出高电平1 无人0
delay(2000);
}
我买个模块是这样使用的:如果放在小车上那么可以感应周围是否有人,如果没人的时候不运行,有人的时候才会出来得瑟一下,哈。。
2、超声波测距模块测试

//超声波测距
//Echo 接 arduino.5;Trig 接 arduino.4
//VCC +,END - GND 无需外接电源即可测试
const int TrigPin = 4;
const int EchoPin = 5;
void setup() {
// initialize serial communication:
Serial.begin(9600);
}
void loop()
{
// establish variables for duration of the ping,
// and the distance result in centimeters:
long duration, cm;
// The HC-SR04 is triggered by a HIGH pulse of 2 or more microseconds.
// Give a short LOW pulse beforehand to ensure a clean HIGH pulse:
pinMode(TrigPin, OUTPUT);
digitalWrite(TrigPin, LOW);
delayMicroseconds(2);
digitalWrite(TrigPin, HIGH);
delayMicroseconds(5);
digitalWrite(TrigPin, LOW);
// The same pin is used to read the signal from the HC-SR04: a HIGH
// pulse whose duration is the time (in microseconds) from the sending
// of the ping to the reception of its echo off of an object.
pinMode(EchoPin, INPUT);
duration = pulseIn(EchoPin, HIGH);
// convert the time into a distance
cm = microsecondsToCentimeters(duration);
Serial.print(cm);
Serial.print("cm");
Serial.println();
delay(1000);
}
long microsecondsToCentimeters(long microseconds)
{
// The speed of sound is 340 m/s or 29 microseconds per centimeter.
// The ping travels out and back, so to find the distance of the
// object we take half of the distance travelled.
return microseconds / 29 / 2;
}
机器人三定律
第一法则机器人不得伤害人类,或袖手旁观坐视人类受到伤害;
第二法则除非违背第一法则,机器人必须服从人类的命令;
第三法则在不违背第一及第二法则下,机器人必须保护自己。
有了超声波模块就能检测小车离障碍物的距离,并根据距离作出反应。那么就能保护自己,符合第三定律。
3、直流电机控制模块测试
//直流电机控制
//需要外接电源 5V - 12V
//VCC接 arduino +5,GND 接 arduino GND
//1INA 1INB 分别接 arduino PWM 6,7
int leftmotorpin1 = 7; // define your motor pins
int leftmotorpin2 = 6;
void setup()
{
for (int pinindex = 0; pinindex < 14; pinindex++) {
pinMode(pinindex, OUTPUT); // set pins 0 to 13 as outputs
}
Serial.begin(9600); // 打开串口,设置波特率为9600 bps
}
void loop()
{
Serial.println("run");
digitalWrite(leftmotorpin1, HIGH);
digitalWrite(leftmotorpin2, LOW);
delay(5000);
Serial.println("back");
digitalWrite(leftmotorpin1, LOW);
digitalWrite(leftmotorpin2, HIGH);
delay(5000);
Serial.println("stop");
digitalWrite(leftmotorpin1, LOW);
digitalWrite(leftmotorpin2, LOW);
delay(3000);
}
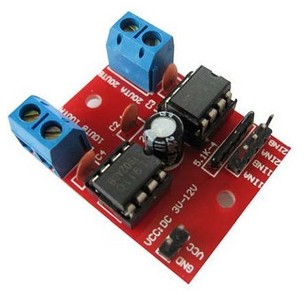
有了电机驱动就能控制小车前进、后退。也可以利用两轮转速差来实现左转、右转、掉头等功能。开始我用的是上图的驱动模块结果发现这个模块对超声波模块信号干扰严重,最终换成了带光耦的电机驱动解决了这个问题。
带光耦的电机驱动:

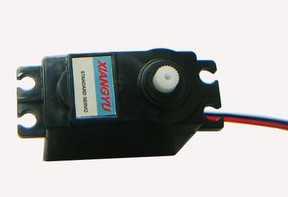
4、舵机控制测试
//舵机控制测试
//需要外接电源 +5V - +12V
//舵机接5+ arduino.GND 型号端接 arduino.PWM 9
#include <Servo.h>
Servo myservo;//定义舵机变量名
void setup()
{
myservo.attach(9);//定义舵机接口,9或10
Serial.begin(9600); // 打开串口,设置波特率为9600 bps
}
void loop()
{
for(int i=0;i<=18;i++)
{
myservo.write(i * 10);//设置舵机旋转的角度
Serial.println(i * 10);
delay(1000);
}
}
//舵机接5+ arduino.GND 型号端接 arduino.PWM 9
#include <Servo.h>
Servo myservo;//定义舵机变量名
void setup()
{
myservo.attach(9);//定义舵机接口,9或10
Serial.begin(9600); // 打开串口,设置波特率为9600 bps
}
void loop()
{
for(int i=0;i<=18;i++)
{
myservo.write(i * 10);//设置舵机旋转的角度
Serial.println(i * 10);
delay(1000);
}
}
需要注意的是:舵机电流比较大,需要外接电源供电不能直接用 android 板子上的5v供电。