本节内容
磁盘管理
LVM
一、磁盘管理
1、硬盘接口
种类及其应用:
IDE接口硬盘多用于家用产品,部分应用于服务器
SATA
SCSI接口硬盘主要应用于服务器
SAS只在高端服务器上,价格昂贵
2、硬盘种类
a、SATA硬盘:SATA接口,又叫串口硬盘。PC机主流发展方向。有较强的纠错能力,错误一经发现能自动纠正,这样就大大的提高了数据传输的安全性。(0.5V电压,转速可达7200转/分)
b、SCSI硬盘:SCSI接口。优点:SCSI接口应用范围广、多任务、带宽大、CPU占用率低,以及热插拔等。它由于性能好、稳定性高,因此在服务器上得到广泛应用。缺点:由于SCSI硬盘价格非常昂贵,所以一般的PC是不会使用SCSI硬盘。 一般转速可达10000转/分。
c、SAS硬盘:SAS(Serial Attached SCSI)即串行连接SCSI,是新一代的SCSI技术,和现在流行的Serial ATA(SATA)硬盘相同,都是采用串行技术以获得更高的传输速度,并通过缩短连结线改善内部空间等。改善存储系统的效能、可用性和扩充性。 一般转速可达15000转/分,甚至更高。
3、分区符
在Linux系统中一切皆文件,所以硬盘也是文件,分区也是文件
设备文件都存放在/dev目录中,/dev又叫做设备文件目录
MBR(Master Boot Record)硬盘的主引导记录
硬盘的0柱面、0磁头、1扇区称为主引导扇区(也叫主引导记录MBR)。它由三个部分组成,主引导程序、硬盘分区表DPT(Disk Partition table)和分区有效标志(55AA)。在总共512字节的主引导扇区里主引导程序(boot loader)占446个字节,第二部分是Partition table区(分区表),即DPT,占64个字节,硬盘中分区有多少以及每一分区的大小都记在其中。第三部分是magic number,占2个字节,固定为55AA。
512字节
三部分组成
主引导程序:bootloader 446
分区表:64字节
魔数:55AA
分区作用:
主分区:主要是用来启动操作系统的,它主要放的是操作系统的启动或引导程序,/boot分区最好放在主分区上
扩展分区:不能使用的,它只是做为逻辑分区的容器存在的,先创建一个扩展分区,在拓展分区之上创建逻辑分区;我们真正存放数据的是主分区和逻辑分区,大量数据都放在逻辑分区中。
注意:使用分区工具fdisk对磁盘进行操作,分区,格式化(重点)
主分区:最多是4个。编号默认是从1开始(1-4)。
扩展分区:最多是一个,可以是0个。(扩展分区也算是主分区一种,也就是说,当存在扩展分区时,主分区还可以划分3个)
逻辑分区:可以很多个,逻辑分区是建立在扩展分区之上的(编号从5开始)
命名方式: /dev/sd[a-z]n
其中:(s代表scsi或者sata;h为ide接口;)(d代表硬盘;r代表光驱;)a-z表示设备的序号,如sda表示第一块scsi硬盘,sdb就是第二块......,n表示每块磁盘上划分的磁盘分区编号。
4、文件系统
用户在硬件存储设备中执行的文件建立、写入、读取、修改、转存与控制等操作都是依靠文件系统来完成的。文件系统的作用是合理规划硬盘,以保证用户正常的使用需求。Linux系统支持数十种的文件系统,而最常见的文件系统如下所示。
centos6系统默认的是ext4--ext2,Linux second extended file system,ext2fx
centos7系统默认的是xfs
Ext4:Ext3的改进版本,作为RHEL 6系统中的默认文件管理系统,它支持的存储容量高达1EB(1EB=1,073,741,824GB),且能够有无限多的子目录。另外,Ext4文件系统能够批量分配block块,从而极大地提高了读写效率。
XFS:是一种高性能的日志文件系统,而且是RHEL 7中默认的文件管理系统,它的优势在发生意外宕机后尤其明显,即可以快速地恢复可能被破坏的文件,而且强大的日志功能只用花费极低的计算和存储性能。并且它最大可支持的存储容量为18EB,这几乎满足了所有需求。
5、fdisk分区管理工具(manipulate disk partition table)
m 查看全部可用的参数
n 添加新的分区
d 删除某个分区信息
l 列出所有可用的分区类型(查看)
t 改变某个分区的类型
p 打印分区信息(查看分区表信息)
w 保存分区信息并退出
q 不保存直接退出
fdisk:磁盘分区,是Linux发行版本中最常用的分区工具
用法:fdisk [选项] device
例子1:创建主分区
第一步:创建主分区
[root@renyz08 ~]# fdisk /dev/sdb
Welcome to fdisk (util-linux 2.23.2).
Changes will remain in memory only, until you decide to write them.
Be careful before using the write command.
更改将停留在内存中,直到您决定将更改写入磁盘。
使用写入命令前请三思。
Device does not contain a recognized partition table
Building a new DOS disklabel with disk identifier 0x1eff4d75.
Command (m for help): m #查看命令帮助信息
Command action
a toggle a bootable flag
b edit bsd disklabel
c toggle the dos compatibility flag
d delete a partition
g create a new empty GPT partition table
G create an IRIX (SGI) partition table
l list known partition types
m print this menu
n add a new partition
o create a new empty DOS partition table
p print the partition table
q quit without saving changes
s create a new empty Sun disklabel
t change a partition's system id
u change display/entry units
v verify the partition table
w write table to disk and exit
x extra functionality (experts only)
Command (m for help): n #创建新的分区
Partition type:
p primary (0 primary, 0 extended, 4 free)
e extended
Select (default p): #创建主分区,回车默认是主分区
Using default response p
Partition number (1-4, default 1): #回车默认编号为1
First sector (2048-41943039, default 2048): #默认分区起始值
Using default value 2048
Last sector, +sectors or +size{K,M,G} (2048-41943039, default 41943039): +30G #分区大小不能超过磁盘总大小(错误尝试)(G单位要大写)
Value out of range.
Last sector, +sectors or +size{K,M,G} (2048-41943039, default 41943039): +1G
#输入想要分区的大小
Partition 1 of type Linux and of size 1 GiB is set
Command (m for help): p #打印分区信息
Disk /dev/sdb: 21.5 GB, 21474836480 bytes, 41943040 sectors
Units = sectors of 1 * 512 = 512 bytes
Sector size (logical/physical): 512 bytes / 512 bytes
I/O size (minimum/optimal): 512 bytes / 512 bytes
Disk label type: dos
Disk identifier: 0x1eff4d75
Device Boot Start End Blocks Id System
/dev/sdb1 2048 2099199 1048576 83 Linux
Command (m for help): w #保存当前分区信息
The partition table has been altered!
Calling ioctl() to re-read partition table.
Syncing disks.
第二步:查看分区
[root@renyz08 ~]# ls /dev/sdb*
/dev/sdb /dev/sdb1
第三步:进行格式化,就是安装文件系统的过程mkfs(meke xfs)
[root@renyz08 ~]# mkfs.xfs /dev/sdb1
或者[root@renyz08 ~]# mkfs -t xfs /dev/sdb1
第四步:挂载使用
[root@renyz08 ~]# df -h #查看原先的挂载信息
文件系统 容量 已用 可用 已用% 挂载点
/dev/mapper/centos-root 17G 1.2G 16G 7% /
devtmpfs 475M 0 475M 0% /dev
tmpfs 487M 0 487M 0% /dev/shm
tmpfs 487M 7.6M 479M 2% /run
tmpfs 487M 0 487M 0% /sys/fs/cgroup
/dev/sda1 1014M 133M 882M 14% /boot
tmpfs 98M 0 98M 0% /run/user/0
[root@renyz08 ~]# mkdir /ren1 #创建挂载点
[root@renyz08 ~]# mount /dev/sdb1 /ren1
#把磁盘分区挂载到linux系统一个目录下
[root@renyz08 ~]# df -h #查看挂载信息
文件系统 容量 已用 可用 已用% 挂载点
/dev/mapper/centos-root 17G 1.2G 16G 7% /
devtmpfs 475M 0 475M 0% /dev
tmpfs 487M 0 487M 0% /dev/shm
tmpfs 487M 7.6M 479M 2% /run
tmpfs 487M 0 487M 0% /sys/fs/cgroup
/dev/sda1 1014M 133M 882M 14% /boot
tmpfs 98M 0 98M 0% /run/user/0
/dev/sdb1 1014M 33M 982M 4% /ren1
第五步:验证数据写入位置
[root@renyz08 ~]# touch /ren1/{1..50}.txt #数据写入磁盘中
[root@renyz08 ~]# ls /ren1 #查看数据
10.txt 15.txt 1.txt 24.txt 29.txt 33.txt 38.txt 42.txt 47.txt 5.txt
11.txt 16.txt 20.txt 25.txt 2.txt 34.txt 39.txt 43.txt 48.txt 6.txt
12.txt 17.txt 21.txt 26.txt 30.txt 35.txt 3.txt 44.txt 49.txt 7.txt
13.txt 18.txt 22.txt 27.txt 31.txt 36.txt 40.txt 45.txt 4.txt 8.txt
14.txt 19.txt 23.txt 28.txt 32.txt 37.txt 41.txt 46.txt 50.txt 9.txt
[root@renyz08 ~]# umount /ren1 #取消挂载点
[root@renyz08 ~]# ls /ren1 #磁盘中的数据不在原先挂载目录下
[root@renyz08 ~]# mkdir /ren2 #创建新的挂载点
[root@renyz08 ~]# mount /dev/sdb1 /ren2 #挂载到新的目录下
[root@renyz08 ~]# ls /ren2 #原先的数据存放到了新的挂载目录下
10.txt 15.txt 1.txt 24.txt 29.txt 33.txt 38.txt 42.txt 47.txt 5.txt
11.txt 16.txt 20.txt 25.txt 2.txt 34.txt 39.txt 43.txt 48.txt 6.txt
12.txt 17.txt 21.txt 26.txt 30.txt 35.txt 3.txt 44.txt 49.txt 7.txt
13.txt 18.txt 22.txt 27.txt 31.txt 36.txt 40.txt 45.txt 4.txt 8.txt
14.txt 19.txt 23.txt 28.txt 32.txt 37.txt 41.txt 46.txt 50.txt 9.txt
第六步:实现开机自动挂载
方法一:
[root@renyz08 ~]# vim /etc/fstab
/dev/sdb1 /ren2 xfs defaults 0 0
/dev/sdb1 要挂载的分区设备
/ren2 挂载点
xfs 文件系统类型
defaults 挂载选项
0 是否备份
0 是否检测
写到该文件中系统容易启动不起来,解决办法:
bios方法如下图:
1、打开电源时进入固件模式

2、CD-ROM Drive系统启动模式调整到第一位(按+号),F10保存退出

3、选择Troubleshooting模式

4、选择Rescue a CentOS system

5、依次按下图操作,并重启系统;最后关闭系统,进入固件模式,将BOOT中的系统启动项还原

方法二:
[root@renyz08 ~]# vim /etc/rc.local
mount /dev/sdb1 /ren1
[root@renyz08 ~]# ll /etc/rc.local
lrwxrwxrwx. 1 root root 13 7月 10 14:27 /etc/rc.local -> rc.d/rc.local
#/etc/rc.local是rc.d/rc.local的软连接文件
[root@renyz08 ~]# chmod +x /etc/rc.d/rc.local
#一定要加执行权限,否则文件中的命令无法执行
例子2:创建扩展分区
第一步:创建扩展分区
[root@renyz08 ~]# fdisk /dev/sdb
Welcome to fdisk (util-linux 2.23.2).
Changes will remain in memory only, until you decide to write them.
Be careful before using the write command.
Command (m for help): n
Partition type:
p primary (1 primary, 0 extended, 3 free)
e extended
Select (default p): e #创建拓展分区选择e
Partition number (2-4, default 2): 3 #分区编号可以在范围内自由选择
First sector (2099200-41943039, default 2099200): #起始扇区默认
Using default value 2099200
Last sector, +sectors or +size{K,M,G} (2099200-41943039, default 41943039): +3G #指定扩展分区大小
Partition 3 of type Extended and of size 3 GiB is set
Command (m for help): p #查看
Disk /dev/sdb: 21.5 GB, 21474836480 bytes, 41943040 sectors
Units = sectors of 1 * 512 = 512 bytes
Sector size (logical/physical): 512 bytes / 512 bytes
I/O size (minimum/optimal): 512 bytes / 512 bytes
Disk label type: dos
Disk identifier: 0x1eff4d75
Device Boot Start End Blocks Id System
/dev/sdb1 2048 2099199 1048576 83 Linux
/dev/sdb3 2099200 8390655 3145728 5 Extended
Command (m for help): w #保存退出
The partition table has been altered!
Calling ioctl() to re-read partition table.
WARNING: Re-reading the partition table failed with error 16: Device or resource busy.
The kernel still uses the old table. The new table will be used at
the next reboot or after you run partprobe(8) or kpartx(8)
Syncing disks.
第二步:查看分区磁盘
[root@renyz08 ~]# ls /dev/sdb*
/dev/sdb /dev/sdb1 /dev/sdb3
#如果发现没有新创建的磁盘,执行第三步
第三步:同步分区表
[root@ken1 ~]# partprobe
Warning: Unable to open /dev/sr0 read-write (Read-only file system). /dev/sr0 has been opened read-only.
Warning: 无法以读写方式打开 /dev/sr0 (只读文件系统)。/dev/sr0 已按照只读方式打开。
例子3:创建逻辑分区
第一步:创建逻辑分区
[root@renyz08 ~]# fdisk /dev/sdb
Welcome to fdisk (util-linux 2.23.2).
Changes will remain in memory only, until you decide to write them.
Be careful before using the write command.
Command (m for help): n
Partition type:
p primary (1 primary, 1 extended, 2 free)
l logical (numbered from 5)
Select (default p): l #选择l,逻辑分区编号是从5开始的,即使主分区的编号没用完
Adding logical partition 5
First sector (2101248-8390655, default 2101248):
Using default value 2101248
Last sector, +sectors or +size{K,M,G} (2101248-8390655, default 8390655): +4G
Value out of range.
Last sector, +sectors or +size{K,M,G} (2101248-8390655, default 8390655): +1G
Partition 5 of type Linux and of size 1 GiB is set
Command (m for help): p
Disk /dev/sdb: 21.5 GB, 21474836480 bytes, 41943040 sectors
Units = sectors of 1 * 512 = 512 bytes
Sector size (logical/physical): 512 bytes / 512 bytes
I/O size (minimum/optimal): 512 bytes / 512 bytes
Disk label type: dos
Disk identifier: 0x1eff4d75
Device Boot Start End Blocks Id System
/dev/sdb1 2048 2099199 1048576 83 Linux
/dev/sdb3 2099200 8390655 3145728 5 Extended
/dev/sdb5 2101248 4198399 1048576 83 Linux
Command (m for help): w
The partition table has been altered!
Calling ioctl() to re-read partition table.
WARNING: Re-reading the partition table failed with error 16: Device or resource busy.
The kernel still uses the old table. The new table will be used at
the next reboot or after you run partprobe(8) or kpartx(8)
Syncing disks.
[root@renyz08 ~]# partprobe #同步磁盘信息
Warning: Unable to open /dev/sr0 read-write (Read-only file system). /dev/sr0 has been opened read-only.
[root@renyz08 ~]# ls /dev/sdb* #查看逻辑分区
/dev/sdb /dev/sdb1 /dev/sdb3 /dev/sdb5
第二步:格式化
[root@renyz08 ~]# mkfs.xfs /dev/sdb5
第三步:挂载
[root@renyz08 ~]# mount /dev/sdb5 /ren2
[root@renyz08 ~]# df -h
文件系统 容量 已用 可用 已用% 挂载点
/dev/mapper/centos-root 17G 1.2G 16G 7% /
devtmpfs 475M 0 475M 0% /dev
tmpfs 487M 0 487M 0% /dev/shm
tmpfs 487M 7.6M 479M 2% /run
tmpfs 487M 0 487M 0% /sys/fs/cgroup
/dev/sda1 1014M 133M 882M 14% /boot
tmpfs 98M 0 98M 0% /run/user/0
/dev/sdb5 1014M 33M 982M 4% /ren2
第四步:开机自启
[root@renyz08 ~]# echo "mount /dev/sdb5 /ren2" >> /etc/rc.local
二、swap(交换)分区
SWAP(交换)分区是一种通过在硬盘中预先划分一定的空间,然后将把内存中暂时不常用的数据临时存放到硬盘中,以便腾出物理内存空间让更活跃的程序服务来使用的技术,其设计目的是为了解决真实物理内存不足的问题。但由于交换分区毕竟是通过硬盘设备读写数据的,速度肯定要比物理内存慢,所以只有当真实的物理内存耗尽后才会调用交换分区的资源。
swap交换分区就是把磁盘中一块当中内存使用
工作中建议不用!
如果工作中发现交换分区用的太多,需要考虑加大内存!
工作中建议交换分区大小设置为真实物理内存的1.5~2倍左右(物理内存为16G的话,交换分区大小设置32G)
查看交换分区:
[root@renyz08 ~]# free -h
total used free shared buff/cache available
Mem: 972M 88M 752M 7.6M 131M 733M
Swap: 2.0G 0B 2.0G
例子1:添加2G交换分区
第一步:创建分区
略
第二步:格式化为swap类型
[root@renyz08 ~]# mkswap /dev/sdb2
正在设置交换空间版本 1,大小 = 2097148 KiB
无标签,UUID=bfdc606b-8a6a-4375-a7a2-c96edfc2a949
第三步:启动swap交换分区
[root@renyz08 ~]# swapon /dev/sdb2
[root@renyz08 ~]# free -h
total used free shared buff/cache available
Mem: 972M 86M 768M 7.6M 118M 742M
Swap: 4.0G 0B 4.0G
第四步:swap交换分区开机自启
vim /etc/fstab
/dev/sdb2 swap swap defaults 0 0
第五步:停止swap
使用swapoff可以停止swap
[root@renyz08 ~]# free -h
total used free shared buff/cache available
Mem: 972M 86M 763M 7.6M 122M 740M
Swap: 4.0G 0B 4.0G
[root@renyz08 ~]# swapoff
Usage:
swapoff [options] [<spec>]
Options:
-a, --all disable all swaps from /proc/swaps
-v, --verbose verbose mode
-h, --help display this help and exit
-V, --version output version information and exit
The <spec> parameter:
-L <label> LABEL of device to be used
-U <uuid> UUID of device to be used
LABEL=<label> LABEL of device to be used
UUID=<uuid> UUID of device to be used
<device> name of device to be used
<file> name of file to be used
For more details see swapoff(8).
[root@renyz08 ~]# swapoff -a
[root@renyz08 ~]# free -h
total used free shared buff/cache available
Mem: 972M 83M 766M 7.6M 122M 742M
Swap: 0B 0B 0B
三、LVM逻辑卷
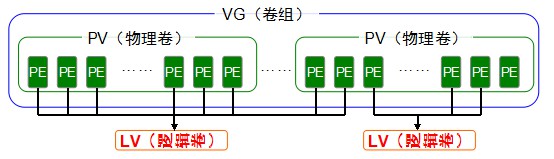
逻辑卷管理器是Linux系统用于对硬盘分区进行管理的一种机制,理论性较强,其创建初衷是为了解决硬盘设备在创建分区后不易修改分区大小的缺陷。尽管对传统的硬盘分区进行强制扩容或缩容从理论上来讲是可行的,但是却可能造成数据的丢失。而LVM技术是在硬盘分区和文件系统之间添加了一个逻辑层,它提供了一个抽象的卷组,可以把多块硬盘进行卷组合并。这样一来,用户不必关心物理硬盘设备的底层架构和布局,就可以实现对硬盘分区的动态调整。
物理存储介质(The physical media):VM存储介质可以是磁盘分区,整个磁盘,RAID阵列或SAN磁盘,设备必须初始化为LVM物理卷,才能与LVM结合使用
物理卷PV(physical volume):物理卷就是LVM的基本存储逻辑块,但和基本的物理存储介质(如分区、磁盘等)比较,却包含有与LVM相关的管理参数,创建物理卷它可以用硬盘分区,也可以用硬盘本身;
卷组VG(Volume Group):一个LVM卷组由一个或多个物理卷组成??
逻辑卷LV(logical volume):LV建立在VG之上,可以在LV之上建立文件系统
PE(physical extents):PV物理卷中可以分配的最小存储单元,PE的大小是可以指定的,默认为4MB
LE(logical extent):LV逻辑卷中可以分配的最小存储单元,在同一个卷组中,LE的大小和PE是相同的,并且一一对应
常用的LVM部署命令:
功能/命令 物理卷管理 卷组管理 逻辑卷管理
扫描 pvscan vgscan lvscan
建立 pvcreate vgcreate lvcreate
显示 pvdisplay vgdisplay lvdisplay
删除 pvremove vgremove lvremove
扩展 vgextend lvextend
缩小 vgreduce lvreduce
例子1:创建逻辑卷
第一步:创建物理卷
[root@renyz08 ~]# pvcreate /dev/sd{b,c,d}
Physical volume "/dev/sdb" successfully created.
Physical volume "/dev/sdc" successfully created.
Physical volume "/dev/sdd" successfully created.
第二步:创建卷组
[root@renyz08 ~]# vgcreate ren /dev/sd{b,c,d}
Volume group "ren" successfully created
第三步:查看卷组信息
[root@renyz08 ~]# vgdisplay ren
第四步:创建逻辑卷
[root@renyz08 ~]# lvcreate -L 5G -n lv_ren ren
#-L指定创建磁盘的大小,-l指定PE的数量,PE大小4M
# lvcreate -l 100%vg -n lv_ren ren #利用全部空间来创建lv(或者100%free)
第五步:查看逻辑卷详细
[root@renyz08 ~]# lvdisplay /dev/ren/lv_ren
第六步:格式化
[root@renyz08 ~]# mkfs.xfs /dev/ren/lv_ren
第七步:挂载
[root@renyz08 ~]# mkdir /ren
[root@renyz08 ~]# mount /dev/ren/lv_ren /ren
[root@renyz08 ~]# df -h
文件系统 容量 已用 可用 已用% 挂载点
/dev/mapper/centos-root 17G 1.2G 16G 7% /
devtmpfs 475M 0 475M 0% /dev
tmpfs 487M 0 487M 0% /dev/shm
tmpfs 487M 7.7M 479M 2% /run
tmpfs 487M 0 487M 0% /sys/fs/cgroup
/dev/sda1 1014M 133M 882M 14% /boot
tmpfs 98M 0 98M 0% /run/user/0
/dev/mapper/ren-lv_ren 5.0G 33M 5.0G 1% /ren
四、LVM扩容
ext4扩容不能在线扩容,必须卸载才能扩容,支持扩容和缩容
xfs支持在线动态扩容,不支持缩容
1、xfs格式扩容
例子:
第一步:扩容
[root@renyz08 ~]# lvextend -L +5G /dev/ren/lv_ren
Size of logical volume ren/lv_ren changed from 5.00 GiB (1280 extents) to 10.00 GiB (2560 extents).
Logical volume ren/lv_ren successfully resized.
第二步:查看磁盘大小
[root@renyz08 ~]# df -h
文件系统 容量 已用 可用 已用% 挂载点
/dev/mapper/centos-root 17G 1.2G 16G 7% /
devtmpfs 475M 0 475M 0% /dev
tmpfs 487M 0 487M 0% /dev/shm
tmpfs 487M 7.7M 479M 2% /run
tmpfs 487M 0 487M 0% /sys/fs/cgroup
/dev/sda1 1014M 133M 882M 14% /boot
tmpfs 98M 0 98M 0% /run/user/0
/dev/mapper/ren-lv_ren 5.0G 33M 5.0G 1% /ren
第三步:执行xfs_growfs
[root@renyz08 ~]# xfs_growfs /dev/ren/lv_ren
meta-data=/dev/mapper/ren-lv_ren isize=512 agcount=4, agsize=327680 blks
= sectsz=512 attr=2, projid32bit=1
= crc=1 finobt=0 spinodes=0
data = bsize=4096 blocks=1310720, imaxpct=25
= sunit=0 swidth=0 blks
naming =version 2 bsize=4096 ascii-ci=0 ftype=1
log =internal bsize=4096 blocks=2560, version=2
= sectsz=512 sunit=0 blks, lazy-count=1
realtime =none extsz=4096 blocks=0, rtextents=0
data blocks changed from 1310720 to 2621440
第四步:再次查看磁盘大小
[root@renyz08 ~]# df -h
文件系统 容量 已用 可用 已用% 挂载点
/dev/mapper/centos-root 17G 1.2G 16G 7% /
devtmpfs 475M 0 475M 0% /dev
tmpfs 487M 0 487M 0% /dev/shm
tmpfs 487M 7.7M 479M 2% /run
tmpfs 487M 0 487M 0% /sys/fs/cgroup
/dev/sda1 1014M 133M 882M 14% /boot
tmpfs 98M 0 98M 0% /run/user/0
/dev/mapper/ren-lv_ren 10G 33M 10G 1% /ren
五、LVM逻辑卷删除
第一步:卸载光盘(取消挂载)
[root@renyz08 ~]# umount /ren
第二步:删除逻辑卷
[root@renyz08 ~]# lvremove /dev/ren/lv_ren
Do you really want to remove active logical volume ren/lv_ren? [y/n]: y
Logical volume "lv_ren" successfully removed
第三步:删除卷组
[root@renyz08 ~]# vgremove ren
Volume group "ren" successfully removed
第四步:删除物理卷
[root@renyz08 ~]# pvremove /dev/sd{b,c,d}
Labels on physical volume "/dev/sdb" successfully wiped.
Labels on physical volume "/dev/sdc" successfully wiped.
Labels on physical volume "/dev/sdd" successfully wiped.
作业:扩容根磁盘,在原有基础上加10G
(vg的剩余空间不足)
[root@renyz08 ~]# df -h #查看原先的磁盘容量
文件系统 容量 已用 可用 已用% 挂载点
/dev/mapper/centos-root 17G 1.2G 16G 7% /
devtmpfs 475M 0 475M 0% /dev
tmpfs 487M 0 487M 0% /dev/shm
tmpfs 487M 7.6M 479M 2% /run
tmpfs 487M 0 487M 0% /sys/fs/cgroup
/dev/sda1 1014M 133M 882M 14% /boot
tmpfs 98M 0 98M 0% /run/user/0
第一步:查询vg的剩余空间
[root@renyz08 ~]# vgdisplay
第二步:查看是否有可用的pv卷
[root@renyz08 ~]# pvscan
PV /dev/sda2 VG centos lvm2 [<19.00 GiB / 0 free]
Total: 1 [<19.00 GiB] / in use: 1 [<19.00 GiB] / in no VG: 0 [0 ]
第三步:添加硬盘并转换为pv卷
[root@renyz08 ~]# pvcreate /dev/sdb
Physical volume "/dev/sdb" successfully created.
[root@renyz08 ~]# pvscan
PV /dev/sda2 VG centos lvm2 [<19.00 GiB / 0 free]
PV /dev/sdb lvm2 [20.00 GiB]
Total: 2 [<39.00 GiB] / in use: 1 [<19.00 GiB] / in no VG: 1 [20.00 GiB]
第四步:将新pv卷添加至vg
[root@renyz08 ~]# vgextend centos /dev/sdb
Volume group "centos" successfully extended
第五步:调整lv的大小
[root@renyz08 ~]# lvresize -L +10G /dev/centos/root (或者lvextend)
Size of logical volume centos/root changed from <17.00 GiB (4351 extents) to <27.00 GiB (6911 extents).
Logical volume centos/root successfully resized.
第六步:将lv的最新容量通知给文件系统
[root@renyz08 ~]# xfs_growfs /dev/centos/root
[root@renyz08 ~]# df -h #再次查看,磁盘大小已改变
文件系统 容量 已用 可用 已用% 挂载点
/dev/mapper/centos-root 27G 1.2G 26G 5% /
devtmpfs 475M 0 475M 0% /dev
tmpfs 487M 0 487M 0% /dev/shm
tmpfs 487M 7.6M 479M 2% /run
tmpfs 487M 0 487M 0% /sys/fs/cgroup
/dev/sda1 1014M 133M 882M 14% /boot
tmpfs 98M 0 98M 0% /run/user/0
vg的剩余空间充足
1. 查询vg的剩余空间
# vgdisplay
2. 调整lv的大小
# lvresize -L +5G /dev/vgwtl/lvwtl
3. 将lv的最新容量通知给文件系统
# xfs_growfs /dev/vgwtl/lvwtl
4. 查看更新结果
# df -h
六、ext4格式扩容
1、ext4格式扩容
第一步:卸载
[root@ken ~]# umount /test1
第二步:把ken1逻辑卷扩展到300M
[root@ken ~]# umount /test1
[root@ken ~]# lvextend -L 300M /dev/ken/ken1
Size of logical volume ken/ken1 changed from 100.00 MiB (25 extents) to 300.00 MiB (75 extents).
Logical volume ken/ken1 successfully resized.
第三步:检查磁盘完整性
[root@ken ~]# e2fsck -f /dev/ken/ken1
e2fsck 1.42.9 (28-Dec-2013)
Pass 1: Checking inodes, blocks, and sizes
Pass 2: Checking directory structure
Pass 3: Checking directory connectivity
Pass 4: Checking reference counts
Pass 5: Checking group summary information
/dev/ken/ken1: 11/25688 files (9.1% non-contiguous), 8896/102400 blocks
第四步:重置硬盘容量
[root@ken ~]# resize2fs /dev/ken/ken1
resize2fs 1.42.9 (28-Dec-2013)
Resizing the filesystem on /dev/ken/ken1 to 307200 (1k) blocks.
The filesystem on /dev/ken/ken1 is now 307200 blocks long.
第五步:重新挂载
可以发现现在已经是300M了
[root@ken ~]# mount /dev/ken/ken1 /test1
[root@ken ~]# df -h
Filesystem Size Used Avail Use% Mounted on
/dev/mapper/centos-root 17G 1.2G 16G 7% /
devtmpfs 476M 0 476M 0% /dev
tmpfs 488M 0 488M 0% /dev/shm
tmpfs 488M 7.7M 480M 2% /run
tmpfs 488M 0 488M 0% /sys/fs/cgroup
/dev/sda1 1014M 130M 885M 13% /boot
tmpfs 98M 0 98M 0% /run/user/0
/dev/mapper/ken-ken1 287M 2.0M 266M 1% /test1
2、缩小逻辑卷
相较于扩容逻辑卷,在对逻辑卷进行缩容操作时,其丢失数据的风险更大。所以在生产环境中执行相应操作时,一定要提前备份好数据。另外Linux系统规定,在对LVM逻辑卷进行缩容操作之前,要先检查文件系统的完整性(当然这也是为了保证我们的数据安全)。在执行缩容操作前记得先把文件系统卸载掉。
第一步:卸载
[root@ken ~]# umount /test1/
第二步:检查系统完整性
[root@ken ~]# e2fsck -f /dev/ken/ken1
e2fsck 1.42.9 (28-Dec-2013)
Pass 1: Checking inodes, blocks, and sizes
Pass 2: Checking directory structure
Pass 3: Checking directory connectivity
Pass 4: Checking reference counts
Pass 5: Checking group summary information
/dev/ken/ken1: 11/75088 files (9.1% non-contiguous), 15637/307200 blocks
第三步:大小重置
[root@ken ~]# resize2fs /dev/ken/ken1 200M
resize2fs 1.42.9 (28-Dec-2013)
Resizing the filesystem on /dev/ken/ken1 to 204800 (1k) blocks.
The filesystem on /dev/ken/ken1 is now 204800 blocks long.
第四步:缩小到200M
[root@ken ~]# lvreduce -L 200M /dev/ken/ken1
WARNING: Reducing active logical volume to 200.00 MiB.
THIS MAY DESTROY YOUR DATA (filesystem etc.)
Do you really want to reduce ken/ken1? [y/n]: y
Size of logical volume ken/ken1 changed from 300.00 MiB (75 extents) to 200.00 MiB (50 extents).
Logical volume ken/ken1 successfully resized.
第五步:重新挂载使用
[root@ken ~]# mount /dev/ken/ken1 /test1/
[root@ken ~]# df -h
Filesystem Size Used Avail Use% Mounted on
/dev/mapper/centos-root 17G 1.2G 16G 7% /
devtmpfs 476M 0 476M 0% /dev
tmpfs 488M 0 488M 0% /dev/shm
tmpfs 488M 7.7M 480M 2% /run
tmpfs 488M 0 488M 0% /sys/fs/cgroup
/dev/sda1 1014M 130M 885M 13% /boot
tmpfs 98M 0 98M 0% /run/user/0
/dev/mapper/ken-ken1 190M 1.6M 175M 1% /test1