1. 场景描述
朋友项目需要弄个测试环境,稍微帮忙了下,系统不复杂,但是需要自己安装mysql、Reids、Es、RabbitMq等,Mq主要用在同步用户信息与发送站内消息和短信上,RabbitMq以前没记录,刚好又重新走了一遍,记录下部署、测试、常见问题,有需要的朋友,拿走不谢!
2.解决方案
2.1 mq部署
安装说明,版本没有用最新的版本,用的2018年的3.6.15,最新的在github上下载太慢了。
2.1.1 安装erlang语言相关包
[root@ruanjianlaowang ~]# yum install epel-release
[root@ruanjianlaowang ~]# yum install erlang
[root@ruanjianlaowang ~]# wget https://packages.erlang-solutions.com/erlang-solutions-1.0-1.noarch.rpm
[root@ruanjianlaowang ~]# rpm -Uvh erlang-solutions-1.0-1.noarch.rpm
2.1.2 安装rabbitmq
[root@ruanjianlaowang ~]# wget http://www.rabbitmq.com/releases/rabbitmq-server/v3.6.15/rabbitmq-server-3.6.15-1.el7.noarch.rpm
[root@ruanjianlaowang ~]# yum install rabbitmq-server-3.6.15-1.el7.noarch.rpm
#开启允许远程访问
[root@ruanjianlaowang ~]# cat /etc/rabbitmq/rabbitmq.config
[{rabbit, [{loopback_users, []}]}].
假如文件或者内容不存在,添加下(3.6.6版本没有)
[root@ruanjianlaowang ~]# vi /etc/rabbitmq/rabbitmq.config
[root@ruanjianlaowang ~]# rabbitmq-plugins enable rabbitmq_management
#安装延迟插件,特定场景,非必须
[root@ruanjianlaowang ~]# cd /usr/lib/rabbitmq/lib/rabbitmq_server-3.6.15/plugins
[root@ruanjianlaowang ~]# wget https://dl.bintray.com/rabbitmq/community-plugins/rabbitmq_delayed_message_exchange-0.0.1.ez
[root@ruanjianlaowang ~]# rabbitmq-plugins enable rabbitmq_delayed_message_exchange
#防火墙放行端口号
[root@ruanjianlaowang ~]# firewall-cmd --add-port=15672/tcp --permanent
[root@ruanjianlaowang ~]# firewall-cmd --add-port=5672/tcp --permanent
#启动关闭查看等命令
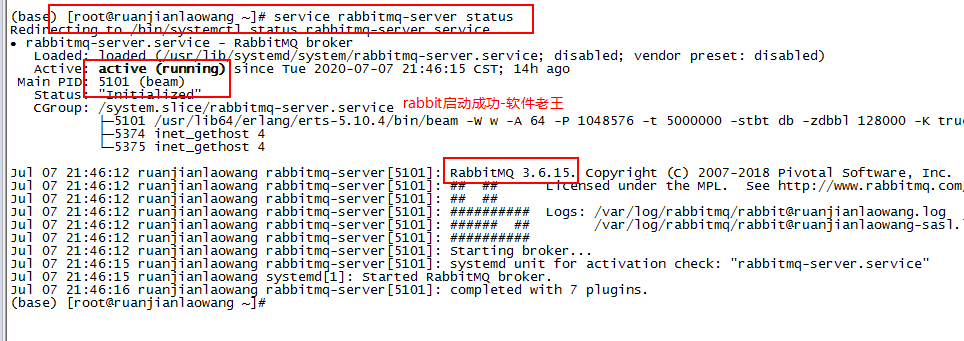
[root@ruanjianlaowang ~]# service rabbitmq-server start
[root@ruanjianlaowang ~]# service rabbitmq-server status
[root@ruanjianlaowang ~]# service rabbitmq-server restart
[root@ruanjianlaowang ~]# service rabbitmq-server stop
启动成功图:
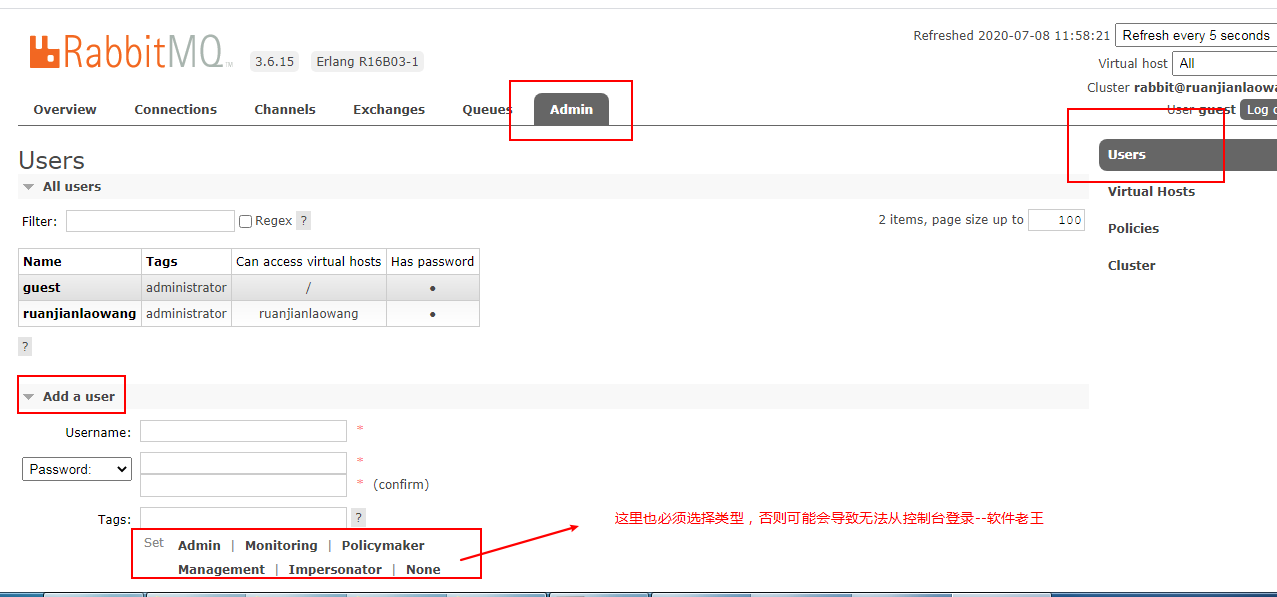
2.1.3 控制台新增用户和虚拟机
(1)控制台地址:http://45.122.146.23:15672/#/(阿里云的服务器,ip改成自己安装mq的地址)
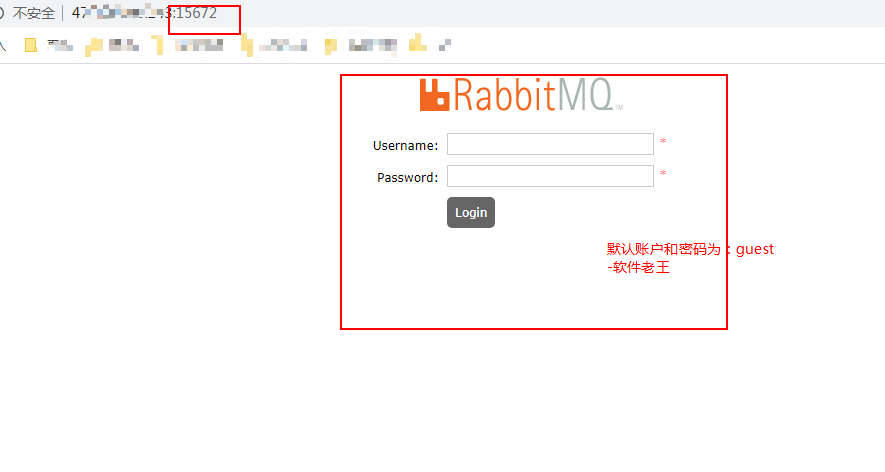
(2)两个端口,控制台:15672,消息通讯:5672

(3)添加用户
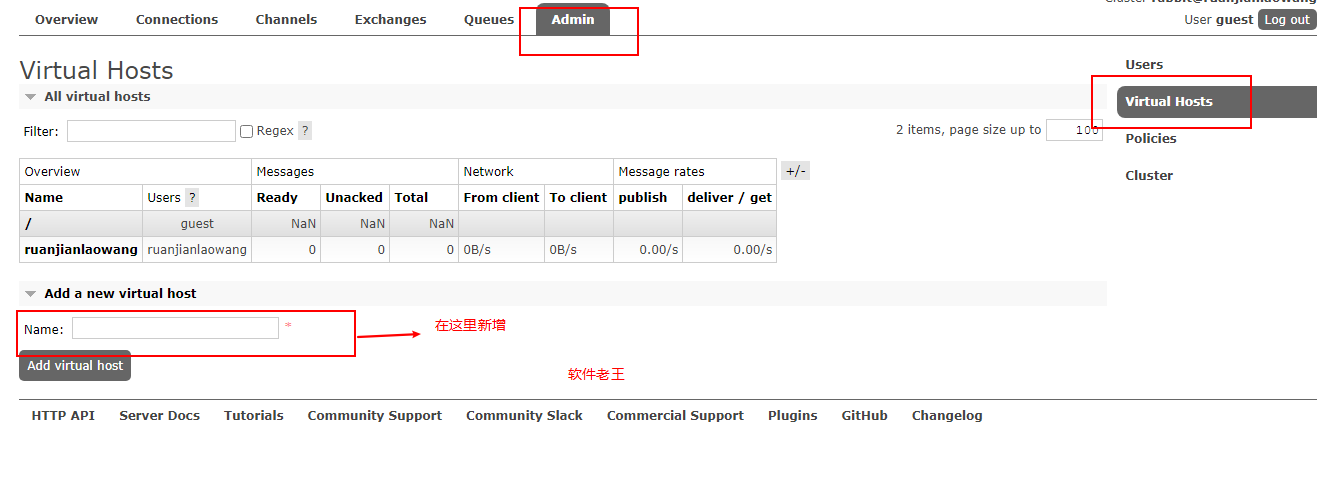
(4)添加虚拟host
其实类似linux中的文件,默认是/目录下,创建一个虚拟host便于区分。
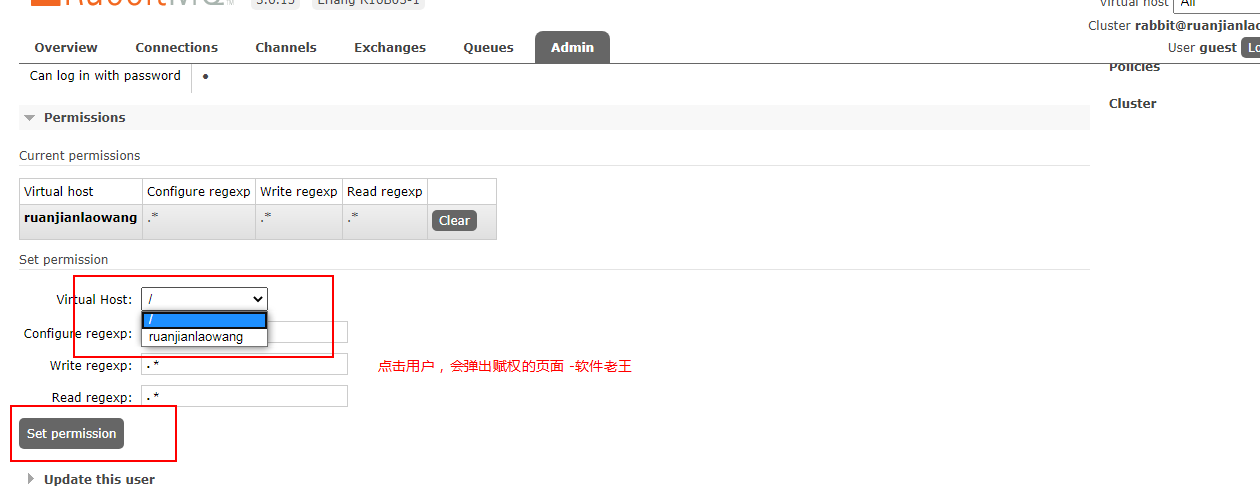
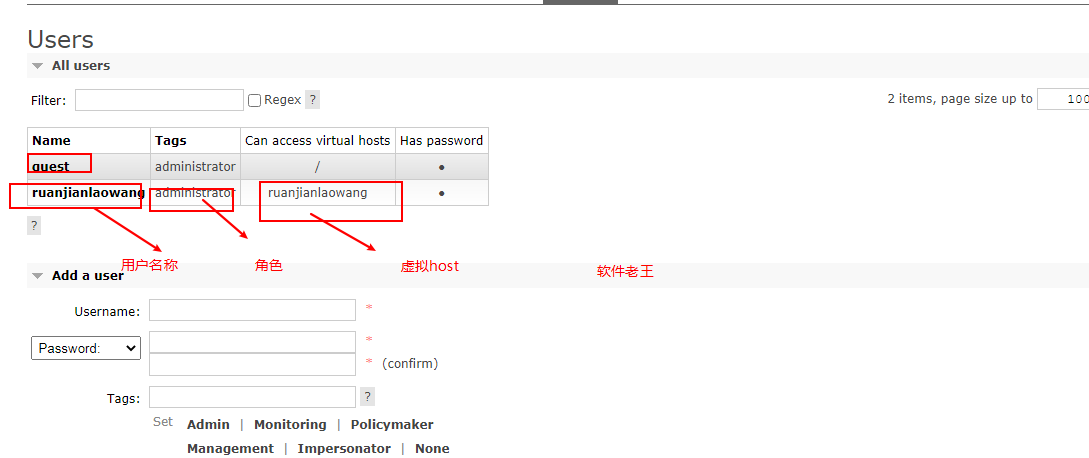
(5)关联用户和虚拟host
点击用户,会弹出赋权的页面
(6)配置完成
2.2 rabbitmq验证
直接用官方提供的验证代码,更改下配置就可以,两个类一个发送消息,一个接受消息。
2.2.1 官网demo地址:
https://github.com/rabbitmq/rabbitmq-tutorials/blob/master/java/Send.java
2.2.2 测试
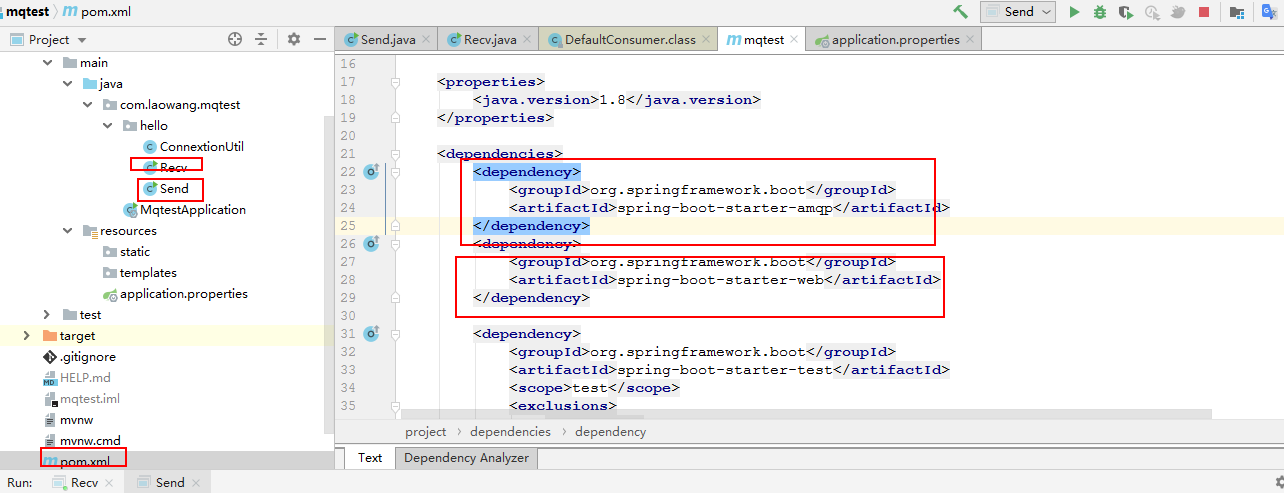
(1)idea下测试,springboot项目,两个depency就可以了,pom文件
<?xml version="1.0" encoding="UTF-8"?>
<project xmlns="http://maven.apache.org/POM/4.0.0" xmlns:xsi="http://www.w3.org/2001/XMLSchema-instance"
         xsi:schemaLocation="http://maven.apache.org/POM/4.0.0 https://maven.apache.org/xsd/maven-4.0.0.xsd">
    <modelVersion>4.0.0</modelVersion>
    <parent>
        <groupId>org.springframework.boot</groupId>
        <artifactId>spring-boot-starter-parent</artifactId>
        <version>2.3.1.RELEASE</version>
        <relativePath/> <!-- lookup parent from repository -->
    </parent>
    <groupId>com.laowang</groupId>
    <artifactId>mqtest</artifactId>
    <version>0.0.1-SNAPSHOT</version>
    <name>mqtest</name>
    <description>Demo project for Spring Boot</description>
    <properties>
        <java.version>1.8</java.version>
    </properties>
    <dependencies>
        <dependency>
            <groupId>org.springframework.boot</groupId>
            <artifactId>spring-boot-starter-amqp</artifactId>
        </dependency>
        <dependency>
            <groupId>org.springframework.boot</groupId>
            <artifactId>spring-boot-starter-web</artifactId>
        </dependency>
    <build>
        <plugins>
            <plugin>
                <groupId>org.springframework.boot</groupId>
                <artifactId>spring-boot-maven-plugin</artifactId>
            </plugin>
        </plugins>
    </build>
</project>
效果图如下:
(2)消息推送类:Send.java
package com.laowang.mqtest.hello;

import com.rabbitmq.client.Channel;
import com.rabbitmq.client.Connection;
import com.rabbitmq.client.ConnectionFactory;
import java.nio.charset.StandardCharsets;
public class Send {
    private final static String QUEUE_NAME = "hello";

    public static void main(String[] argv) throws Exception {
        ConnectionFactory factory = new ConnectionFactory();
//        factory.setHost("localhost");
        factory.setHost("45.122.146.23");
        factory.setPort(5672);
        factory.setVirtualHost("ruanjianlaowang");
        factory.setUsername("ruanjianlaowang");
        factory.setPassword("123");

        try (Connection connection = factory.newConnection();
             Channel channel = connection.createChannel()) {
            channel.queueDeclare(QUEUE_NAME, false, false, false, null);
            String message = "Hello World!";
            channel.basicPublish("", QUEUE_NAME, null, message.getBytes(StandardCharsets.UTF_8));
            System.out.println(" [x] Sent '" + message + "'");
        }
    }
}
(3)消息接受类Recv.java:
package com.laowang.mqtest.hello;
import com.rabbitmq.client.Channel;
import com.rabbitmq.client.Connection;
import com.rabbitmq.client.ConnectionFactory;
import com.rabbitmq.client.DeliverCallback;
public class Recv {
    private final static String QUEUE_NAME = "hello";
    public static void main(String[] argv) throws Exception {
        ConnectionFactory factory = new ConnectionFactory();
//        factory.setHost("localhost");
        factory.setHost("45.122.146.23");
        factory.setPort(5672);
        factory.setVirtualHost("ruanjianlaowang");
        factory.setUsername("ruanjianlaowang");
        factory.setPassword("123");

        Connection connection = factory.newConnection();
        Channel channel = connection.createChannel();

        channel.queueDeclare(QUEUE_NAME, false, false, false, null);
        System.out.println(" [*] Waiting for messages. To exit press CTRL+C");

        DeliverCallback deliverCallback = (consumerTag, delivery) -> {
            String message = new String(delivery.getBody(), "UTF-8");
            System.out.println(" [x] Received '" + message + "'");
        };
        channel.basicConsume(QUEUE_NAME, true, deliverCallback, consumerTag -> { });
    }
}
说明:连接信息更改为你自己的连接信息。
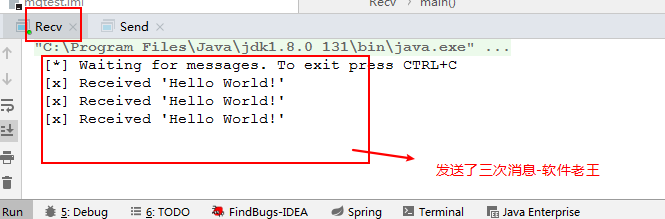
(4)执行效果图
发送类:

接受类,发送了三次。
2.3 问题总结:
(1) 虚拟host创建可以带“/”,也可以不带,配置的要注意。
(2) 防火墙记得放开端口号。
I’m 「软件老王」,如果觉得还可以的话,关注下呗,后续更新秒知!欢迎讨论区、同名公众号留言交流!