我们知道,spring boot自动配置功能可以根据不同情况来决定spring配置应该用哪个,不应该用哪个,举个例子:
- Spring的JdbcTemplate是不是在Classpath里面?如果是,并且DataSource也存在,就自动配置一个JdbcTemplate的Bean
- Thymeleaf是不是在Classpath里面?如果是,则自动配置Thymeleaf的模板解析器、视图解析器、模板引擎
那个这个是怎么实现的呢?原因就在于它利用了Spring的条件化配置,条件化配置允许配置存在于应用中,但是在满足某些特定条件前会忽略这些配置。
要实现条件化配置我们要用到@Conditional条件化注解。
本篇随便讲从如下三个方面进行展开:
- @Conditional小例子,来说明条件化配置的实现方式
- spring boot 的条件化配置详解
- spring boot 自动配置源码分析
- 自己动手实现spring boot starter pom
一、@Conditional小例子
我们知道在windows下显示列表的命令是dir,而在linux系统下显示列表的命令是ls,基于条件配置,我们可以实现在不同的操作系统下返回不同的值。
- 判断条件定义
- )windows下的判定条件

/** * 实现spring 的Condition接口,并且重写matches()方法,如果操作系统是windows就返回true * */ public class WindowsCondition implements Condition{ @Override public boolean matches(ConditionContext context, AnnotatedTypeMetadata metadata) { return context.getEnvironment().getProperty("os.name").contains("Windows"); } } - )linux下的判定条件
/**
 * 实现spring 的Condition接口,并且重写matches()方法,如果操作系统是linux就返回true
 *
 */
public class LinuxCondition implements Condition{

    @Override
    public boolean matches(ConditionContext context, AnnotatedTypeMetadata metadata) {

        return context.getEnvironment().getProperty("os.name").contains("Linux");
    }


}
- )windows下的判定条件
- 不同系统下的Bean的类
- )接口
public interface ListService { public String showListLine(); } - )windows下的Bean类
public class WindowsListService implements ListService{ @Override public String showListLine() { return "dir"; } } - )linux下的Bean的类
public class LinuxListService implements ListService{

    @Override
    public String showListLine() {
        return "ls";
    }

}
- )接口
- 配置类
@Configuration public class ConditionConfig { /** * 通过@Conditional 注解,符合windows条件就返回WindowsListService实例 * */ @Bean @Conditional(WindowsCondition.class) public ListService windonwsListService() { return new WindowsListService(); } /** * 通过@Conditional 注解,符合linux条件就返回LinuxListService实例 * */ @Bean @Conditional(LinuxCondition.class) public ListService linuxListService() { return new LinuxListService(); } } - 测试类
public class ConditionTest { public static void main(String[] args) { AnnotationConfigApplicationContext context = new AnnotationConfigApplicationContext(ConditionConfig.class); ListService listService = context.getBean(ListService.class); System.out .println(context.getEnvironment().getProperty("os.name") + " 系统下的列表命令为: " + listService.showListLine()); } } - 运行测试类,由于我的是windows7 系统,因此结果是
Windows 7 系统下的列表命令为: dir
如果你的是linux系统,则结果就会是
Linux 系统下的列表命令为: ls
二、spring boot 的条件化配置
在spring boot项目中会存在一个名为spring-boot-autoconfigure的jar包

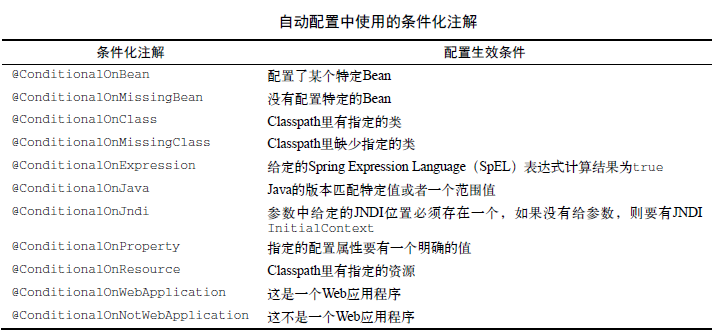
条件化配置就是在这个jar里面实现的,它用到了如下的条件化注解,这些注解都是以@ConditionalOn开头的,他们都是应用了@Conditional的组合注解:
接下来我们看个源码的列子:
以JdbcTemplateAutoConfiguration为例,它里面有这段代码:
@Bean
    @Primary
    @ConditionalOnMissingBean(JdbcOperations.class)
    public JdbcTemplate jdbcTemplate() {
        return new JdbcTemplate(this.dataSource);
    }
只有在不存在JdbcOperations(如果查看JdbcTemplate的源码,你会发现JdbcTemplate类实现了JdbcOperations接口)实例的时候,才会初始化一个JdbcTemplate 的Bean。
基于以上内容,我们就可以阅读自动配置相关的源码了。
三、spring boot 自动配置源码分析
spring boot项目的启动类用的注解--@SpringBootApplication是一个组合注解,其中@EnableAutoConfiguration是自动配置相关的。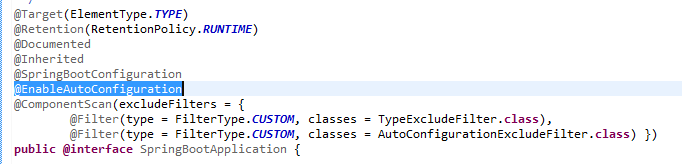
而这个@EnableAutoConfiguration注解里面有个@Import注解导入了EnableAutoConfigurationImportSelector用来实现具体的功能
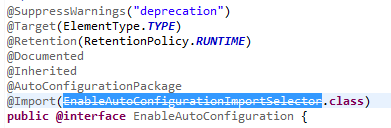
(注:由于我本地的spring boot版本不是最新的,这里的EnableAutoConfigurationImportSelector已经不建议使用了,新版本可能已经换成了其他类,但是不影响我们看代码)
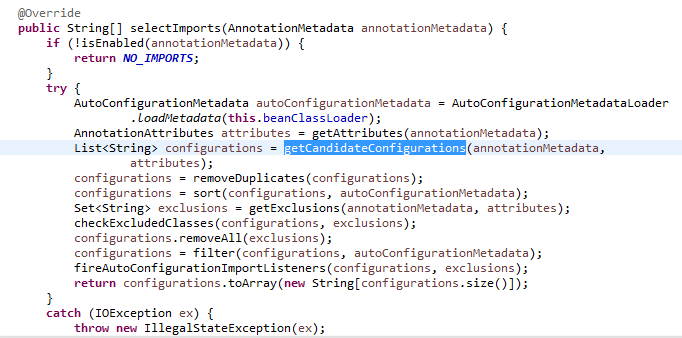
这个类继承了AutoConfigurationImportSelector

进入父类,里面有个方法selectImports()调用了方法getCandidateConfigurations(),进而调用了SpringFactoriesLoader.loadFactoryNames()方法
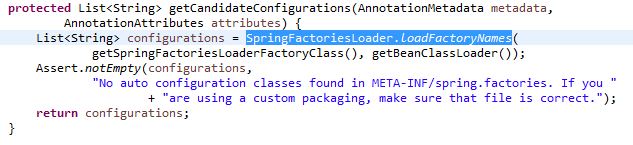
在SpringFactoriesLoader.loadFactoryNames()方法里面,我们看到会查询META-INF/spring.factories这个配置文件
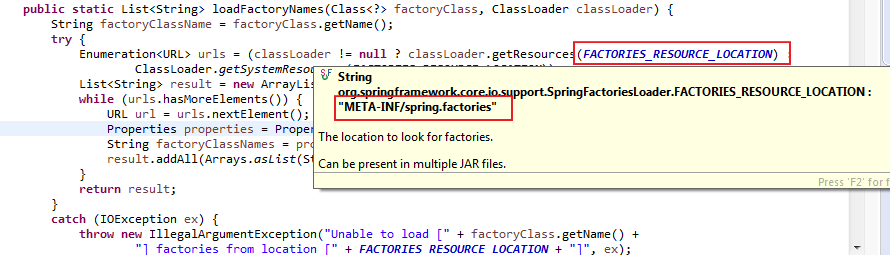
SpringFactoriesLoader.loadFactoryNames方法会扫描具有META-INF/spring.factories文件的jar包,而我们的spring-boot-autoconfigure.jar里面就有一个这样的文件,此文件中声明了具体有哪些自动配置:
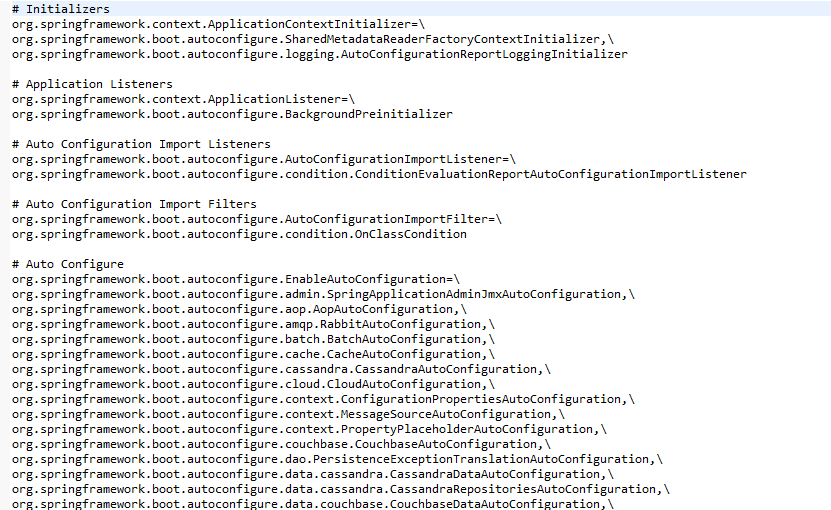
我们上面提到的JdbcTemplateAutoConfiguration自动配置类就在里面。
四、编写自己的spring boot starter pom
接下来,我们就来写一个简单的spring boot starter pom。
步骤如下:
- 新建starter maven项目spring-boot-starter-hello
- 修改pom文件
<project xmlns="http://maven.apache.org/POM/4.0.0" xmlns:xsi="http://www.w3.org/2001/XMLSchema-instance" xsi:schemaLocation="http://maven.apache.org/POM/4.0.0 http://maven.apache.org/xsd/maven-4.0.0.xsd"> <modelVersion>4.0.0</modelVersion> <groupId>com.sam</groupId> <artifactId>spring-boot-starter-hello</artifactId> <version>0.0.1-SNAPSHOT</version> <packaging>jar</packaging> <dependencies> <!-- 这里需要引入spring boot的自动配置作为依赖 --> <dependency> <groupId>org.springframework.boot</groupId> <artifactId>spring-boot-autoconfigure</artifactId> <version>1.5.1.RELEASE</version> </dependency> </dependencies> </project> - 属性配置
/** * @ConfigurationProperties * 自动匹配application.properties文件中hello.msg的值,然后赋值给类属性msg,这里的msg默认值为“spring boot” * */ @ConfigurationProperties(prefix="hello") public class HelloServiceProperties { private static final String MSG = "spring boot"; private String msg = MSG; public String getMsg() { return msg; } public void setMsg(String msg) { this.msg = msg; } } - 判定依据类
/** * 后面的代码会依据此类是否存在,来决定是否生产对应的Bean * */ public class HelloService { private String msg; public String getMsg() { return msg; } public void setMsg(String msg) { this.msg = msg; } public String sayHello() { return "hello " + msg; } } - 自动配置类
@Configuration
@EnableConfigurationProperties(HelloServiceProperties.class)
@ConditionalOnClass(HelloService.class)
@ConditionalOnProperty(prefix = "hello", matchIfMissing = true, value = "enabled")
public class HelloServiceAutoConfiguration {

    @Autowired
    HelloServiceProperties helloServiceProperties;

    @Bean
    @ConditionalOnMissingBean(HelloService.class)
    public HelloService helloService() {
        HelloService service = new HelloService();
        service.setMsg(helloServiceProperties.getMsg());
        return service;
    }
}
根据HelloServiceProperties提供的参数,并通过@ConditionalOnClass(HelloService.class)判定HelloService这个类在Classpath中是否存在,存在并且还没有对应的Bean,就生成对应的helloService Bean
- 注册配置,需要到META-INF/spring.factories文件中注册改自动配置类:在src/main/source目录下新建改文件,然后进行配置。
org.springframework.boot.autoconfigure.EnableAutoConfiguration=
com.sam.spring_boot_starter_hello.HelloServiceAutoConfiguration
- 对该工程进行mvn clean install,将jar推送到本地maven仓库,供后续使用。 使用starter ,使用我们这个starter 需要新建一个或使用既存的一个spring boot工程(这里我用的是既存的),然后
- )修改pom,引入上述的依赖
<dependency> <groupId>com.sam</groupId> <artifactId>spring-boot-starter-hello</artifactId> <version>0.0.1-SNAPSHOT</version> </dependency> - )实现controller
@RestController public class HelloController { //代码中没有配置这个helloService Bean,但是自动配置能够帮忙实例化,因此可以直接注入 @Autowired HelloService helloService; @RequestMapping(value="/helloService") public String sayHello() { return helloService.sayHello(); } } - )页面访问/helloService接口

- )在application.properties里面配置hello.msg=sam,然后再次访问/helloService接口
