这篇文章主要讲述服务追踪组件zipkin,Spring Cloud Sleuth集成了zipkin组件。
一、简介
Spring Cloud Sleuth 主要功能就是在分布式系统中提供追踪解决方案,并且兼容支持了 zipkin,你只需要在pom文件中引入相应的依赖即可。
二、服务追踪分析
微服务架构上通过业务来划分服务的,通过REST调用,对外暴露的一个接口,可能需要很多个服务协同才能完成这个接口功能,如果链路上任何一个服务出现问题或者网络超时,都会形成导致接口调用失败。随着业务的不断扩张,服务之间互相调用会越来越复杂。

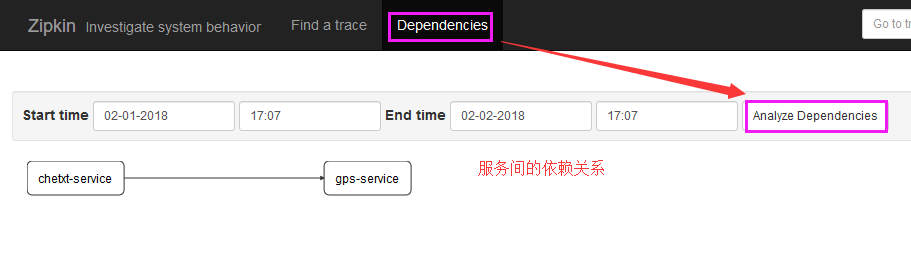
随着服务的越来越多,对调用链的分析会越来越复杂。它们之间的调用关系也许如下:

三、术语
- Span:基本工作单元,例如,在一个新建的span中发送一个RPC等同于发送一个回应请求给RPC,span通过一个64位ID唯一标识,trace以另一个64位ID表示,span还有其他数据信息,比如摘要、时间戳事件、关键值注释(tags)、span的ID、以及进度ID(通常是IP地址)
span在不断的启动和停止,同时记录了时间信息,当你创建了一个span,你必须在未来的某个时刻停止它。 - Trace:一系列spans组成的一个树状结构,例如,如果你正在跑一个分布式大数据工程,你可能需要创建一个trace。
- Annotation:用来及时记录一个事件的存在,一些核心annotations用来定义一个请求的开始和结束
- cs - Client Sent -客户端发起一个请求,这个annotion描述了这个span的开始
- sr - Server Received -服务端获得请求并准备开始处理它,如果将其sr减去cs时间戳便可得到网络延迟
- ss - Server Sent -注解表明请求处理的完成(当请求返回客户端),如果ss减去sr时间戳便可得到服务端需要的处理请求时间
- cr - Client Received -表明span的结束,客户端成功接收到服务端的回复,如果cr减去cs时间戳便可得到客户端从服务端获取回复的所有所需时间
将Span和Trace在一个系统中使用Zipkin注解的过程图形化:
将Span和Trace在一个系统中使用Zipkin注解的过程图形化:

四、构建工程
基本知识讲解完毕,下面我们来实战,本文的案例主要有三个工程组成:
1.server-zipkin
它的主要作用使用ZipkinServer 的功能,收集调用数据,并展示;
2.chetxt-service
对外暴露接口
3.gps-service
对外暴露接口
上面两个service可以相互调用,并且只有调用了,server-zipkin才会收集数据的,这就是为什么叫服务追踪了。
新建server-zipkin
pom.xml
<dependency>
            <groupId>org.springframework.cloud</groupId>
            <artifactId>spring-cloud-starter-zipkin</artifactId>
        </dependency>
        <dependency>
            <groupId>io.zipkin.java</groupId>
            <artifactId>zipkin-server</artifactId>
        </dependency>

        <dependency>
            <groupId>io.zipkin.java</groupId>
            <artifactId>zipkin-autoconfigure-ui</artifactId>
        </dependency>
springboot启动类
@SpringBootApplication(exclude = {DataSourceAutoConfiguration.class}) // 不加红字会出现默认database的错误
@EnableZipkinServer
public class BootApplication {
    public static void main(String[] args) {
        SpringApplication.run(BootApplication.class, args);
    }
}
配置文件
server.port=9411
新建chetxt-service
pom.xml
<dependency>
            <groupId>org.springframework.cloud</groupId>
            <artifactId>spring-cloud-starter-zipkin</artifactId>
        </dependency>
配置文件
server.port=8008

spring.zipkin.base-url=http://localhost:9411
spring.application.name=chetxt-service
springboot启动类
@SpringBootApplication
@ComponentScan(basePackages="com.chetxt")//扫描组件
@ServletComponentScan(basePackages="com.chetxt")//扫描拦截器,过滤器
public class BootApplication {
    public static void main(String[] args) {
        SpringApplication.run(BootApplication.class, args);
    }

    @Bean
    public RestTemplate restTemplate() {
        HttpComponentsClientHttpRequestFactory httpRequestFactory = new HttpComponentsClientHttpRequestFactory();
        httpRequestFactory.setConnectionRequestTimeout(10000);
        httpRequestFactory.setConnectTimeout(10000);
        httpRequestFactory.setReadTimeout(10000);
        return new RestTemplate();//httpRequestFactory);
    }

    @Bean // 采样器
    public AlwaysSampler defaultSampler(){
        return new AlwaysSampler();
    }
}
暴露接口
@RestController
@RequestMapping("/v1/vehicleorder")
public class OrderinfoController {

    @RequestMapping(value = "/addgps", method = RequestMethod.GET)
//    @Transactional(propagation = Propagation.REQUIRED, isolation = Isolation.DEFAULT, readOnly = false)
    public String addgps(String Appcode) {
        // 验证笔录项目
        if(Appcode == null || Appcode.equals("")){
            TransactionAspectSupport.currentTransactionStatus().setRollbackOnly();
            return new ZhongruiResult(false, true, "缺少appcode", null, null).toJsonString();
        }

        JSONObject param = new JSONObject();
        try {
            param.put("appcode", Appcode);
        } catch (JSONException e) {
            e.printStackTrace();
        }

     // resttemplate调用gps-service暴露的接口
        HttpHeaders headers = new HttpHeaders();
        MediaType type = MediaType.parseMediaType("application/json; charset=UTF-8");
        headers.setContentType(type);
        headers.add("Accept", MediaType.APPLICATION_JSON_UTF8_VALUE.toString());//application/json
        HttpEntity<String> formEntity = new HttpEntity<String>(param.toString(), headers);
        String rtnStr=this.restTemplate.postForObject("http://localhost:8009/gps/order/add", formEntity,String.class);

        return rtnStr;
    }
@RequestMapping(value = "/xxx", method = RequestMethod.GET)
//    @Transactional(propagation = Propagation.REQUIRED, isolation = Isolation.DEFAULT, readOnly = false)
    public String xxx(String Appcode) {


  }
}创建gps-service
pom文件和启动类和上面一样
暴露接口
@RestController
@RequestMapping("/gps/order")
public class OrderinfoController {
    public static Logger logger = LoggerFactory.getLogger(OrderinfoController.class);

    @Autowired
    private RestTemplate restTemplate;

    @Value("${server.port}")
    private int port;

    @RequestMapping(value = "/add", method = RequestMethod.POST, consumes = "application/json", produces = "*/*")
//    @Transactional(propagation = Propagation.REQUIRED, isolation = Isolation.DEFAULT, readOnly = false)
    public String add(@RequestBody RequestAdd param) {


//        TransactionAspectSupport.currentTransactionStatus().setRollbackOnly();
        return new ObjectResult(true, "", JsonUtil.object2JsonString(param), null).toJsonString();
    }

}
配置文件
server.port=8009

spring.zipkin.base-url=http://localhost:9411
spring.application.name=gps-service
一切准备就绪,下面启动三个微服务。
五、演示
浏览器里输入下面的地址,模拟服务之间调用接口
http://localhost:8008/v1/vehicleorder/addgps?Appcode=112233445566
返回结果,表示调用成功

打开zipkin的追踪网址
http://localhost:9411
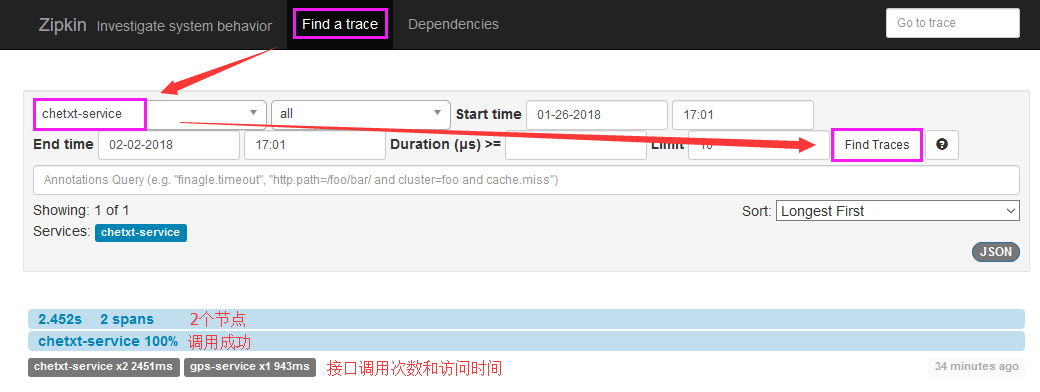
点击2 spans那一行
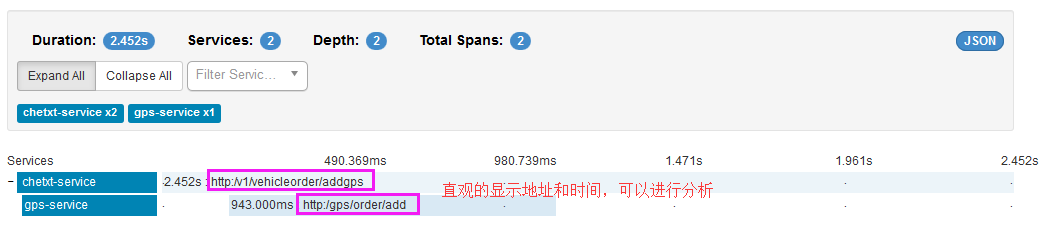
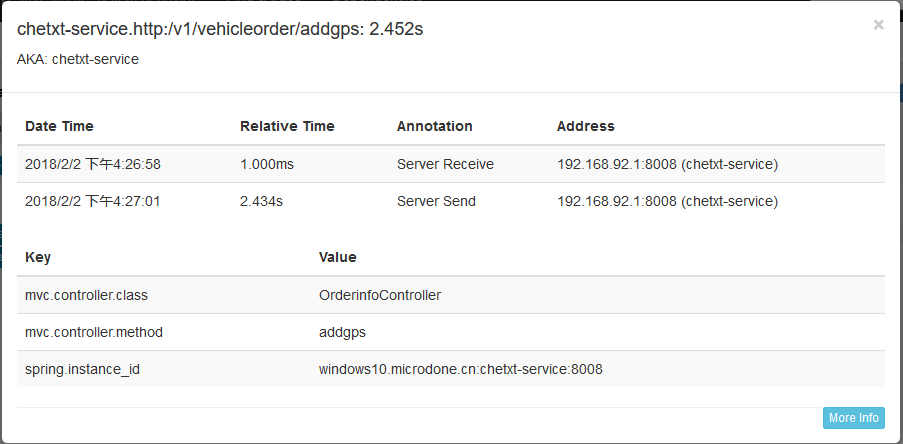
点击链接行,弹出具体信息
上面是成功了的,下面改下代码,让gps-service里的add接口出现访问超时
@Bean
    public RestTemplate restTemplate() {
        HttpComponentsClientHttpRequestFactory httpRequestFactory = new HttpComponentsClientHttpRequestFactory();
        httpRequestFactory.setConnectionRequestTimeout(10000);
        httpRequestFactory.setConnectTimeout(10000);
        httpRequestFactory.setReadTimeout(10000);
        return new RestTemplate(httpRequestFactory);// 设置resttemplate访问10s超时
    }
@RequestMapping(value = "/add", method = RequestMethod.POST, consumes = "application/json", produces = "*/*")
//    @Transactional(propagation = Propagation.REQUIRED, isolation = Isolation.DEFAULT, readOnly = false)
    public String add(@RequestBody RequestAdd param) {
        // 睡眠30s
        for (int i = 0; i < 30; i++) {
            try {
                Thread.sleep(1000);
            } catch (InterruptedException e) {
                e.printStackTrace();
            }
        }

//        TransactionAspectSupport.currentTransactionStatus().setRollbackOnly();
        return new ObjectResult(true, "", JsonUtil.object2JsonString(param), null).toJsonString();
    }
再次请求地址,报超时错误,这是我们预期的

再去zipkin里看看
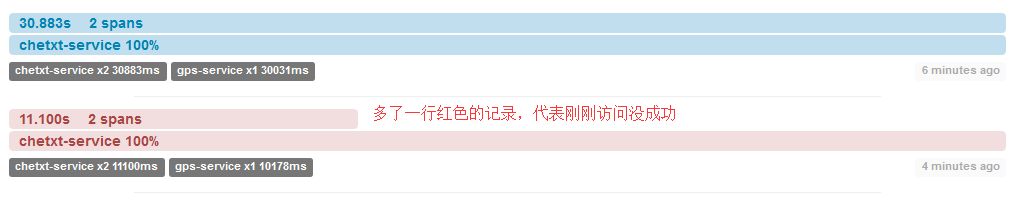
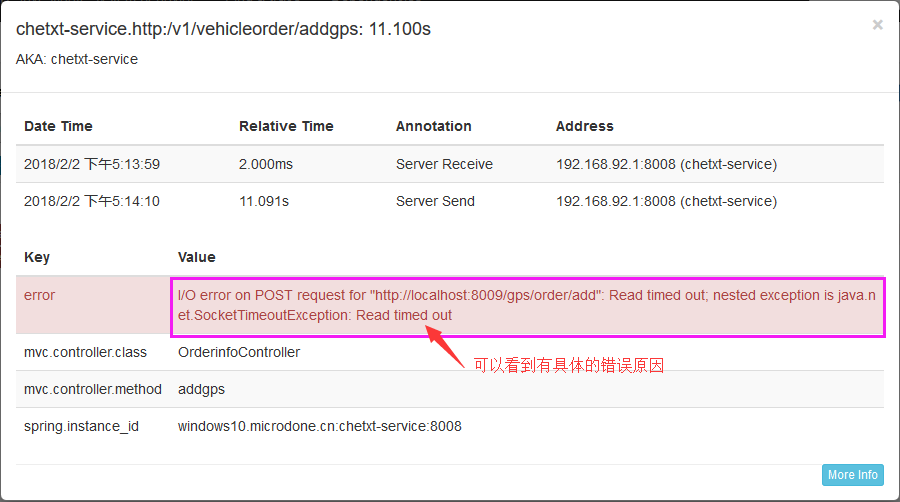
点击红色链接进来

再点击查看具体原因
好了,是不是非常棒,再也不用怕服务一多乱套了。
源码在微云。