3.1,文档
http://redis.cn/topics/cluster-tutorial.html
3.2,原理:去中心化
3.3,集群规则
|
机器编号 |
ip |
port |
|
1 |
192.168.120.129 |
7000 |
|
2 |
192.168.120.129 |
7001 |
|
3 |
192.168.120.129 |
7002 |
|
4 |
192.168.120.129 |
7003 |
|
5 |
192.168.120.129 |
7004 |
|
6 |
192.168.120.129 |
7005 |
3.4,搭建过程
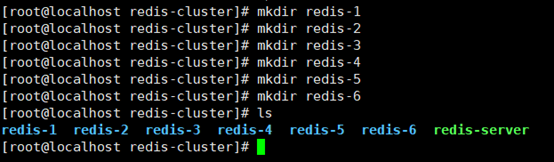
3.4.1 新建文件夹

3.4.2 准备一个服务端程序

3.4.3准备6个redis的配置文件

Redis-1
bind 0.0.0.0 69行
port 7000 92行
daemonize yes 136行
# 打开aof 持久化
appendonly yes 672行
# 开启集群
cluster-enabled yes 814行
# 集群的配置文件,该文件自动生成
cluster-config-file nodes-7000.conf 822行
# 集群的超时时间
cluster-node-timeout 5000 828行
------------------------------------
Redis-2
daemonize yes
bind 0.0.0.0
port 7001
# 打开aof 持久化
appendonly yes
# 开启集群
cluster-enabled yes
# 集群的配置文件,该文件自动生成
cluster-config-file nodes-7001.conf
# 集群的超时时间
cluster-node-timeout 5000
-------------------------------------
Redis-3
daemonize yes
bind 0.0.0.0
port 7002
# 打开aof 持久化
appendonly yes
# 开启集群
cluster-enabled yes
# 集群的配置文件,该文件自动生成
cluster-config-file nodes-7002.conf
# 集群的超时时间
cluster-node-timeout 5000
------------------------------------
Redis-4
daemonize yes
bind 0.0.0.0
port 7003
# 打开aof 持久化
appendonly yes
# 开启集群
cluster-enabled yes
# 集群的配置文件,该文件自动生成
cluster-config-file nodes-7004.conf
# 集群的超时时间
cluster-node-timeout 5000
-------------------------------------
Redis-5
daemonize yes
bind 0.0.0.0
port 7004
# 打开aof 持久化
appendonly yes
# 开启集群
cluster-enabled yes
# 集群的配置文件,该文件自动生成
cluster-config-file nodes-7005.conf
# 集群的超时时间
cluster-node-timeout 5000
--------------------------------------
Redis-6
daemonize yes
bind 0.0.0.0
port 7005
# 打开aof 持久化
appendonly yes
# 开启集群
cluster-enabled yes
# 集群的配置文件,该文件自动生成
cluster-config-file nodes-7006.conf
# 集群的超时时间
cluster-node-timeout 5000
3.4.3同时启动所有的redis

3.4.4 使用脚本创建集群(分配槽)
找到集群脚本,在src/src/redis-trib.rb 要安装Ruby的环境【不推荐
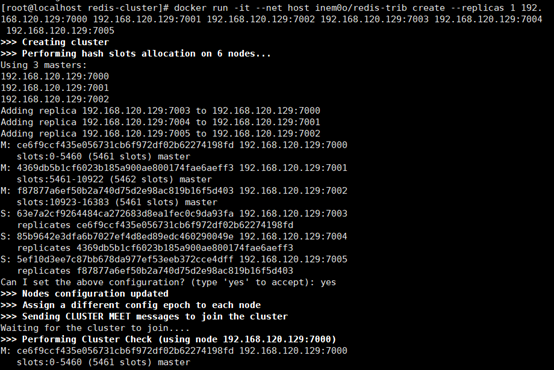
3.4.5 使用docker 下载redis-trib的镜像运行【推荐】
安装Docker
yum install docker
启动docker
systemctl start docker
A: 下载镜像
docker pull inem0o/redis-trib
docker run -it --net host inem0o/redis-trib create --replicas 1
192.168.120.129:7000 192.168.120.129:7001
192.168.120.129:7002 192.168.120.129:7003
192.168.120.129:7004 192.168.120.129:7005
-it是为了可以输入
--net host 是为了上docker容器能连接上本地的宿主机
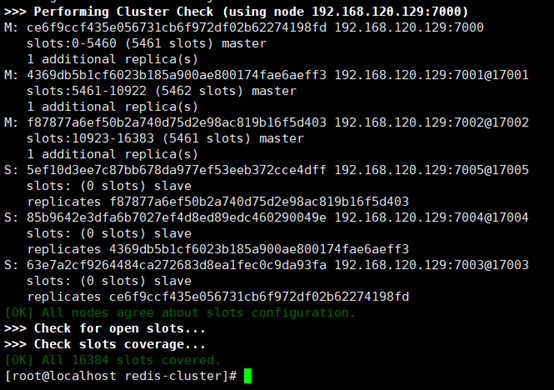
3.4.6测试集群环境


到此集群搭建完成
到此集群搭建完成