1、位置属性
jquery的css
position获取匹配元素相对父元素的偏移位置;offset获取匹配元素在当前视口的相对偏移,返回的对象包含两个整型属性:top 和 left
$("p").offset()
$('div').offset().top
$("p").offset().left
scrollTop获取匹配元素相对滚动条顶部的偏移 文档被卷起的像素值;scrollLeft获取匹配元素相对滚动条左侧的偏移,文档被卷起的像素值;
 //获取匹配元素相对滚动条顶部的偏移  文档被卷起的像素值
$(document).scrollTop()
$(document).scrollLeft()

//监听文档滚动的jquery方法
$(document).scroll(function(){
    console.log($(document).scrollTop())
    console.log($(document).scrollLeft())

 })
innerHeight获取第一个匹配元素内部区域高度(包括补白、不包括边框);
$('#box').innerHeight()
innerWidth获取第一个匹配元素内部区域宽度(包括补白、不包括边框);
$('#box').innerWeight()
outerHeight获取第一个匹配元素外部高度(默认包括补白和边框);
$('#box').outerHeidth()
outerWeight获取第一个匹配元素外部宽度(默认包括补白和边框);
$('#box').outerWeidth()
weight取得匹配元素当前计算的宽度值
//获取值
$('p').width()

//设置值
$('p').width(200)
height取得匹配元素当前计算的高度值
//获取值
$('p').height()
//设置值
$('p').Height(200)
<!DOCTYPE html>
<html>
<head>
<meta charset="UTF-8">
<title></title>
<style type="text/css">
*{padding: 0;margin: 0;}
#box{position: relative; 200px;height: 200px;border: 1px solid red;padding: 10px 5px;}
p{position: absolute;left:30px;top: 30px} /*父相子绝*/
</style>
</head>
<body style="height: 2000px; 2000px;"> //内嵌样式,肯定比上边的优先级高;给height、width是为了有滚动条
<div id="box">
<p>我是一个段落标签</p>
</div>
<button id="btn">动画吧</button>
<div style=" 200px;height: 200px;margin: 100px auto;border: 1px solid deepskyblue;"></div>
</body>
<script src="jquery-3.2.1.js"></script>
<script type="text/javascript">
$(function(){
//1.获取匹配元素的相对父元素的偏移 position
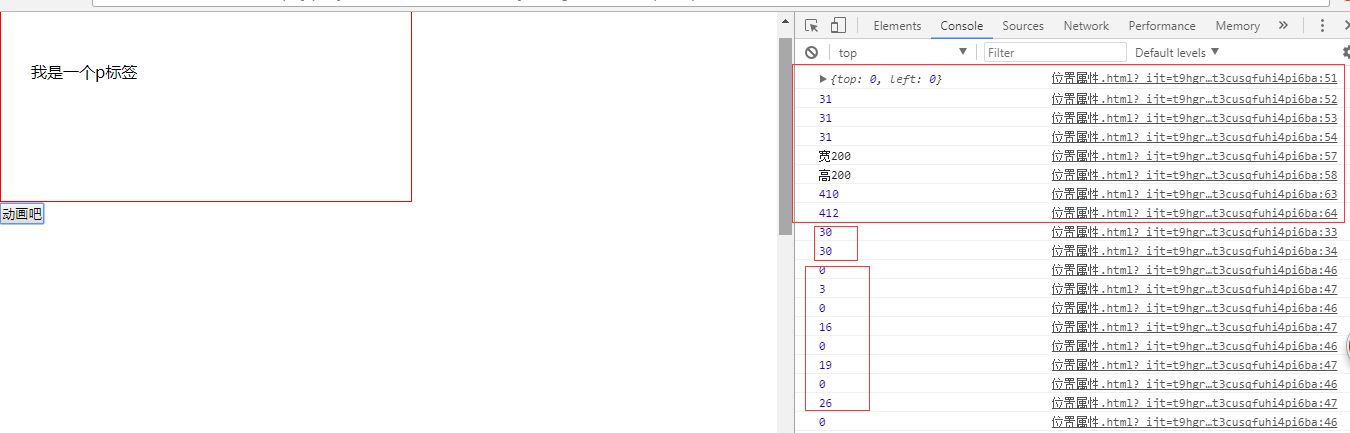
console.log($('p').position().left); //30
console.log($('p').position().top); //30
var offsetTop = $('p').position().top + 50 + 'px';
$('#btn').click(function(){
$('p').animate({top:offsetTop},1000); //执行一个动画效果
})
//2.获取匹配元素 相对滚动条卷起的位置信息 scrollTop scrollLeft
// console.log($(document).scrollLeft());
// console.log($(document).scrollTop());
$(document).scroll(function(){ //调用scroll方法
console.log($(document).scrollLeft());
console.log($(document).scrollTop());
})
//3.offset 获取匹配元素在当前视口的相对偏移 相对于浏览器(左上角)
console.log($('#box').offset());
console.log($('p').offset().top); //边框有1
console.log($('p').offset().left);
console.log($('#btn').offset().top);
//4.获取元素的宽高
console.log("宽"+$('#box').width());
console.log("高"+$('#box').height());
//设置宽高
$('#box').width(400);
//innerWidth获取内部区域宽度; / outerWidth获取外部区域宽度
//获取 width + 2*padding 不包括边框 获取匹配元素的内部宽度
console.log($('#box').innerWidth()); //410
// width + 2*padding + 2*border 获取匹配元素的外部宽度
console.log($('#box').outerWidth()) //412
})
</script>
</html>
获取偏移量:相当于父级用的是position,相当于浏览器用的是offset;获取滚动条卷起的位置用的是scrollTop和scrollLeft;
innerWidth是不包括边框的,outerWidth是包括所有的。
防淘宝导航栏案例
淘宝滚动监听
<!DOCTYPE html>
<html>
    <head>
        <meta charset="UTF-8">
        <title></title>
        <style type="text/css">
            *{padding: 0;margin: 0;}
            div{ 100%;}
            div img{
                 100%;  /*每个div img都填充满父级100%*/
            }
            .nav{display: none;}
        </style>
    </head>
    <body>
        <div class="top">
            <img src="images/top.jpg" alt="" />
        </div>
        <div class="nav">
            <img src="images/nav.jpg"/>
        </div>
        <div class= 'taobao'>
            <img src="images/taobao1.png"/>
        </div>

        <script src="../jquery-3.2.1.js"></script>
        <script type="text/javascript">
            $(function(){
                var h = $('.top').height();  //先获取top盒子的高度,如果盒子有边框计算的时就不是height了而是outerWidth

                $(document).scroll(function(){
                    var scollTp = $(document).scrollTop();  //scrollTop 文档卷起的值,值时时在变大;

                    if(h<scollTp){
                        $('.nav').css({display:'block',position:'fixed',top:0});
                    }else{
                        $('.nav').css({display:'none',position:'static',top:0});
                    }
                })
            })
        </script>
    </body>
</html>
2、jquery筛选方法
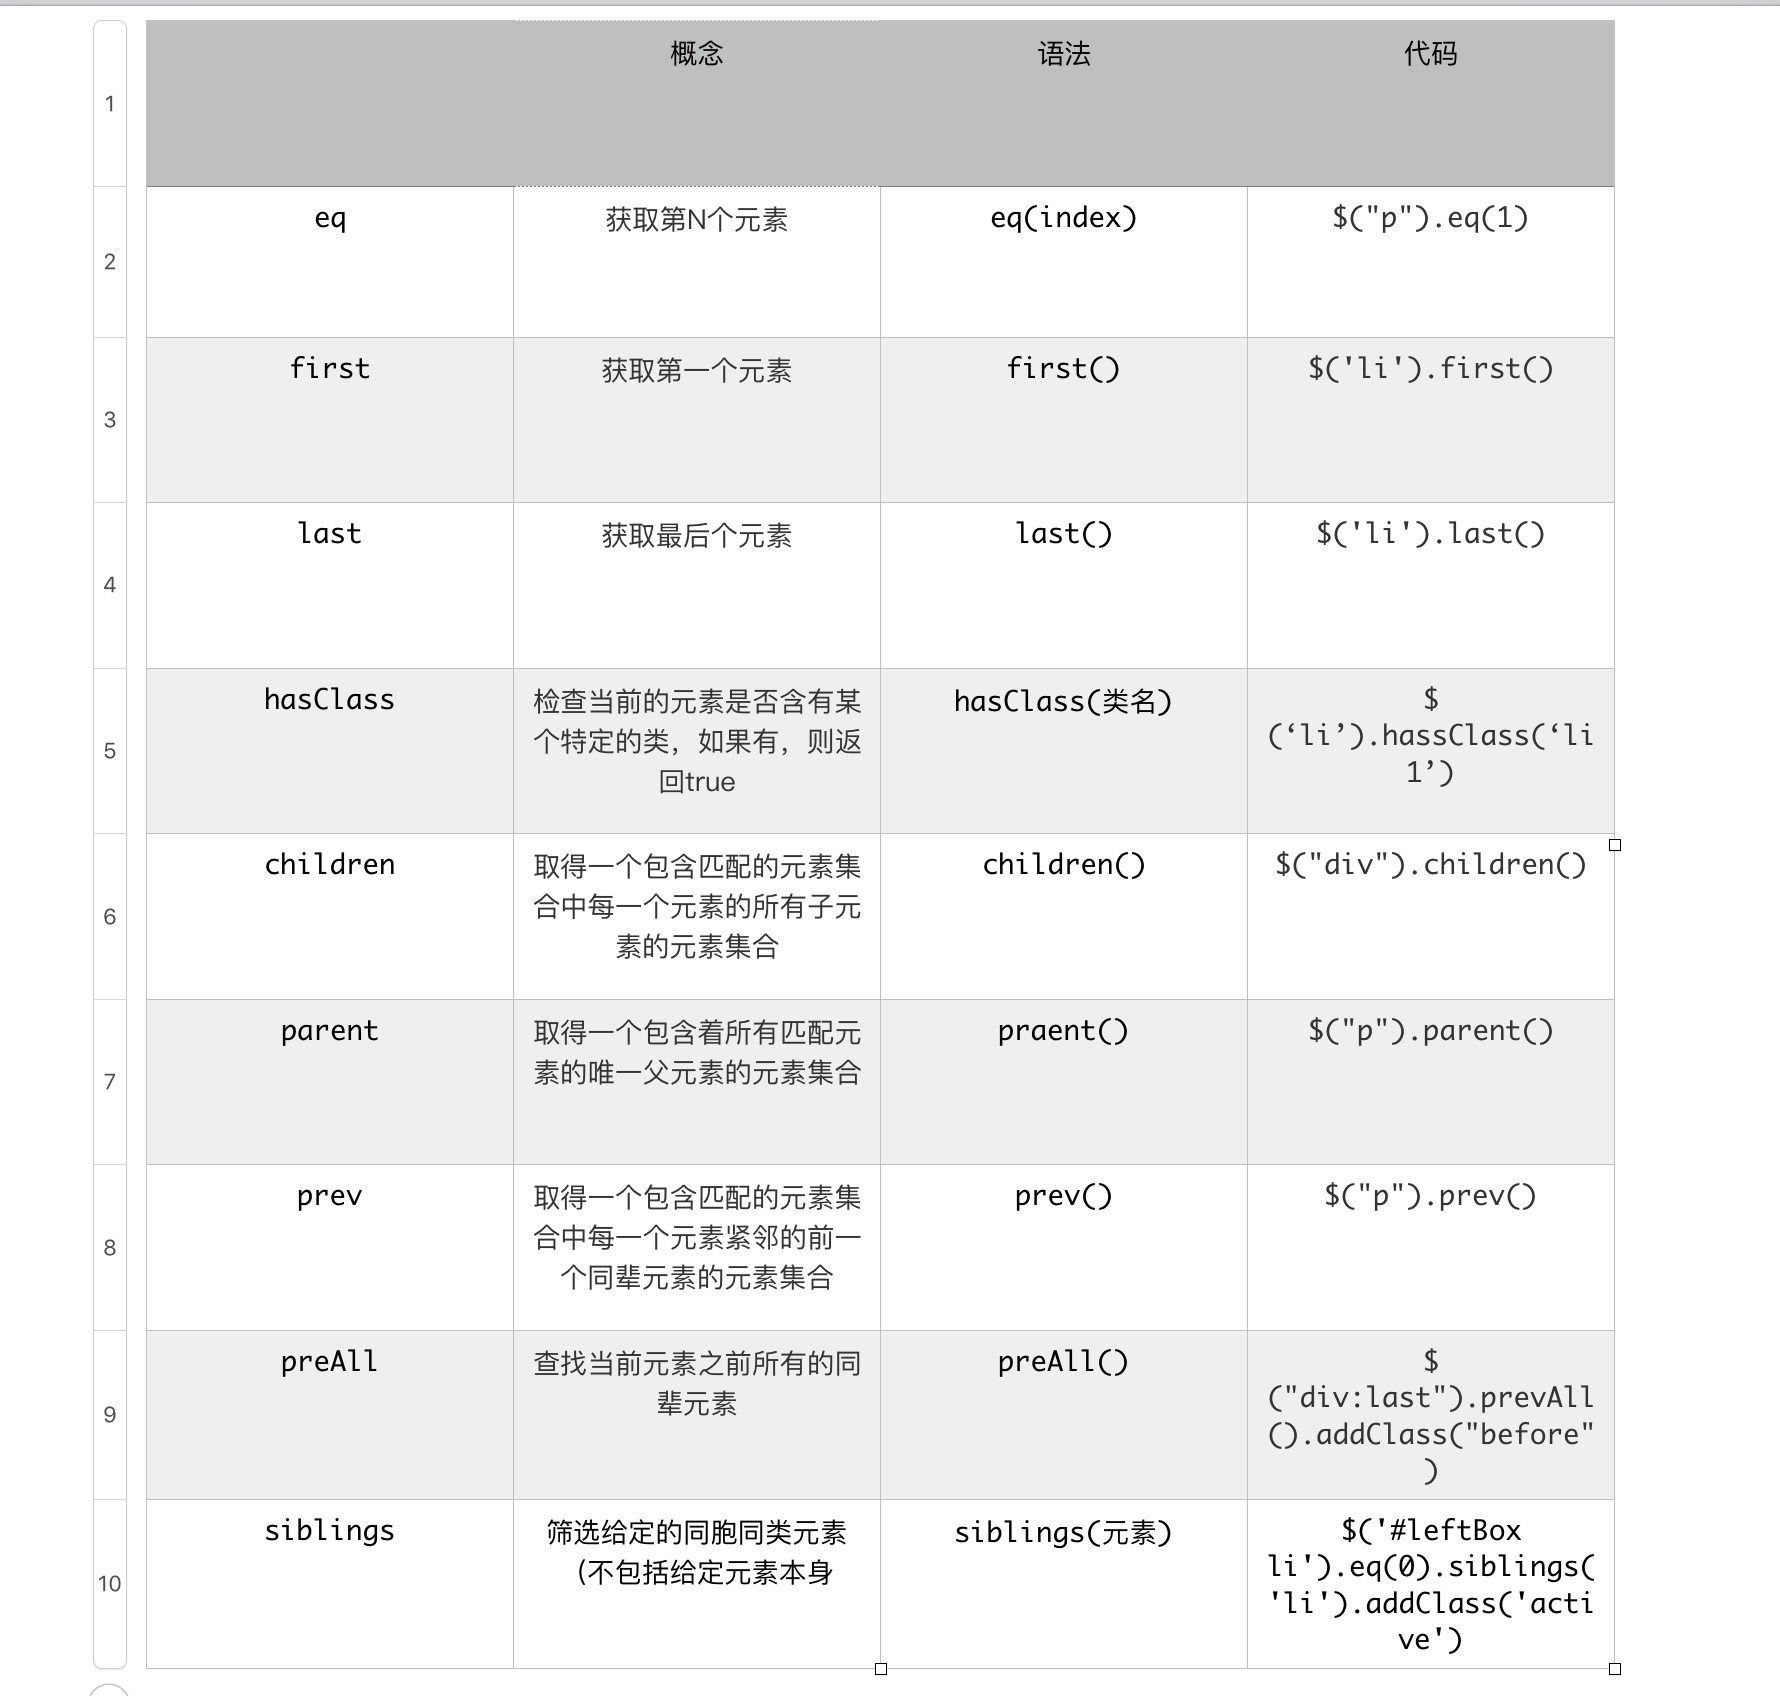
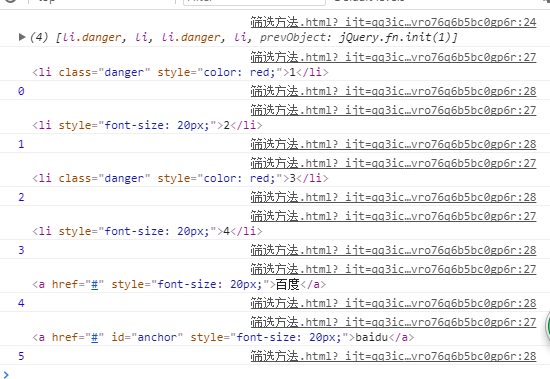
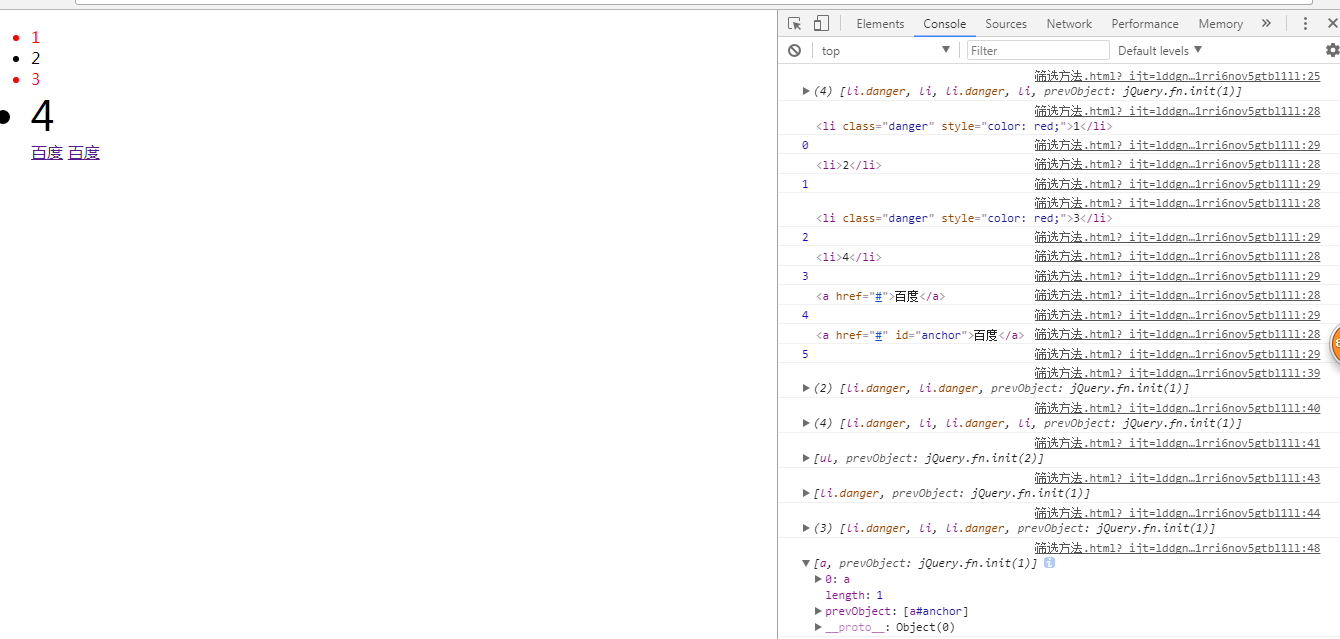
<!DOCTYPE html>
<html lang="en">
<head>
    <meta charset="UTF-8">
    <title></title>
    <style type="text/css">
        li.active{
            font-size: 40px;
        }
    </style>
</head>
<body>
    <ul>
        <li class="danger">1</li>
        <li>2</li>
        <li class="danger">3</li>
        <li>4</li>
        <a href="#">百度</a>
        <a href="#" id="anchor">百度</a>
    </ul>
</body>
<script src="../jquery-3.2.1.js"></script>
<script type="text/javascript">
    $(function () {
        console.log($('li'));   //  4个
        //jquery遍历方法.each()
        $('ul').children().each(function (index,ele) {     // $('li') 就等于 $('ul').children();index是索引,ele是元素 dom对象。
            console.log(ele);
            console.log(index);

            var isDanger = $(this).hasClass('danger');  //检查当前元素是否含有某个类,如果有则返回true
            if (isDanger){
                $(this).css('color','red');
            } else {
                // $(this).css('font-size','20px');
            }
        })

        console.log($('ul').children('.danger'))  //取得一个包含匹配的元素集合中每一个元素的所有子集合的元素集合。
        console.log($('li'))
        console.log($('a').parent());  //获取的是li,父标签一级

        console.log($('li').last().prev()); //last是li标签的最后一个元素;它是最后一个标签的前一个同类元素;li.danger
        console.log($('li').last().prevAll());   //最后一个元素的所有元素;是一个数组,找的索引是从下往上去找的


        //siblings
        console.log($('#anchor').siblings('a'))  //匹配元素同胞之间选择 ;siblings('a')指同胞间的所有的a标签
        $('li').hover(function () {
            $(this).addClass('active').siblings('li').removeClass('active');
        })

    })

</script>


</html>
遍历
案例1-选项卡嵌套
<!DOCTYPE html>
<html>
    <head>
        <meta charset="UTF-8">
        <title></title>
        <style type="text/css">
            *{padding: 0;margin: 0;}
            ul{
                list-style: none;
            }
            /*清除浮动产生的问题*/
            #box:after{
                content: "";
                display: block;
                clear: both;
            }
            #box{ 800px;border: 1px solid black;margin: 20px auto;background: blue;}
            #leftBox{ 200px;float: left;}
            #leftBox li{ 200px;height: 89px;background: red;margin-bottom: 2px;color: white;font: 50px/89px "黑体";  text-align: center;}
            #rightBox div{display: none;float: left;  600px;}
            #rightBox p{100%;height: 325px;font: 100px/325px "黑体";text-align: center;background: greenyellow }

            /*父元素设置display:table使它成为一个块级表格元素

             * 子元素设置display:table-cell使子元素成为表格单元格,就好比是在表格中一样*/
            #rightBox ul{ 600px;display: table;}

             #rightBox li{display: table-cell;background: purple;height: 40px;border-right: 2px solid blue;font: 30px/40px "黑体";text-align: center;color: white;}
             #leftBox .active{background: yellow;color: black;}
                #rightBox .active{background: white;color: black;}

        </style>
    </head>
    <body>
        <div id="box">
                <ul id="leftBox">
                <li>a</li>
                <li>b</li>
                <li>c</li>
                <li>d</li>
            </ul>
            <div id="rightBox">
        <div style="display: block">
            <p>a1</p>
            <ul>
                <li class="active">a1</li>
                <li>a2</li>
                <li>a3</li>
                <li>a4</li>
            </ul>
        </div>
        <div>
            <p>b1</p>
            <ul>
                <li class="active">b1</li>
                <li>b2</li>
                <li>b3</li>
                <li>b4</li>
            </ul>
        </div>
        <div>
            <p>c1</p>
            <ul>
                <li class="active">c1</li>
                <li>c2</li>
                <li>c3</li>
                <li>c4</li>
                <li>c5</li>
                <li>c6</li>
            </ul>
        </div>
        <div>
            <p>d1</p>
            <ul>
                <li class="active">d1</li>
                <li>d2</li>
                <li>d3</li>
                <li>d4</li>
            </ul>
        </div>
    </div>
        </div>

    </body>
    <script src="jquery-3.2.1.js"></script>
    <script type="text/javascript">
        $(function(){
            //鼠标移入的时候
            $('#leftBox li').mouseover(function(){
                //修改自己的样式
                $(this).addClass('active').siblings('li').removeClass('active');

                //修改右边的div

                console.log($(this).index())
                $('#rightBox div').eq($(this).index()).show().siblings('div').hide();

            })

            $('#rightBox li').click(function(){
                $(this).addClass('active').siblings('li').removeClass('active');

                var liValue  = $(this).html();

                $(this).parent().prev().html(liValue);
            })
        })

    </script>
</html>

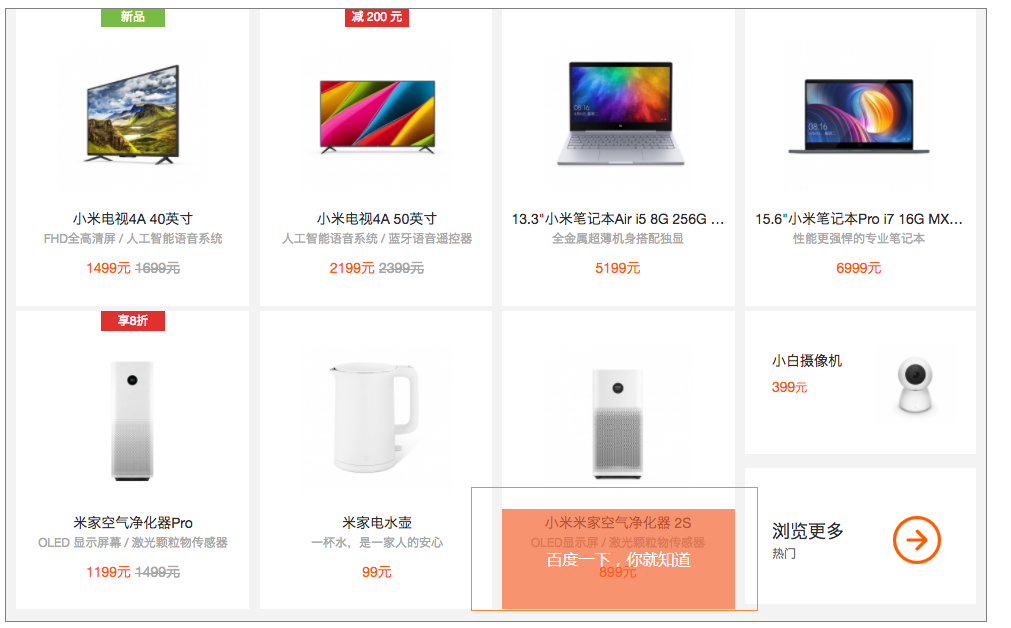
案例2小米官网
<!DOCTYPE html>
<html lang="en">
<head>
    <meta charset="UTF-8">
    <title>Title</title>
    <style type="text/css">
        *{
            padding: 0;
            margin: 0;
        }
        ul{list-style: none;}
        .wrap{ 980px;
            height: 612px;
            margin: 20px auto 0px;
            background: #f4f3f4;
            border: 1px solid gray;}

        ul li{float: left;
            margin-left: 10px;
            position: relative;
            overflow: hidden;  /*超出部分隐藏*/
             233px;
            height: 300px;}


        ul li p{
             233px;
            height: 100px;
            background: rgba(245,102,51,.7);
            position: absolute;
            bottom: -100px;
            text-align: center;
            color: white;
            line-height: 100px;

        }
    </style>

</head>
<body>
    <div class="wrap">
        <ul>
            <li><a href="#"><img src="images/xiaomi_01.png"/> </a><p>百度一下,你就知道了</p> </li>
            <li><a href="#"><img src="images/xiaomi_02.png"/></a><p>百度一下,你就知道</p></li>
            <li><a href="#"><img src="images/xiaomi_03.png"/></a><p>百度一下,你就知道</p></li>
            <li><a href="#"><img src="images/xiaomi_04.png"/></a><p>百度一下,你就知道</p></li>
            <li><a href="#"><img src="images/xiaomi_05.png"/></a><p>百度一下,你就知道</p></li>
            <li><a href="#"><img src="images/xiaomi_07.png"/></a><p>百度一下,你就知道</p></li>
            <li><a href="#"><img src="images/xiaomi_08.png"/></a><p>百度一下,你就知道</p></li>
            <li><a href="#"><img src="images/xiaomi_09.png"/></a><p>百度一下,你就知道</p></span></li>
        </ul>
    </div>
</body>
<script src="../jquery-3.2.1.js"></script>
<script type="text/javascript">

    //mouseenter进入   mouseleave 离开
    $('.wrap li').hover(function () {
        $(this).children('p').stop(true).animate({bottom:0},100); //移进去的时候先让它停一下

    },function () {
        $(this).children('p').stop(true).animate({bottom:-100},100);
    })

</script>
</html>
案例3-焦点轮播图
<!DOCTYPE html>
<html>
    <head>
        <meta charset="UTF-8">
        <title></title>
        <style type="text/css">
            *{padding: 0;margin: 0;}
            ul,ol{list-style: none;}

            #wrap{ 650px;height: 250px;margin: 100px auto 0;background: red;overflow: hidden;position: relative;}
            /*#wrap img{display: block;}*/
            #wrap ul{height: 250px;position: relative;z-index: 1;}
            #wrap ol{height: 30px;position: absolute;z-index: 2;bottom: 0;right: 0;}

            #wrap>ul>li{
                position: absolute;
                top:0;
                left: 0;

            }

            #wrap>ol>li{
                float: left;
                 20px;
                height: 20px;
                text-align: center;
                line-height: 20px;
                border: 1px solid white;
                background: gray;
                margin-right: 5px;
            }
            #wrap>ol>li:hover{
                /*设置鼠标形状*/
                cursor: pointer;
            }

            #wrap li.active{
                padding: 2px;
                color: orange;
                margin-top: -4px;
                border: 1px solid orange;
            }
        </style>
    </head>
    <body>
        <div id="wrap">
            <ul>
                <!--设置绝对定位之后 脱离标准流 最后一个盒子层级提升了-->
                <li style="z-index: 1;"><a href="#"><img src="./images/01.jpg"/></a></li>
                <li><a href="#"><img src="./images/02.jpg"/></a></li>
                <li><a href="#"><img src="./images/03.jpg"/></a></li>
                <li><a href="#"><img src="./images/04.jpg"/></a></li>
                <li><a href="#"><img src="./images/05.jpg"/></a></li>

            </ul>
            <ol>
                <li class="active">1</li>
                <li>2</li>
                <li>3</li>
                <li>4</li>
                <li>5</li>
            </ol>

        </div>
    </body>
    <script src="http://libs.baidu.com/jquery/2.0.0/jquery.min.js"></script>
    <script type="text/javascript">
        $(function(){

            //控制层级关系的索引
            var index  = 0;
            $('#wrap>ol>li').mouseenter(function(){
                index++;  //鼠标移进去的时候

                //修改下标的class
                $(this).addClass('active').siblings('li').removeClass('active');//选中哪个给它加一个active,siblings取到每个li,同胞元素removeclass

                //修改图片 原理是用了一种层级关系,让它漂起来;滑的是ol下的li要选取ul下的li
                $('#wrap>ul>li').eq($(this).index()).css({left:650,'z-index':index}).animate({ //取到索引,然后调整它的css,把想修改的层级关系给它提上来
                    left:0  //改它的绝对定位left值
                },1000)
            })
        })

    </script>
</html>

3、事件流
事件的概念
HTML中与javascript交互是通过事件驱动来实现的,例如鼠标点击事件、页面的滚动事件onscroll等等,可以向文档或者文档中的元素添加事件侦听器来预订事件。想要知道这些事件是在什么时候进行调用的,就需要了解一下“事件流”的概念。
什么是事件流
事件流描述的是从页面中接收事件的顺序
1、DOM事件流
“DOM2级事件”规定的事件流包括三个阶段:
① 事件捕获阶段;
② 处于目标阶段;
③ 事件冒泡阶段。
<!DOCTYPE html>
<html lang="en">
<head>
    <meta charset="UTF-8">
    <title>事件流</title>
    <script>

        window.onload = function(){

            var oBtn = document.getElementById('btn');  //取到dom元素oBtn

            oBtn.addEventListener('click',function(){  //调用监听器的一个方法;第一个参数事件名称,第二个参数是回调函数
                console.log('btn处于事件捕获阶段');  //4
            }, true);
            oBtn.addEventListener('click',function(){
                console.log('btn处于事件冒泡阶段'); //5
            }, false);

            document.addEventListener('click',function(){ //给文档加一个事件
                console.log('document处于事件捕获阶段');  //1
            }, true);
            document.addEventListener('click',function(){
                console.log('document处于事件冒泡阶段'); //8
            }, false);

            document.documentElement.addEventListener('click',function(){
                console.log('html处于事件捕获阶段');  //2
            }, true);
            document.documentElement.addEventListener('click',function(){
                console.log('html处于事件冒泡阶段'); //7
            }, false);

            document.body.addEventListener('click',function(){
                console.log('body处于事件捕获阶段'); //3
            }, true);
            document.body.addEventListener('click',function(){
                console.log('body处于事件冒泡阶段'); //6
            }, false);

        };

    </script>
</head>
<body>
<a href="javascript:;" id="btn">按钮</a>  //阻止a标签的默认事件,点击btn的时候会触发一个click事件
</body>
</html>

1、addEventListener
addEventListener 是DOM2 级事件新增的指定事件处理程序的操作,这个方法接收3个参数:要处理的事件名、作为事件处理程序的函数和一个布尔值。最后这个布尔值参数如果是true,表示在捕获阶段调用事件处理程序;如果是false,表示在冒泡阶段调用事件处理程序。
2、document、documentElement和document.body三者之间的关系:
document代表的是整个html页面; document.documentElement代表的是<html>标签; document.body代表的是<body>标签;
接着我们就来聊聊上面的例子中输出的结果为什么是这样:
在标准的“DOM2级事件”中规定,事件流首先是经过事件捕获阶段,接着是处于目标阶段,最后是事件冒泡阶段。这里可以画个图示意一下:
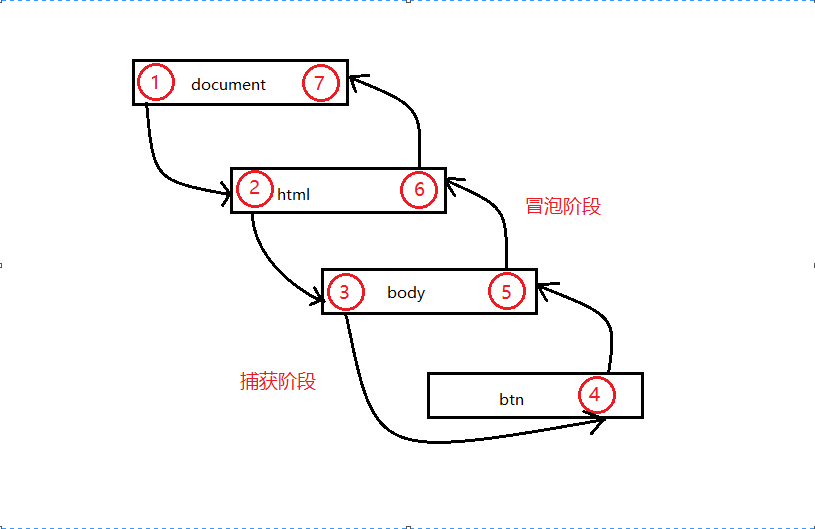
首先在事件捕获过程中,document对象首先接收到click事件,然后事件沿着DOM树依次向下,一直传播到事件的实际目标,就是id为btn的a标签。
接着在事件冒泡过程中,事件开始时由最具体的元素(a标签)接收,然后逐级向上传播到较为不具体的节点(document)。
需要注意的点:由于老版本的浏览器不支持事件捕获,因此在实际开发中需要使用事件冒泡,在由特殊需要时再使用事件捕获。
补充:
1、IE中的事件流只支持“事件冒泡”,但是版本到了IE9+以后,实现了“DOM2级事件”,也就是说IE9+以后也可以在捕获阶段对元素进行相应的操作。
2、在DOM事件流中,实际的目标在“捕获阶段”不会接收到事件。而是在“处于目标阶段”被触发,并在事件处理中被看成“冒泡阶段”的一部分。然后,“冒泡阶段”发生,事件又传播回文档。
从父级到子级一层层冒泡
jquery的常用事件
jquery只有事件冒泡,不支持事件捕获。
事件对象和冒泡
<!DOCTYPE html>
<html>
    <head>
        <meta charset="UTF-8">
        <title></title>
        <style type="text/css">
            #box{
                 200px;
                height: 200px;
                background: gray;
            }

            p{
                 100px;
                height: 100px;
                background: red;
            }
        </style>
    </head>
    <body>
        <div id="box">
            <p class="p1"></p>


            <a href="https://www.luffycity.com">luffy</a>

        </div>
    </body>
    <script src="jquery-3.2.1.js"></script>
    <script type="text/javascript">

    //  入口函数事件
        $(function(){
            //事件对象
            $('.p1').click(function(ev){

                //事件类型 事件属性
                console.log(ev.type);
                console.log(ev.target);

                console.log(ev.pageX);
                console.log(ev.pageY);

                alert('当前按钮事件触发了')

                //常用的事件方法 1.阻止事件冒泡  2.阻止默认事件

                //1.阻止事件冒泡
                ev.stopPropagation();
            })

            $('#box').click(function(){
                alert('#box盒子事件触发了')
            })

            $('a').click(function(ev){

                //阻止a标签的默认事件
//                ev.preventDefault()
//                ev.stopPropagation();

                alert('哈哈哈哈');

                return false;
            })
        })


    </script>

</html>

事件绑定和移除、触发自定义事件
<!DOCTYPE html>
<html>
    <head>
        <meta charset="UTF-8">
        <title></title>
        <style type="text/css">
            #box{
                 200px;
                height: 200px;
                background: red;
            }
        </style>

    </head>
    <body>
        <div id="box">

        </div>

        <button>按钮</button>
    </body>
    <script src="jquery-3.2.1.js"></script>
    <script type="text/javascript">


        $(function(){

            //事件的绑定

//            $('#box').click(fn)


            //给当前的dom元素绑定事件
            //语法:jquery对象.bind('事件类型',fn)
//            $('#box').bind('click mouseenter',function(){  //添加多个事件做同样的事情;click事件和mouseenter事件、回调函数;类似k value这样子的
//                alert('事件被绑定了');
//            })
//
            //

            function add(){
                console.log('click');
            }

            function add2(){
                console.log('over');
            }

            $('#box').bind({
                "click":add,
                "mouseover":add2
            })


            //事件移除 如果没有参数 表示移除所有事件
            setTimeout(function(){
//                $('#box').unbind()

                $('#box').unbind('click',function(){  //移除完事件之后,还可以加参数;
                    alert(111);
                });
            },3000)


            //添加的事件不能发生在未来==》动态生成的元素不能直接添加对象 里面的事件不能发生了  ==>事件代理
            $('body').append('<div style=" 200px;height: 300px;background: yellow">哈哈哈哈</div>')


            //补充内容:绑定自定义的事件
            $('button').bind('myClick',function(ev,a,b,c){
                alert(111);

                alert(a);
                alert(b);


            })

            //触发自定义的事件
            $('button').trigger('myClick',[1,2,3])//有几个参数就传几个值

        })


    </script>

</html>
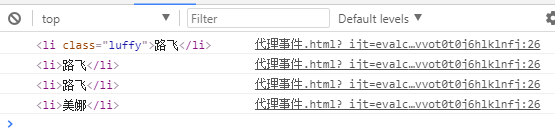
自定义事情和代理事件
<!DOCTYPE html>
<html>
    <head>
        <meta charset="UTF-8">
        <title></title>
    </head>
    <body>
        <ul>
            <li class="luffy">路飞</li>
            <li>路飞</li>
            <li>路飞</li>

        </ul>
    </body>
    <script src="jquery-3.2.1.js"></script>
    <script type="text/javascript">

        $(document).ready(function(){
            //先点击
//            $('ul>li').bind('click',function(){
//                console.log($(this));
//            })
//            $('ul>li').click(function(){
//                console.log($(this));
//            })


            //事件代理 自己完成不了当前的点击事件,交给父级元素来做这件事件
            //父级.on('事件名字','点击当前的标签元素',fn)

            //$('ul').on('click','#namei,.luffy',function()...//绑定多个选择器使用这个方法
            $('ul').on('click','li',function(){ //前边父级,后边是点击当前的事件标签
                console.log(this);
            })

            //后来 添加的元素
            $('ul').append('<li>娜美</li>') //换成a标签试试;
        //$('ul').append('<a id="namei">娜美</a>')  //
        })

    </script>
</html>
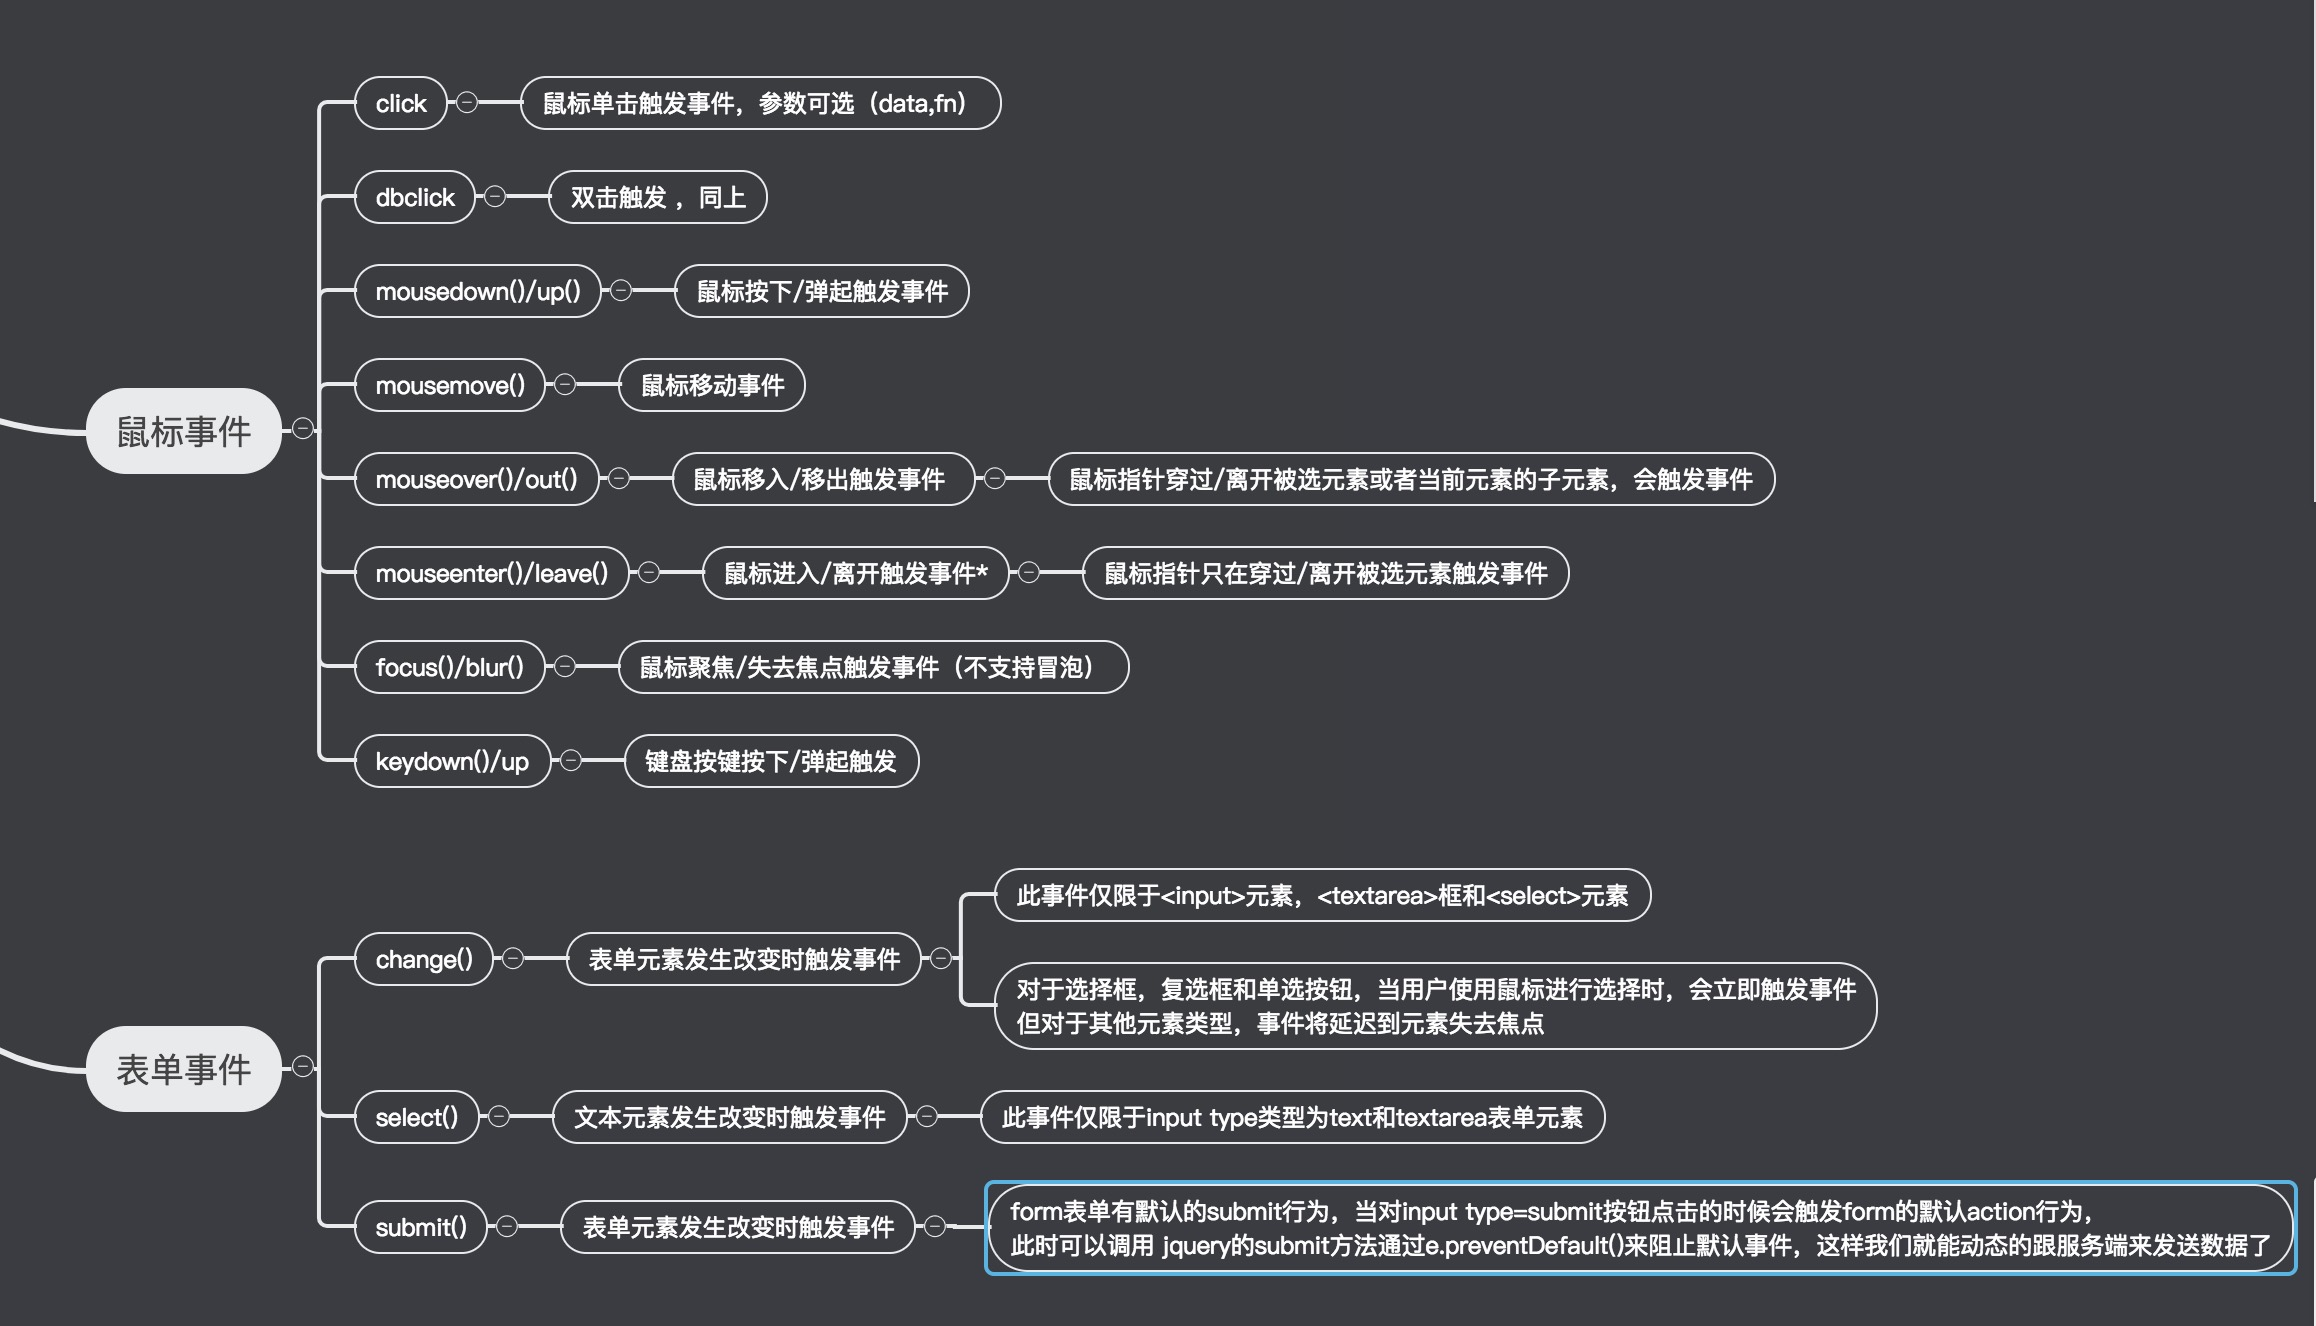
鼠标事件
<!DOCTYPE html>
<html>
    <head>
        <meta charset="UTF-8">
        <title></title>
        <style type="text/css">
            *{padding: 0;margin: 0;}
            #box{
                 200px;
                height: 200px;
                background: gray;
            }

            #child{
                 100px;
                height: 100px;
                background: yellow;
            }
        </style>
    </head>
    <body>

        <div id="box">
            <div id="child">
            </div>

            <input type="text"  value="123" />
            <br />
            <input type="password"  value="" />

        </div>
    </body>
    <script src="jquery-3.2.1.js"></script>
    <script type="text/javascript">

        $(document).ready(function(){
            //点击事件
            /*
            $("#box").click(function(){
                console.log('click')
            })

            //双击事件
            $("#box").dblclick(function(){
                console.log('dbclick')
            })
            */
            /*
            //鼠标按下不松开
            $("#box").mousedown(function(){ //对应的是mouseup
                console.log('mousedown');
            })

            //鼠标松开
            $("#box").mouseup(function(){
                console.log('mouseup');
            })
            */


//            被选元素和子元素被选中时 会触发函数  (移入和移出)
            /* 先移动父盒子上-mouseover,再移到子盒子上-mouseout(从父盒子移开)、mouseover(移到子盒子子元素会触发);离开out再over,再出来out
            $('#box').mouseover(function(){
                console.log('mouseover');
            })
            $('#box').mouseout(function(){
                console.log('mouseout');
            })
            */

            /*
            //只有被选元素移入的时候才会触发;(进入、离开)    移到父盒子上-mouseenter、到子盒子上没有变化,从父盒子移开mouseleave
            $('#box').mouseenter(function(){
                console.log('mouseenter');
            })
            $('#box').mouseleave(function(){
                console.log('mouseleave');
            })
            */


            /*
            $("#box").mousemove(function(){
                console.log('mousemove');
            })
            */

            /*获取焦点
            $('input[type=text]').focus(function(){
                console.log($(this).val())  //form表单获取值用val
            })


            $('input[type=text]').blur(function(){
                console.log($(this).val())
            })
            */

            $('input[type=password]').keydown(function(e){  //键盘按下
                console.log(e.keyCode);

                if(e.keyCode == 13){
                    console.log('enter被按下了')
                }

//                console.log($(this).val())
            })
            $('input[type=password]').keyup(function(){  //键盘弹起
                console.log($(this).val())
            })

        })

    </script>
</html>
表单事件
<!DOCTYPE html>
<html>
<head>
    <meta charset="utf-8" />
    <meta http-equiv="X-UA-Compatible" content="IE=edge">
    <title>Page Title</title>
    <meta name="viewport" content="width=device-width, initial-scale=1">

    <style>
    .show{
        color: red;
    }
    </style>

</head>
<body>
    <form action="https://www.luffycity.com">
        <select name="sweets" id="" multiple=''>
            <option value="">巧克力</option>
            <option value="" selected=''>糖果</option>
            <option value="">焦糖</option>
            <option value="" selected=''>曲奇饼</option>
            <option value="">烧饼</option>
            <option value="">麦香饼</option>
            <option value="">曲奇饼2</option>
        </select>

        <input type="text" value="hello" id='target'>
        <input type="submit" value="Luffy"/>
        <input type="button" name="" id="" value="按钮" />

    </form>

    <input id="other" type="text" value="Trigger the handler">


    <div class="show"></div>

    <script src="./jquery-3.2.1.min.js"></script>
    <script>

        $(function() {


                //change()s事件

                //此事件仅限于input元素  textarea select
            $('select').change(function(){
                    console.log($('select option:selected').text());

                $('.show').text($('select option:selected').text());

            })


//          select()  仅限于用在 input type=text  textarea
            $('#other').select(function(){
                console.log($(this).val());
            })


            $('form').submit(function(e){
//
                //阻止默认事件
                e.preventDefault();

                //跟服务端有很大挂钩  下节课 咱们简单的来玩一下ajax技术

                alert(1111);
            })


        })

    </script>

</body>
</html>
4、jquery的Ajax技术
AJAX = 异步的javascript和XML(Asynchronous Javascript and XML)
简言之,在不重载整个网页的情况下,AJAX通过后台加载数据,并在网页上进行显示。
通过 jQuery AJAX 方法,您能够使用 HTTP Get 和 HTTP Post 从远程服务器上请求文本、HTML、XML 或 JSON - 同时您能够把这些外部数据直接载入网页的被选元素中。
<!DOCTYPE html>
<html>
    <head>
        <meta charset="UTF-8">
        <title></title>
    </head>
    <body>

        <button id="btn">演示</button>
        <div id="box">

        </div>
    </body>
    <script src='jquery-3.2.1.js'></script>
    <script type="text/javascript">
        $(document).ready(function(){
//            $('#btn').click(function(){
//                  //只传一个url,导入的index.html文件含有多个传递参数,类似于:index/html?name='张三'
//                  $('#box').load('./test.html');
//            })


            /*
            //get请求
            $.ajax({
                url:'./data.json',
                type:'get',
//                dataType:'json',
                success:function(data){

                    console.log(data);

                },
                error:function(){

                }
            })
            */

            /*
            //注意:post请求无法演示 马上学django 就可以演示了
            $.ajax({
                url:"/course",
                type:'post',
                data:{
                    username:'zhangsan',
                    password:'123'
                },
                success:function(data){

                    if(data.state == 'ok'&& data.status =='200'){
                        //登录成功
                    }

                },
                error:function(err){
                    console.log(err);
                }
            })
            */
        })
    </script>
</html>