最简单的直播环境构建HOWTO。
(一)资源准备
数据源采集:OBS(Open Broadcaster Software),下载地址:https://obsproject.com/zh-cn/,可以选择自己的环境所需,我这里选择Windows的。
后端服务器:nginx-http-flv-module,下载地址:https://github.com/winshining/nginx-http-flv-module,可以选择当前最新版本,我这里选择的是nginx-http-flv-module-1.2.9.tar.gz,目前最新版本(openresty版本:openresty-1.13.6.2.tar.gz)
客户端播放器:基于flv.js的HTML5浏览器直播,插件下载地址:https://github.com/bilibili/flv.js/releases/tag/v1.6.1。此版本是目前最新的版本
(二)安装环境
1. 安装OBS的过程,不做过多介绍,windows的安装,点击默认执行即可
2. 安装nginx-http-flv-module
这个是nginx的一个插件,我的测试环境,目前是已经有了nginx的环境的,只需要安装一下http-flv这个模块即可。安装指令,很简单,只需要重新编译一下openresty,同时将nginx-http-flv-module作为一个插件进行编译并安装。
[tkiot@tkiot-nginx1 openresty-1.13.6.2]$ ./configure --prefix=/u02/openresty2 --add-module=/home/tkiot/openresty/nginx-http-flv-module-1.2.9
然后进行make, make install。 安装完成后,检查一下模块安装好了没:
[tkiot@tkiot-nginx1 sbin]$ ll
total 33356
-rwxrwxr-x 1 tkiot tkiot 18195040 Aug 20 18:52 nginx
-rwxrwxr-x 1 tkiot tkiot 15954472 Sep 12  2019 nginx.old
会发现,有一个nginx.old,这个是安装完成后,将原本这个目录下的nginx指令做了备份。
[tkiot@tkiot-nginx1 sbin]$ ./nginx -V
nginx version: openresty/1.13.6.2
built by gcc 4.8.5 20150623 (Red Hat 4.8.5-11) (GCC)
built with OpenSSL 1.0.1e-fips 11 Feb 2013
TLS SNI support enabled
configure arguments: --prefix=/u02/openresty2/nginx --with-cc-opt=-O2 --add-module=../ngx_devel_kit-0.3.0 --add-module=../echo-nginx-module-0.61 --add-module=../xss-nginx-module-0.06 --add-module=../ngx_coolkit-0.2rc3 --add-module=../set-misc-nginx-module-0.32 --add-module=../form-input-nginx-module-0.12 --add-module=../encrypted-session-nginx-module-0.08 --add-module=../srcache-nginx-module-0.31 --add-module=../ngx_lua-0.10.13 --add-module=../ngx_lua_upstream-0.07 --add-module=../headers-more-nginx-module-0.33 --add-module=../array-var-nginx-module-0.05 --add-module=../memc-nginx-module-0.19 --add-module=../redis2-nginx-module-0.15 --add-module=../redis-nginx-module-0.3.7 --add-module=../rds-json-nginx-module-0.15 --add-module=../rds-csv-nginx-module-0.09 --add-module=../ngx_stream_lua-0.0.5 --with-ld-opt=-Wl,-rpath,/u02/openresty2/luajit/lib --add-module=/home/tkiot/openresty/nginx-http-flv-module-1.2.9 --with-stream --with-stream_ssl_module --with-http_ssl_module
[tkiot@tkiot-nginx1 sbin]$
特别说明:安装nginx-http-flv-module之后,就不需要再安装nginx-rtmp-module了,这个rtmp的模块已经被包含在nginx-http-flv-module模块了。
(三)环境配置
1. nginx配置,分为rtmp配置,以及http拉流配置。
1.1 rtmp协议配置(和http属于同一个层次级别,根节点)
rtmp_auto_push on;
rtmp_auto_push_reconnect 1s;
rtmp_socket_dir /tmp;
rtmp{
    out_queue 4096;
    out_cork 8;
    max_streams 128;
    timeout 15s;
    drop_idle_publisher 15s;
    log_interval 5s;
    log_size 1m;

    server{
         listen 1935;
         server_name localhost;

         application myapp{     #myapp是后面推流和拉流地址中对应的app的名称,注意rtmp里面的匹配是名称全匹配,和http里面的正则是不一样的
               live on;
               gop_cache on;
         }
         application hls{
               live on;
               hls on;
               hls_path /u02/openresty2/nginx/html/hls;
        }
        application dash{
               live on;
               dash on;
               dash_path /u02/openresty2/nginx/html/dash;
        }
    }
}
重点是 server部分的application myapp段,和直播推流和拉流有直接关系,应用端需要关注这个地方。这里重点需要理解各个rtmp模块的指令含义,参考链接https://github.com/arut/nginx-rtmp-module/wiki/Directives,看不了的,可以重点关注我这里copy过来的几个参数(hls以及dash的,不在这里解释,从链接里自己学习):
Multi-worker live streaming is implemented through pushing stream to remaining nginx workers.所以,rtmp模块上面全局的几个参数都是和多进程协作相关的。
rtmp_auto_push
Syntax: rtmp_auto_push on|off
Context: root
Toggles auto-push (multi-worker live streaming) mode.
Default is off.

rtmp_auto_push_reconnect
Syntax: rtmp_auto_push_reconnect timeout
Context: root
Sets auto-push reconnect timeout when worker is killed.
Default is 100 milliseconds.

rtmp_socket_dir
Syntax: rtmp_socket_dir dir
Context: root
Sets directory for UNIX domains sockets used for stream pushing.
Default is /tmp.

application
syntax: application name { ... }
context: server
Creates RTMP application. Unlike http location application name cannot be a pattern.

live
Syntax: live on|off
Context: rtmp, server, application
Toggles live mode i.e. one-to-many broadcasting.

另外,gop_cache指令,是一种缓存模式,只有on和off,这里配置为on,开启GOP(Group of Picture)缓存,播放器解码时,收到一个完整的GOP才会开始播放,这个是减少播放延迟的选项
1.2 http协议部分配置
http {
    server {
        listen       80;
        server_name  localhost;

        #charset koi8-r;

        #access_log  logs/host.access.log  main;

        location / {
            root   /home/tkiot/www;
            index  index.html index.htm;
        }

        include       mime.types;
        default_type  application/octet-stream;
        sendfile        on;
        keepalive_timeout  65;

        location /live{
             flv_live on;           #以HTTP协议请求以/live结尾的服务,匹配这儿,这个选项表示开启了flv直播播放功能
             chunked_transfer_encoding  on;  #支持HTTP服务端以超文本文件分块传输给浏览器端进行展示
             add_header 'Access-Control-Allow-Origin' '*';  #服务器默认是不被允许跨域的。给Nginx服务器配置`Access-Control-Allow-Origin *`后,表示服务器可以接受所有的请求源(Origin),即接受所有跨域的请求。
             add_header 'Access-Control-Allow-Credentials' 'true'; #响应报头指示的请求的响应是否可以暴露于该页面,当true值返回时它可以被暴露。
        }
        location /hls{
             types {
                application/vnd.apple.mpegurl m3u8;
                video/mp2t ts;
             }
             root /u02/openresty2/nginx/html/hls;
             add_header 'Cache-Control' 'no-cache';
        }
        location /dash {
            root /u02/openresty2/nginx/html/dash;
            add_header 'Cache-Control' 'no-cache';
        }

        location /stat {
            rtmp_stat all;
            rtmp_stat_stylesheet stat.xsl;
        }
        location /stat.xsl {
            root /home/tkiot/openresty/nginx-http-flv-module-1.2.9;
        }

        location /control {
            rtmp_control all; #configuration of control module of rtmp
        }
    }
}
这里,重点需要注意/live的匹配location。当在HTML5的页面上,进行展示的时候,http的url需要匹配这个。注意,默认直播拉流服务,需要指定rtmp的服务端口,app,以及stream,后面会介绍。
2. 推流配置
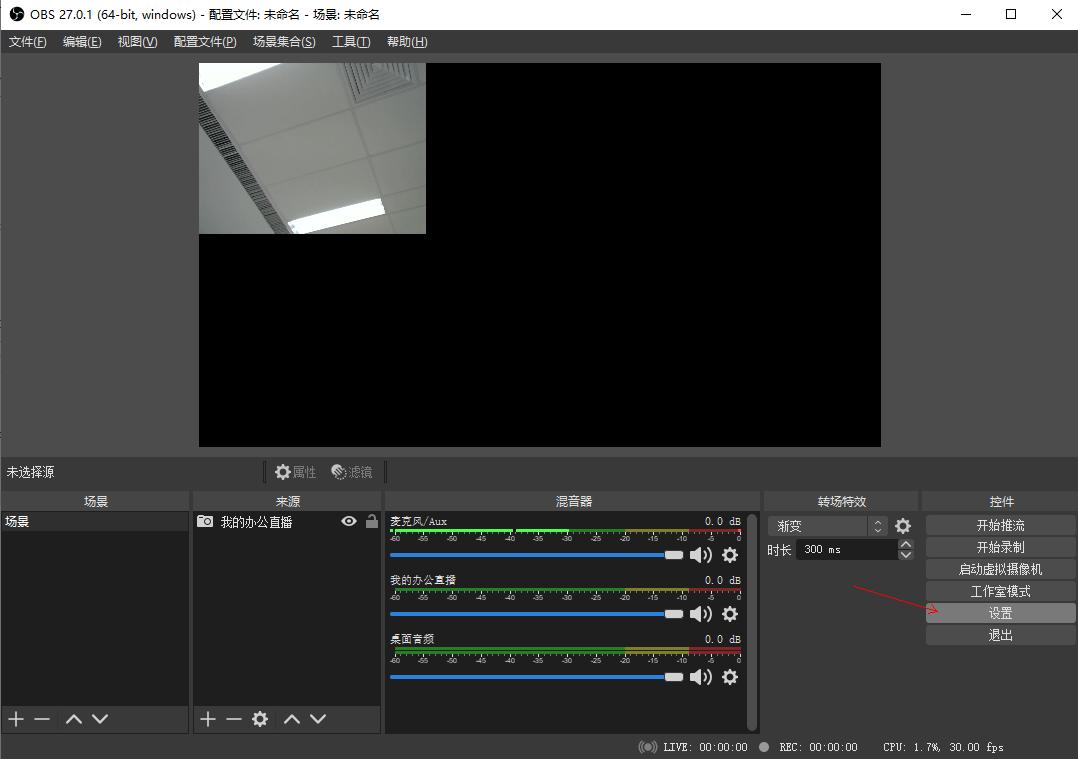
2.1,主要是OBS软件的推流设置,【文件】->【设置】,或者如图箭头所示的【设置】
2.2,配置【推流】的核心信息,如图所示,需要配置的地方。

2.2.1,首选,[服务]项,选择“自定义”
2.2.2,其次,[服务器]项,填入你nginx所在的服务器地址,这里输入上面配置的 rtmp://10.95.198.18:1935/myapp/
2.2.3,最后,[串流秘钥]项,填入一个自定义的字符串,用来表示直播的流是哪个,对应前面说到的stream信息。我这里设置为cowork1。
2.3, 配置完毕后,点击【确定】
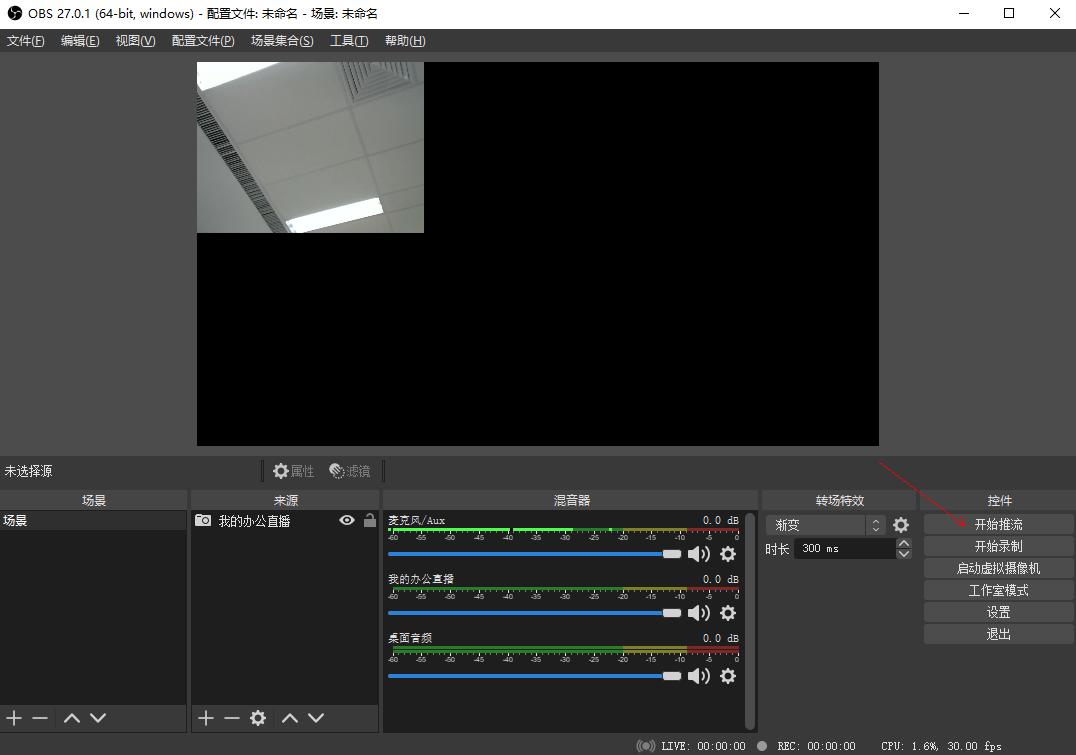
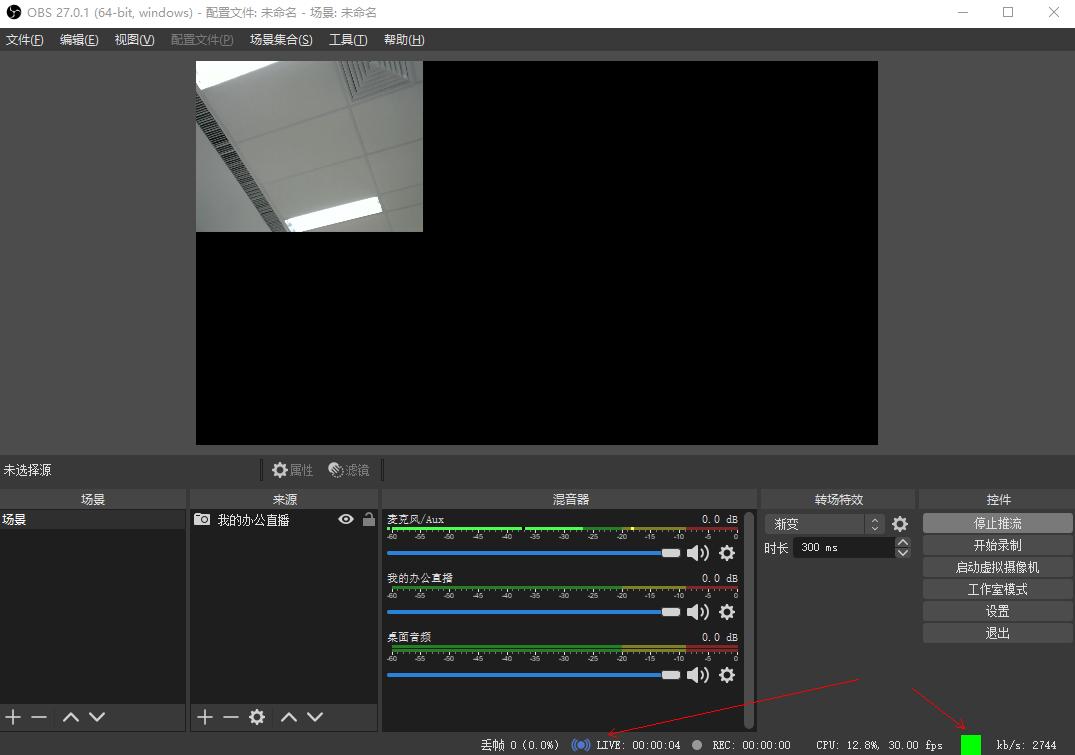
2.4,开始推流,直接点击【开始推流】按钮,若成功,则如下图,箭头所示位置为高亮色,若不成功,则为暗色。
(四) 应用开发
这里,主要是基于flv.js做了一个简单的demo,不多说,直接上代码。
<!DOCTYPE html>
<html>
<head>
    <meta content="text/html; charset=utf-8" http-equiv="Content-Type">
    <title>Web直播</title>
    <style>
.mainContainer {
    display: block;
     1024px;
    margin-left: auto;
    margin-right: auto;
}

.urlInput {
    display: block;
     100%;
    margin-left: auto;
    margin-right: auto;
    margin-top: 8px;
    margin-bottom: 8px;
}

.centeredVideo {
    display: block;
     100%;
    height: 576px;
    margin-left: auto;
    margin-right: auto;
    margin-bottom: auto;
}

.controls {
    display: block;
     100%;
    text-align: left;
    margin-left: auto;
    margin-right: auto;
}
    </style>
</head>

<body>
    <div class="mainContainer">
        <video id="videoElement" class="centeredVideo" controls autoplay width="1024" height="576">Your browser is too old which doesn't support HTML5 video.</video>
        <br>
        <div class="controls">
            <button onclick="flv_start()">开始</button>
            <button onclick="flv_pause()">暂停</button>
            <button onclick="flv_destroy()">停止</button>
            <input style="80%;" type="text" name="seekpoint" />
            <button onclick="flv_seekto()">跳转</button>
        </div>
    </div>
    <script src="./flv-1.6.1.min.js"></script>
    <script>
        var player = document.getElementById('videoElement');
        if (flvjs.isSupported()) {
            var flvPlayer = flvjs.createPlayer({
                type: 'flv',
                url: 'http://10.95.198.18/live?port=1935&app=myapp&stream=cowork1'
            });
            flvPlayer.attachMediaElement(videoElement);
            flvPlayer.load(); //加载
        }

        function flv_start() {
            player.play();
        }

        function flv_pause() {
            player.pause();
        }

        function flv_destroy() {
            player.pause();
            player.unload();
            player.detachMediaElement();
            player.destroy();
            player = null;
        }

        function flv_seekto() {
            player.currentTime = parseFloat(document.getElementsByName('seekpoint')[0].value);
        }
    </script>
</body>
</html>
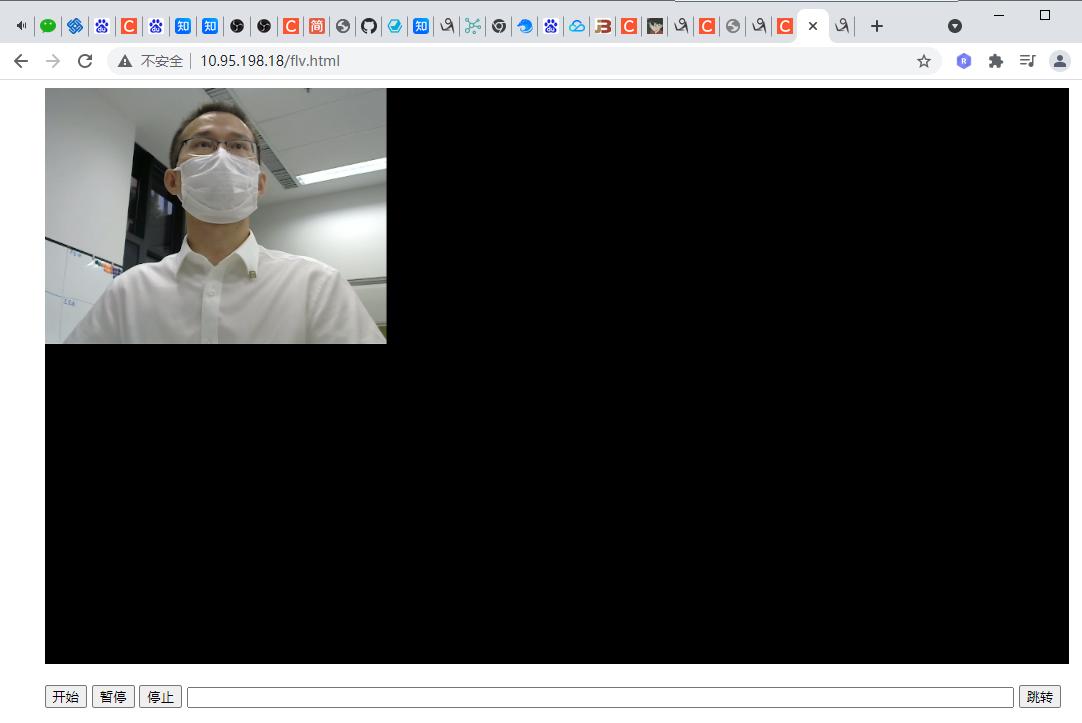
好了,主要的内容,就这么多,现在再上两种图片,展示推流OBS端,以及web端播放的效果。