第22课 - 条件编译使用分析

这节课我们介绍如何使用C语言中的条件编译。
市面上的电子产品一般有低配版、中配版、高配版,那相应的软件也要开发三个版本吗?显然不是这样的,我们一般在同一套代码中使用条件编译区分不同的版本。
1. 基本概念
(1)c 程序的编译一般经过如下四个过程
![]()
条件编译是在预处理阶段由预处理器完成的,预处理器根据条件编译指令选择使用哪些代码。
(2)条件编译的行为类似于if ...else...语句,但他们有本质的区别。前者在预处理阶段进行分支判断,后者在程序运行期间进行分支判断
 1 // #include <stdio.h>
 2
 3 #define C 1
 4
 5 int main()
 6 {
 7     const char* s;
 8
 9     #if( C == 1 )   // 条件成立,选择该分支
10         s = "This is first printf...
";
11     #else
12         s = "This is second printf...
";
13     #endif
14
15     // printf("%s", s);
16
17     return 0;
18 }
使用 gcc -E 命令查看该程序由预处理器处理后的结果
swj@ubuntu:~/c_course/ch_22$ gcc -E test.c
# 1 "test.c"
# 1 "<built-in>"
# 1 "<command-line>"
# 1 "/usr/include/stdc-predef.h" 1 3 4
# 1 "<command-line>" 2
# 1 "test.c"int main()
{
const char* s;s = "This is first printf... ";
return 0;
}
(3)除了在代码中定义宏,可以通过命令行定义宏 -D后面的宏会在预处理时传递到程序中(D是definition的缩写)
gcc –Dmacro=value file.c // 针对 #if 语句
gcc –Dmacro file.c // 针对 #ifdef 或 ifndef 语句
// 查看gcc的man手册,这种形式下macro的值为1

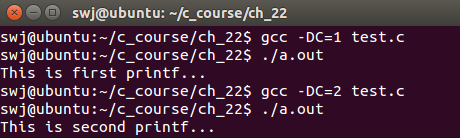
下面验证-D选项的功能
 1 #include <stdio.h>
 2
 3 int main()
 4 {
 5     const char* s;
 6
 7     #if( C == 1 )
 8         s = "This is first printf...
";
 9     #else
10         s = "This is second printf...
";
11     #endif
12
13     printf("%s", s);
14
15     return 0;
16 }
上面代码删除了 #define C 1,转而使用 -D选项传递宏,观察下面的编译命令及程序的输出结果
这里再添加一个细节:如果文件中没有 #define C 1 这条语句,命令行也没有使用 -DC=1,那么 gcc test.c 可以编译通过吗?实际测试是OK的。
在预处理器处理 #if( C==1 ) 这条语句时,如果没有定义C,并不会报错,而是认为 C==1 为“假”
2. #include的本质
(1)#include 的本质是将已经存在的头文件的内容嵌入到当前文件中
(2)如果#include包含的头文件中又包含了其它头文件,那么该文件的内容也会被嵌入到当前文件中
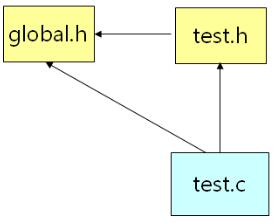
下面看一个关于#include的小例子:如下图所示,test.c中包含了test.h和global.h,而test.h又包含了global.h。
// global.h
1 int global = 10;
// test.h
1 #include "global.h"
2
3 const char* NAME = "test.h";
4 char* hello_world(){return "Hello World!
";}
// test.c
 1 // #include <stdio.h>
 2 #include "test.h"
 3 #include "global.h"
 4
 5 int main()
 6 {
 7     const char* s = hello_world();
 8     int g = global;
 9
10     //printf("%s
",NAME);
11     //printf("%d
",g);
12
13     return 0;
14 }
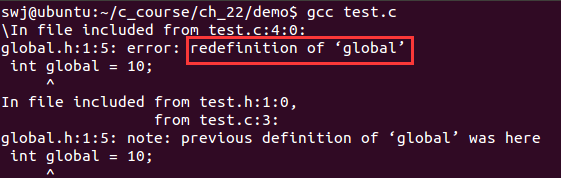
使用gcc编译test.c,编译报错,显示重复定义了global变量,这是由于重复包含了global.h头文件导致的。
要解决上面这种由于重复包含同一个头文件,导致全局变量、函数声明、类型定义等被重复定义的错误,就需要使用条件编译。
一般格式如下:
1 #ifndef _HEADER_FILE_H_
2 #define _HEADER_FILE_H_
3
4 // 头文件的内容
5
6 #endif
当重复包含某个头文件时,由于第一次已经定义了_HEADER_H_,第二次就不会再包含这个文件的内容了。
使用这种方法对 global.h 和 test.h 进行改造
// global.h
1 #ifndef _GLOBAL_H_
2 #define _GLOBAL_H_
3 int  global = 10;
4 #endif
// test.h
1 #ifndef  _TEST_H_
2 #define _TEST_H_
3 #include "global.h"
4
5 const char* NAME = "test.h";
6 char* hello_world(){return "Hello World!
";}
7 #endif
这样当tes.c重复包含global.h时,由于条件编译的缘故,global.h的内容只会被嵌入一次,不会出现重复包含global变量的错误。
3. 条件编译的意义
(1)条件编译使得我们可以按照不同的条件编译不同的代码段,因而可以产生不同的目标代码
(2)#if...#else...#endif 被预处理器处理;而 if...else... 语句被编译器处理,必然会被编译到目标代码中
(3)实际工程中条件编译主要用于以下两种情况:
① 不同的产品线共用一份代码
② 区分编译 产品的调试版和发布版
【产品线区分及调试代码应用】
// product.h
1 #define DEBUG 1    // 区分版本时调试版还是发布版
2 #define HIGH  1    // 区分版本是高配版还是低配版
// test.c
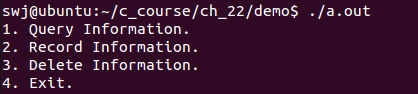
 1 #include <stdio.h>
 2 #include "product.h"
 3
 4 #if DEBUG
 5     #define LOG(s) printf("[%s:%d] %s
",__FILE__,__LINE__,s)
 6 #else
 7     #define LOG(s) NULL  // 注意这里的写法
 8 #endif
 9
10 #if HIGH
11 void f()
12 {
13     printf("This is the high level product!
");
14 }
15 #else
16 void f()
17 {
18 }
19 #endif
20
21 int main()
22 {
23     LOG("Enter main()...");
24     f();
25
26     printf("1. Query Information.
");
27     printf("2. Record Information.
");
28     printf("3. Delete Information.
");
29
30     #if HIGH
31         printf("4. High Level Query.
");
32         printf("5. Mannual Service.
");
33         printf("6. Exit.
");
34     #else
35         printf("4. Exit.
");
36     #endif
37
38     LOG("Exit main()...");
39 }
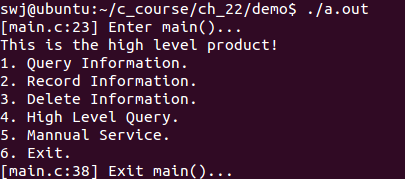
① DEBUG为1,HIGH为1 ==> 高配调试版
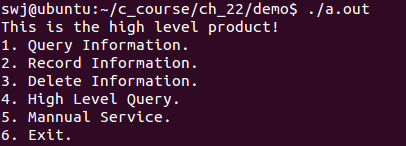
② DEBUG为0,HIGH为1 ==> 高配发布版
③ DEBUG为1,HIGH为0 ==> 低配调试版
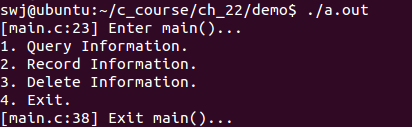
④ DEBUG为1,HIGH为0 ==> 低配发布版