重新正经学框架,从Spring开始!
1.概念
框架框架,就是项目的架子,也就是半成品,需要完善,而不能作为完整项目。
2.核心
IOC:控制反转。大白话讲就是原本我们用对象是new出来玩,现在去XML配置文件里配置,直接用。
AOP:面向切面方程。大白话讲就是,切进去,原来的代码上加东西不影响原来的。
3.搭建环境
(1)建一个普通文件夹(Folder)lib加入jar包
- spring-beans
- spring-context
- spring-core
- spring-expression
- commons-loging(日志包)
按住shitf点第一个和最后一个包保证全选,右键build path添加路径。
(2)建一个源文件夹(Source Folder)conf放配置文件,默认名applicationContext,每一个标签对<bean></bean>代表一个对象,属性中要设置是哪个类:包+类名,用id属性作为唯一标识,可以给对象赋值。
4.使用
(1)写一个类,例如类名叫Person,属性有名字name、序号id、年龄age,然后在XML中做出如下配置
<?xml version="1.0" encoding="UTF-8"?>
<beans xmlns="http://www.springframework.org/schema/beans"
    xmlns:xsi="http://www.w3.org/2001/XMLSchema-instance"
    xsi:schemaLocation="http://www.springframework.org/schema/beans
     http://www.springframework.org/schema/beans/spring-beans-4.3.xsd">

    <bean id="person1" class="com.atguigu.spring.mod.Person">
        <property name="age" value="22"></property>
        <property name="name" value="守林鸟"></property>
    </bean>
    <bean id="person2" class="com.atguigu.spring.mod.Person"></bean>
    <bean id="person3" class="com.atguigu.spring.mod.Person"></bean>
</beans>
第1行理解成“我是xml文件”,照抄就行。
接下来4行是命名空间,理解成“我要用Spring技术”,照抄就行。
接下来3行的3对<bean>标签表示3个对象,可以设置id和name,id是唯一标识不能重复,如果没有设置name和id,默认class值当作id使用。
<property>标签表示为对象的属性赋值,赋值,这就是所谓的DI,依赖注入,是IOC具体的实现方式。<property>中的name对应的是set方法而不是属性名。
注入方法还可以用构造器,写构造方法,构造注入
<constructor-arg value="" index="1/2/3" type="java.lang.Double"></constructor-arg>;
很麻烦,index表示构造方法第几个参数,type表示通过类型区分重载构造器,可不加,容易出错。
在main函数中这样使用XML文件中配置的对象。
    public static void main(String[] args) {
        //初始化容器
        ApplicationContext ac=new ClassPathXmlApplicationContext("applicationContext.xml");
        //通过getBean()获取对象
        Person person1=(Person)ac.getBean("person1");
        System.out.println(person1);
    }
第二种方法,用反射技术获取类对象,但是这个技术要保证对象唯一,一个类只能有一个<bean>标签,上面的配置文件不能用这个方法。
Person person2=(Person)ac.getBean(Person.class);
第三种方法,id+类对象
Person person3=(Person)ac.getBean("person3",Person.class);
5.p命名空间
在xml文件的命名空间处加入p命名空间,设值注入写法会变得简单。
<?xml version="1.0" encoding="UTF-8"?>
<beans xmlns="http://www.springframework.org/schema/beans"
    xmlns:xsi="http://www.w3.org/2001/XMLSchema-instance"
    xsi:schemaLocation="http://www.springframework.org/schema/beans
     http://www.springframework.org/schema/beans/spring-beans-4.3.xsd"

    xmlns:p="http://www.springframework.org/schema/p"
    >

    <bean id="person1" class="com.atguigu.spring.mod.Person">
        <property name="age" value="22"></property>
        <property name="name" value="守林鸟"></property>
    </bean>

    <bean id="person2" class="com.atguigu.spring.mod.Person" p:id="10086" p:name="灰太狼" p:age="19"></bean>
</beans>
6.字面量和ref
在上面的设值注入都是value等于一个字符串,这就是字面量,基本类型的包装类型可以这么玩。
但如果是一个有多个属性的引用类型就不可以这样玩,怎么办?用<bean>标签再写一个对象,用ref替换value,普通写法和p命名空间的写法如下
    <bean id="person1" class="com.atguigu.spring.mod.Person">
        <property name="age" value="22"></property>
        <property name="name" value="守林鸟"></property>
        <property name="teacher" ref="teacher"></property>
    </bean>

    <bean id="person2" class="com.atguigu.spring.mod.Person"
    p:id="10086" p:name="灰太狼" p:age="19" p:teacher-ref="teacher"></bean>

    <bean id="teacher" class="com.atguigu.spring.mod.Teacher">
        <property name="lesson" value="大数据"></property>
        <property name="age" value="30"></property>
    </bean>
7.联级查询
对引用类型的属性赋值,用".",会对引用类型的对象造成影响,如果这个引用类型被多个对象引用,都会造成影响。
    <bean id="person1" class="com.atguigu.spring.mod.Person">
        <property name="age" value="22"></property>
        <property name="name" value="守林鸟"></property>
        <property name="teacher" ref="teacher"></property>
        <property name="teacher.lesson" value="大学语文"></property>
    </bean>
8.内部bean
定义在某个bean的内部,只能被当前bean使用。
    <bean id="person3" class="com.atguigu.spring.mod.Person">
        <property name="age" value="22"></property>
        <property name="name" value="霸王别鸡"></property>
        <property name="teacher">
            <bean id="tt" class="com.atguigu.spring.mod.Teacher">
                <property name="lesson" value="高等数学"></property>
                <property name="age" value="30"></property>
            </bean>
        </property>
    </bean>
9.集合属性
通过<list>,<set>,<map>,<array>等标签赋值。
(1)例如Teacher类里加了几种属性,配置写法如下
    private List<String> list;
    private List<Student> students;
    private Map<String,Double> map;
    <bean id="teacher2" class="com.atguigu.spring.mod.Teacher">
        <property name="lesson" value="大学英语"></property>
        <property name="age" value="28"></property>
        <property name="list">
            <list>
                <value>A</value>
                <value>B</value>
                <value>C</value>
            </list>
        </property>
        <property name="students">
            <list>
                <ref bean="s1"/>
                <ref bean="s2"/>
                <bean id="s3" class="com.atguigu.spring.mod.Student">
                    <property name="name" value="小黑同学"></property>
                    <property name="score" value="88"></property>
                    <property name="age" value="14"></property>
                </bean>
            </list>
        </property>
        <property name="map">
            <map>
                <entry><!-- 键值对 -->
                    <key>
                        <value>儿子</value>
                    </key>
                    <value>2</value>
                </entry>
                <entry><!-- 键值对 -->
                    <key>
                        <value>女儿</value>
                    </key>
                    <value>3</value>
                </entry>
            </map>
        </property>
    </bean>
    <bean id="s1" class="com.atguigu.spring.mod.Student">
        <property name="name" value="小明同学"></property>
        <property name="score" value="66"></property>
        <property name="age" value="12"></property>
    </bean>
    <bean id="s2" class="com.atguigu.spring.mod.Student">
        <property name="name" value="小红同学"></property>
        <property name="score" value="77"></property>
        <property name="age" value="13"></property>
    </bean>
引用类型通过<ref bean=""/>引用或者直接开一个新的<bean>作为内部bean,注意点:只有<value>标签可以直接夹着字面量,像<key>等里面都还要再夹一个<value>赋值。
也可以在XML直接定义一个集合,用<util:list><util:map>之类的标签,但是要加上命名空间。第7行和12-13行。
 1 <?xml version="1.0" encoding="UTF-8"?>
 2 <beans xmlns="http://www.springframework.org/schema/beans"
 3     xmlns:xsi="http://www.w3.org/2001/XMLSchema-instance"
 4
 5
 6     xmlns:p="http://www.springframework.org/schema/p"
 7     xmlns:util="http://www.springframework.org/schema/util"
 8
 9     xsi:schemaLocation="http://www.springframework.org/schema/beans
10      http://www.springframework.org/schema/beans/spring-beans-4.3.xsd
11
12      http://www.springframework.org/schema/util
13      http://www.springframework.org/schema/util/spring-util.xsd"
14
15     >
    <bean id="teacher3" class="com.atguigu.spring.mod.Teacher">
        <property name="lesson" value="线性代数"></property>
        <property name="age" value="44"></property>
        <property name="students" ref="stulist"></property>
    </bean>
    <util:list id="stulist" >
        <ref bean="s1"/>
        <ref bean="s2"/>
    </util:list>
写法如上,像其他集合的写法也差不多,要么新开对象,要么用ref引用。
10.通过工厂来创造对象,用的是设计模式的工厂方法模式,没什么神秘的。
11.bean的作用域
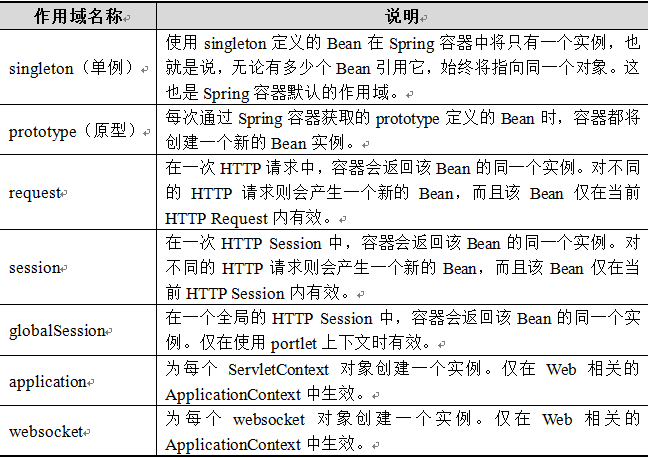
属性scpoe=“作用域”加在<bean>标签里。
注意点,单例是在初始化容器的时候就创建这个对象。而原型是每一次getBean()时创建一个。并且不写时默认单例。
12.bean的生命周期
(1)通过构造器或者工厂方法创建bean实例
(2)注入
(3)调用初始化方法init
(4)使用
(5)容器关闭,调用bean的销毁方法
其中,初始化方法和销毁一般不会调用,需要在<bean>标签的属性加上init-method="init" destroy-method="destroy",其中init和destroy是初始化方法和销毁方法的名字,可以重写。容器关闭用ac.close();初始化容器ac需要用实现类即ClassPathXmlApplicationContext,而不是ApplicationContext。
13.bean的后置处理器
在对象的初始化前后各执行一个方法,玩法:定义一个类AfterHandler实现BeanPostProcessor接口中的两个抽象方法,并且在配置文件中创建一下AfterHandler的bean,对配置文件中的所有都bean对象都起到处理作用。所以,两个方法里的内容不要涉及到 某一个对象没有的属性。
14.引用外部属性/资源文件
当bean的配置信息逐渐增多时,查找和修改一些bean的配置信息就变得愈加困难。这时可以将一部分信息提取到bean配置文件的外部,以properties格式的属性文件保存起来,同时在bean的配置文件中引用properties属性文件中的内容,从而实现一部分属性值在发生变化时仅修改properties属性文件即可。这种技术多用于连接数据库的基本信息的配置。properties文件是一种key-value的映射关系。写法如下:
#key = value
jdbc.driver=com.mysql.jdbc.Driver
jdbc.url=jdbc:mysql://localhost:3306/spring
jdbc.username=root
jdbc.password=shoulinniao
    <!-- 加载资源文件,db.properties,key-val的对应方法,相当于把内容写到资源文件中-->
    <bean class="org.springframework.beans.factory.config.PropertyPlaceholderConfigurer" >
        <property name="location" value="db.properties"></property>
    </bean>

      <!-- 另一种加载资源文件的方法
      <context:property-placeholder location="db.properties" />
    -->


    <bean id="datasource" class="com.alibaba.druid.pool.DruidDataSource">
        <property name="driverClassName" value="${jdbc.driver}"></property>
        <property name="url" value="${jdbc.url}"></property>
        <property name="username" value="${jdbc.username}"></property>
        <property name="password" value="${jdbc.password}"></property>
    </bean>
15.自动装配(即自动注入)
- 手动装配:手写value和ref,上面的都是;
- 自动装配:根据某种策略自动为非字面量属性赋值。
需要用到的属性是<bean>标签里的autowire属性,autowire="byName || byType"。
byName:需要配置的bean的属性名 等于 其他bean的id名。(id名唯一,所以也是唯一性)
byType:需要配置的bean的属性类型 等于 其他bean的类型。(确保同类型只有一个bean,多个就不知道配哪个,和getBean唯一一个道理)
建议:约束性太强了,别用。
16.注解
标识受Spring IOC容器管理的组件
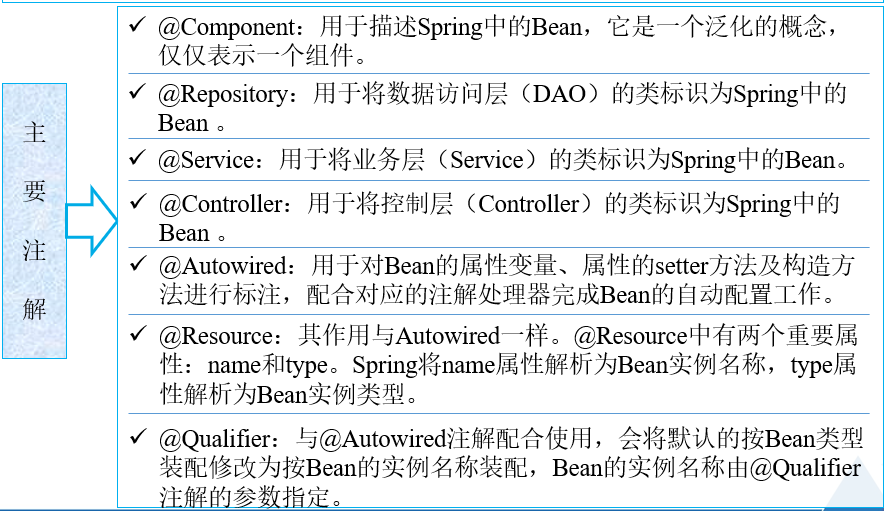
(1)大白话:哪个类标注了注解,就变成了组件。(什么是组件?组件就是Spring中的bean)用一个语句扫描 指定包下的类,对于加上注解的类进行加载。这些类的id名默认是单个首字母变小写的类名。
(2)条件:添加Spring-aop包,命名空间第7行,location在15-16行。
 1 <beans xmlns="http://www.springframework.org/schema/beans"
 2     xmlns:xsi="http://www.w3.org/2001/XMLSchema-instance"
 3
 4
 5     xmlns:p="http://www.springframework.org/schema/p"
 6     xmlns:util="http://www.springframework.org/schema/util"
 7     xmlns:context="http://www.springframework.org/schema/context"
 8
 9     xsi:schemaLocation="http://www.springframework.org/schema/beans
10      http://www.springframework.org/schema/beans/spring-beans-4.3.xsd
11
12      http://www.springframework.org/schema/util
13      http://www.springframework.org/schema/util/spring-util.xsd
14
15      http://www.springframework.org/schema/context
16      http://www.springframework.org/schema/context/spring-context-4.3.xsd">
(3)过滤器
如果一次性把整个包的都扫描,有些不需要用的也扫,就有点浪费时间,所以有过滤器这个功能。包含与排除(include和exclude),可以同时包含,同时排除,不能同时包含和排除。包的范围可以用逗号,表示多个包。
       <context:component-scan base-package="com.atguigu.ioc" use-default-filters="false">

           <!-- 自定义包含过滤时,要把默认的过滤器关闭,即use-default-filters="false" -->
           <!-- 根据注解类型,只扫描 包中注解是@Componet的类,可以改成别的 -->
           <context:include-filter type="annotation" expression="org.springframework.stereotype.Component"/>

           <!-- 自定义排除过滤时,不要把默认的过滤器关闭,即use-default-filters="true"或不写 -->
           <!-- 根据注解类型,只不扫描 包中注解是@Service的类,可以改成别的 -->
           <context:exclude-filter type="annotation" expression="org.springframework.stereotype.Service"/>


           <!-- 根据类的类型,只扫描 包中类型是**的,过滤器同上 -->
           <context:include-filter type="assignable" expression="com.atguigu.ioc.scope.Teacher"/>
           <!-- 根据类的类型,只不扫描 包中类型是**的,过滤器同上 -->
           <context:include-filter type="assignable" expression="com.atguigu.ioc.scope.Student"/>
       </context:component-scan>
(4)注解和自动装配的混合运用
对特定类型的属性用@Autowired注解,会根据类型去xml中找指定的bean装配。
(5)注解中的属性
value表示在xml里装配之后生成的对应的bean的id不再是默认的类首字母小写,而是自己设置的value值
@Component(value="aaa") 或者 @Component("aaa")
学习资源:B站尚硅谷Spring视频。