博客链接:https://blog.csdn.net/sinat_23619409/article/details/84202651
1. cuda的安装
到 https://developer.nvidia.com/cuda-toolkit 去下载。在安装的时候一定要自定义安装,否则将会安装很多无用的东西。安装的选项,可以选择不更新驱动程序。
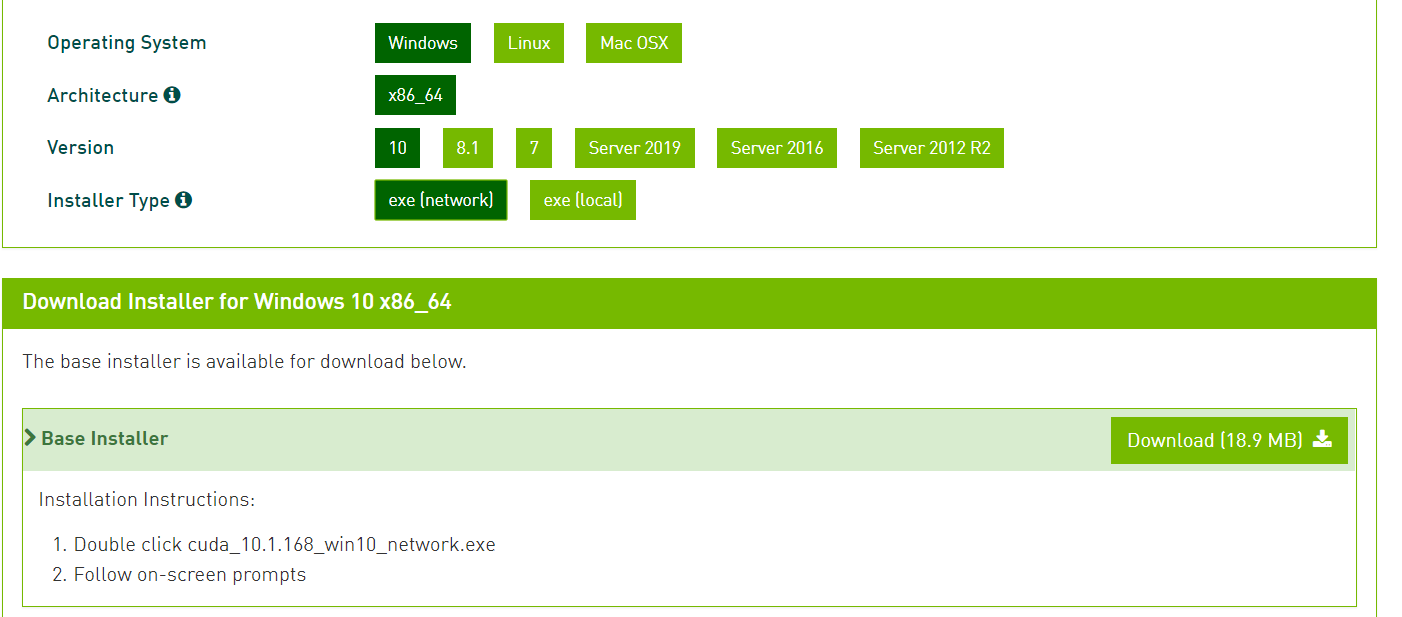
或者下载离线文件安装
![]()
安装,选择自定义安装。

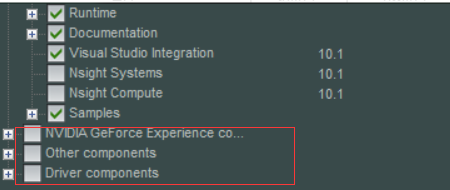
安装后,和英伟达cuda相关的程序如下图所示。

注意,千万不要勾选 Nsight Visual Studio Edition 2019.2等类似的无用的东西。
2. 测试环境是否安装成功
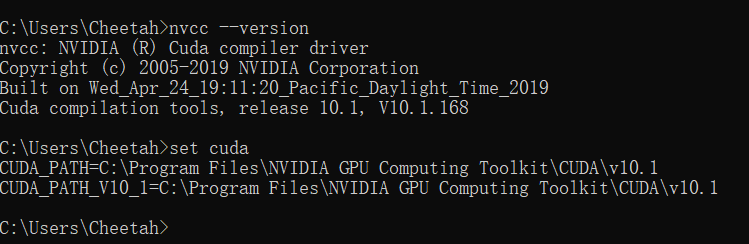
运行cmd,输入nvcc --version 即可查看版本号;
set cuda,可以查看cuda设置的环境变量。
3. 运行官方自带的demo
在任务管理器中搜索,Browse CUDA Samples。 或者一般位于 C:ProgramDataNVIDIA CorporationCUDA Samples
未编译前,Debug文件夹中只有三个文件,如图。

成功编译后这个位置(具体路径见上图)将生成很多文件,在其中找到deviceQueryDrv.exe的程序拖入到cmd中,回车运行。
4. 自己配置cuda项目
(1)打开vs2017,创建一个空win32程序,即cuda_test项目。
(2)选择cuda_test,点击右键–>项目依赖项–>自定义生成,选择CUDA10.1。
(3)右键源文件文件夹->添加->新建项->选择CUDA C/C++File,取名cuda_main。
(4)点击cuda_main.cu的属性,在配置属性–>常规–>项类型–>选择“CUDA C/C++”。
注意:以下步骤中的项目属性设置均针对x64。
(5)包含目录配置:
右键点击项目属性–>属性–>配置属性–>VC++目录–>包含目录
添加包含目录:$(CUDA_PATH)include
(6)库目录配置
VC++目录–>库目录
添加库目录:$(CUDA_PATH)libx64
(7)依赖项
配置属性–>链接器–>输入–>附加依赖项
添加库文件:cublas.lib;cuda.lib;cudadevrt.lib;cudart.lib;cudart_static.lib;OpenCL.lib
cuda_main.cu代码如下:
|
1
2
3
4
5
6
7
8
9
10
11
12
13
14
15
16
17
18
19
20
21
22
23
24
25
26
27
28
29
30
31
32
33
34
35
36
37
38
39
40
41
42
43
44
45
46
47
48
49
50
51
52
53
54
55
56
57
58
59
60
61
62
63
64
65
66
67
68
69
70
71
72
73
74
75
76
77
78
79
80
81
82
83
84
85
86
87
88
89
90
91
92
93
94
95
96
97
98
99
100
101
102
103
104
105
106
107
108
109
110
111
112
113
114
115
116
117
118
119
120
121
122
123
124
125
126
127
128
129
130
131
132
133
134
135
136
137
138
139
140
141
142
143
144
145
146
147
148
149
150
151
152
153
154
155
156
|
#include "cuda_runtime.h" #include "cublas_v2.h" #include <time.h> #include <iostream> using namespace std;// 定义测试矩阵的维度 int const M = 5;int const N = 10;int main(){ // 定义状态变量 cublasStatus_t status; // 在 内存 中为将要计算的矩阵开辟空间 float *h_A = (float*)malloc(N*M * sizeof(float)); float *h_B = (float*)malloc(N*M * sizeof(float)); // 在 内存 中为将要存放运算结果的矩阵开辟空间 float *h_C = (float*)malloc(M*M * sizeof(float)); // 为待运算矩阵的元素赋予 0-10 范围内的随机数 for (int i = 0; i < N*M; i++) { h_A[i] = (float)(rand() % 10 + 1); h_B[i] = (float)(rand() % 10 + 1); } // 打印待测试的矩阵 cout << "矩阵 A :" << endl; for (int i = 0; i < N*M; i++) { cout << h_A[i] << " "; if ((i + 1) % N == 0) cout << endl; } cout << endl; cout << "矩阵 B :" << endl; for (int i = 0; i < N*M; i++) { cout << h_B[i] << " "; if ((i + 1) % M == 0) cout << endl; } cout << endl; /* ** GPU 计算矩阵相乘 */ // 创建并初始化 CUBLAS 库对象 cublasHandle_t handle; status = cublasCreate(&handle); if (status != CUBLAS_STATUS_SUCCESS) { if (status == CUBLAS_STATUS_NOT_INITIALIZED) { cout << "CUBLAS 对象实例化出错" << endl; } getchar(); return EXIT_FAILURE; } float *d_A, *d_B, *d_C; // 在 显存 中为将要计算的矩阵开辟空间 cudaMalloc( (void**)&d_A, // 指向开辟的空间的指针 N*M * sizeof(float) // 需要开辟空间的字节数 ); cudaMalloc( (void**)&d_B, N*M * sizeof(float) ); // 在 显存 中为将要存放运算结果的矩阵开辟空间 cudaMalloc( (void**)&d_C, M*M * sizeof(float) ); // 将矩阵数据传递进 显存 中已经开辟好了的空间 cublasSetVector( N*M, // 要存入显存的元素个数 sizeof(float), // 每个元素大小 h_A, // 主机端起始地址 1, // 连续元素之间的存储间隔 d_A, // GPU 端起始地址 1 // 连续元素之间的存储间隔 ); cublasSetVector( N*M, sizeof(float), h_B, 1, d_B, 1 ); // 同步函数 cudaThreadSynchronize(); // 传递进矩阵相乘函数中的参数,具体含义请参考函数手册。 float a = 1; float b = 0; // 矩阵相乘。该函数必然将数组解析成列优先数组 cublasSgemm( handle, // blas 库对象 CUBLAS_OP_T, // 矩阵 A 属性参数 CUBLAS_OP_T, // 矩阵 B 属性参数 M, // A, C 的行数 M, // B, C 的列数 N, // A 的列数和 B 的行数 &a, // 运算式的 α 值 d_A, // A 在显存中的地址 N, // lda d_B, // B 在显存中的地址 M, // ldb &b, // 运算式的 β 值 d_C, // C 在显存中的地址(结果矩阵) M // ldc ); // 同步函数 cudaThreadSynchronize(); // 从 显存 中取出运算结果至 内存中去 cublasGetVector( M*M, // 要取出元素的个数 sizeof(float), // 每个元素大小 d_C, // GPU 端起始地址 1, // 连续元素之间的存储间隔 h_C, // 主机端起始地址 1 // 连续元素之间的存储间隔 ); // 打印运算结果 cout << "计算结果的转置 ( (A*B)的转置 ):" << endl; for (int i = 0; i < M*M; i++) { cout << h_C[i] << " "; if ((i + 1) % M == 0) cout << endl; } // 清理掉使用过的内存 free(h_A); free(h_B); free(h_C); cudaFree(d_A); cudaFree(d_B); cudaFree(d_C); // 释放 CUBLAS 库对象 cublasDestroy(handle); getchar(); return 0;} |
5 使用VS下的模板创建
打开VS 2017,我们可以观察到,在VS2017模板一栏下方出现了“NVIDIA/CUDA 10.1”。
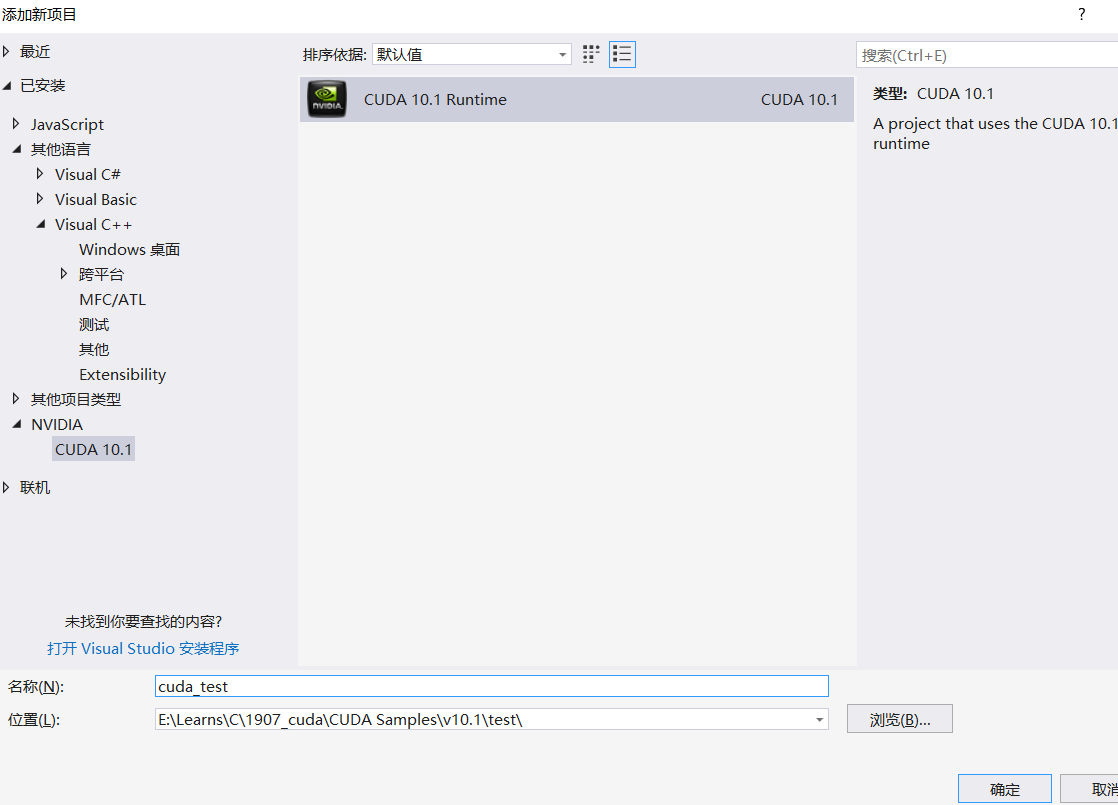
直接新建一个CUDA 10.1 Runtime 项目。
右键项目 → 属性 → 配置属性 → 链接器 → 常规 → 附加库目录,添加以下目录:
(CUDAPATHV100)lib(CUDAPATHV100)lib(Platform)
示例代码如下:
|
1
2
3
4
5
6
7
8
9
10
11
12
13
14
15
16
17
18
19
20
21
22
23
24
25
26
27
28
29
30
31
32
33
34
35
36
37
38
39
40
41
42
43
44
|
#include "cuda_runtime.h"#include "device_launch_parameters.h"#include <stdio.h>int main() { int deviceCount; cudaGetDeviceCount(&deviceCount); int dev; for (dev = 0; dev < deviceCount; dev++) { int driver_version(0), runtime_version(0); cudaDeviceProp deviceProp; cudaGetDeviceProperties(&deviceProp, dev); if (dev == 0) if (deviceProp.minor = 9999 && deviceProp.major == 9999) printf("
"); printf("
Device%d:"%s"
", dev, deviceProp.name); cudaDriverGetVersion(&driver_version); printf("CUDA驱动版本: %d.%d
", driver_version / 1000, (driver_version % 1000) / 10); cudaRuntimeGetVersion(&runtime_version); printf("CUDA运行时版本: %d.%d
", runtime_version / 1000, (runtime_version % 1000) / 10); printf("设备计算能力: %d.%d
", deviceProp.major, deviceProp.minor); printf("Total amount of Global Memory: %u bytes
", deviceProp.totalGlobalMem); printf("Number of SMs: %d
", deviceProp.multiProcessorCount); printf("Total amount of Constant Memory: %u bytes
", deviceProp.totalConstMem); printf("Total amount of Shared Memory per block: %u bytes
", deviceProp.sharedMemPerBlock); printf("Total number of registers available per block: %d
", deviceProp.regsPerBlock); printf("Warp size: %d
", deviceProp.warpSize); printf("Maximum number of threads per SM: %d
", deviceProp.maxThreadsPerMultiProcessor); printf("Maximum number of threads per block: %d
", deviceProp.maxThreadsPerBlock); printf("Maximum size of each dimension of a block: %d x %d x %d
", deviceProp.maxThreadsDim[0], deviceProp.maxThreadsDim[1], deviceProp.maxThreadsDim[2]); printf("Maximum size of each dimension of a grid: %d x %d x %d
", deviceProp.maxGridSize[0], deviceProp.maxGridSize[1], deviceProp.maxGridSize[2]); printf("Maximum memory pitch: %u bytes
", deviceProp.memPitch); printf("Texture alignmemt: %u bytes
", deviceProp.texturePitchAlignment); printf("Clock rate: %.2f GHz
", deviceProp.clockRate * 1e-6f); printf("Memory Clock rate: %.0f MHz
", deviceProp.memoryClockRate * 1e-3f); printf("Memory Bus Width: %d-bit
", deviceProp.memoryBusWidth); } return 0;} |
参考文章