一个网站的主题包括布局,色调,内容展示等,每种主题在某些方面应该或多或少不一样的,否则就不能称之为不同的主题了。每一个网站至少都有一个主题,我这里称之为默认主题,也就是我们平常开发设计网站时的一个固定布局,固定色调,固定内容展示等构成一个默认的固定主题。单一主题针对一些小网站或网站用户群体相对单一固定还是比较适用的,但如果是大型网站或是网站的用户群体比较多而且复杂,如:京东,博客园里的每个博客空间、文俊IT社区网(我的网站,虽不是大型网站,但也实现了主题切换功能的哦!~)等,是需要多个网站主题的,当然我举的这两个网站他们都实现了多主题,比如:
京东默认主题:适合国内人群

英文主题:适合国外人群

博客园就不用在此举例了吧,大家看每个人的博客风格不同就知道了。
上面的表述其作用是为了说明主题对于一个大中型或多种不同用户群体的网站的重要性,而如何实现多种主题的实现与切换也是本文主要说明的。主题的实现与切换方法有很多,常见的方法有:动态替换CSS+JS、ASPX页面可以采取制作多种控件主题进行切换、切换页面路径,不同的路径同页面文件设计成不同的主题等,而我这里要讲解的是MVC下如何实现通过切换路径来实现主题的切换功能。
MVC页面展示的内容来自视图页面(view.cshtml,view.vbhtml),如果说要实现在相同的后台处理代码下,实现不同的主题展示,我们只需要改变视图页面内容就可以了,但默认情况下,一个Action对应一个视图,如何实现一个Action在某种主题下对应不同的的视图文件呢?我这里给出如下两种方案:
第一种方案,很简单,可以根据请求的主题名称来返回不同的视图,代码实现如下:
Action:
|
1
2
3
4
5
|
public ActionResult TestCustomViewPath(string theme){ string themeName = string.IsNullOrEmpty(theme) ? "Default" : theme; return View(themeName + "/Test"); //注意这里指定了一相对路径} |
View:
|
1
2
3
4
5
6
7
8
9
10
11
12
13
14
15
16
17
18
19
20
21
22
23
24
25
26
27
28
29
30
31
32
33
34
35
36
37
38
39
40
41
42
43
|
//Default:<!DOCTYPE html><html><head> <title></title></head><body> <div> 我是自定义的视图路径,风格:@ViewBag.CurrentThemeName </div> @using(Html.BeginForm()){ <span>选择主题:</span> @Html.DropDownList("theme", new[] { new SelectListItem() { Text = "默认", Value = "Default" }, new SelectListItem() { Text = "绿色", Value = "Green" }}) <p> <input type="submit" value="应用" /> </p> }</body></html>//Green:<!DOCTYPE html><html><head> <title></title></head><body style="color:Orange;"> <div> 我是自定义的视图路径,风格:@ViewBag.CurrentThemeName </div> @using(Html.BeginForm()){ <span>选择主题:</span> @Html.DropDownList("theme", new[] { new SelectListItem() { Text = "默认", Value = "Default" }, new SelectListItem() { Text = "绿色", Value = "Green" }}) <p> <input type="submit" value="应用" /> </p> }</body></html> |
注意这里面的视图文件,不再是之前的默认情况,而是如下结构:即:在同一个控制器对应的视图目录下存在多个以主题为名的子目录,子目录中的文件名相同。

实现效果如下图示:
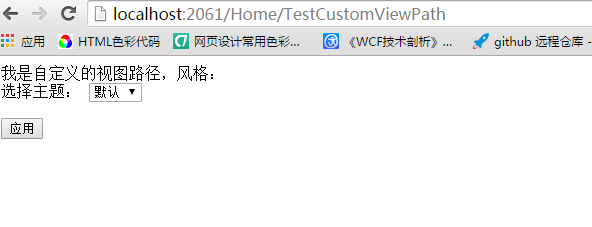

从上面的效果来看,确实已经实现了所谓的主题切换,但这种方法我并不是很推荐,因为视图文件目录过于混乱,每个控制器视图目录下均包含多个主题子目录,且每个子目录下的文件名相同,这让我很难区别,容易出现更错的情况,有人可能会说,我也可以将视图文件名改成不同的呀,比如:Green_Test.cshtml,这样就能区分了,但我仍然说不建议这样做,至少找视图文件都找得麻烦,推荐我下面介绍的第2种方法,具体如何实现,请君往下看。
我们知道,视图如何呈现,或者说如何被解析,均是需要视图引擎ViewEngine来支持的,微软给我们提供了两种视图引擎,即:WebFormViewEngine,对应的视图文件扩展名为:aspx;RazorViewEngine,对应的视图文件扩展名为:cshtml,vbhtml;从如下源代码也可以看出来:
|
1
2
3
4
5
6
7
8
9
10
11
12
13
14
15
16
17
18
19
|
namespace System.Web.Mvc{ public static class ViewEngines { private static readonly ViewEngineCollection _engines = new ViewEngineCollection { new WebFormViewEngine(), new RazorViewEngine() }; public static ViewEngineCollection Engines { get { return ViewEngines._engines; } } }} |
看到这个代码,我们应该可以看出,可以通过ViewEngines.Engines来添加我们自定义或是第三方的视图引擎(如:Nvelocity),来实现支持不同的视图文件格式,我这里因为目的是需要实现主题切换,所以就来自定义视图引擎,因为视图引擎实现细节比较复杂,若直接继承自IViewEngine接口,需要考虑与实现的代码会比较多且存在风险,所以我是直接继承自RazorViewEngine,既然要实现该类,我们先看一下该类的源代码:
|
1
2
3
4
5
6
7
8
9
10
11
12
13
14
15
16
17
18
19
20
21
22
23
24
25
26
27
28
29
30
31
32
33
34
35
36
37
38
39
40
41
42
43
44
45
46
47
48
49
50
51
52
53
54
55
56
57
58
59
60
61
62
63
64
65
66
67
68
69
70
71
72
73
74
75
76
77
78
79
80
81
82
|
using System;using System.Collections.Generic;namespace System.Web.Mvc{ public class RazorViewEngine : BuildManagerViewEngine { internal static readonly string ViewStartFileName = "_ViewStart"; public RazorViewEngine() : this(null) { } public RazorViewEngine(IViewPageActivator viewPageActivator) : base(viewPageActivator) { base.AreaViewLocationFormats = new string[] { "~/Areas/{2}/Views/{1}/{0}.cshtml", "~/Areas/{2}/Views/{1}/{0}.vbhtml", "~/Areas/{2}/Views/Shared/{0}.cshtml", "~/Areas/{2}/Views/Shared/{0}.vbhtml" }; base.AreaMasterLocationFormats = new string[] { "~/Areas/{2}/Views/{1}/{0}.cshtml", "~/Areas/{2}/Views/{1}/{0}.vbhtml", "~/Areas/{2}/Views/Shared/{0}.cshtml", "~/Areas/{2}/Views/Shared/{0}.vbhtml" }; base.AreaPartialViewLocationFormats = new string[] { "~/Areas/{2}/Views/{1}/{0}.cshtml", "~/Areas/{2}/Views/{1}/{0}.vbhtml", "~/Areas/{2}/Views/Shared/{0}.cshtml", "~/Areas/{2}/Views/Shared/{0}.vbhtml" }; base.ViewLocationFormats = new string[] { "~/Views/{1}/{0}.cshtml", "~/Views/{1}/{0}.vbhtml", "~/Views/Shared/{0}.cshtml", "~/Views/Shared/{0}.vbhtml" }; base.MasterLocationFormats = new string[] { "~/Views/{1}/{0}.cshtml", "~/Views/{1}/{0}.vbhtml", "~/Views/Shared/{0}.cshtml", "~/Views/Shared/{0}.vbhtml" }; base.PartialViewLocationFormats = new string[] { "~/Views/{1}/{0}.cshtml", "~/Views/{1}/{0}.vbhtml", "~/Views/Shared/{0}.cshtml", "~/Views/Shared/{0}.vbhtml" }; base.FileExtensions = new string[] { "cshtml", "vbhtml" }; } protected override IView CreatePartialView(ControllerContext controllerContext, string partialPath) { string layoutPath = null; bool runViewStartPages = false; IEnumerable<string> fileExtensions = base.FileExtensions; IViewPageActivator viewPageActivator = base.ViewPageActivator; return new RazorView(controllerContext, partialPath, layoutPath, runViewStartPages, fileExtensions, viewPageActivator); } protected override IView CreateView(ControllerContext controllerContext, string viewPath, string masterPath) { bool runViewStartPages = true; IEnumerable<string> fileExtensions = base.FileExtensions; IViewPageActivator viewPageActivator = base.ViewPageActivator; return new RazorView(controllerContext, viewPath, masterPath, runViewStartPages, fileExtensions, viewPageActivator); } }} |
有没有发现有什么值得我们关注的地方呢?对了,就是构造函数,构造函数中直接初始化了7个数组,除了FileExtensions外,其余6个均是用来存放视图查找的路径的,中间的{0}{1}{2}分别为view,controller,area的占位符,在执行查找视图时会被替换成实际的值。知道了这6个数组,等于就掌握了视图查找路径,我们只需要重新赋值这个6个数组,就能实现视图的随意切换了,以下面我实现的自定义视图引擎代码:
|
1
2
3
4
5
6
7
8
9
10
11
12
13
14
15
16
17
18
19
20
21
|
public class CustomViewEngine : RazorViewEngine{ public CustomViewEngine(string theme) { FormatLocations(base.AreaViewLocationFormats, theme); FormatLocations(base.AreaMasterLocationFormats, theme); FormatLocations(base.AreaPartialViewLocationFormats, theme); FormatLocations(base.ViewLocationFormats, theme); FormatLocations(base.MasterLocationFormats, theme); FormatLocations(base.PartialViewLocationFormats, theme); FormatLocations(base.MasterLocationFormats, theme); } private void FormatLocations(string[] locationFormats,string theme) { for (int i = 0; i < locationFormats.Length; i++) { locationFormats[i] = locationFormats[i].Replace("/Views/",string.Format("/Views/{0}/",theme)); } }} |
这个类很简单,只有一个构造函数及一个私有方法FormatLocations,目的就是改变默认的视图查找路径。
有了这个视图引擎,要实现主题切换就很简单了,实现方式如下:
1.全局实现:
|
1
2
3
4
5
6
7
8
9
10
11
12
13
14
15
16
17
18
19
20
21
22
23
24
25
26
27
28
29
30
31
32
33
34
35
36
37
38
39
40
41
|
public class HomeController : Controller{private string themeName = null; protected override void OnResultExecuting(ResultExecutingContext filterContext) { var viewResult = filterContext.Result as ViewResult; if (viewResult != null) { string themeCookieName="ThemeName"; if (!string.IsNullOrEmpty(themeName)) { HttpContext.Response.Cookies.Set(new HttpCookie(themeCookieName, themeName) { Expires=DateTime.Now.AddYears(1)}); } else { themeName = (HttpContext.Request.Cookies[themeCookieName].Value??"").Trim(); } ViewEngineCollection viewEngines = new ViewEngineCollection() { new CustomViewEngine(themeName) }; foreach (var item in ViewEngines.Engines) { viewEngines.Add(item); } viewResult.ViewEngineCollection = viewEngines; //viewResult.ViewEngineCollection = new ViewEngineCollection(new List<IViewEngine> { new CustomViewEngine(themeName) });//这里是只用自定义视图引擎 } base.OnResultExecuting(filterContext); } public ActionResult TestCustomViewEngine(string theme) { themeName = string.IsNullOrEmpty(theme) ? "Default" : theme; ViewBag.CurrentThemeName = themeName; var viewResult = View("Test"); return viewResult; }} |
注意上面代码中定义的私有字段themeName,这个主要是用作第一次设置主题时会用到,因为如果单纯的靠Cookie是不行的,Cookie在没有输出到客户端时,Request.Cookies是空的,那样的话就会存在延迟,不信的话,大家可以试试,另一个地方是viewResult.ViewEngineCollection,这里我是采用将自定义与默认的引擎都放到引擎集合中,这样可以保证兼容多种路径下视图,当然如果只希望应用自定义的引擎,则可以初始化一个引擎集合且里面只有自定义的视图引擎。
这里也可以将这些方法定义到一个ThemeController中,然后其它的控制器继承自它就可以了,还可以实现过滤器,然后再应用到ACTION上。
2.单个视图实现:仅作演示,一般不会这么用
|
1
2
3
4
5
6
7
8
|
public ActionResult TestCustomViewEngine(string theme){ string themeName = string.IsNullOrEmpty(theme) ? "Default" : theme; var viewResult = View("Test"); viewResult.ViewEngineCollection = new ViewEngineCollection(new List<IViewEngine> { new CustomViewEngine(themeName) }); ViewBag.CurrentThemeName = themeName; return viewResult;} |
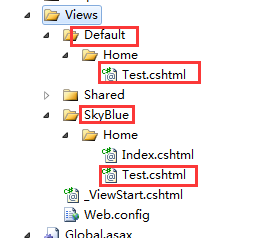
视图内容:
Views/Default/Home/Test.cshtml
Views/SkyBlue/Home/Test.cshtml
视图文件目录结构如下图示:
最终的实现主题切换效果如下图所示:

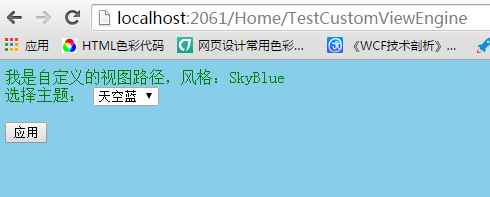
当切到其它视图,如:View/Home/Index

主题切换实现成功,到此结束,欢迎大家讨论,写代码很快,但写文章却实有点耗时间,花了我几个小时,主要是需要将设计思路讲出来,好让大家明白,我不想写那种只讲结果不讲原理及设计思路的文章,想让大家看了我的文章,不仅会用,还能明白实现原理,最后大家都能自己设计出更好的方案。独乐乐不如众乐乐,如果觉得这篇文章我(梦在旅途)用心了,还请支持一下哦,谢谢!
https://www.cnblogs.com/zuowj/p/4977193.html