1. OAuth2简易实战(四)-Github社交联合登录
1.1. 用到的第三方插件
https://github.com/spring-projects/spring-social-github
1.2. 测试步骤
1.2.1. 先在github上注册一个OAuth Apps

我的配置内容如下
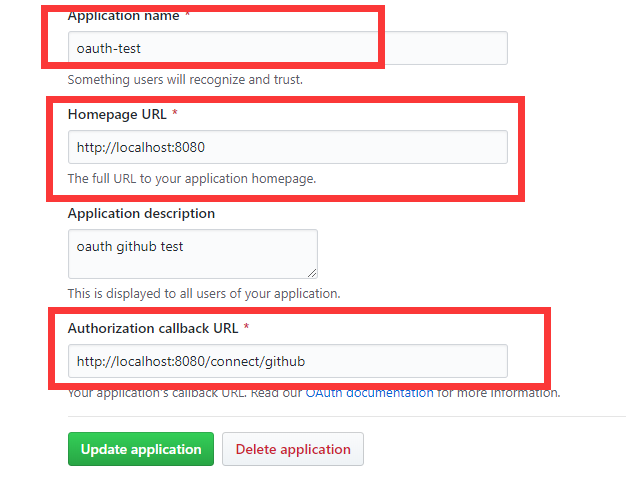
- 需要注意的,这里的最后一个回调地址的配置,格式严格规定,/connect/xxx,最后的github参数对应了特定页面,后面我通过阅读源码来详细解释
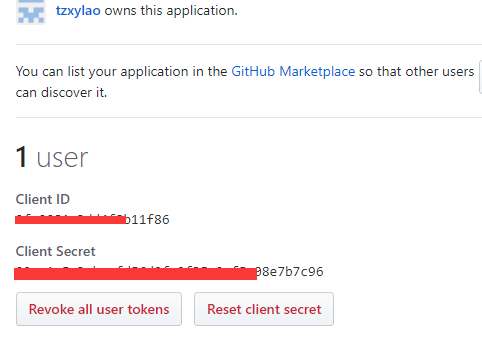
- 注册完之后,会有一个client id和client secret,这是需要配置到程序中的
1.2.2. 属性配置
- applicaton.properties
spring.social.github.app-id=xxxx
spring.social.github.app-secret=xxxx
- 属性类
@ConfigurationProperties(prefix = "spring.social.github")
public class GitHubProperties extends SocialProperties {

}
1.2.3. social核心配置
- 属性配置导入,建立与github连接
@Configuration
@EnableSocial
@EnableConfigurationProperties(GitHubProperties.class)
public class GitHubConfiguration extends SocialAutoConfigurerAdapter {

	private final GitHubProperties properties;

	public GitHubConfiguration(GitHubProperties properties) {
		this.properties = properties;
	}

	@Bean
	@Scope(value = "request", proxyMode = ScopedProxyMode.INTERFACES)
	public GitHub gitHub(ConnectionRepository repository) {
		Connection<GitHub> connection = repository
				.findPrimaryConnection(GitHub.class);
		return connection != null ? connection.getApi() : null;
	}

	@Bean
	public ConnectController connectController(
			ConnectionFactoryLocator factoryLocator,
			ConnectionRepository repository) {

		ConnectController controller = new ConnectController(
			factoryLocator, repository);
		controller.setApplicationUrl("http://localhost:8080");
		return controller;
	}

	@Override
	protected ConnectionFactory<?> createConnectionFactory() {
		return new GitHubConnectionFactory(properties.getAppId(),
				properties.getAppSecret());
	}
}
1.2.4. controller层
@Controller
public class RepositoriesController {
@Autowired
private GitHub github;
@Autowired
private ConnectionRepository connectionRepository;
@GetMapping
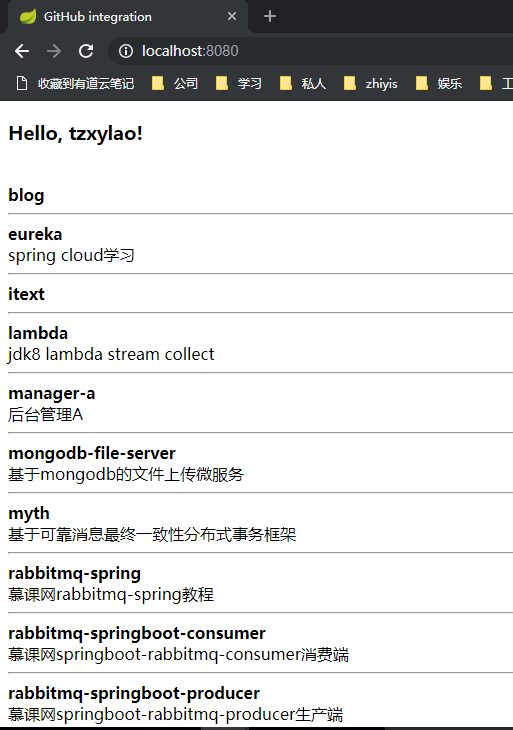
public String repositories(Model model) {
if (connectionRepository.findPrimaryConnection(GitHub.class) == null) {
return "redirect:/connect/github";
}
String name = github.userOperations().getUserProfile().getUsername();
String username = github.userOperations().getUserProfile()
.getUsername();
model.addAttribute("name", name);
String uri = "https://api.github.com/users/{user}/repos";
GitHubRepo[] repos = github.restOperations().getForObject(uri,
GitHubRepo[].class, username);
model.addAttribute("repositories", Arrays.asList(repos));
return "repositories";
}
}
- 当我们请求localhost:8080 会重定向到localhost:8080/connect/github ,这又是写在哪呢?查看源代码,会发现在social-web包的ConnectController类中有
@Controller
@RequestMapping({"/connect"})
public class ConnectController implements InitializingBean {
    @RequestMapping(
        value = {"/{providerId}"},
        method = {RequestMethod.GET}
    )
    public String connectionStatus(@PathVariable String providerId, NativeWebRequest request, Model model) {
        this.setNoCache(request);
        this.processFlash(request, model);
        List<Connection<?>> connections = this.connectionRepository.findConnections(providerId);
        this.setNoCache(request);
        if (connections.isEmpty()) {
            return this.connectView(providerId);
        } else {
            model.addAttribute("connections", connections);
            return this.connectedView(providerId);
        }
    }
- 进入connectView方法
    protected String connectView(String providerId) {
        return this.getViewPath() + providerId + "Connect";
    }
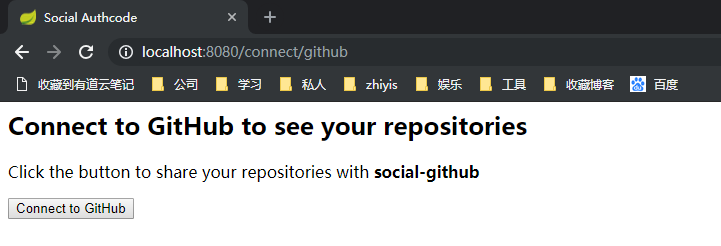
- 可以看到,在这里它固定拼接了参数Connect,所以,在自己的跳转页面中需要有特定的命名规范,这里一定就是githubConnect.html了
<html>
<head>
	<title>Social Authcode</title>
</head>
<body>
	<h2>Connect to GitHub to see your repositories</h2>

	<form action="/connect/github" method="POST">
		<input type="hidden" name="scope" value="public_repo user" />

		<div class="formInfo">
			Click the button to share your repositories with <b>social-github</b>
		</div>
		<p><button type="submit">Connect to GitHub</button></p>
	</form>

</body>
</html>
- 显示页面如下
- 点击按钮进行post请求,进入源码如下
    @RequestMapping(
        value = {"/{providerId}"},
        method = {RequestMethod.POST}
    )
    public RedirectView connect(@PathVariable String providerId, NativeWebRequest request) {
        ConnectionFactory<?> connectionFactory = this.connectionFactoryLocator.getConnectionFactory(providerId);
        MultiValueMap<String, String> parameters = new LinkedMultiValueMap();
        this.preConnect(connectionFactory, parameters, request);

        try {
            return new RedirectView(this.connectSupport.buildOAuthUrl(connectionFactory, request, parameters));
        } catch (Exception var6) {
            this.sessionStrategy.setAttribute(request, "social_provider_error", var6);
            return this.connectionStatusRedirect(providerId, request);
        }
    }
- 层层深入后,会发现它本质还是在组装授权参数,使用的是OAuth2的授权码模式,最后组装的http请求为如下,很明显为了去获得授权码
https://github.com/login/oauth/authorize?client_id=9fc0081c3dd4f8b11f86&response_type=code&redirect_uri=http%3A%2F%2Flocalhost%3A8080%2Fconnect%2Fgithub&scope=public_repo+user&state=e37f1891-cd45-47b4-adb4-5c541f777e60&state=48742b99-c04e-4dfd-af0a-f19b0193f1bb&state=c2737022-3cc7-4b80-92ce-fcba2ca9beb4
- 这最后跳转这层的代码如下,封装成buildOAuthUrl方法进行了组装
    public RedirectView connect(@PathVariable String providerId, NativeWebRequest request) {
        ConnectionFactory<?> connectionFactory = this.connectionFactoryLocator.getConnectionFactory(providerId);
        MultiValueMap<String, String> parameters = new LinkedMultiValueMap();
        this.preConnect(connectionFactory, parameters, request);

        try {
            return new RedirectView(this.connectSupport.buildOAuthUrl(connectionFactory, request, parameters));
        } catch (Exception var6) {
            this.sessionStrategy.setAttribute(request, "social_provider_error", var6);
            return this.connectionStatusRedirect(providerId, request);
        }
    }
-
获取授权码后,跳转github登录页面
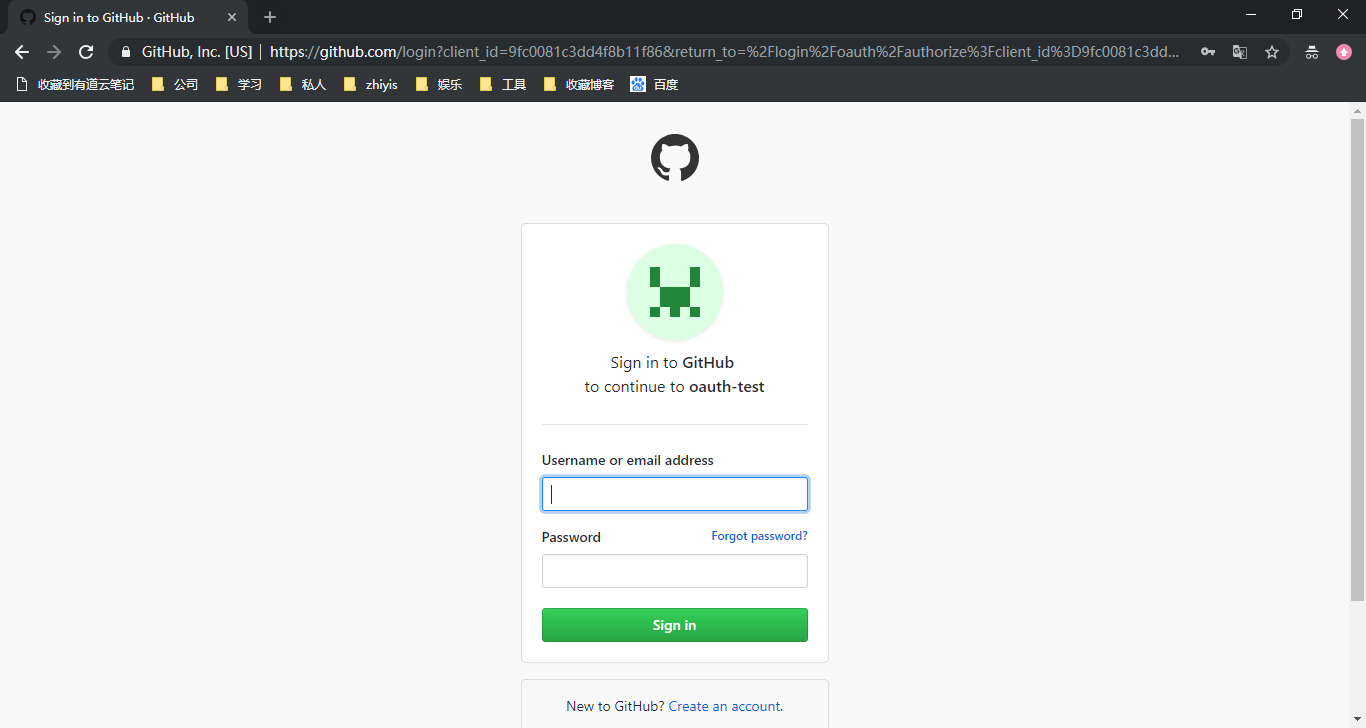

-
输入用户名密码正确后立即回调到方法
@RequestMapping(
value = {"/{providerId}"},
method = {RequestMethod.GET},
params = {"code"}
)
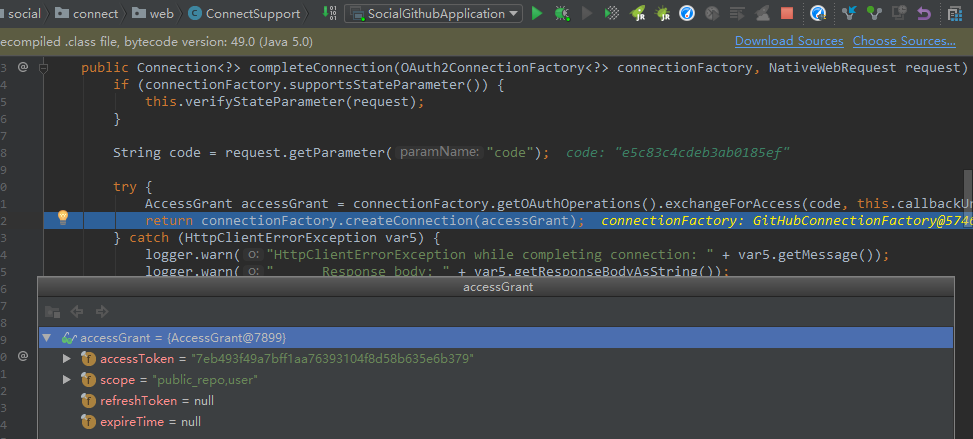
public RedirectView oauth2Callback(@PathVariable String providerId, NativeWebRequest request) {
try {
OAuth2ConnectionFactory<?> connectionFactory = (OAuth2ConnectionFactory)this.connectionFactoryLocator.getConnectionFactory(providerId);
Connection<?> connection = this.connectSupport.completeConnection(connectionFactory, request);
this.addConnection(connection, connectionFactory, request);
} catch (Exception var5) {
this.sessionStrategy.setAttribute(request, "social_provider_error", var5);
logger.warn("Exception while handling OAuth2 callback (" + var5.getMessage() + "). Redirecting to " + providerId + " connection status page.");
}
return this.connectionStatusRedirect(providerId, request);
}
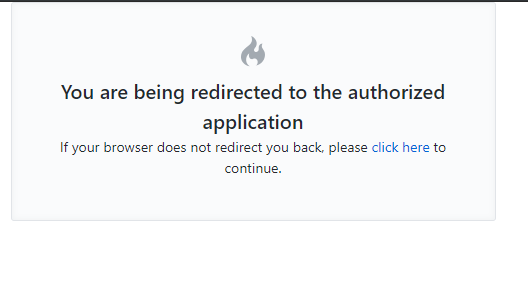
- 通过授权码再去取得token
- 再继续跳转/connect/github
 @RequestMapping(
        value = {"/{providerId}"},
        method = {RequestMethod.GET}
    )
    public String connectionStatus(@PathVariable String providerId, NativeWebRequest request, Model model) {
        this.setNoCache(request);
        this.processFlash(request, model);
        List<Connection<?>> connections = this.connectionRepository.findConnections(providerId);
        this.setNoCache(request);
        if (connections.isEmpty()) {
            return this.connectView(providerId);
        } else {
            model.addAttribute("connections", connections);
            return this.connectedView(providerId);
        }
    }
- 此时connections有值,进入connectedView方法
    protected String connectedView(String providerId) {
        return this.getViewPath() + providerId + "Connected";
    }
- 由此可以知道,下个页面我们命名也定下来了,githubConnected.html,这里简单一个点击连接,跳转到主页
<html>
	<head>
		<title>Social Authcode</title>
	</head>
	<body>
		<h2>Connected to GitHub</h2>

		<p>
			Click <a href="/">here</a> to see your repositories.
		</p>
	</body>
</html>
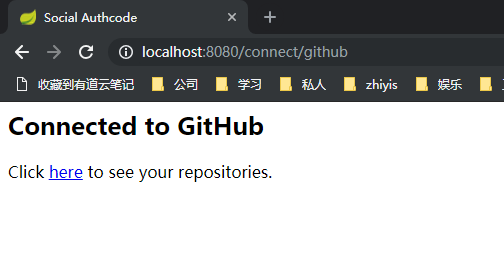
- 到此其实授权操作都已经完成了,接下来就是正式调用github需要权限的接口了,点击here