springfox.documentation.swagger2.web.Swagger2Controller
@Controller
@ApiIgnore
public class Swagger2Controller {

  public static final String DEFAULT_URL = "/v2/api-docs";
  private static final String HAL_MEDIA_TYPE = "application/hal+json";

  @Value("${springfox.documentation.swagger.v2.host:DEFAULT}")
  private String hostNameOverride;

  @Autowired
  private DocumentationCache documentationCache;

  @Autowired
  private ServiceModelToSwagger2Mapper mapper;

  @Autowired
  private JsonSerializer jsonSerializer;

  @ApiIgnore
  @RequestMapping(value = "${springfox.documentation.swagger.v2.path:" + DEFAULT_URL + "}",
      method = RequestMethod.GET, produces = { APPLICATION_JSON_VALUE, HAL_MEDIA_TYPE })
  public
  @ResponseBody
  ResponseEntity<Json> getDocumentation(
      @RequestParam(value = "group", required = false) String swaggerGroup,
      HttpServletRequest servletRequest) {

    String groupName = Optional.fromNullable(swaggerGroup).or(Docket.DEFAULT_GROUP_NAME);
    Documentation documentation = documentationCache.documentationByGroup(groupName);
    if (documentation == null) {
      return new ResponseEntity<Json>(HttpStatus.NOT_FOUND);
    }
    Swagger swagger = mapper.mapDocumentation(documentation);
    if (isNullOrEmpty(swagger.getHost())) {
      final UriComponents uriComponents = componentsFrom(servletRequest);
      swagger.basePath(Strings.isNullOrEmpty(uriComponents.getPath()) ? "/" : uriComponents.getPath());
      swagger.host(hostName(uriComponents));
    }
    return new ResponseEntity<Json>(jsonSerializer.toJson(swagger), HttpStatus.OK);
  }

  private String hostName(UriComponents uriComponents) {
    if ("DEFAULT".equals(hostNameOverride)) {
      String host = uriComponents.getHost();
      int port = uriComponents.getPort();
      if (port > -1) {
        return String.format("%s:%d", host, port);
      }
      return host;
    }
    return hostNameOverride;
  }
}
https://github.com/swagger-api/swagger-core/wiki/Annotations-1.5.X
http://springfox.github.io/springfox/docs/snapshot/
http://springfox.github.io/springfox/docs/snapshot/
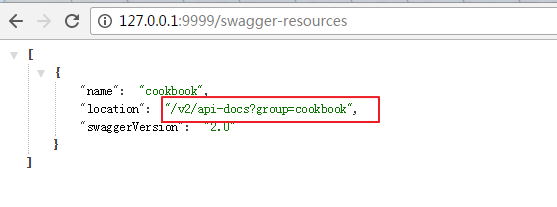
Rest接口对应Swagger Specification路径获取办法: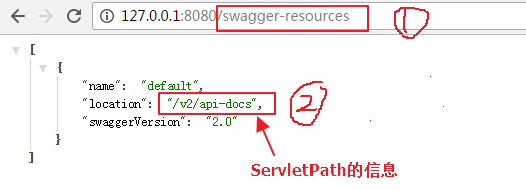
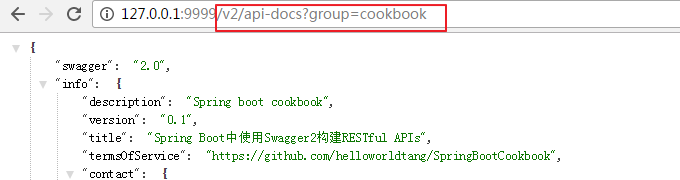
根据location的值获取api json描述文件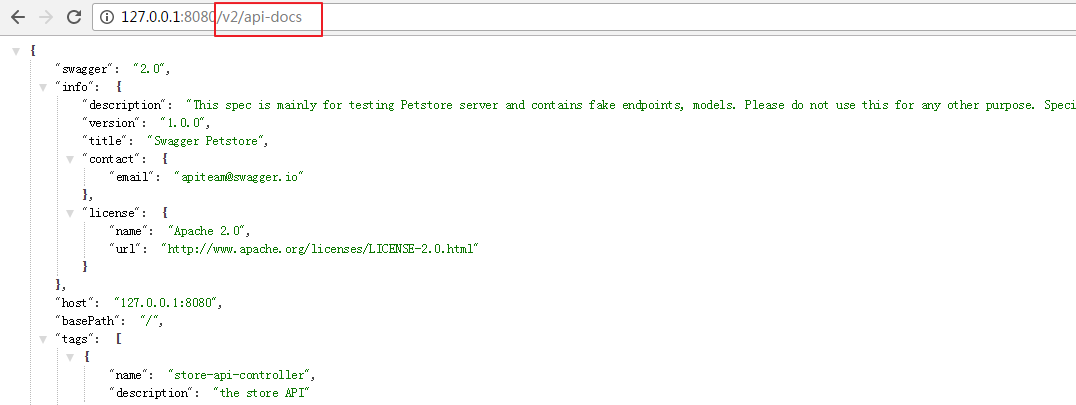
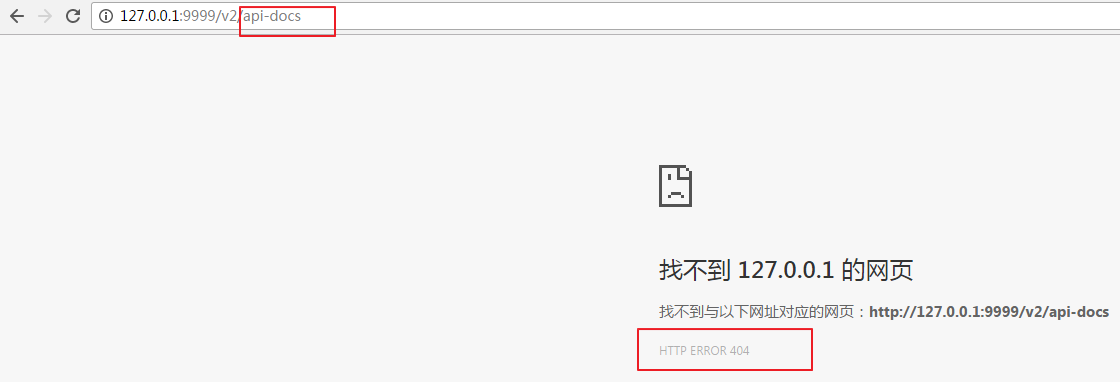
也许有同学会问,为什么搞的这么麻烦,api json描述文件不就是http://domain:port/v2/api-docs获取的么。
因为如果使用group,api json描述文件就不是上面的情况哦
https://github.com/springfox/springfox-demos/tree/master/boot-swagger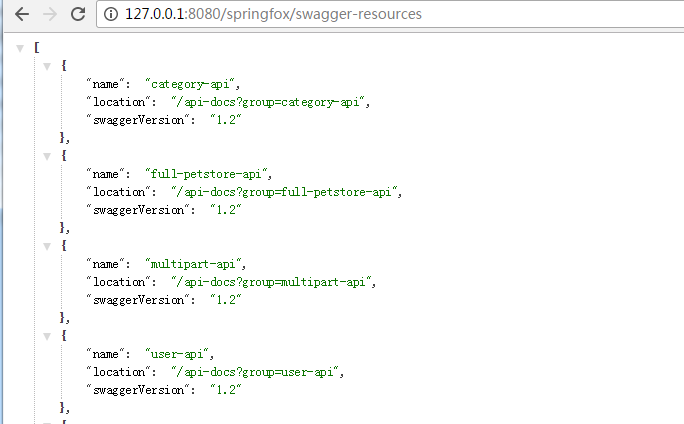
再小结一下swagger与spring之间关系及相关信息:
swagger 官方网站 http://swagger.io/ ,demo示例 http://petstore.swagger.io/
swagger简单来说就是统一定义了api的语义描述(json,yaml),并提供ui显示,代码自动生成等等,即建立了rest api生态系统。如何生成这些api数据描述文件,大部分语言都有相关实现。
Swagger-UI本身只提供在线测试功能,要集成它还需要告诉它本项目提供的各种服务和参数信息
java方面比较好的实现就是springfox
http://springfox.github.io/springfox/
github地址: https://github.com/springfox/springfox
springfox通过annotation来实现api描述,生成api json描述文件。再交由swagger-ui实现展示。
spring-boot集成:
添加依赖:
gradle依赖:
dependencies {
  compile "io.springfox:springfox-swagger1:${springfoxVersion}"
}
maven依赖:
        <dependency>
            <groupId>io.springfox</groupId>
            <artifactId>springfox-swagger2</artifactId>
            <version>${springfox.version}</version>
        </dependency>
        <dependency>
            <groupId>io.springfox</groupId>
            <artifactId>springfox-swagger-ui</artifactId>
            <version>${springfox.version}</version>
        </dependency>
@Configuration
@EnableSwagger2
public class Swagger2Configuration {
@SpringBootApplication
public class CookBookApplication {
swagger默认会把所有的controller生成api描述文件,可以@ApiIgnore参类或者方法进行忽略。
需要显示指定访问方式:get,post,put,delete等。通过save(@RequestBody Country country),@RequestBody来自动绑定提交的json数据。
domain类通过@ApiModelProperty(hidden = true)忽略不需要提交的属性。
默认swagger集成后会带ui,可以不使用它自带的ui,因为ui的相关静态文件是打包到jar文件,更改不方便。可以下载ui的相关代码进行集成
地址为: https://github.com/swagger-api/swagger-ui。加入相关js后可以进行汉化。swagger-ui提供api文档html描述以及在线测试。
json文件获取地址格式为: http://domain:port/v2/api-docs (如果有group,就不是这个地址了,如文章开关所示)
http://www.asdtiang.org/2016/02/17/spring-boot-swagger-springfox-%E9%9B%86%E6%88%90/
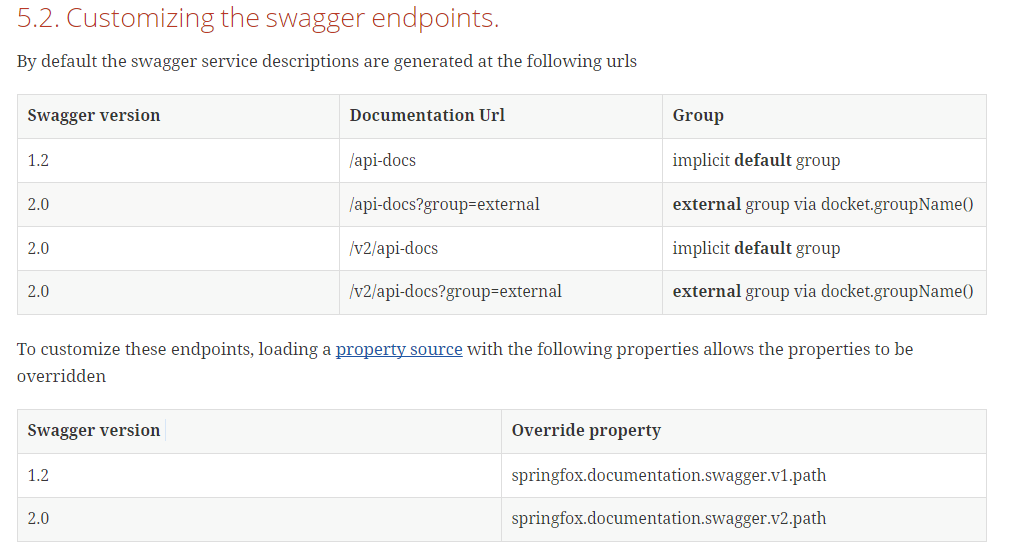
4.设定访问API doc的路由
在配置文件中,application.yml中声明:
springfox.documentation.swagger.v2.path: /swagger
则默认情况下的访问api json的路径就为http://domain:port/swagger
这个path就是json的访问request mapping.可以自定义,防止与自身代码冲突。
API doc的显示路由是:http://localhost:8080/swagger-ui.html
如果项目是一个webservice,通常设定home / 指向这里:
@Controller
public class HomeController {

    @RequestMapping(value = "/swagger")
    public String index() {
        System.out.println("swagger-ui.html");
        return "redirect:swagger-ui.html";
    }
}
5.访问
就是上面的了。但是,注意到安全问题就会感觉困扰。首先,该接口请求有几个:
http://localhost:8080/swagger-resources/configuration/ui
http://localhost:8080/swagger-resources
http://localhost:8080/api-docs
http://localhost:8080/swagger-resources/configuration/security
除却自定义的url,还有2个ui显示的API和一个安全问题的API。关于安全问题的配置还没去研究,但目前发现一个问题是在我的一个项目中,所有的url必须带有query htid=xxx,这是为了sso portal验证的时候需要。这样这个几个路由就不符合要求了。
如果不想去研究安全问题怎么解决,那么可以自定ui。只需要将ui下面的文件拷贝出来,然后修改请求数据方式即可。
https://github.com/swagger-api/swagger-codegen/tree/master/samples/server/petstore/springboot
http://www.cnblogs.com/woshimrf/p/5863318.html
http://ju.outofmemory.cn/entry/206015
http://swagger.io/specification/
四、相关注解解读
1. @Api
用在类上,说明该类的作用
@Api(value = "UserController", description = "用户相关api")
2. @ApiOperation
用在方法上,说明方法的作用
@ApiOperation(value = "查找用户", notes = "查找用户", httpMethod = "GET", produces = MediaType.APPLICATION_JSON_UTF8_VALUE)
3 @ApiImplicitParams
用在方法上包含一组参数说明
4. @ApiImplicitParam
用在@ApiImplicitParams注解中,指定一个请求参数的各个方面
paramType:参数放在哪个地方
header–>请求参数的获取:@RequestHeader
query–>请求参数的获取:@RequestParam
path(用于restful接口)–>请求参数的获取:@PathVariable
body(不常用)
form(不常用)
name:参数名
dataType:参数类型
required:参数是否必须传
value:参数的意思
defaultValue:参数的默认值
@ApiImplicitParams({
        @ApiImplicitParam(name = "id", value = "唯一id", required = true, dataType = "Long", paramType = "path"),
})
5. @ApiResponses
用于表示一组响应
6. @ApiResponse
用在@ApiResponses中,一般用于表达一个错误的响应信息
code:数字,例如400
message:信息,例如”请求参数没填好”
response:抛出异常的类
@ApiResponses(value = {
          @ApiResponse(code = 400, message = "No Name Provided")
  })
7. @ApiModel
Swagger-core builds the model definitions based on the references to them throughout the API introspection.
The @ApiModel allows you to manipulate the meta data of a model from a simple description or name change to a definition of polymorphism.
描述一个Model的信息(这种一般用在post创建的时候,使用@RequestBody这样的场景,请求参数无法使用@ApiImplicitParam注解进行描述的时候)
@ApiModel(value = "用户实体类")
8. @ApiModelProperty
描述一个model的属性
@ApiModelProperty(value = "登录用户")
@ApiIgnore //使用这个注解忽略这个接口
五、 和Swagger UI的集成(Spring boot 集成springfox后,默认就带了swagger-ui.html了,不需要此操作。如果想对界面进行定制,则需要)
首先,从github swagger-ui 上下载Swagger-UI, 把该项目dist目录下的内容拷贝到项目的resources的目录public下。
https://github.com/JavaUsers/xiaomo-info-java/tree/master/website
https://xiaomo.info/2016/JavaSpringBootSwaggerUi/
Swagger-Core Annotations
In order to generate the Swagger documentation, swagger-core offers a set of annotations to declare and manipulate the output. The swagger-core output is compliant with Swagger Specification. A user is not required to be familiar with the full aspects of the Swagger Specification in order to use it, but as a reference it may answer a few questions regarding the generated output.
This page introduces the annotations provided by swagger-core. They are grouped into three - the annotation to declare the resource, the set of annotations to declare an operation, and the set of annotations that declare API models.
The documentation for each annotation is meant as an overview of its usage. Each annotation also has links to its javadocs (both on the header and at the end of the overview). The javadocs provide you with additional information about each annotation, especially dealing with some edge cases.
At the very least:
@Api is required to declare an API resource.
@javax.ws.rs.Path is required at class level (since v1.5.8) to have Swagger scan root resoure, in compliance with JAX-RS spec.
Without having those two combined, no output will be generated, unless scanAllResources config option is not set, in which case also @Path annotatied classes with no @Api annotation will be scanned.
Servlets require @ApiImplicitParam to define the method parameters whereas JAX-RS based application can utilize the basic @XxxxParam annotations (@QueryParam, @PathParam...).
The following table summarizes parsing behaviour depending on annotations and ReaderConfig.scanAllResources value
| Annotations | Result |
|---|---|
| @Api | skip |
| @Path | skip |
| scanAllResources | skip |
| @Api hidden | skip |
| @Api @Path hidden | skip |
| @Api hidden scanAllResources | skip |
| @Api scanAllResources | skip |
| @Api @Path | parse |
| @Api hidden scanAllResources | skip |
| @Path scanAllResources | parse |
| subresource | parse |
| @Api subresource | parse |
NOTE: in version 1.5.8 only, @Api annotation is not needed to have class scanned, @Path is sufficient, according to the following table:
| Annotations | Result |
|---|---|
| @Api | skip |
| @Path | parse |
| scanAllResources | parse |
| @Api hidden | skip |
| @Api @Path hidden | skip |
| @Api hidden scanAllResources | skip |
| @Api scanAllResources | skip |
| @Api @Path | parse |
| @Api hidden scanAllResources | skip |
| @Path scanAllResources | parse |
| subresource | parse |
| @Api subresource | parse |
Table of contents:
- Quick Annotation Overview
- Resource API Declaration
- Operation Declaration
- Model Declaration
- Swagger Definition
- Customising the Swagger Definition
For your convenience, the javadocs are available as well.
Quick Annotation Overview
| Name | Description |
|---|---|
| @Api | Marks a class as a Swagger resource. |
| @ApiImplicitParam | Represents a single parameter in an API Operation. |
| @ApiImplicitParams | A wrapper to allow a list of multiple ApiImplicitParam objects. |
| @ApiModel | Provides additional information about Swagger models. |
| @ApiModelProperty | Adds and manipulates data of a model property. |
| @ApiOperation | Describes an operation or typically a HTTP method against a specific path. |
| @ApiParam | Adds additional meta-data for operation parameters. |
| @ApiResponse | Describes a possible response of an operation. |
| @ApiResponses | A wrapper to allow a list of multiple ApiResponse objects. |
| @Authorization | Declares an authorization scheme to be used on a resource or an operation. |
| @AuthorizationScope | Describes an OAuth2 authorization scope. |
| @ResponseHeader | Represents a header that can be provided as part of the response. |
The latest release also adds a number of annotations for adding extensions and metadata at the Swagger Definition level:
| Name | Description |
|---|---|
| @SwaggerDefinition | Definition-level properties to be added to the generated Swagger definition |
| @Info | General metadata for a Swagger definition |
| @Contact | Properties to describe the contact person for a Swagger definition |
| @License | Properties to describe the license for a Swagger definition |
| @Extension | Adds an extension with contained properties |
| @ExtensionProperty | Adds custom properties to an extension |
Resource API Declaration
@Api
In Swagger 2.0, resources were replaced by tags, and this impacts the @Api annotation. It is no longer used to declare a resource, and it is now used to apply definitions for all the operations defined under it.
A JAX-RS usage would be:
@Path("/pet")
@Api(value = "pet", authorizations = {
      @Authorization(value="sampleoauth", scopes = {})
    })
@Produces({"application/json", "application/xml"})
public class PetResource {
 ...
}
In this example, we're saying that the tag for the operations under this class is pet (so they would all be grouped together). Swagger will pick up on the @Produces annotation but you can override this value if you wish.
@Api can also be used to declare authorization at the resource-level. These definitions apply to all operations under this resource, but can be overridden at the operation level if needed. In the example above, we're adding a previously-declared OAuth2 authorization scheme without any scopes. For further details, check the @Authorization annotation.
Instead of using the value(), you can use the tags() property which allows you to set multiple tags for the operations. For example:
@Api(tags = {"external_info","user_info"})
Note that in this case, value() would be ignored even if it exists.
The boolean hidden property can be used to entirely hide an @Api even if it declared. This is especially useful when using sub-resources to remove unwanted artifacts.
In swagger-core 1.5.X, description(), basePath(), and position() are no longer used.
For further details about this annotation, usage and edge cases, check out the javadocs.
Operation Declaration
@ApiOperation
The @ApiOperation is used to declare a single operation. An operation is considered a unique combination of a path and a HTTP method.
A JAX-RS usage would be:
 @GET
 @Path("/findByStatus")
 @ApiOperation(value = "Finds Pets by status",
    notes = "Multiple status values can be provided with comma seperated strings",
    response = Pet.class,
    responseContainer = "List")
 public Response findPetsByStatus(...) { ... }
The value of the annotation is a short description on the API. Since this is displayed in the list of operations in Swagger-UI and the location is limited in size, this should be kept short (preferably shorter than 120 characters). The notes allows you to give significantly more details about the operations. response is the return type of the method. Notice that the actual method declaration returns a Response but that is a general-purpose JAX-RS class and not the actual response sent to the user. If the returned object is the actual result, it can be used directly instead of declaring it in the annotation. Since we want to return a list of pets, we declare that using the responseContainer. Keep in mind that Java has type erasure, so using generics in the return type may not be parsed properly, and the response should be used directly. The @GET JAX-RS annotation will be used as the (HTTP) method field of the operation, and the @Path would tell us the path of the operation (operations are grouped under the same path, one for each HTTP method used).
The output would be:
    "/pet/findByStatus": {
  "get": {
    "tags": [
      "pet"
    ],
    "summary": "Finds Pets by status",
    "description": "Multiple status values can be provided with comma seperated strings",
    "responses": {
      "200": {
        "description": "successful operation",
        "schema": {
          "type": "array",
          "items": {
            "$ref": "#/definitions/Pet"
          }
        }
      },
      .
      .
      .
For further details about this annotation, usage and edge cases, check out the javadocs.
@ApiResponses, @ApiResponse
It's a common practice to return errors (or other success messages) using HTTP status codes. While the general return type of an operation is defined in the @ApiOperation, the rest of the return codes should be described using these annotations.
The @ApiResponse describes a concrete possible response. It cannot be used directly on the method or class/interface and needs to be included in the array value of @ApiResponses (whether there's one response or more).
If the response is accompanied with a body, the body model can be described as well (one model per response).
  @ApiResponses(value = {
      @ApiResponse(code = 400, message = "Invalid ID supplied",
                   responseHeaders = @ResponseHeader(name = "X-Rack-Cache", description = "Explains whether or not a cache was used", response = Boolean.class)),
      @ApiResponse(code = 404, message = "Pet not found") })
  public Response getPetById(...) {...}
In swagger-core 1.5.X, you can also add description of response headers as seen in the example above.
For further details about this annotation, usage and edge cases, check out the javadocs (@ApiResponses, @ApiResponse).
@Authorization, @AuthorizationScope
These annotations are used as input to @Api and @ApiOperation only, and not directly on the resources and operations. Once you've declared and configured which authorization schemes you support in your API, you can use these annotation to note which authorization scheme is required on a resource or a specific operation. The @AuthorizationScope is specific to the case of an OAuth2 authorization scheme where you may want to specify specific supported scopes.
The @Authorization and @AuthorizationScope translate to the Security Requirement Object.
The behavior between the implementations (JAX-RS, Servlets or otherwise) is the same:
  @ApiOperation(value = "Add a new pet to the store",
    authorizations = {
      @Authorization(
          value="petoauth",
          scopes = { @AuthorizationScope(scope = "add:pet") }
          )
    }
  )
  public Response addPet(...) {...}
In this case we declare that the addPet operation uses the petoauth authorization scheme (we'll assume it is an OAuth2 authorization scheme). Then using the @AuthorizationScope we fine-tune the definition by saying it requires the add:pet scope. As mentioned above, you can see that @AuthorizationScope is used as an input to @Authorization, and that in turn is used as input to @ApiOperation. Remember, these annotations can only be used as input to @Api and @ApiOperation. Using any of them directly on a class or a method will be ignored.
The output would be:
"security": [
  {
    "petoauth": [
      "add:pet"
    ]
  }
]
For further details about this annotation, usage and edge cases, check out the javadocs (@Authorization, @AuthorizationScope).
@ApiParam
The @ApiParam is used solely with the JAX-RS parameter annotations (@PathParam, @QueryParam, @HeaderParam, @FormParam and in JAX-RS 2, @BeanParam). While swagger-core scans these annotations by default, the @ApiParam can be used to add more details on the parameters or change the values as they are read from the code.
In the Swagger Specification, this translates to the Parameter Object.
Swagger will pick up the value() of these annotations and use them as the parameter name, and based on the the annotation it will also set the parameter type.
Swagger will also use the value of @DefaultValue as the default value property if one exists.
 @Path("/{username}")
 @ApiOperation(value = "Updated user",
    notes = "This can only be done by the logged in user.")
public Response updateUser(
      @ApiParam(value = "name that need to be updated", required = true) @PathParam("username") String username,
      @ApiParam(value = "Updated user object", required = true) User user) {...}
Here we have two parameters. The first, username which is a part of the path. The second is the body, in this case a User object. Note that both parameters have the required property set to true. For the @PathParam, this is redundant as it is mandatory by default and cannot be overridden.
The output would be:
 "parameters": [
  {
    "name": "username",
    "in": "path",
    "description": "name that need to be deleted",
    "required": true,
    "type": "string"
  },
  {
    "in": "body",
    "name": "body",
    "description": "Updated user object",
    "required": false,
    "schema": {
      "$ref": "#/definitions/User"
    }
  }
]
For further details about this annotation, usage and edge cases, check out the javadocs.
@ApiImplicitParam, @ApiImplicitParams
You may wish you describe operation parameters manually. This can be for various reasons, for example:
- Using Servlets which don't use JAX-RS annotations.
- Wanting to hide a parameter as it is defined and override it with a completely different definition.
- Describe a parameter that is used by a filter or another resource prior to reaching the JAX-RS implementation.
Since there can be several parameters to be included, the @ApiImplicitParams allows for multiple @ApiImplicitParam definitions.
In the Swagger Specification, these translate to the Parameter Object.
When defining parameters implicitly, it's important to set name, dataType and paramType for Swagger's definitions to be proper.
 @ApiImplicitParams({
    @ApiImplicitParam(name = "name", value = "User's name", required = true, dataType = "string", paramType = "query"),
    @ApiImplicitParam(name = "email", value = "User's email", required = false, dataType = "string", paramType = "query"),
    @ApiImplicitParam(name = "id", value = "User ID", required = true, dataType = "long", paramType = "query")
  })
 public void doPost(HttpServletRequest request, HttpServletResponse response) throws ServletException, IOException {...}
In the above sample we can see a Servlet definition with several parameters. The dataType can be either a primitive or a class name. The paramType can be any of the parameter types that are supported by Swagger (refer to the javadocs or the spec for further details).
 "parameters": [
  {
    "name": "name",
    "description": "User's name",
    "required": true,
    "type": "string",
    "in": "query"
  },
  {
    "name": "email",
    "description": "User's email",
    "required": false,
    "type": "string",
    "in": "query"
  },
  {
    "name": "id",
    "description": "User ID",
    "required": true,
    "type": "integer",
    "format": "int64",
    "in": "query"
  }
]
For further details about this annotation, usage and edge cases, check out the javadocs (@ApiImplicitParam, @ApiImplicitParams).
@ResponseHeader
If you want to describe a response header, you can simply add it to your @ApiOperation or @ApiResponse, while supplying the name of the header, a description and a type.
For example, in a given response, it would look as follows:
  @ApiResponses(value = {
      @ApiResponse(code = 400, message = "Invalid ID supplied",
                   responseHeaders = @ResponseHeader(name = "X-Rack-Cache", description = "Explains whether or not a cache was used", response = Boolean.class)),
      @ApiResponse(code = 404, message = "Pet not found") })
  public Response getPetById(...) {...}
For further details about this annotation, usage and edge cases, check out the javadocs.
Model Declaration
@ApiModel
Swagger-core builds the model definitions based on the references to them throughout the API introspection. The @ApiModel allows you to manipulate the meta data of a model from a simple description or name change to a definition of polymorphism.
This translates to the Schema Object in the Swagger Specification.
At its basic functionality, you an use @ApiModel to change the name of the model and add a description to it:
@ApiModel(value="DifferentModel", description="Sample model for the documentation")
class OriginalModel {...}
Here we change the name of the model from OriginalModel to DifferentModel.
The output would be:
 "DifferentModel": {
      "description": "Sample model for the documentation",
      .
      .
  }
You can also use @ApiModel to implement model composition, by specifying subtypes like:
@ApiModel(value = "Pet", subTypes = {Cat.class})
public class Pet {

}
An example of this scenario is available in swagger-samples:
For further details about this annotation, usage and edge cases, check out the javadocs.
@ApiModelProperty
While swagger-core will introspect fields and setters/getters, it will also read and process JAXB annotations. The @ApiModelProperty allows controlling Swagger-specific definitions such as allowed values, and additional notes. It also offers additional filtering properties in case you want to hide the property in certain scenarios.
  @ApiModelProperty(value = "pet status in the store", allowableValues = "available,pending,sold")
  public String getStatus() {
    return status;
  }
This is a simple example of adding a short description to the model property. It can also be observed that while status is a String, we document it as having only three possible values.
The output of it would be:
  "properties": {
        ...,
        "status": {
          "type": "string",
          "description": "pet status in the store",
          "enum": [
            "available",
            "pending",
            "sold"
          ]
        }
      }
For further details about this annotation, usage and edge cases, check out the javadocs.
Swagger Definition
@SwaggerDefinition
The SwaggerDefinition annotation provides properties corresponding to many (but not all) top-level properties of the Swagger object, allowing you to set these for your auto-generated definition. The annotation can be on any class scanned during the Swagger auto-configuration process, i.e. it does not have to be on a JAX-RS API class but could just be on a marker/config interface, for example:
@SwaggerDefinition(
        info = @Info(
                description = "Gets the weather",
                version = "V12.0.12",
                title = "The Weather API",
                termsOfService = "http://theweatherapi.io/terms.html",
                contact = @Contact(
                   name = "Rain Moore",
                   email = "rain.moore@theweatherapi.io",
                   url = "http://theweatherapi.io"
                ),
                license = @License(
                   name = "Apache 2.0",
                   url = "http://www.apache.org/licenses/LICENSE-2.0"
                )
        ),
        consumes = {"application/json", "application/xml"},
        produces = {"application/json", "application/xml"},
        schemes = {SwaggerDefinition.Scheme.HTTP, SwaggerDefinition.Scheme.HTTPS},
        tags = {
                @Tag(name = "Private", description = "Tag used to denote operations as private")
        },
        externalDocs = @ExternalDocs(value = "Meteorology", url = "http://theweatherapi.io/meteorology.html")
)
public interface TheWeatherApiConfig {
}
The properties shown above will result in the corresponding metadata to be added to the generates swagger.json / swagger.yaml file
If you have multiple @SwaggerDefinition annotations they will be aggregated in the order they are found - any duplicate annotation properties will overwrite previous ones.
@Info
The @Info annotation adds general metadata properties for a Swagger definition - corresponding to the Info object in the specification. As in the example above:
@SwaggerDefinition(
        info = @Info(
                description = "Gets the weather",
                version = "V12.0.12",
                title = "The Weather API",
                termsOfService = "http://theweatherapi.io/terms.html",
                ...
        ),
...
See the javadoc for a complete list of supported properties.
@Contact
The @Contact annotation adds contact properties to the @Info section of a Swagger definition - corresponding to the Contact object in the specification. As in the example above:
@SwaggerDefinition(
        info = @Info(
                ...
                contact = @Contact(
                   name = "Rain Moore",
                   email = "rain.moore@theweatherapi.io",
                   url = "http://theweatherapi.io"
                ),
                ...
        ),
...
See the javadoc for a list of supported properties.
@License
The @License annotation adds license properties to the @Info section of a Swagger definition - corresponding to the License object in the specification. As in the example above:
@SwaggerDefinition(
        info = @Info(
                ...
                license = @License(
                   name = "Apache 2.0",
                   url = "http://www.apache.org/licenses/LICENSE-2.0"
                )
        ),
...
See the javadoc for a list of supported properties.
@Extension
The extension annotation allows for adding of extension properties to a Swagger definition. It is currently supported within the @ApiOperation, @Info and @Tag annotations. There are two ways to use it:
...
   extensions = {
       @Extension(properties = {
           @ExtensionProperty(name = "test1", value = "value1"),
           @ExtensionProperty(name = "test2", value = "value2")
       })
    }
...
which will result in the following json:
...
   "x-test1" : "value1",
   "x-test2" : "value2"
...
The property name will automatically be prefixed with "x-" if it isn't done so explicitly in the annotation.
Alternatively you can name the extension:
...
   extensions = {
       @Extension( name = "my-extension", properties = {
           @ExtensionProperty(name = "test1", value = "value1"),
           @ExtensionProperty(name = "test2", value = "value2")
       })
    }
...
which will result in the following json:
...
   "x-my-extension" : {
      "test1" : "value1",
      "test2" : "value2"
   }
...
which wraps the contained extension properties in a JSON object.
@ExtensionProperty
An individual property within an extension - see previous @Extension section for examples.
Customising the Swagger Definition
If you for any reason want to customise the generated Swagger definition beyond what is possible with the annotations, you can provide the Swagger engine with a ReaderListener that provides the corresponding callbacks:
public interface ReaderListener {

    /**
     * Called before the Swagger definition gets populated from scanned classes. Use this method to
     * pre-process the Swagger definition before it gets populated.
     *
     * @param reader the reader used to read annotations and build the Swagger definition
     * @param swagger the initial swagger definition
     */

    void beforeScan(Reader reader, Swagger swagger);

    /**
     * Called after a Swagger definition has been populated from scanned classes. Use this method to
     * post-process Swagger definitions.
     *
     * @param reader the reader used to read annotations and build the Swagger definition
     * @param swagger the configured Swagger definition
     */

    void afterScan(Reader reader, Swagger swagger);
}
Any class found during resource scanning with this annotation will be instantiated and invoked correspondingly. For example the following class:
public class BasePathModifier implements ReaderListener {
    void beforeScan(Reader reader, Swagger swagger){}

    void afterScan(Reader reader, Swagger swagger){
        swagger.setBasePath( System.getProperty( "swagger.basepath", swagger.getBasePath() ));
    }
}
Would allow you to override the generated basePath from a system-property.
https://github.com/swagger-api/swagger-core/wiki/Annotations-1.5.X
Springfox Reference Documentation
http://springfox.github.io/springfox/docs/snapshot/