http://docs.pylonsproject.org/projects/pyramid/en/1.4-branch/narr/install.html
是我在csdn的博客:http://blog.csdn.net/spaceship20008/article/details/8767884
放在cnblogs做备份
按照介绍操作。
我用的是mint13, python 3.2.3版本。
使用的是virtualenv 开发工具
在一个虚拟的python环境下开发web app
这样很不错。请按照其步骤来。
在python3.2中,有一些东西需要记住:
4.6.2. Old String Formatting Operations
Note
The formatting operations described here are modelled on C’s printf() syntax. They only support formatting of certain builtin types. The use of a binary operator means that care may be needed in order to format tuples and dictionaries correctly. As the new String Formatting syntax is more flexible and handles tuples and dictionaries naturally, it is recommended for new code. However, there are no current plans to deprecate printf-style formatting.
String objects have one unique built-in operation: the % operator (modulo). This is also known as the string formatting or interpolationoperator. Given format % values (where format is a string), % conversion specifications in format are replaced with zero or more elements of values. The effect is similar to the using sprintf() in the C language.
If format requires a single argument, values may be a single non-tuple object. [5] Otherwise, values must be a tuple with exactly the number of items specified by the format string, or a single mapping object (for example, a dictionary).
A conversion specifier contains two or more characters and has the following components, which must occur in this order:
- The '%' character, which marks the start of the specifier.
- Mapping key (optional), consisting of a parenthesised sequence of characters (for example, (somename)).
- Conversion flags (optional), which affect the result of some conversion types.
- Minimum field width (optional). If specified as an '*' (asterisk), the actual width is read from the next element of the tuple in values, and the object to convert comes after the minimum field width and optional precision.
- Precision (optional), given as a '.' (dot) followed by the precision. If specified as '*' (an asterisk), the actual precision is read from the next element of the tuple in values, and the value to convert comes after the precision.
- Length modifier (optional).
- Conversion type.
When the right argument is a dictionary (or other mapping type), then the formats in the string must include a parenthesised mapping key into that dictionary inserted immediately after the '%' character. The mapping key selects the value to be formatted from the mapping. For example:
这个东西在地一个helloworld历程里面非常重要
看看为什么是%,意思是取得的后面字典的相应index的值。
>>> print('%(language)s has %(number)03d quote types.' %
...       {'language': "Python", "number": 2})
Python has 002 quote types.
In this case no * specifiers may occur in a format (since they require a sequential parameter list).
The conversion flag characters are:
| Flag | Meaning |
|---|---|
| '#' | The value conversion will use the “alternate form” (where defined below). |
| '0' | The conversion will be zero padded for numeric values. |
| '-' | The converted value is left adjusted (overrides the '0' conversion if both are given). |
| ' ' | (a space) A blank should be left before a positive number (or empty string) produced by a signed conversion. |
| '+' | A sign character ('+' or '-') will precede the conversion (overrides a “space” flag). |
A length modifier (h, l, or L) may be present, but is ignored as it is not necessary for Python – so e.g. %ld is identical to %d.
The conversion types are:
| Conversion | Meaning | Notes |
|---|---|---|
| 'd' | Signed integer decimal. | |
| 'i' | Signed integer decimal. | |
| 'o' | Signed octal value. | (1) |
| 'u' | Obsolete type – it is identical to 'd'. | (7) |
| 'x' | Signed hexadecimal (lowercase). | (2) |
| 'X' | Signed hexadecimal (uppercase). | (2) |
| 'e' | Floating point exponential format (lowercase). | (3) |
| 'E' | Floating point exponential format (uppercase). | (3) |
| 'f' | Floating point decimal format. | (3) |
| 'F' | Floating point decimal format. | (3) |
| 'g' | Floating point format. Uses lowercase exponential format if exponent is less than -4 or not less than precision, decimal format otherwise. | (4) |
| 'G' | Floating point format. Uses uppercase exponential format if exponent is less than -4 or not less than precision, decimal format otherwise. | (4) |
| 'c' | Single character (accepts integer or single character string). | |
| 'r' | String (converts any Python object using repr()). | (5) |
| 's' | String (converts any Python object using str()). | (5) |
| 'a' | String (converts any Python object using ascii()). | (5) |
| '%' | No argument is converted, results in a '%' character in the result. |
2. 格式化输出整数
支持参数格式化,与C语言的printf类似
>>> strHello = "the length of (%s) is %d" %('Hello World',len('Hello World'))
>>> print (strHello)
the length of (Hello World) is 11
3. 格式化输出16进制,十进制,八进制整数
#%x --- hex 十六进制
#%d --- dec 十进制
#%o --- oct 八进制

>>> nHex = 0xFF
>>> print("nHex = %x,nDec = %d,nOct = %o" %(nHex,nHex,nHex))
nHex = ff,nDec = 255,nOct = 377
4.格式化输出浮点数(float)
import math
>>> print('PI=%f'%math.pi)
PI=3.141593
>>> print ("PI = %10.3f" % math.pi)
PI =      3.142
>>> print ("PI = %-10.3f" % math.pi)
PI = 3.142
>>> print ("PI = %06d" % int(math.pi))
PI = 000003
5. 格式化输出浮点数(float)
>>> precise = 3
>>> print ("%.3s " % ("python"))
pyt
>>> precise = 4
>>> print ("%.*s" % (4,"python"))
pyth
>>> print ("%10.3s " % ("python"))
       pyt
6.输出列表(List)
输出列表
>>> lst = [1,2,3,4,'python']
>>> print (lst)
[1, 2, 3, 4, 'python']
>>> print(d)
{1: 'A', 2: 'B', 3: 'C', 4: 'D'}
7. 自动换行
print 会自动在行末加上回车,如果不需回车,只需在print语句的结尾添加一个逗号”,“,就可以改变它的行为。
>>> for i in range(0,6):
    print (i,)
0
1
2
3
4
5
或直接使用下面的函数进行输出:
>>> import sys
>>> sys.stdout.write('Hello World')
Hello World
Hello World
Here’s one of the very simplest Pyramid applications:
1 2 3 4 5 6 7 8 9 10 11 12 13 14 15 16 |
from wsgiref.simple_server import make_server
from pyramid.config import Configurator
from pyramid.response import Response


def hello_world(request):
    return Response('Hello %(name)s!' % request.matchdict)

if __name__ == '__main__':
    config = Configurator()
    config.add_route('hello', '/hello/{name}')
    config.add_view(hello_world, route_name='hello')
    app = config.make_wsgi_app()
    server = make_server('0.0.0.0', 8080, app)
    server.serve_forever()
|
from wsgiref.simple_server import make_server
from pyramid.config import Configurator
from pyramid.response import Response


def hello_world(request):
    return Response('Hello %(name)s!' % request.matchdict)

if __name__ == '__main__':
    config = Configurator()
    config.add_route('hello', '/hello/{name}')
    config.add_view(hello_world, route_name='hello')
    app = config.make_wsgi_app()
    server = make_server('0.0.0.0', 8080, app)
    server.serve_forever()
When this code is inserted into a Python script named helloworld.py and executed by a Python interpreter which has the Pyramidsoftware installed, an HTTP server is started on TCP port 8080.
On UNIX:
$ /path/to/your/virtualenv/bin/python helloworld.py
On Windows:
C:\> \path\to\your\virtualenv\Scripts\python.exe helloworld.py
通过以上代码,我们可以看到:
这是在virtualenv下面的环境,装载的pyramid。
进入./bin/python3
可以查看是否能载入import pyramid
在本机python3编译器上直接使用import pyramid,发现没有这个模块。因为是只在虚拟环境python下装的。没有在实际运行环境中装。
下面,在任务栏里面输入
http://localhost:8080/hello/world
浏览器里面就输出
Hello world!
如果是
http://localhost:8080/hello/China
就是
Hello China!
效果如下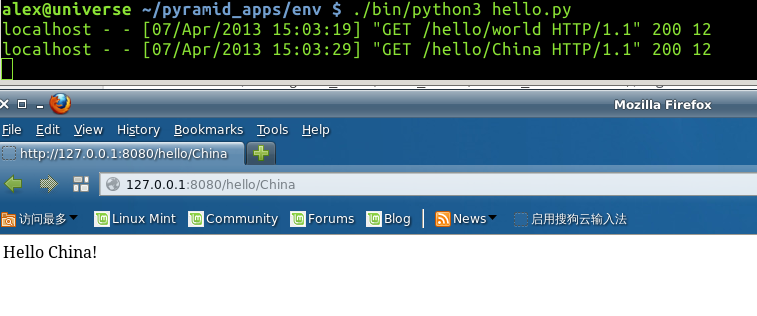
再来看看代码:
from wsgiref.simple_server import make_server
from pyramid.config import Configurator
from pyramid.response import Response


def hello_world(request):
    return Response('Hello %(name)s!' % request.matchdict) #这里面是将 后面的一个字典{name:value} 按照索引name反给%(name)s处。 %s是字符串的意思

if __name__ == '__main__':
    config = Configurator()  #创建一个Configurator 实例,
    config.add_route('hello', '/hello/{name}')  #
    config.add_view(hello_world, route_name='hello') #当route_name是hello的时候,保证hello_world是callable的。http://localhost:8080/hello
    #保证在目录http://localhost:8080/hello 下运行这个hello_world 函数
     #这里当route_name='hello'下传来一个request的时候,config.add_view会把这个request传入hello_world函数,然后hello_world就执行了
    app = config.make_wsgi_app()  #对于这个实例,创造一个wsgi协议的app
    server = make_server('0.0.0.0', 8080, app)    #创造一个关于这个app的一个server
    server.serve_forever()  #确定这个server的运行状态,一直运行
Adding Configuration
1 2 |
    config.add_route('hello', '/hello/{name}')
    config.add_view(hello_world, route_name='hello')
|
First line above calls the pyramid.config.Configurator.add_route() method, which registers a route to match any URL path that begins with /hello/ followed by a string.
The second line, config.add_view(hello_world, route_name='hello'), registers the hello_world function as a view callable and makes sure that it will be called when the hello route is matched.