ssm在项目运行时,首先会加载web.xml
其中web.xml中加载顺序:context-param -> listener -> filter -> servlet -> interceptor(同类级别按照顺序执行)
1.ServletContext
首先我们说到ServletContext,ServletContext是一个Web应用的全局上下文,可以理解为整个Web应用的全局变量,项目中的所有方法皆可以获取ServletContext。
说到ServletContext,就到说到所有web项目的web.xml,下面我们先贴出web.xml的一部分配置:
  <context-param>
    <param-name>contextConfigLocation</param-name>
    <param-value>classpath:applicationContext.xml</param-value>
  </context-param>
  <context-param>
    <param-name>log4jConfigLocation</param-name>
    <param-value>classpath:log4j.properties</param-value>
  </context-param>
  <listener>
    <listener-class>org.springframework.web.util.IntrospectorCleanupListener</listener-class>
  </listener>
  <listener>
    <listener-class>org.springframework.web.context.ContextLoaderListener</listener-class>
  </listener>
  <listener>
    <listener-class>listener.SessionListener</listener-class>
  </listener>
  <filter>
    <filter-name>encodingFilter</filter-name>
    <filter-class>org.springframework.web.filter.CharacterEncodingFilter</filter-class>
    <init-param>
      <param-name>encoding</param-name>
      <param-value>UTF-8</param-value>
    </init-param>
    <init-param>
      <param-name>forceEncoding</param-name>
      <param-value>true</param-value>
    </init-param>
  </filter>
  <filter-mapping>
    <filter-name>encodingFilter</filter-name>
    <url-pattern>*.do</url-pattern>
  </filter-mapping>
  <filter>
    <filter-name>sessionFilter</filter-name>
    <filter-class>web.filter.SessionFilter</filter-class>
  </filter>
  <filter-mapping>
    <filter-name>sessionFilter</filter-name>
    <url-pattern>*.do</url-pattern>
  </filter-mapping>
  <servlet>
    <servlet-name>springmvc</servlet-name>
    <servlet-class>org.springframework.web.servlet.DispatcherServlet</servlet-class>
    <load-on-startup>1</load-on-startup>
  </servlet>
  <servlet-mapping>
    <servlet-name>springmvc</servlet-name>
    <url-pattern>*.do</url-pattern>
  </servlet-mapping>
上面贴出的就是web.xml的部分配置,在这里我们首先讲解下web项目启动的加载顺序:
以Tomcat举例,启动Tomcat之后,首先会加载web.xml文件:
a)容器首先读取web.xml中的<context-param>的配置内容和<listener>标签中配置项;
b)紧接着实例化ServletContext对象,并将<context-param>配置的内容转化为键值传递给ServletContext;
c)创建<listener>配置的监听器的类实例,并且启动监听;
d)随后调用listener的contextInitialized(ServletContextEvent args)方法,ServletContext = ServletContextEvent.getServletContext();
此时你可以通过ServletContext获取context-param配置的内容并可以加以修改,此时Tomcat还没完全启动完成。
e)后续加载配置的各类filter;
f)最后加载servlet;
最后的结论是:web.xml中配置项的加载顺序是context-param=>listener=>filter=>servlet,配置项的顺序并不会改变加载顺序,但是同类型的配置项会应该加载顺序,servlet中也可以通过load-on-startup来指定加载顺序。
ServletContext中的属性所有的servlet皆可以使用ServletContext.
2.ApplicationContext
首先介绍下applicationContext,applicationContext是spring的BeanFactory的实现类:
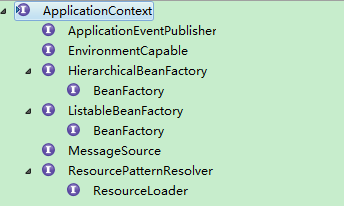
ApplicationContext接口的继承关系如上面的截图,ApplicationContext是如何产生的呢,这里我们看之前的web.xml中的
  <listener>
    <listener-class>org.springframework.web.context.ContextLoaderListener</listener-class>
  </listener>
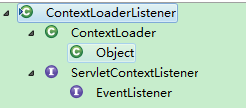 继承关系如左图
我们看看是如何初始化的
public WebApplicationContext initWebApplicationContext(ServletContext servletContext) {
        if (servletContext.getAttribute(WebApplicationContext.ROOT_WEB_APPLICATION_CONTEXT_ATTRIBUTE) != null) {
            throw new IllegalStateException(
                    "Cannot initialize context because there is already a root application context present - " +
                    "check whether you have multiple ContextLoader* definitions in your web.xml!");
        }

        Log logger = LogFactory.getLog(ContextLoader.class);
        servletContext.log("Initializing Spring root WebApplicationContext");
        if (logger.isInfoEnabled()) {
            logger.info("Root WebApplicationContext: initialization started");
        }
        long startTime = System.currentTimeMillis();

        try {
            // Store context in local instance variable, to guarantee that
            // it is available on ServletContext shutdown.
            if (this.context == null) {
                this.context = createWebApplicationContext(servletContext);
            }
            if (this.context instanceof ConfigurableWebApplicationContext) {
                ConfigurableWebApplicationContext cwac = (ConfigurableWebApplicationContext) this.context;
                if (!cwac.isActive()) {
                    // The context has not yet been refreshed -> provide services such as
                    // setting the parent context, setting the application context id, etc
                    if (cwac.getParent() == null) {
                        // The context instance was injected without an explicit parent ->
                        // determine parent for root web application context, if any.
                        ApplicationContext parent = loadParentContext(servletContext);
                        cwac.setParent(parent);
                    }
                    configureAndRefreshWebApplicationContext(cwac, servletContext);
                }
            }
            servletContext.setAttribute(c, this.context);

            ClassLoader ccl = Thread.currentThread().getContextClassLoader();
            if (ccl == ContextLoader.class.getClassLoader()) {
                currentContext = this.context;
            }
            else if (ccl != null) {
                currentContextPerThread.put(ccl, this.context);
            }

            if (logger.isDebugEnabled()) {
                logger.debug("Published root WebApplicationContext as ServletContext attribute with name [" +
                        WebApplicationContext.ROOT_WEB_APPLICATION_CONTEXT_ATTRIBUTE + "]");
            }
            if (logger.isInfoEnabled()) {
                long elapsedTime = System.currentTimeMillis() - startTime;
                logger.info("Root WebApplicationContext: initialization completed in " + elapsedTime + " ms");
            }

            return this.context;
        }
        catch (RuntimeException ex) {
            logger.error("Context initialization failed", ex);
            servletContext.setAttribute(WebApplicationContext.ROOT_WEB_APPLICATION_CONTEXT_ATTRIBUTE, ex);
            throw ex;
        }
        catch (Error err) {
            logger.error("Context initialization failed", err);
            servletContext.setAttribute(WebApplicationContext.ROOT_WEB_APPLICATION_CONTEXT_ATTRIBUTE, err);
            throw err;
        }
    }
代码中加粗的部分就是讲WebApplicationContext以WebApplicationContext.ROOT_WEB_APPLICATION_CONTEXT_ATTRIBUTE为key保存到ServletContext中,所以我们在需要获取时,可以根据request.getSession().
getAttribute("WebApplicationContext.ROOT_WEB_APPLICATION_CONTEXT_ATTRIBUTE")来获取WebApplicationContext.
所以WebApplicationContext依赖于ServletContext,ApplicationContext存储了Spring中所有的Bean,
但是我们常规的Springmvc项目一般除了applicationContext.xml之外还有springmvc.xml,两个配置文件会对应两个ApplicationContext,springmvc的ApplicationContext中可以调用applicationContext.xml的ApplciationContext。
3.获取WebApplication的几种方式
a)request.getSession().getServletContext().getAttribute("org.springframework.web.context.WebApplicationContext.ROOT")
b)实现ApplicationContextAware接口
 public interface ApplicationContextAware {

         void setApplicationContext(ApplicationContext applicationContext) throws BeansException;

}