本文主要记录swift中delegate的使用、“?!”Optional的概念、GCD的使用、request请求、网络加载图片并保存到沙箱、闭包以及桥接。
一、delegate的使用
swift中delegate的使用和objective-c大同小异,简单记录一下:
step1:声明
@objc protocol testProtocol:NSObjectProtocol{
     @objc optional func testAdd( a:Int, b:Int) -> Int;

}
step2:实例化
class TextFieldViewController: UIViewController ,UITextFieldDelegate{
    var delegate:testProtocol!
}
step3:调用delegate响应(此处没有处理delegate为空的情况,因为使用了“?”,当delegate为nil的时候,后面的testAdd不会被执行)
//        if (self.delegate != nil)&&(self.delegate?.responds(to:#selector(testProtocol.testAdd(a:b:))))!{
//            let result = self.delegate!.testAdd!(a: 2, b: 5)
//            print(result)
//        }
        let result = self.delegate?.testAdd!(a: 3, b: 1)
        print(result ?? "delegate没有响应")
step4:其他类遵循并实现协议
class UIBaseViewController: UIViewController,UITableViewDataSource,UITableViewDelegate,testProtocol{
        func testAdd( a:Int, b:Int) -> Int{
        print(a+b)
        return a+b
        }
        func jump{
           let txtVC = TextFieldViewController()
            txtVC.delegate = self
            self.navigationController?.pushViewController(txtVC, animated: true)
         }
}
二、“? !”的使用和含义
详细深层的理解,请Google,百度,下面简单记录使用时的区别
self.navigationController?.pushViewController(txtVC, animated: true)
上面的“?”处理逻辑是,当navigationController为nil时直接不执行后面的push操作,当navigationController存在时执行后面的push操作。
self.navigationController!.pushViewController(txtVC, animated: true)
上面的“!”对UINavigationController?进行了手动解包,也就是说navigationController绝对存在,否则(navigationController为nil)程序就会直接崩溃。
三、GCD使用
1、同步
    func dispatch_sync(){
        let queue = DispatchQueue(label: "com.test.queuesync")
        queue.sync {
            for i in 0...10{
                print("sync test --- ",i)
            }
            print("   ---同步执行结束  子线程---")
        }
    }
2、异步
    func dispatch_async(){
        let queue = DispatchQueue(label: "com.test.queueasync")
        queue.async {
            for i in 0...10{
                print("async test --- ",i)
            }
            print("   ---异步执行结束  子线程---")
        }
    }
3、延时
    func dispatch_delay(){
        let queue = DispatchQueue(label: "com.test.queuedelay")
        queue.asyncAfter(deadline: DispatchTime.now()+DispatchTimeInterval.seconds(3), execute: {

            print("   ---延迟执行执行结束  子线程---")
        })
    }
4、回到主线程
    func dispatch_main(){

        let queue = DispatchQueue(label: "com.test.backtomain")
        queue.async{
            DispatchQueue.main.sync {
                print("   ---回到主线程---")
            }
        }
    }
5、全局并发队列
        func dispatch_global(){
        let queue = DispatchQueue.global()
        let workItem = DispatchWorkItem{
            print("调用了workitem")
        }
        queue.async {
            for i in 0...10{
                print("async test --- ",i)
            }
            workItem.perform();
            print("   ---global异步执行结束  子线程---")
        }
    }
四、request
1、GET请求
    func getRequest(){
        let url = URL.init(string: "https://api.github.com/repos/alibaba/weex")
        let request = NSMutableURLRequest.init(url:url!)

        request.httpMethod = "GET"

        request.timeoutInterval = 10
//        let params = "type=shentong&postid=3333557693903" as NSString
//        request.setValue("application/x-www-form-urlencoded", forHTTPHeaderField: "Content-Type")
//        request.httpBody = params.data(using: String.Encoding.utf8.rawValue)

        let session = URLSession.shared
        let dataTask = session.dataTask(with: request as URLRequest) { (data, response, error) -> Void in
            if (error != nil) {
                print(error ?? "")
                return
            }else {
                //此处是具体的解析,具体请移步下面
                do{
                    let json = try JSONSerialization.jsonObject(with: data!, options: [])
                    print(json)
//                    let json: Any = try! JSONSerialization.jsonObject(with: data!, options: [])
//                    print(json)
                    JYToast.showInMidWindow(title: NSString.init(format: "data is --
 %@", json as! CVarArg) as String)
                }catch{
                    print(error.localizedDescription)
                }


            }
        }
        dataTask.resume()


    }
2、POST请求
func postRequest(){
        let url = URL.init(string: "http://www.kuaidi100.com/query")
        let request = NSMutableURLRequest.init(url:url!)

        request.httpMethod = "POST"
        request.timeoutInterval = 10
        let params = "type=shentong&postid=3333557693903" as NSString
        request.setValue("application/x-www-form-urlencoded", forHTTPHeaderField: "Content-Type")
        request.httpBody = params.data(using: String.Encoding.utf8.rawValue)

        let session = URLSession.shared
        let dataTask = session.dataTask(with: request as URLRequest) { (data, response, error) -> Void in
            if (error != nil) {
                print(error ?? "")
                JYToast.showInMidWindow(title: NSString.init(format: "error is --
 %@", error! as CVarArg) as String)
                return
            }else {
                do{
                    let json = try JSONSerialization.jsonObject(with: data!, options: [])
                    print(json)
                    JYToast.showInMidWindow(title: NSString.init(format: "data is --
 %@", json as! CVarArg) as String)
                }catch{
                    print(error.localizedDescription)

                }
            }
        }
        dataTask.resume()
    }
五、加载网络图片并保存到沙箱
let queue = DispatchQueue.global();

queue.async {

    let data = NSData.init(contentsOf: NSURL.init(string: "http://c.hiphotos.baidu.com/image/h%3D300/sign=58adc7aa3c2ac65c78056073cbf3b21d/3b292df5e0fe9925de1b729a3da85edf8cb171e0.jpg")! as URL)
    let image = UIImage.init(data: data! as Data)
    let doc = NSHomeDirectory() as NSString
    doc.appendingPathComponent("Documents/1.jpg")

    do{
        try data?.write(toFile: doc.appendingPathComponent("Documents/1.jpg"), options: NSData.WritingOptions.atomic)
    }catch{
        print(error.localizedDescription)
    }

    let main = DispatchQueue.main
    main.async {
        let imageView = UIImageView.init(frame: CGRect.init(x: 0, y: 80,  200, height: 100))
        imageView.image = image
        self.view.addSubview(imageView)
    }
}
六、闭包
闭包和block类似,有逃逸闭包和非逃逸闭包之分
//起别名
typealias AlertHandler = (_ action:UIAlertAction) -> ()

class JYShowAlert: NSObject {
    // 作为参数
    class func showAlert(alertTitle:String,message:String,actionTitle:String,handler:@escaping AlertHandler){
        let alertVC = UIAlertController.init(title:alertTitle, message: message, preferredStyle: UIAlertControllerStyle.alert)
        let confirm = UIAlertAction.init(title: actionTitle, style: UIAlertActionStyle.cancel, handler: handler)
        alertVC.addAction(confirm)
        let rootVC = UIApplication.shared.keyWindow?.rootViewController
        if ((rootVC?.presentedViewController) != nil){
            rootVC?.presentedViewController?.present(alertVC, animated: true, completion: nil)
        }else{
            rootVC?.present(alertVC, animated: true, completion: nil)
        }

    }

}
七、桥接文件
1、新建header-file
2、如下图导入
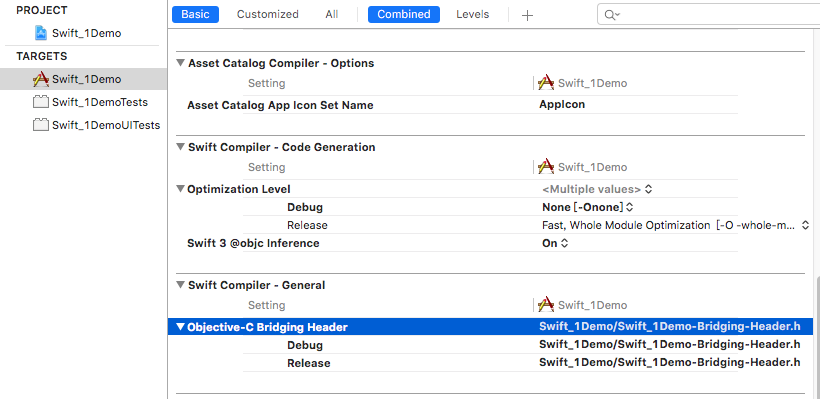
3、在文件中加入需要桥接的objective-c的头文件即可