1. 线程的一些其他方法
threading.current_thread() # 线程对象
threading.current_thread().getName() # 线程名称
threading.current_thread().ident # 当前线程ID
threading.get_ident() # 当前线程ID
threading.enumerate() # 连同主线程在内的正在运行的线程名称
threading.active_count() # 活跃的线程数


from threading import Thread
import threading
import time


def work():
    time.sleep(1)
    print('子线程', threading.get_ident())   # 当前线程 ID
    print('子线程', threading.current_thread().ident)   # 当前线程ID
    print('子线程', threading.current_thread().getName())  # 当前线程名称

if __name__ == '__main__':
    t = Thread(target=work)
    t.start()
    # time.sleep(2)
    print('主线程', threading.current_thread())   # 主线程对象
    print('主线程', threading.current_thread().getName())  # 主线程名称
    print('主线程', threading.current_thread().ident)   # 当前线程ID
    print('主线程', threading.get_ident())   # 当前线程ID

    print(threading.enumerate())   # 连同主线程在内正在运行的线程
    print(threading.active_count())   # 目前正在活跃的线程数量
2. 线程事件
from threading import Thread, Event

e = Event()  # e的两种状态: False, True, 当事件对象的状态为False的时候, wait的地方会阻塞

# e.set()  # 将事件对象的状态改为True
# e.clear()  # 将事件对象的状态改为False
print('在这里等待')
e.wait()
print('好了')
3. 线程队列
双向队列
import queue
# 先进先出 FIFO

q = queue.Queue()
q.put('first')
q.put('second')
q.put('third')
q.put_nowait(4)  # 没有数据会报错
print(q.get())
print(q.get())
print(q.get())
print(q.get_nowait())
import queue
# 后进先出 LIFO  Last in First out

q = queue.LifoQueue()
q.put('first')
q.put('second')
q.put('third')
q.put_nowait(4)  # 没有数据会报错
print(q.get())
print(q.get())
print(q.get())
print(q.get_nowait())
优先级队列
# 优先级队列

import queue

q = queue.PriorityQueue()
q.put((20, 'b'))   # 元组第一个对象表示优先级, 第二个对象是放入队列的数据
q.put((20, 'c'))
q.put((20, 'a'))   # 先比较优先级, 优先级相同的按照数据ASCII码顺序排列
q.put((0, 'b'))
q.put((30, 'c'))

print(q.get())
print(q.get())
print(q.get())
print(q.get())
print(q.get())
print(q.get())
import queue
q = queue.PriorityQueue()
q.put((20, 'abc'))   # 元组第一个对象表示优先级, 第二个对象是放入队列的数据
q.put((20, 'acc'))   # 先比较优先级, 优先级相同的按照数据ASCII码顺序排列
q.put((20, 'ac'))

print(q.get())
print(q.get())
print(q.get())
4.线程池 (重点)
Python 标准模块: concurrent.futures
早期的时候我们没有线程池,现在python提供了一个新的标准或者说内置的模块,这个模块里面提供了新的线程池和进程池,之前我们说的进程池是在multiprocessing里面的,现在这个在这个新的模块里面,
他俩用法上是一样的。为什么要将进程池和线程池放到一起呢,是为了统一使用方式,使用threadPoolExecutor和ProcessPoolExecutor的方式一样,而且只要通过这个concurrent.futures导入就可以
直接用他们两个了。
multiprocessing VS. concurrent.futures
线程池中的基本方法
concurrent.futures模块提供了高度封装的异步调用接口
ThreadPoolExecutor:线程池,提供异步调用
ProcessPoolExecutor: 进程池,提供异步调用
Both implement the same interface, which is defined by the abstract Executor class.

#2 基本方法
#submit(fn, *args, **kwargs)
异步提交任务

#map(func, *iterables, timeout=None, chunksize=1)
取代for循环submit的操作

#shutdown(wait=True)
相当于进程池的pool.close()+pool.join()操作
wait=True,等待池内所有任务执行完毕回收完资源后才继续
wait=False,立即返回,并不会等待池内的任务执行完毕
但不管wait参数为何值,整个程序都会等到所有任务执行完毕
submit和map必须在shutdown之前

#result(timeout=None)
取得结果

#add_done_callback(fn)
回调函数
import time
from concurrent.futures import ThreadPoolExecutor, ProcessPoolExecutor
from threading import current_thread

def func(n):
    time.sleep(1)
    print(n, current_thread().ident)
    return n**2

if __name__ == '__main__':
    t_p = ThreadPoolExecutor(max_workers=4)  # 最大线程数量
    map_res = t_p.map(func, range(10))
    # print(map_res)
    # for i in map_res:
    #     print(i)
    print([i for i in map_res])   # 异步执行, map自带join功能
from concurrent.futures import ThreadPoolExecutor, ProcessPoolExecutor
from threading import current_thread
import time

def func(n):
    time.sleep(1)
    print(n, current_thread().ident)
    return n**2

if __name__ == '__main__':
    t_p = ThreadPoolExecutor(max_workers=4)  # 此处切换成ProcessPoolExecutor就可以直接转换成进程, 下面都一样
    t_res_list = []
    for i in range(10):
        res_obj = t_p.submit(func, i)   # 整合了创建线程和启动线程  异步提交了10个任务
        # res_obj.result()  # 和get一样会阻塞等待
        t_res_list.append(res_obj)

   t_p.shutdown()  # 等同于close() + join() 如果不加, res.result会四个四个地打印,加了就一次性打印
    for res in t_res_list:   # 和进程池一样, 不用等到get阻塞,异步进行
        print(res.result())


    print('主线程结束')
回调函数
from concurrent.futures import ThreadPoolExecutor, ProcessPoolExecutor
from threading import current_thread
import time

def func(n):
    # time.sleep(1)
    # print(n, current_thread().ident)
    return n**2

def func2(n):
    # print('>>>>>>>', n)
    print('current_thread>>>', current_thread().getName())
    print('>>>>>>>', n.result())

if __name__ == '__main__':
    t_p = ThreadPoolExecutor(max_workers=4)  # 此处切换成ProcessPoolExecutor就可以直接转换成进程, 下面都一样
    for i in range(10):
        res_obj = t_p.submit(func, i).add_done_callback(func2)

    t_p.shutdown()  # 等同于close() + join()
    print('主线程结束')
5.GIL 全局解释器锁 (重点)
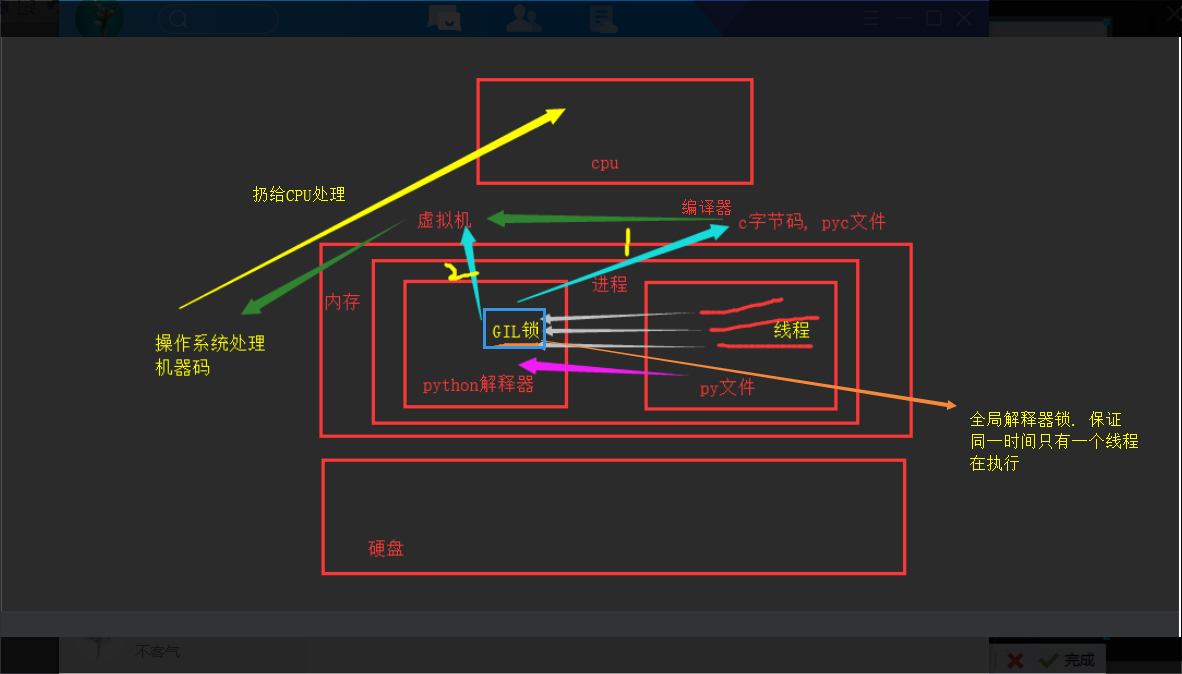
'''
执行进程要调用python解释器, 开启一个python解释器进程. 代码写在硬盘上, 需要加载到内存中交给cpu运行. 要想运行,系统先开辟
一块内存, 里面跑进程. 先把python解释器代码加载到内存,也是在这个进程中,此时这个进程中包含解释器和py文件, 将py文件的代码
交给解释器解释(一堆字符串,相当于传参), 解释器解释,遇到函数解释器自动调用. 目前默认的解释器是CPython解释器. 此时解释器
有两项事情要做:1. 编译器  2. 虚拟机 . 先经过编译器编译, 先编译成C语言的字节码, 生成.pyc文件, 然后虚拟机拿到c的字节码,
输出机器码, 再配合操作系统,把这个进程扔给CPU去执行.  所有py文件里的线程都要去cpython解释器中去编译解释, CPython解释器
中有一个GIL全局解释器锁, 导致同一时间同一进程内只有一个线程能够执行解释, 无法应用多核.
'''
在C语言写的python解释器中存在全局解释器锁, 由于全局解释器锁的存在, 在同一时间内, python解释器只能运行一个线程的代码, 这大大影响了python多线程的性能. 而这个解释器锁由于历史原因, 现在几乎无法消除.
python GIL之所以会影响多线程等性能, 是因为再多线程的情况下, 只有当线程获得了一个全局锁的时候, 该线程代码才能运行, 而全局锁只有一个, 所以使用python多线程, 在同一时刻也只有一个线程在运行, 因此即使是在多核的情况下,也只能发挥出单核的性能.
python线程切换:
对于有IO操作的线程, 当一个线程执行IO操作时,python会强制收回GIL, 其他线程可以抢夺.
对于计算密集型线程, python中会有一个执行指令的计数器, 当一个线程执行了一定数量的指令时, 该线程就会停止执行并让出当前的锁, 其他线程就可以抢夺GIL.
参见: GIL锁简介、以及解决方案
GIL锁与互斥锁的区别
# 线程抢的是GIL锁,GIL锁相当于执行权限,拿到执行权限后才能拿到互斥锁Lock,其他线程也可以抢到GIL,但如果发现Lock仍然没有被释放则阻塞,即便是拿到执行权限GIL也要立刻交出来

# join是等待所有,即整体串行,而锁只是锁住修改共享数据的部分,即部分串行,要想保证数据安全的根本原理在于让并发变成串行,join与互斥锁都可以实现,毫无疑问,互斥锁的部分串行效率要更高

    #1.多个线程去抢GIL锁,即抢执行权限
    #2. 肯定有一个线程先抢到GIL(暂且称为线程1),然后开始执行,一旦执行就会拿到lock.acquire()
    #3. 极有可能线程1还未运行完毕,就有另外一个线程2抢到GIL,然后开始运行,但线程2发现互斥锁lock还未被线程1释放,于是阻塞,被迫交出执行权限,即释放GIL
    #4.直到线程1重新抢到GIL,开始从上次暂停的位置继续执行,直到正常释放互斥锁lock,然后其他的线程再重复2 3 4的过程
GIL锁保证只有一个线程可以进入cpu运行, 如果想用多核, 可以用多进程.
多线程与多进程进行纯计算的效率对比
from multiprocessing import Process
from threading import Thread
import time

def func():
    num = 0
    for i in range(1, 10000000):
        num += i

if __name__ == '__main__':
    p_s_t = time.time()
    p_list = []
    for i in range(10):
        p = Process(target=func)
        p.start()
        p_list.append(p)
    [p.join() for p in p_list]
    p_e_t = time.time()
    p_dif_t = p_e_t - p_s_t

    t_s_t = time.time()
    t_list = []
    for i in range(10):
        t = Thread(target=func,)
        t.start()
        t_list.append(t)
    [t.join() for t in t_list]
    t_e_t = time.time()
    t_dif_t = t_e_t - t_s_t
    print('多进程执行时间', p_dif_t)
    print('多线程执行时间', t_dif_t)
I/o密集型效率对比 当计算少, IO操作多的时候, 多线程有优势
from multiprocessing import Process
from threading import Thread
import time

def func():
    time.sleep(1)
    for i in range(10):
        print('
%s' % i, end='')

if __name__ == '__main__':
    p_s_t = time.time()
    p_list = []
    for i in range(10):
        p = Process(target=func)
        p.start()
        p_list.append(p)
    [p.join() for p in p_list]
    p_e_t = time.time()
    p_dif_t = p_e_t - p_s_t

    t_s_t = time.time()
    t_list = []
    for i in range(10):
        t = Thread(target=func,)
        t.start()
        t_list.append(t)
    [t.join() for t in t_list]
    t_e_t = time.time()
    t_dif_t = t_e_t - t_s_t
    print('多进程执行时间', p_dif_t)
    print('多线程执行时间', t_dif_t)
6.协程的认识
协程: 单线程下实现并发
并发: 伪并行, 遇到IO就切换, 单核下多个任务之间切换执行, 给你的效果就是貌似你的几个程序在同时执行, 提高效率.
(任务切换+保存状态)
并行: 多核cpu, 真正的同时执行
串行: 一个任务执行完再执行下一个任务
多线程多进程下的任务切换+保存状态是操作系统做的, 也要耗时. 为了提高效率, 出现协程.
并发与串行效率对比
# 并发执行的效率(在没有IO的情况下,两个纯计算的任务)
import time


def func1():
    num2 = 0
    for i in range(1000001):
        num2 += i
        yield
        # print('执行到下一个yield',current_thread().name)


def func2():
    g = func1()
    next(g)
    sum = 0
    for i in range(1000000):
        # g.send(i)
        sum += i
        next(g)


s_t = time.time()
func2()
print('协程的时间', time.time() - s_t)


# 串行执行的效率
def func3():
    num2 = 0
    for i in range(1000001):
        num2 += i
        # print('执行到下一个yield',current_thread().name)


def func4():
    sum = 0
    for i in range(1000000):
        sum = sum + i


s_t = time.time()
func3()
func4()
print('串行的时间', time.time() - s_t)
此时串行比yield切换省时间
# 串行
import time
def consumer(i):
    time.sleep(1)
    print('处理了数据:', i)

def producer():
    for i in range(3):
        consumer(i)
        print('发送了数据:', i)

start2 = time.time()
producer()
stop2 = time.time()
print(stop2 - start2)
通过生成器实现单线程下的并发, 没有实现IO切换, 比串行慢
import time
# 协程, 单线程下实现并发
def consumer():
    while 1:
        x = yield
        time.sleep(1)
        print('处理了数据:', x)

def producer():
    g = consumer()
    next(g)
    for i in range(3):
        g.send(i)
        print('发送了数据:', i)

start = time.time()
producer()
stop = time.time()
print(stop - start)
7.Greenlet
import time
from greenlet import greenlet

def eat(name):
    print('%s eat 1' % name)
    time.sleep(1)
    g2.switch('taibai')
    print('%s eat 2' % name)
    g2.switch()

def play(name):
    print('%s play 1' % name)
    time.sleep(1)
    g1.switch()
    print('%s play 2' % name)

g1 = greenlet(eat)
g2 = greenlet(play)

g1.switch('taibai')

# 也没有实现IO切换
8.Gevent
9. condition 条件
使得线程等待,只有满足某条件时,才释放n个线程
import threading

def run(n):
    con.acquire()
    con.wait()
    print("run the thread: %s" %n)
    con.release()

if __name__ == '__main__':

    con = threading.Condition()
    for i in range(10):
        t = threading.Thread(target=run, args=(i,))
        t.start()

    while True:
        inp = input('>>>')
        if inp == 'q':
            break
        con.acquire()
        con.notify(int(inp))
        con.release()
def condition_func():

    ret = False
    inp = input('>>>')
    if inp == '1':
        ret = True

    return ret


def run(n):
    con.acquire()
    con.wait_for(condition_func)
    print("run the thread: %s" %n)
    con.release()

if __name__ == '__main__':

    con = threading.Condition()
    for i in range(10):
        t = threading.Thread(target=run, args=(i,))
        t.start()
10. 定时器 Timer
import time
from threading import Timer,current_thread #这里就不需要再引入Timer
import threading
def hello():
    print(current_thread().getName())
    print("hello, world")
    # time.sleep(3) #如果你的子线程的程序执行时间比较长,那么这个定时任务也会乱,当然了,主要还是看业务需求
# t = Timer(10, hello)  #创建一个子线程去执行后面的函数
# t.start()
# after 10 seconds, "hello, world" will be printed
for i in range(5):
    t = Timer(2, hello)
    t.start()
    time.sleep(3) # 这个是创建一个t用的时间是2秒,等待3秒后创建出来第二个.

print(threading.active_count())
print('主进程',current_thread().getName())
参见: https://www.cnblogs.com/clschao/articles/9684694.html#part_9