上一篇文章分析了一个小游戏,使用qml编写界面+js进行复杂逻辑控制,算是一个比较完整的qml示例代码了,今天就不那么继续变态啦,来看一个简单的字体示例程序吧,该示例代码比较简单,主要是展示了几个简单的使用场景,下边我将逐个进行分析
1、淡出
如图1所示是一个文本淡出并伴随字母间距增大的效果,该组件使用了两个序列动画,一个用于将字母间距放大,另一个用于改变文字透明度
图1 淡出
代码如下所示
 1 //Hello world字样  3000ms淡出并伴随着字母间距增大  之后文本框位置瞬间重置 进行下一个3000淡出
 2 import QtQuick 2.0
 3
 4 Rectangle {
 5     id: screen
 6
 7      320; height: 480
 8     color: "black"
 9
10     Item {//文本框
11         id: container
12         x: screen.width / 2; y: screen.height / 2
13
14         Text {
15             id: text
16             anchors.centerIn: parent
17             color: "white"
18             text: "Hello world!"
19             font.pixelSize: 32
20
21 //! [letterspacing]
22             SequentialAnimation on font.letterSpacing {//字母间距
23                 loops: Animation.Infinite;//无限循环
24                 NumberAnimation { from: 0; to: 50; easing.type: Easing.InQuad; duration: 3000 }//3000ms将字母间距从0变到50
25                 ScriptAction {//动画结束后  使用脚本动作  重置该文本框位置
26                     script: {
27                         container.y = (screen.height / 4) + (Math.random() * screen.height / 2)
28                         container.x = (screen.width / 4) + (Math.random() * screen.width / 2)
29                     }
30                 }
31             }
32 //! [letterspacing]
33
34             SequentialAnimation on opacity {//应用于透明度上的序列动画
35                 loops: Animation.Infinite;//无限循环
36                 NumberAnimation { from: 1; to: 0; duration: 2600 }//淡出效果
37                 PauseAnimation { duration: 400 }//暂停400ms  加上该动画之前动画2600ms 总共3000ms  同letterSpacing序列动画刚好构成一个并行动画
38             }
39         }
40     }
41 }
2、字体样式
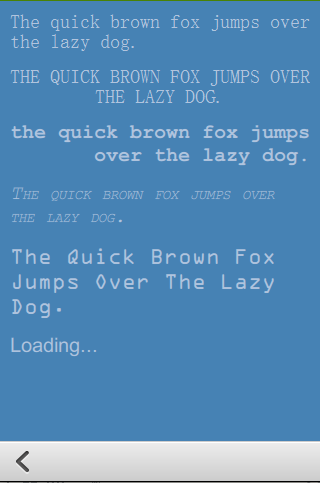
qml有内置FontLoader可以加载系统字体、本地字体和远端字体,效果如图2所示
图2 字体样式
改变字体样式和字体显示风格都使用了font属性组
 1 import QtQuick 2.0
 2
 3 Rectangle {
 4     property string myText: "The quick brown fox jumps over the lazy dog."//各Text将显示文本
 5
 6      320; height: 480
 7     color: "steelblue"
 8
 9 //! [fontloader]
10     FontLoader { id: fixedFont; name: "Courier" }//加载系统字体Courier
11 //! [fontloader]
12 //! [fontloaderlocal]
13     FontLoader { id: localFont; source: "content/fonts/tarzeau_ocr_a.ttf" }//加载本地字体
14 //! [fontloaderlocal]
15 //! [fontloaderremote]
16     FontLoader { id: webFont; source: "http://www.princexml.com/fonts/steffmann/Starburst.ttf" }//加载远端字体
17 //! [fontloaderremote]
18
19     Column {
20         anchors { fill: parent; leftMargin: 10; rightMargin: 10; topMargin: 10 }
21         spacing: 15
22
23         Text {
24             text: myText//指定文本显示内容
25             color: "lightsteelblue"//指定文本颜色
26              parent.width
27             wrapMode: Text.WordWrap//一行显示不下时 换行模式  按字换行  保证换行时一个单词不会被显示在两行
28 //! [name]
29             font.family: "Times"//通过字体名称指定字体
30 //! [name]
31             font.pixelSize: 20//字体像素大小
32         }
33         Text {
34             text: myText
35             color: "lightsteelblue"
36              parent.width
37             wrapMode: Text.WordWrap
38             horizontalAlignment: Text.AlignHCenter//水平方向居中
39             font { //通过font指定字体各项属性 也可以通过font.attribute来单个设置
40                 family: "Times";
41                 pixelSize: 20;
42                 capitalization: Font.AllUppercase//设置字母都大写
43             }
44         }
45         Text {
46             text: myText
47             color: "lightsteelblue"
48              parent.width
49             horizontalAlignment: Text.AlignRight//文本右对齐
50             wrapMode: Text.WordWrap
51             font {
52                 family: fixedFont.name; //通过字体加载器设置字体
53                 pixelSize: 20;
54                 weight: Font.Bold; //字体加粗
55                 capitalization: Font.AllLowercase//设置字母都小写
56             }
57         }
58         Text {
59             text: myText
60             color: "lightsteelblue"
61              parent.width
62             wrapMode: Text.WordWrap
63             font {
64                 family: fixedFont.name;
65                 pixelSize: 20;
66                 italic: true;
67                 capitalization: Font.SmallCaps//以小写字母的大小写大写字母  首字母依然是正常大写
68             }
69         }
70         Text {
71             text: myText
72             color: "lightsteelblue"
73              parent.width
74             wrapMode: Text.WordWrap
75             font {
76                 family: localFont.name;
77                 pixelSize: 20;
78                 capitalization: Font.Capitalize//每个单词的首字母大写
79             }
80         }
81         Text {
82             text: {
83                 if (webFont.status == FontLoader.Ready) myText
84                 else if (webFont.status == FontLoader.Loading) "Loading..."
85                 else if (webFont.status == FontLoader.Error) "Error loading font"
86             }
87             color: "lightsteelblue"
88              parent.width
89             wrapMode: Text.WordWrap
90             font.family: webFont.name;//设置远端字体名称
91             font.pixelSize: 20
92         }
93     }
94 }
3、系统字体

图3 系统字体
如图3所示,使用了ListView展示了当前系统支持的所有字体,文本项所使用的字体样式就是文本内容,代码如下
 1 //展示当前系统所有字体
 2 import QtQuick 2.0
 3
 4 Rectangle {
 5      320; height: 480; color: "steelblue"
 6
 7     ListView {
 8         anchors.fill: parent
 9 //! [model]
10         model: Qt.fontFamilies()//数据源是所有的qt字体
11 //! [model]
12
13         delegate: Item {
14             height: 40;  ListView.view.width
15             Text {
16                 anchors.centerIn: parent
17                 text: modelData//文本内容显示字体名称
18 //! [delegate]
19                 font.family: modelData//设置字体名称
20 //! [delegate]
21                 font.pixelSize: 20//字体像素大小
22                 color: "white"//字体颜色
23             }
24         }
25     }
26 }
4、跑马灯
示例代码中banner.qml组件实现了跑马灯效果,不过个人感觉效果不是特别好,因此这里就不细说,如果感兴趣的同学可自行到Qt5.7.0_vs2013ExamplesQt-5.7quick ext目录下查找,该文件代码量比较少
5、图文混用
qml对css支持的相对来说还可以,css已经发展到3.0版本,具体qml友好的支持到哪一版本感兴趣的同学可自行上网上查找

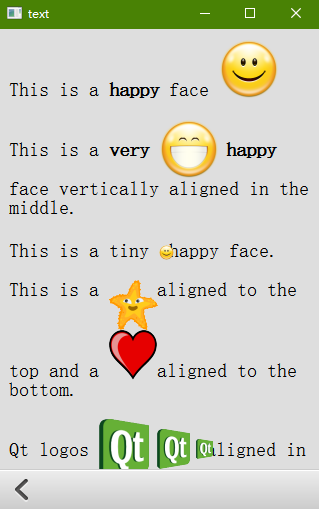
图4 图文混合
如图4所示是简单的图文混用,其实代码也比较简单,主要还是使用了web技术中的一些关键字,比如<b>:加粗,<img>:远端图片等。代码如下
 1 import QtQuick 2.0
 2
 3 Rectangle {
 4     id: main
 5      320; height: 480
 6     focus: true
 7     color: "#dedede"
 8
 9     property var hAlign: Text.AlignLeft
10
11     Flickable {//可滑动区域
12         anchors.fill: parent
13         contentWidth: parent.width
14         contentHeight: col.height + 20
15
16         Column {
17             id: col
18             x: 10; y: 10
19             spacing: 20
20              parent.width - 20
21
22             TextWithImage {
23                 text: "This is a <b>happy</b> face<img src="images/face-smile.png">"//谁用css语法  设置happy字体加粗  并使用img关键字导入图片
24             }
25             TextWithImage {
26                 text: "This is a <b>very<img src="images/face-smile-big.png" align="middle"/>happy</b> face vertically aligned in the middle."//使用middle属性将图片置于中间位置
27             }
28             TextWithImage {
29                 text: "This is a tiny<img src="images/face-smile.png" width="15" height="15">happy face."//使用width和height属性设置图片大小
30             }
31             TextWithImage {
32                 text: "This is a<img src="images/starfish_2.png" width="50" height="50" align="top">aligned to the top and a<img src="images/heart200.png" width="50" height="50">aligned to the bottom."
33             }
34             TextWithImage {//连续导入3张图片 并设置其大小 位置居中
35                 text: "Qt logos<img src="images/qtlogo.png" width="55" height="60" align="middle"><img src="images/qtlogo.png" width="37" height="40" align="middle"><img src="images/qtlogo.png" width="18" height="20" align="middle">aligned in the middle with different sizes."
36             }
37             TextWithImage {
38                 text: "Some hearts<img src="images/heart200.png" width="20" height="20" align="bottom"><img src="images/heart200.png" width="30" height="30" align="bottom"> <img src="images/heart200.png" width="40" height="40"><img src="images/heart200.png" width="50" height="50" align="bottom">with different sizes."
39             }
40             TextWithImage {//从远端加载图片
41                 text: "Resized image<img width="48" height="48" align="middle" src="http://qt-project.org/images/qt13a/Qt-logo.png">from the internet."
42             }
43             TextWithImage {
44                 text: "Image<img align="middle" src="http://qt-project.org/images/qt13a/Qt-logo.png">from the internet."
45             }
46             TextWithImage {
47                 height: 120
48                 verticalAlignment: Text.AlignVCenter
49                 text: "This is a <b>happy</b> face<img src="images/face-smile.png"> with an explicit height."
50             }
51         }
52     }
53
54     Keys.onUpPressed: main.hAlign = Text.AlignHCenter//水平居中
55     Keys.onLeftPressed: main.hAlign = Text.AlignLeft//水平居左
56     Keys.onRightPressed: main.hAlign = Text.AlignRight//水平居右
57 }
如上代码54-56行,对键盘事件进行了简单处理,向上键:文本水平居中,向左键:水平居左,向右键:水平居中
6、文本布局
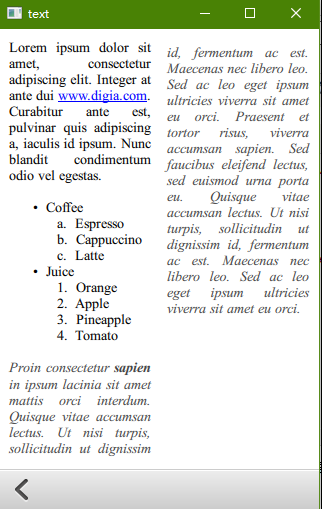
之前一直用QTextEdit做文本显示功能,一直很羡慕html的文本布局功能,现在不用担心了,qml也可以在文本布局时做自己想做的一些事情,主要还是处理lineLaidOut信号,如图5所示,该文本显示在窗口左半侧进行展示,当展示不下时,从右半侧窗口开始展示

图5 Text自定义布局
当窗口进行放大缩小时,这个灵活布局才能更有好多的展示,感兴趣的同学可以自己运行qt示例,要实现这个友好的功能其实代码量很少,代码如下所示
 1 //复杂文本显示
 2 import QtQuick 2.0
 3
 4 Rectangle {
 5     id: main
 6      320; height: 480
 7     focus: true
 8
 9     property real offset: 0
10     property real margin: 8
11
12     Text {
13         id: myText
14         anchors.fill: parent
15         anchors.margins: 10
16         wrapMode: Text.WordWrap
17         font.family: "Times New Roman"
18         font.pixelSize: 14
19         textFormat: Text.StyledText
20         horizontalAlignment: Text.AlignJustify
21
22         //css关键字 <a  <br <ul <ol <li  <p
23         text: "Lorem ipsum dolor sit amet, consectetur adipiscing elit. Integer at ante dui <a href="http://www.digia.com">www.digia.com</a>.<br/>Curabitur ante est, pulvinar quis adipiscing a, iaculis id ipsum. Nunc blandit condimentum odio vel egestas.<br><ul type="bullet"><li>Coffee<ol type="a"><li>Espresso<li>Cappuccino<li>Latte</ol><li>Juice<ol type="1"><li>Orange</li><li>Apple</li><li>Pineapple</li><li>Tomato</li></ol></li></ul><p><font color="#434343"><i>Proin consectetur <b>sapien</b> in ipsum lacinia sit amet mattis orci interdum. Quisque vitae accumsan lectus. Ut nisi turpis, sollicitudin ut dignissim id, fermentum ac est. Maecenas nec libero leo. Sed ac leo eget ipsum ultricies viverra sit amet eu orci. Praesent et tortor risus, viverra accumsan sapien. Sed faucibus eleifend lectus, sed euismod urna porta eu. Quisque vitae accumsan lectus. Ut nisi turpis, sollicitudin ut dignissim id, fermentum ac est. Maecenas nec libero leo. Sed ac leo eget ipsum ultricies viverra sit amet eu orci."
24
25 //! [layout]
26         onLineLaidOut: {
27             line.width = width / 2  - (margin)//每一行的宽度只有当前根窗口宽度一半
28
29             if (line.y + line.height >= height) {//当文字显示越过窗口底部时
30                 line.y -= height - margin//y值将去窗口高度
31                 line.x = width / 2 + margin//x值向右移动根窗口宽度一半    即从由半侧窗口显示剩余文本
32             }
33         }
34 //! [layout]
35     }
36 }
好啦。。。qml简单的文本展示就这么些了,其实应该还有很多,只是这个示例程序就这么些,那我们暂时也就说这么多吧。