背景知识:
keepalived:Keepalived的作用是检测web服务器的状态,如果有一台web服务器死机,或工作出现故障,Keepalived将检测到,并将有故障的web 服务器从系统中剔除,当web服务器工作正常后Keepalived自动将web服务器加入到服务器群中,这些工作全部自动完成,不需要人工干涉,需要人工做的只是修复故障的web服务器。
LVS:LVS是Linux Virtual Server的简写,意即Linux虚拟服务器,是一个虚拟的服务器集群系统。
实验系统:CentOS 6.6_x86_64
实验前提:提前准备好编译环境,防火墙和selinux都关闭
实验说明:本实验共有4台主机,其中keep1和keep2为2台前端的keepalived服务器,real1和real2为LVS中的realserver,IP地址对应如拓扑图。
实验软件:httpd-2.2.15 keepalived-1.2.19
实验拓扑:

一、配置realserver
1.安装httpd:
yum -y install httpd
2.配置内核参数:
echo 1 > /proc/sys/net/ipv4/conf/lo/arp_ignore           //仅在请求的地址配置在请求报文的接口进行响应
echo 1 > /proc/sys/net/ipv4/conf/all/arp_ignore
echo 2 > /proc/sys/net/ipv4/conf/lo/arp_announce         //表示仅通告网络直连的接口的地址
echo 2 > /proc/sys/net/ipv4/conf/all/arp_announce
3.增加测试页面并配置VIP:
real1上:
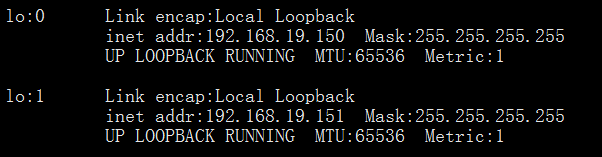
ifconfig lo:0 192.168.19.150 netmask 255.255.255.255 broadcast 192.168.19.150 up    //配置VIP
ifconfig lo:1 192.168.19.151 netmask 255.255.255.255 broadcast 192.168.19.151 up
route add -host 192.168.19.150 dev lo:0                                             //配置路由
route add -host 192.168.19.151 dev lo:1
vim /var/www/html/index.html
---------------------------------------------
<h1>realserver1</h1>
---------------------------------------------
service httpd start
real2上:
ifconfig lo:0 192.168.19.150 netmask 255.255.255.255 broadcast 192.168.19.150 up
ifconfig lo:1 192.168.19.151 netmask 255.255.255.255 broadcast 192.168.19.151 up
route add -host 192.168.19.150 dev lo:0
route add -host 192.168.19.151 dev lo:1
vim /var/www/html/index.html
---------------------------------------------
<h1>realserver2</h1>
---------------------------------------------
service httpd start
二、安装并配置keepalived
1.编译安装keepalived,在keep1和keep2上操作:
wget http://www.keepalived.org/software/keepalived-1.2.19.tar.gz
tar xf keepalived-1.2.19.tar.gz
cd keepalived-1.2.19
./configure --prefix=/usr/local/keepalived --sbindir=/usr/sbin/ --sysconfdir=/etc/ --mandir=/usr/local/share/man/ --with-kernel-dir=/usr/src/kernels/2.6.32-504.30.3.el6.x86_64/      //内核版本换成自己主机的
make && make install
chkconfig --add keepalived
chkconfig keepalived on
yum -y install ipvsadm                //安装LVS工具
2.配置keepalived:
keep1上:
vim /etc/keepalived/keepalived.conf
----------------------------------------------------
vrrp_instance VI_1 {
    state MASTER
    interface eth0
    virtual_router_id 31
    priority 100
    advert_int 1
    authentication {
        auth_type PASS
        auth_pass abcd
    }
    virtual_ipaddress {
        192.168.19.150
    }
}

vrrp_instance VI_2 {
    state BACKUP
    interface eth0
    virtual_router_id 41
    priority 99
    advert_int 1
    authentication {
        auth_type PASS
        auth_pass abcd
    }
    virtual_ipaddress {
        192.168.19.151
    }
}

virtual_server 192.168.19.150 80 {
    delay_loop 6
    lb_algo rr                         //LVS算法
    lb_kind DR                         //调度类型
    protocol TCP

    real_server 192.168.19.29 80 {
            weight 1
        inhibit_on_failure
            TCP_CHECK {
            connect_timeout 3
            nb_get_retry 2
            delay_before_retry 1
            connect_port 80
            }
        }

    real_server 192.168.19.34 80 {
            weight 1
        inhibit_on_failure
            TCP_CHECK {
            connect_timeout 3
            nb_get_retry 2
            delay_before_retry 1
            connect_port 80
            }
        }
}

virtual_server 192.168.19.151 80 {
    delay_loop 6
    lb_algo rr
    lb_kind DR
    protocol TCP

    real_server 192.168.19.29 80 {
            weight 1
        inhibit_on_failure
            TCP_CHECK {
            connect_timeout 3
            nb_get_retry 2
            delay_before_retry 1
            connect_port 80
            }
        }

    real_server 192.168.19.34 80 {
            weight 1
        inhibit_on_failure
            TCP_CHECK {
            connect_timeout 3
            nb_get_retry 2
            delay_before_retry 1
            connect_port 80
            }
        }
}
keep2上:
vim /etc/keepalived/keepalived.conf
----------------------------------------------
vrrp_instance VI_1 {
    state BACKUP
    interface eth0
    virtual_router_id 31
    priority 99
    advert_int 1
    authentication {
        auth_type PASS
        auth_pass abcd
    }
    virtual_ipaddress {
        192.168.19.150
    }
}

vrrp_instance VI_2 {
    state MASTER
    interface eth0
    virtual_router_id 41
    priority 100
    advert_int 1
    authentication {
        auth_type PASS
        auth_pass abcd
    }
    virtual_ipaddress {
        192.168.19.151
    }
}

virtual_server 192.168.19.150 80 {
    delay_loop 6
    lb_algo rr
    lb_kind DR
    protocol TCP

    real_server 192.168.19.29 80 {
            weight 1
            inhibit_on_failure
            TCP_CHECK {
            connect_timeout 3
            nb_get_retry 2
            delay_before_retry 1
            connect_port 80
            }
        }

    real_server 192.168.19.34 80 {
            weight 1
            inhibit_on_failure
            TCP_CHECK {
            connect_timeout 3
            nb_get_retry 2
            delay_before_retry 1
            connect_port 80
            }
        }
}

virtual_server 192.168.19.151 80 {
    delay_loop 6
    lb_algo rr
    lb_kind DR
    protocol TCP

    real_server 192.168.19.29 80 {
            weight 1
            inhibit_on_failure
            TCP_CHECK {
            connect_timeout 3
            nb_get_retry 2
            delay_before_retry 1
            connect_port 80
            }
        }

    real_server 192.168.19.34 80 {
            weight 1
            inhibit_on_failure
            TCP_CHECK {
            connect_timeout 3
            nb_get_retry 2
            delay_before_retry 1
            connect_port 80
            }
        }
}
3.两台机器启动keepalived:
service keepalived start
ipvsadm -L -n              //用LVS工具查看keepalived运行
ip addr show               //查看VIP
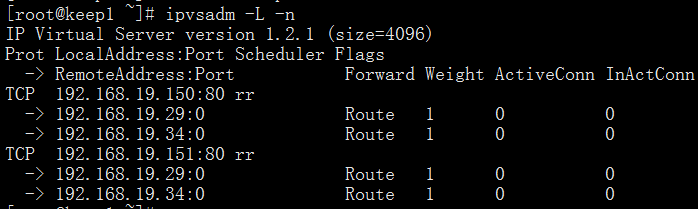
两台机器上LVS规则都已经生效,且2个VIP分别运行在2个节点:
keep1上:

keep2上:

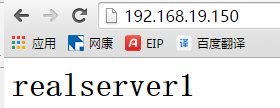
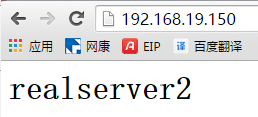
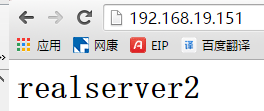
分别打开测试页面进行测试:

停掉任何一个节点,资源都会自动转移:

至此,演示完毕,谢谢!如有问题,请与我联系,QQ:82800452