和上一篇手势解锁不一样,手势解锁只画了一条路径,从触摸开始--》触摸移动--》触摸结束 ,然后路径完成了,渲染出来就是手势解锁了;
这次涂鸦想做到的效果是可以画很多次线段或弧,每次又可以设置不同的宽度和颜色,然后还要有撤销、清屏、橡皮擦的功能,那就需要画很多条路径了,然后每条路径有自己的颜色和宽度,那么
UIBezierPath类也实现不了,需要自定义一个类,继承自UIBezierPath,然后再增加自己的颜色和宽度属性。
效果截图:
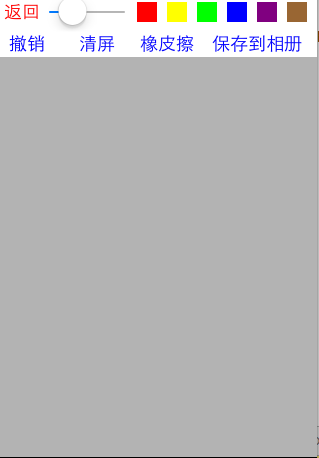 涂鸦了
涂鸦了  橡皮擦擦除
橡皮擦擦除 
保存到相册
代码:
1、自定义PaintingBezierPath类继承自UIBezierPath类,增加一个自定义路径颜色的属性;自定义构造函数,设置颜色和路径宽度
PaintingBezierPath.h文件代码:
#import <UIKit/UIKit.h>

@interface PaintingBezierPath : UIBezierPath

@property (nonatomic, retain) UIColor *color; //线段的颜色

- (instancetype)initWithColor: (UIColor *)color WithWidth: (CGFloat)width WithStartPoint: (CGPoint)startPoint;

@end
PaintingBezierPath.m文件代码:


 1 //
 2 //  PaintingBezierPath.m
 3 //  tan_iosTwo
 4 //
 5 //  Created by xiaom on 15/7/22.
 6 //
 7 //  为了自定义每个轨迹的宽度和颜色,需要增加一个自定义方法
 8
 9 #import "PaintingBezierPath.h"
10
11 @implementation PaintingBezierPath
12
13 - (instancetype)initWithColor:(UIColor *)color WithWidth:(CGFloat)width WithStartPoint:(CGPoint)startPoint{
14     if (self = [super init]){
15         self.color = color;
16         self.lineWidth = width;
17         self.lineJoinStyle = kCGLineJoinRound;
18         self.lineCapStyle = kCGLineCapRound;
19         [self moveToPoint:startPoint];
20     }
21     return self;
22 }
23
24 @end
2、自定义view, 用来展示涂鸦,名称为:PaintingView
PaintingView.h文件代码:
#import <UIKit/UIKit.h>

@interface PaintingView : UIView

@property (nonatomic, assign) CGFloat lineWidth; //涂鸦的线段宽度
@property (nonatomic, strong) UIColor *lineColor; //涂鸦的线段颜色

- (void)cancelPainting; //撤销涂鸦
- (void)clearScreen; //清屏
- (void)saveImgToAlbum; //保存相片到到手机相册里

@end
PaintingView.m文件代码:
  1 //  绘画, 涂鸦
  2
  3 #import "PaintingView.h"
  4 #import "PaintingBezierPath.h"
  5
  6 @interface PaintingView()
  7
  8 @property (nonatomic, retain) NSMutableArray *paths; //涂鸦路径数组
  9 @property (nonatomic, retain) PaintingBezierPath *currentPath; //当前正在绘制的path
 10
 11 @end
 12
 13 @implementation PaintingView
 14
 15 //代码创建对象会调用: 使用
 16 - (instancetype)initWithFrame:(CGRect)frame{
 17     if (self = [super initWithFrame:frame]){
 18         //NSLog(@"frame...%s", __func__);
 19     }
 20     return self;
 21 }
 22
 23 //xib创建会调用
 24 - (instancetype)initWithCoder:(NSCoder *)aDecoder{
 25     if (self = [super initWithCoder:aDecoder]){
 26         //NSLog(@"coder.. %s", __func__);
 27     }
 28     return self;
 29 }
 30
 31 //监听触摸开始 ,方法继承自UIResponder
 32 - (void)touchesBegan:(NSSet *)touches withEvent:(UIEvent *)event{
 33     PaintingBezierPath *path = [[PaintingBezierPath alloc] initWithColor:self.lineColor WithWidth:self.lineWidth WithStartPoint:[self currentPoint:touches]];
 34
 35     [self.paths addObject:path]; //将路径记录到数组中
 36     self.currentPath = path;
 37
 38     [self setNeedsDisplay];  //调用方法,重新绘制
 39 }
 40
 41 //监听触摸移动中
 42 - (void)touchesMoved:(NSSet *)touches withEvent:(UIEvent *)event{
 43     //追踪每次路径的移动过程
 44     [self.currentPath addLineToPoint:[self currentPoint:touches]];
 45
 46     [self setNeedsDisplay]; //调用方法,重新绘制
 47 }
 48
 49 //获取view对象中的当前位置
 50 - (CGPoint)currentPoint: (NSSet *)touches{
 51     UITouch *touch = [touches anyObject];
 52     return [touch locationInView:self];
 53 }
 54
 55 //次方法是UIView的分类@interface UIView(UIViewRendering)中添加的方法
 56 //setNeedsDisplay方法也是此分类中的方法
 57 - (void)drawRect:(CGRect)rect{
 58     for (int i = 0; i < self.paths.count; i++) {
 59         PaintingBezierPath *path = [self.paths objectAtIndex:i];
 60         [path.color set];
 61         [path stroke];  //渲染
 62     }
 63 }
 64
 65 #pragma mark - 自定义方法实现
 66 //撤销
 67 - (void)cancelPainting{
 68     [self.paths removeLastObject]; //移除最后一个路径对象
 69     [self setNeedsDisplay]; //重新绘制
 70 }
 71
 72 //清屏
 73 - (void)clearScreen{
 74     [self.paths removeAllObjects]; //移除所有路径
 75     self.lineColor = nil; //颜色赋空
 76     [self setNeedsDisplay]; //重新绘制
 77 }
 78
 79 //保存图片到相册
 80 - (void)saveImgToAlbum{
 81     //1、开启图形上下文
 82     UIGraphicsBeginImageContextWithOptions(self.bounds.size, NO, 0.0);
 83     //2、获取当前上下文
 84     CGContextRef ctr = UIGraphicsGetCurrentContext();
 85     //3、渲染当前View的图层到上下文中
 86     [self.layer renderInContext:ctr];
 87     //4、获取新图片
 88     UIImage *newImg = UIGraphicsGetImageFromCurrentImageContext();
 89     //5、关闭图形上下文
 90     UIGraphicsEndImageContext();
 91     //6、保存图片到相册中
 92     UIImageWriteToSavedPhotosAlbum(newImg, self, @selector(image:didFinishSavingWithError:contextInfo:), nil);
 93 }
 94
 95 //保存图片到相册完成之后的处理
 96 - (void)image:(UIImage *)image didFinishSavingWithError:(NSError *)error contextInfo:(void *)contextInfo{
 97     UILabel *lbl = [[UILabel alloc] initWithFrame:CGRectMake(60, 150, 200, 100)];
 98     [lbl setBackgroundColor:[UIColor blackColor]];
 99     lbl.textAlignment = NSTextAlignmentCenter;
100     lbl.textColor = [UIColor yellowColor];
101
102     if (error){ //保存失败
103         lbl.text = @"保存失败";
104     }
105     else{ //保存成功
106         lbl.text = @"保存成功";
107     }
108     [self addSubview:lbl];
109
110     [UIView animateWithDuration:2.0 animations:^{
111         lbl.alpha = 0.1;
112     } completion:^(BOOL finished) {
113         [lbl removeFromSuperview];
114     }];
115 }
116
117 //设置对象默认属性值
118 - (CGFloat)lineWidth{
119     if (_lineWidth < 1){
120         _lineWidth = 1;
121     }
122     return _lineWidth;
123 }
124
125 - (UIColor *)lineColor{
126     if (_lineColor == nil){
127         _lineColor = [UIColor blackColor];
128     }
129     return _lineColor;
130 }
131
132 - (NSMutableArray *)paths{
133     if (_paths == nil){
134         _paths = [[NSMutableArray alloc] init];
135     }
136     return _paths;
137 }
138
139 /*
140 // Only override drawRect: if you perform custom drawing.
141 // An empty implementation adversely affects performance during animation.
142 - (void)drawRect:(CGRect)rect {
143     // Drawing code
144 }
145 */
146
147 @end
3、自定义控制器展示PaintingView
DoodleViewController.h文件:
#import <UIKit/UIKit.h>

@interface DoodleViewController : UIViewController

@end
DoodleViewController.m
  1 //  信手涂鸦
  2
  3 #import "DoodleViewController.h"
  4 #import "PaintingView.h"
  5
  6 @interface DoodleViewController ()
  7
  8 @property (nonatomic, retain) PaintingView *paintV; //涂鸦的画板
  9
 10 @end
 11
 12 @implementation DoodleViewController
 13
 14 - (void)viewDidLoad {
 15     [super viewDidLoad];
 16     // Do any additional setup after loading the view.
 17     [self.view setBackgroundColor:[UIColor whiteColor]];
 18
 19     //自定义View涂鸦
 20     PaintingView *v = [[PaintingView alloc] initWithFrame:CGRectMake(0, 80, 320, 450)];
 21     [v setBackgroundColor:[UIColor grayColor]];
 22     [v setAlpha:0.6];
 23     [self.view addSubview:v];
 24     self.paintV = v;
 25
 26     [self addReturnBtn];    //添加返回按钮
 27     [self addDoodleSetWidthAndColor]; //增加设置涂鸦的宽度和颜色设置
 28 }
 29
 30 //添加返回按钮
 31 - (void)addReturnBtn{
 32     UIButton *returnBtn = [[UIButton alloc] initWithFrame:CGRectMake(0, 20, 50, 30)];
 33     [returnBtn setTitle:@"返回" forState:UIControlStateNormal];
 34     [returnBtn addTarget:self action:@selector(returnPrePage) forControlEvents:UIControlEventTouchUpInside];
 35     [returnBtn setTitleColor:[UIColor redColor] forState:UIControlStateNormal];
 36     [self.view addSubview:returnBtn];
 37 }
 38
 39 //添加涂鸦宽度设置和颜色设置
 40 - (void)addDoodleSetWidthAndColor{
 41     //1、增加UISlider用来设置可调节宽度
 42     UISlider *slider = [[UISlider alloc] initWithFrame:CGRectMake(50, 20, 80, 30)];
 43     slider.maximumValue = 15.0f; //最大值
 44     slider.value = 3.0f;    //默认为1
 45     self.paintV.lineWidth = slider.value;
 46     [slider addTarget:self action:@selector(setLineWidth:) forControlEvents:UIControlEventValueChanged]; //绑定值改变事件
 47     [self.view addSubview:slider];
 48
 49     //2、添加颜色选择按钮
 50     NSArray *colors = @[[UIColor redColor], [UIColor yellowColor], [UIColor greenColor], [UIColor blueColor], [UIColor purpleColor], [UIColor brownColor]];
 51     for (int i = 0; i < colors.count; i++) {
 52         CGFloat x =  140 + 30 * i;
 53         UIButton *colorBtn = [[UIButton alloc] initWithFrame:CGRectMake(x, 25, 20, 20)];
 54         [colorBtn setBackgroundColor:[colors objectAtIndex:i]];
 55         [colorBtn addTarget:self action:@selector(setLineColor:) forControlEvents:UIControlEventTouchUpInside];
 56         [self.view addSubview:colorBtn];
 57     }
 58
 59
 60     //第二行
 61     //3、添加撤销按钮
 62     UIButton *cancelBtn = [[UIButton alloc] initWithFrame:CGRectMake(0, 55, 60, 25)];
 63     [cancelBtn setTitleColor:[UIColor blueColor] forState:UIControlStateNormal];
 64     [cancelBtn setTitle:@"撤销" forState:UIControlStateNormal];
 65     [cancelBtn addTarget:self action:@selector(cancelPainting) forControlEvents:UIControlEventTouchUpInside];
 66     [self.view addSubview:cancelBtn];
 67
 68     //4、清屏按钮
 69     UIButton *clearScreenBtn = [[UIButton alloc] initWithFrame:CGRectMake(70, 55, 60, 25)];
 70     [clearScreenBtn setTitleColor:[UIColor blueColor] forState:UIControlStateNormal];
 71     [clearScreenBtn setTitle:@"清屏" forState:UIControlStateNormal];
 72     [clearScreenBtn addTarget:self action:@selector(clearScreen) forControlEvents:UIControlEventTouchUpInside];
 73     [self.view addSubview:clearScreenBtn];
 74
 75     //5、添加一个橡皮擦
 76     UIButton *brushBtn = [[UIButton alloc] initWithFrame:CGRectMake(140, 55, 60, 25)];
 77     [brushBtn setTitle:@"橡皮擦" forState:UIControlStateNormal];
 78     [brushBtn setTitleColor:[UIColor blueColor] forState:UIControlStateNormal];
 79     [brushBtn addTarget:self action:@selector(brush) forControlEvents:UIControlEventTouchUpInside];
 80     [self.view addSubview:brushBtn];
 81
 82     //6、保存到相册按钮
 83     UIButton *saveBtn = [[UIButton alloc] initWithFrame:CGRectMake(210, 55, 100, 25)];
 84     [saveBtn setTitle:@"保存到相册" forState:UIControlStateNormal];
 85     [saveBtn setTitleColor:[UIColor blueColor] forState:UIControlStateNormal];
 86     [saveBtn addTarget:self action:@selector(saveImgToAlbum) forControlEvents:UIControlEventTouchUpInside];
 87     [self.view addSubview:saveBtn];
 88 }
 89
 90 //调节宽度
 91 - (void)setLineWidth:(UISlider *)sender{
 92     [self.paintV setLineWidth:sender.value];
 93 }
 94
 95 //调节颜色
 96 - (void)setLineColor: (UIButton *)sender{
 97     [self.paintV setLineColor:sender.backgroundColor];
 98 }
 99
100 //设置橡皮擦
101 - (void)brush{
102     self.paintV.lineColor = self.paintV.backgroundColor;
103     if (self.paintV.lineWidth < 5) self.paintV.lineWidth = 5;
104 }
105 //撤销
106 - (void)cancelPainting{
107     [self.paintV cancelPainting];
108 }
109 //清屏
110 - (void)clearScreen{
111     [self.paintV clearScreen];
112 }
113
114 //保存图片到相册
115 - (void)saveImgToAlbum{
116     [self.paintV saveImgToAlbum];
117 }
118
119 //返回上一页
120 - (void)returnPrePage{
121     [self dismissViewControllerAnimated:YES completion:nil];
122 }
123
124 - (void)didReceiveMemoryWarning {
125     [super didReceiveMemoryWarning];
126     // Dispose of any resources that can be recreated.
127 }
128
129 /*
130 #pragma mark - Navigation
131
132 // In a storyboard-based application, you will often want to do a little preparation before navigation
133 - (void)prepareForSegue:(UIStoryboardSegue *)segue sender:(id)sender {
134     // Get the new view controller using [segue destinationViewController].
135     // Pass the selected object to the new view controller.
136 }
137 */
138
139 @end