一 现场问题
最近由于证书到期,替换过现场一个产品证书,后续现场报告一些API不能正常使用,猜测是由于替换证书导致,查询日志果然是证书认证失败:
21:20:31,578 ERROR [com.calix.sxa.user.ws.UserWs] (http-/0.0.0.0:8443-625) Failed to create jasper user: api-user: com.calix.reports.client.JasperReportsException: javax.net.ssl.SSLHandshakeException: sun.security.validator.ValidatorException: PKIX path building failed: sun.security.provider.certpath.SunCertPathBuilderException: unable to find valid certification path to requested target
        at com.calix.reports.impl.JasperReportsClientImpl.initSession(JasperReportsClientImpl.java:247) [jasperserver-client-2.29.0.jar:]
        at com.calix.sxa.user.ws.UserWsImpl.getJasperReportsClient(UserWsImpl.java:909) [classes:]
        at com.calix.sxa.user.ws.UserWsImpl.syncJasperUser(UserWsImpl.java:925) [classes:]
二 解决问题:
只需要将新的证书导入到客户端即可,方法如下:
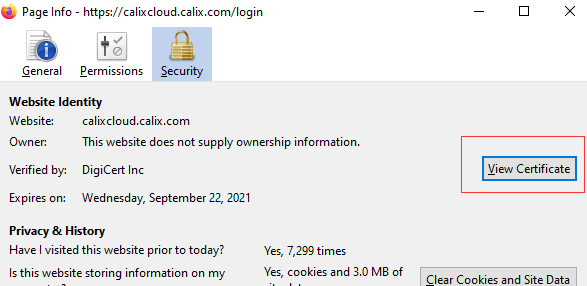
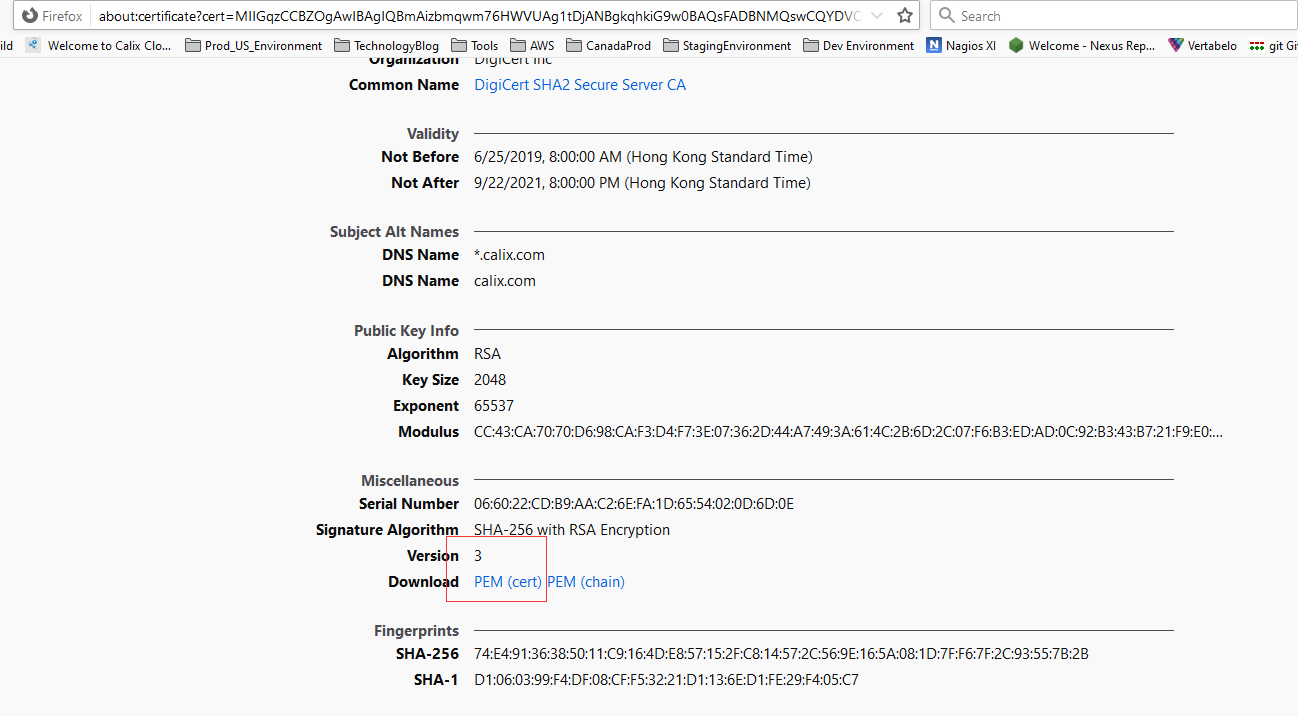
1.通过浏览器打开HTTPS网址,导出证书
2. 通过keytool导入公钥
命令:
keytool -import -alias calix-com -keystore /opt/java/jre/lib/security/cacerts -file calix-com.crt

默认密码为changeit,在命令输入后需要选择yes信任该证书:
![]()
3.通过keytool导出公钥,查询
keytool -list -keystore cacerts -v >test.crt
查询该证书是否导入。
做完上述操作后,功能恢复正常。
3 延伸
HTTPS通信时序:


TCP 三次握手:
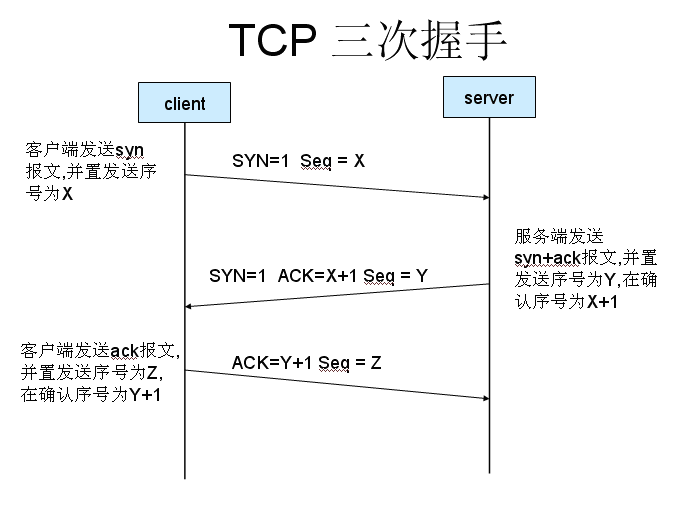
(1)客户端发送一个带SYN标志的TCP报文到服务器。这是三次握手过程中的报文1。
(2)服务器端回应客户端的,这是三次握手中的第2个报文,这个报文同时带ACK标志和SYN标志。因此它表示对刚才客户端SYN报文的回应;同时又标志SYN给客户端,询问客户端是否准备好进行数据通讯。
(3)客户必须再次回应服务段一个ACK报文,这是报文段3。
“三次握手”的目的是为了解决“网络中存在延迟的重复分组”的问题。
谢希仁版《计算机网络》中的例子是这样的,“已失效的连接请求报文段”的产生在这样一种情况下:client发出的第一个连接请求报文段并没有丢失,而是在某个网络结点长时间的滞留了,以致延误到连接释放以后的某个时间才到达server。本来这是一个早已失效的报文段。但server收到此失效的连接请求报文段后,就误认为是client再次发出的一个新的连接请求。于是就向client发出确认报文段,同意建立连接。假设不采用“三次握手”,那么只要server发出确认,新的连接就建立了。由于现在client并没有发出建立连接的请求,因此不会理睬server的确认,也不会向server发送数据。但server却以为新的运输连接已经建立,并一直等待client发来数据。这样,server的很多资源就白白浪费掉了。采用“三次握手”的办法可以防止上述现象发生。例如刚才那种情况,client不会向server的确认发出确认。server由于收不到确认,就知道client并没有要求建立连接。”。 主要目的防止server端一直等待,浪费资源。
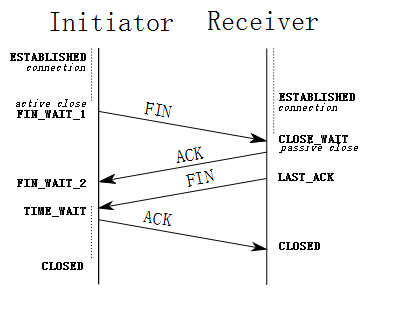
连接终止协议(四次挥手)
由于TCP连接是全双工的,因此每个方向都必须单独进行关闭。这原则是当一方完成它的数据发送任务后就能发送一个FIN来终止这个方向的连接。收到一个 FIN只意味着这一方向上没有数据流动,一个TCP连接在收到一个FIN后仍能发送数据。首先进行关闭的一方将执行主动关闭,而另一方执行被动关闭。
(1) TCP客户端发送一个FIN,用来关闭客户到服务器的数据传送(报文段4)。
(2) 服务器收到这个FIN,它发回一个ACK,确认序号为收到的序号加1(报文段5)。和SYN一样,一个FIN将占用一个序号。
(3) 服务器关闭客户端的连接,发送一个FIN给客户端(报文段6)。
(4) 客户段发回ACK报文确认,并将确认序号设置为收到序号加1(报文段7)。
为什么需要“四次挥手”
那可能有人会有疑问,在tcp连接握手时为何ACK是和SYN一起发送,这里ACK却没有和FIN一起发送呢。原因是因为tcp是全双工模式,接收到FIN时意味将没有数据再发来,但是还是可以继续发送数据。
握手,挥手过程中各状态介绍(详见wiki:TCP)
3次握手过程状态:
LISTEN: 这个也是非常容易理解的一个状态,表示服务器端的某个SOCKET处于监听状态,可以接受连接了。
SYN_SENT: 当客户端SOCKET执行CONNECT连接时,它首先发送SYN报文,因此也随即它会进入到了SYN_SENT状态,并等待服务端的发送三次握手中的第2个报文。SYN_SENT状态表示客户端已发送SYN报文。(发送端)SYN_RCVD: 这个状态与SYN_SENT遥想呼应这个状态表示接受到了SYN报文,在正常情况下,这个状态是服务器端的SOCKET在建立TCP连接时的三次握手会话过程中的一个中间状态,很短暂,基本上用netstat你是很难看到这种状态的,除非你特意写了一个客户端测试程序,故意将三次TCP握手过程中最后一个ACK报文不予发送。因此这种状态时,当收到客户端的ACK报文后,它会进入到ESTABLISHED状态。(服务器端)
ESTABLISHED:这个容易理解了,表示连接已经建立了。4次挥手过程状态:(可参考上图)
FIN_WAIT_1: 这个状态要好好解释一下,其实FIN_WAIT_1和FIN_WAIT_2状态的真正含义都是表示等待对方的FIN报文。而这两种状态的区别是:FIN_WAIT_1状态实际上是当SOCKET在ESTABLISHED状态时,它想主动关闭连接,向对方发送了FIN报文,此时该SOCKET即进入到FIN_WAIT_1状态。而当对方回应ACK报文后,则进入到FIN_WAIT_2状态,当然在实际的正常情况下,无论对方何种情况下,都应该马上回应ACK报文,所以FIN_WAIT_1状态一般是比较难见到的,而FIN_WAIT_2状态还有时常常可以用netstat看到。(主动方)
FIN_WAIT_2:上面已经详细解释了这种状态,实际上FIN_WAIT_2状态下的SOCKET,表示半连接,也即有一方要求close连接,但另外还告诉对方,我暂时还有点数据需要传送给你(ACK信息),稍后再关闭连接。(主动方)
TIME_WAIT: 表示收到了对方的FIN报文,并发送出了ACK报文,就等2MSL后即可回到CLOSED可用状态了。如果FIN_WAIT_1状态下,收到了对方同时带FIN标志和ACK标志的报文时,可以直接进入到TIME_WAIT状态,而无须经过FIN_WAIT_2状态。(主动方)
CLOSING(比较少见): 这种状态比较特殊,实际情况中应该是很少见,属于一种比较罕见的例外状态。正常情况下,当你发送FIN报文后,按理来说是应该先收到(或同时收到)对方的ACK报文,再收到对方的FIN报文。但是CLOSING状态表示你发送FIN报文后,并没有收到对方的ACK报文,反而却也收到了对方的FIN报文。什么情况下会出现此种情况呢?其实细想一下,也不难得出结论:那就是如果双方几乎在同时close一个SOCKET的话,那么就出现了双方同时发送FIN报文的情况,也即会出现CLOSING状态,表示双方都正在关闭SOCKET连接。
CLOSE_WAIT: 这种状态的含义其实是表示在等待关闭。怎么理解呢?当对方close一个SOCKET后发送FIN报文给自己,你系统毫无疑问地会回应一个ACK报文给对方,此时则进入到CLOSE_WAIT状态。接下来呢,实际上你真正需要考虑的事情是察看你是否还有数据发送给对方,如果没有的话,那么你也就可以close这个SOCKET,发送FIN报文给对方,也即关闭连接。所以你在CLOSE_WAIT状态下,需要完成的事情是等待你去关闭连接。(被动方)
LAST_ACK: 这个状态还是比较容易好理解的,它是被动关闭一方在发送FIN报文后,最后等待对方的ACK报文。当收到ACK报文后,也即可以进入到CLOSED可用状态了。(被动方)CLOSED: 表示连接中断。
TCP具体状态图:

Keystore terminology(术语)
- Formats: These instructions read and write files in the following formats:
- PKCS: A binary file format typically associated with Windows systems. Typical file names are *.pkcs, *.p12, *.p7b, *.pfx
- Java Keystore: A binary file format for use by Java applications (like the Code42 server). Typical file names are .keystore and *.jks
- PEM: An ASCII text file that holds keys, certificates, or both. PEM files are common on Linux systems and Apache. Typical file extensions are *.pem, *.key, *.csr, *.cert
To identify a PEM file, open it with a console or text editor. If you see ASCII text, it's a PEM file.

Install a CA-singned SSL certificate with KeyStore Explorer
Build the keystore
Building a Java KeyStore is the first step in configuring your Code42 server to use your own CA-signed SSL certificate. If you have an existing private key and corresponding X.509 certificate (referred to collectively as key materials), you can reuse them. You can also start from scratch, creating new key materials as needed. The steps are different, depending on what existing key materials you have:
Certificates and keystores built to an older standard may lack the Subject Alternative Name (SAN) extension. Most browsers now distrust such certificates. If your existing certificates and keystores don't have the SAN extension, start over with a new certificate signing request.
Option 1: Build a keystore without existing key materials
You must use the same password for the keystore and the private key. You can use any string you want for these parameters, but they must both be set to the same value.
Follow the steps below if you have no private keys or certificates from a CA and need to create them from scratch.
Step 1: Create a keystore, key pair, and certificate
- Start KeyStore Explorer.
- Choose Create a new KeyStore.
- From New KeyStore Type, choose JKS.
- Click OK.

- Generate a key pair:
- Select Tools > Generate Key Pair.
- In Generate Key Pair, choose the following algorithm selection options:
- RSA
- Key Size: 4096

- Click OK.
Generating Key Pair dialog appears, then disappears after a key is generated. - From Generate Key Pair Certificate, click the Edit name icon
 .
. - Complete the Name fields:
- For the Common Name (CN) use the Fully Qualified Domain Name (FQDN) of your server.

- For the Common Name (CN) use the Fully Qualified Domain Name (FQDN) of your server.
- Click OK.
- Specify the domain name of your server as an alternative name. Click Add Extensions, click the + icon, and select Subject Alternative Name.
- In the Subject Alternative Name Extension dialog, click the + icon, select DNS Name, and in General Name Value type the domain name of your server.
- Click OK until you return to the Generate Key Pair Certificate dialog.
- In Generate Key Pair Certificate, click OK.
- In New Key Pair Entry Alias, enter an alias for the key pair.
The alias is pre-set to the CN set in the Name dialog. - Click OK.
- In New Key Pair Entry Password, enter a password, and click OK.
The Generate Key Pair dialog displays "Key Pair Generation Successful".
Save this password, and use it as the password for the entire keystore in step 7 below.
- Click OK.
The new key pair is displayed in the KeyStore Explorer window.

- Save the keystore:
- From the KeyStore Explorer menu, select File > Save.
The Set KeyStore Password dialog appears. - Enter a password for the keystore. This password must be the same as the password for the key pair generated in step 5 above.
- Click OK.
The Save KeyStore As dialog appears. - Enter the name of the keystore.
This format is suggested for easy identification of your keystores: fqdn_domain_com.jks - Click Save.
Your keystore file is saved to your computer.
- From the KeyStore Explorer menu, select File > Save.
Step 2: Generate and send certificate signature request
- Right-click the key pair entry.
- Choose Generate CSR.
The Generate CSR dialog appears.

- (Optional) Enter additional values.
- Click OK.
The CSR Generation Successful dialog appears. - Click OK.
- Send the generated CSR file to your certificate authority.
Step 3: Import signed certificates to your keystore
- When the certificate authority returns your signed certificate and key, place them in a directory accessible by Keystore Explorer.
- In Keystore Explorer, right-click the same key pair entry used to generate the CSR and choose Import CA Reply > From File.
- Select the signed certificate from your certificate authority, and click Import.
The signed certificate is added to the key pair entry as the server-level certificate. - To verify the certificate chain, right-click the key pair entry, and choose View Details > Certificate Chain Details.
- If you need to import intermediate and root-level certificates, right-click the key pair entry, and choose Edit Certificate Chain > Append Certificate to append the intermediate and root-level certificates. See Append certificates to an existing keystore, below.
- From the menu bar, select File > Save to save the imported certificate to your keystore.
Your keystore file is complete and ready to be imported into your Code42 server.
Option 2: Build a keystore with existing key materials
If you want to use existing key materials to build a keystore, you can choose to:
- Append certificate to an existing keystore
- Reuse existing key materials (Linux)
- Reuse existing key materials (Windows)
Append certificates to an existing keystore
If you already have a keystore that contains certificates, you can append new certificates.
If you don't have existing key materials, you can import certificates to the keystore.
- Start KeyStore Explorer.
- Choose Open an existing KeyStore.
- Select the keystore JKS file, click Open, provide the password, and click OK.
- In the main KeyStore Explorer window, right-click the key pair entry.
- Select Edit Certificate Chain > Append Certificate.

Reuse existing key materials from another application (Linux)
Follow these steps to reuse an existing private key/certificate combination from another application if you are running on Linux. These instructions assume that both your private key and certificate are PEM-formatted.
The following steps require the use of the command-line utility OpenSSL.
- Convert the PEM-formatted private key into a PKCS8-formatted key with the following command:
openssl pkcs8 -topk8 -nocrypt -outform DER -in mykey.pem -out mykey.pkcs8
- Start the KeyStore Explorer application.
- Choose Create a new KeyStore from the quick start menu.
- From New KeyStore Type, choose JKS.
- Click OK.
- From the menu bar, select Tools > Import Key Pair.

- From Import Key Pair Type, select PKCS #8.

- From Import PKCS #8 Key Pair, import the key pair as follows:

- If the private key file is encrypted, enter the decryption password in Decryption Password.
- In PKCS #8 Private Key File, enter the path to the private key file in PKCS # 8 format, or click Browse to navigate to the file.
- In Certificate(s) File, enter the path to the X.509 certificate file in PEM or DER format, or click Browse to navigate to the file.
- Click Import.
- In New Key Pair Entry Alias, enter an alias for the key pair.
- Click OK.
- In New Key Pair Entry, enter a password for the key pair.
The Key Pair Import Successful dialog appears. - Click OK.
- Select File > Save from the menu bar.
- In Set KeyStore Password, enter a keystore password, and click OK.
- In Save KeyStore As, enter the name of your new keystore file. Give the file the .jks file extension.
- Click Save.
Your keystore file is complete and ready to be imported into your Code42 server.
Reuse existing key materials from another application (Windows)
Follow these steps to reuse an existing private key/certificate combination from another application if you are running on Windows. Key materials on Windows platforms are typically stored in a PKCS12 keystore file. The KeyStore Explorer can convert a PKCS12 keystore file to a JKS file using the steps below.
- Start the KeyStore Explorer application.
- Select File > Open from the menu bar.
- Navigate to and select the PKCS12 file that you want to convert.
- Click Open.
- In Unlock KeyStore, enter the password for the keystore file and click OK.

- Select File > Save As from the menu bar.
- Enter a name with the .jks file extension for the new keystore.
- Click Save.
- Select Tools > Change Type > JKS from the menu bar.

- From Change KeyStore Type,click OK.
The Change KeyStore Type dialog displays "Change KeyStore type Successful". - Click OK.
- Select File > Save.
The keystore file is saved in JKS format.
Your keystore file is complete and ready to be imported into your Code42 server.
Configure the Code42 server to use the keystore
Troubleshooting
- If your test Code42 server fails to start after installing the new keystore, uninstall and reinstall the server.
- If your production Code42 server fails to start after installing the new keystore, see Recover your Code42 server to a previous state.
- Most problems with SSL certificates are related to key creation, signing, and conversion. We recommend that you:
- Carefully repeat the process described above.
- Check that your certificate and keystore files include the Subject Alternative Name (SAN) extension.
Convert your keystore or certificate to text, as described below. Look for
X509v3 Subject Alternative Name - Consult with your CA to make sure you have the right intermediate certificates.
- Consult documentation for the tool you're using:
- For additional help, contact your Customer Success Manager (CSM).
Convert certificates and keystores to text files
Certificate and keystore files are in binary or base64 formats. You can make them easier to read by converting files to PEM format and then converting PEM files to text, as follows:
- Java keystore to PKCS
keytool -importkeystore -srckeystore <filename>.jks -destkeystore <filename>.p12 -srcstoretype jks -deststoretype pkcs12
- PKCS to PEM
openssl pkcs12 -in <filename>.p12 -out <filename>.crt
- PEM certificate to text
openssl x509 -text -in <filename>.crt > <filename>.crt.txt
- PEM CSR to text (certificate signing request)
openssl req -text -noout -in <filename>.csr > <filename>.csr.txt
A certificate in readable text


Certificate:
    Data:
        Version: 3 (0x2)
        Serial Number: 4096 (0x1000)
    Signature Algorithm: sha256WithRSAEncryption
        Issuer: C = US, ST = MN, O = CAsOrg, OU = CAsUnit, CN = CAsName The issuer is the CA who signed the certificate.
           Validity
            Not Before: Aug 15 13:50:25 2018 GMT
            Not After : Aug 15 13:50:25 2019 GMT This certificate's expiration date.
        Subject: C = US, ST = MN, L = YourTown, O = YourOrg, OU = YourUnit, CN = yourdomain.tld,
            emailAddress = you@yourcompany.tld Subject: You and the website this certificate validates.
        Subject Public Key Info: Your public key. Clients use it to encrypt messages.
            Public Key Algorithm: rsaEncryption
                Public-Key: (2048 bit)
                Modulus:
                    00:aa:a4:de:e3:e3:d4:b9:f3:3d:1c:1e:b7:1b:69:
                    4f:5b:22:08:4b:75:81:54:91:8f:63:57:a8:0e:bd:
                    ...
                    ab:a3:21:3f:c4:28:1c:9a:4e:e4:f0:81:a2:ab:73:
                    b3:83
                Exponent: 65537 (0x10001)
        X509v3 extensions:
            X509v3 Subject Alternative Name: Most browsers require the SAN extension.
                DNS:yourdomain.tld
            X509v3 Basic Constraints:
                CA:FALSE
            Netscape Cert Type:
                SSL Server
            Netscape Comment:
                OpenSSL Generated Server Certificate
            X509v3 Subject Key Identifier:
                12:E8:E1:E5:65:57:BB:2A:1C:CC:E3:61:E8:5C:79:34:CF:DD:E3:B1
            X509v3 Authority Key Identifier:
                keyid:F3:16:90:68:9A:B2:85:40:A8:1D:F3:2D:78:B2:6D:4E:82:0C:B0:32
                DirName:/CN=Vera/OU=Vera/O=VeraCA/L=Roseville/ST=MN/C=US
                serial:10:00
            X509v3 Key Usage: critical
                Digital Signature, Key Encipherment
            X509v3 Extended Key Usage:
                TLS Web Server Authentication
    Signature Algorithm: sha256WithRSAEncryption
         29:52:6f:5a:de:26:44:50:ad:e3:33:7b:8d:ba:2e:b5:cb:d9:
         35:21:75:0c:6b:ea:e0:f4:d0:e3:72:8e:5d:9e:3b:02:bf:8f:
         ...
         81:45:8f:1f:71:45:13:0a:ec:f1:0c:70:30:f2:6f:73:cd:5c:
         55:41:b6:b6:0a:fc:fb:c9
-----BEGIN CERTIFICATE-----
MIIFpTCCA42gAwIBAgICEAAwDQYJKoZIhvcNAQELBQAwWzELMAkGA1UEBhMCVVMx
CzAJBgNVBAgMAk1OMRUwEwYDVQQKDAxQaGlsTm9yY3Jvc3MxDTALBgNVBAsMBFZl
...
BeWBceJRAcqt2XtY/6HteHUxpxCbSPVcEZWw6dkrM4FFjx9xRRMK7PEMcDDyb3PN
XFVBtrYK/PvJ
-----END CERTIFICATE-----
External resources
Related topics
Install a CA-signed SSL certificate with OpenSSL
Create a keystore
Create a keystore using one of the following options:
- Option 1: Create a key, get a CA to sign it, then build a keystore.
- Option 2: Recombine existing keys and certificates into a new keystore.
- Option 3: Convert an existing PKCS12 keystore to a Java keystore.
Option 1: Create and certify a new key
Step 1: Generate a key pair and a signing request
Create a PEM format private key and a request for a CA to certify your public key.
- Create a configuration file openssl.cnf like the example below:
- Or make sure your existing openssl.cnf includes the subjectAltName extension.
- Replace <your.domain.com> with the complete domain name of your Code42 server.
[ req ]
default_bits       = 4096
distinguished_name = req_distinguished_name
req_extensions     = req_ext

[ req_distinguished_name ]
countryName         = Country Name (2-letter code)
stateOrProvinceName = State or Province Name (full name)
localityName        = Locality (e.g. city name)
organizationName    = Organization (e.g. company name)
commonName          = Common Name (your.domain.com)

[ req_ext ]
subjectAltName = @alt_names
[alt_names]
DNS.1 = <your.domain.com>
- Issue the command below, with two substitutions:
- <your.domain.com>: the complete domain name of your Code42 server.
- <path>: the file path for your openssl.cnf file.
openssl req -new -keyout <your.domain.com>.key -out <your.domain.com>.csr -nodes -newkey rsa:4096 -config <path>/openssl.cnf
- Answer the prompts for identifying data.
AtCommon Name, you must supply the domain name of the Code42 server you want to secure.
Most CAs require values for the other fields as well.
Generating a 4096 bit RSA private key
............................................+++
............................................+++
writing new private key to '<your.domain.com>.key'
-----
You are about to be asked to enter information that will be incorporated
into your certificate request.
What you are about to enter is what is called a Distinguished Name or a DN.
There are quite a few fields but you can leave some blank
For some fields there will be a default value,
If you enter '.', the field will be left blank.
-----
Country Name (2 letter code) [AU]:US
State or Province Name (full name) [Some-State]:MN
Locality Name (eg, city) []:Mnpls
Organization Name (eg, company) [Default Org.]:Example
Organizational Unit Name (eg, section) []:IX
Common Name (e.g. server FQDN or YOUR name) []:<your.domain.com>
Email Address []:<cert-admin@your.domain.com>
Please enter the following 'extra' attributes
to be sent with your certificate request
A challenge password []:<password>
An optional company name []:Example Inc.
- Look for two files in the current directory: <your.domain.com>.key and <your.domain.com>.csr
- Confirm that a
cat <filename>command displays ASCII text.
If the two files from Step 3 exist and the command displays ASCII text, the command succeeded.
cat <your.domain.com>.csr
-----BEGIN CERTIFICATE REQUEST-----
MIIDAzCCAesCAQAwgY0xCzAJBgNVBAYTAlVTMQswCQYDVQQIDAJNTjEOMAwGA1UE
BwwFTW5wbHMxDzANBgNVBAoMBkNvZGU0MjELMAkGA1UECwwCSVgxGzAZBgNVBAMM
...
EmV4YW1wbGUuZG9tYWluLmNvbTEmMCQGCSqGSIb3DQEJARYXbmFtZUBleGFtcGxl
QITwVRVRp817TQLFS9o8pdu4iUcxpsiNdn58ZeNNUJjOgmZDxtpQPiL1sv0QuxUo
YgKjmS+0yw==
-----END CERTIFICATE REQUEST-----
Step 2: Request a CA-signed certificate
- Submit the file <your.domain.com>.csr to your CA.
- Details vary from one CA to another. Typically, you submit your request via a website, then the CA contacts you to verify your identity.
- CAs can send signed reply files in a variety of formats, and CAs use a variety of names for those formats. You want the CA's reply in PEM format, the format for a Linux system, for an Apache server.
- Ask the CA what intermediate certificates you need and where to get them. One or more intermediate certificates are often, but not always, necessary to complete the chain of trust between your CA and a root CA trusted web browsers.
- Wait (usually days or a week) for the CA's reply.
Step 3: Import the CA's reply
- When you have the CA's reply file and intermediate certificate, combine them into a single PKCS keystore.
The reply and certificate files must be in PEM format. If you can open them with a text editor and see ASCII characters, they are PEM. -
Copy the files from the CA's reply to the directory of the .key and .csr files from Step 1.
-
Run the following commands from that directory.
If you have multiple intermediate certificates, combine them in any order. - Use the following command, with these substitutions:
<midfile.1.cert.pem> and <midfile.2.cert.pem>: the names of intermediate certificate files.
cat <midfile.1.cert.pem> <midfile.2.cert.pem> > intermediates.cert.pem
- Create the keystore.p12 file. Use the command below, with these substitutions:
- <CAreply> : The name of the CA reply file.
- <your.domain.com> : The complete domain name of your Code42 server.
- <intermediates.cert.pem> : The file of intermediate certificates. Not all CA replies require intermediates.
- When the command prompts for the export password, provide at least 6 characters.
openssl pkcs12 -export -in <CAreply> -inkey <your.domain.com>.key
  -certfile <intermediates.cert.pem> -name "<your.domain.com>"
  -out <your.domain.com>.p12
- Convert your keystore.p12 to a Java keystore.jks. Use the command below, with these substitutions:
- <your.domain.com> : The same domain name as in the command above.
- <youruserid>: The ID of the Linux user you used to sign in.
- When the command prompts for source and destination keystore passwords, provide the same password that you used for the previous command.
sudo keytool -importkeystore
  -srckeystore <your.domain.com>.p12 -srcstoretype PKCS12
  -destkeystore <your.domain.com>.jks
- If the command succeeds, it returns this message:
Import command completed: 1 entries successfully imported, 0 entries failed or cancelled
[Storing <your.domain.com>.jks]
- Set your ownership of the keystore file.
sudo chown <youruserid>:<youruserid> <your.domain.com>.jks
- Proceed to configuring your Code42 server to use the keystore.
Option 2: Recombine existing PEM keys and certificates
If you have an existing private key and certificates for your Code42 server's domain, in PEM format, combine them into a PKCS keystore, then convert the PKCS keystore into a Java keystore.
- Issue the two commands below, with these substitutions:
- <existing.cert.pem>: The existing signed certificate file that matches your existing private key.
- <existing.key.pem>: The existing private key file.
- <intermediate.cert.pem>: The existing intermediate certificates that complete the chain from your certificate to a root CA.
- <your.domain.com> : The complete domain name of your Code42 server.
- <youruserid>: The ID of the Linux user you used to sign in.
- Both commands will prompt you for passwords to the source and destination keystores.
openssl pkcs12 -export -in <existing.cert.pem> -inkey <existing.key.pem>
   -certfile <intermediate.cert.pem> -name "<your.domain.com>"
   -out <your.domain.com>.p12

keytool -importkeystore
   -srckeystore <your.domain.com>.p12 -srcstoretype PKCS12
   -destkeystore <your.domain.com>.jks
- Set your ownership of the keystore file.
sudo chown <youruserid>:<youruserid> <your.domain.com>.jks
Option 3: Convert an existing pkcs12 keystore
If you have an existing PKCS keystore for your Code42 server's domain, convert it to a Java keystore.
- Use the command below, with these substitutions:
- <your.domain.com.p12> : The existing PKCS file.
- <your.domain.com> : The complete domain name of your Code42 server.
- <youruserid>: The ID of the Linux user you used to sign in.
- The command will prompt you for passwords for the source and destination keystores.
keytool -importkeystore
   -srckeystore <your.domain.com.p12> -srcstoretype PKCS12
   -destkeystore <your.domain.com>.jks
- Set your ownership of the Java keystore file.
sudo chown <youruserid>:<youruserid> <your.domain.com>.jks
Configure your Code42 server to use your keystore
Step 1: Back up your Code42 server's database
As a best practice, back up your Code42 server's database:
- Open the administration console.
- Navigate to Settings > Server.
- From the action menu, select Dump Database.
Step 2: Set up a test server
Code42 strongly recommends trying out your keystore on a test server before moving it into production, as errors in a keystore can completely lock up a server.
- Sign in to Linux test system or virtual machine.
- Edit that system's hosts file to provide the same domain name as your production Code42 server.
- Open /etc/hosts with a text editor:
sudo nano /etc/hosts - Insert or change a line so that it begins with the test server's IP address followed by your Code42 server's domain name.
- Exit and save:
control-X y return
- Open /etc/hosts with a text editor:

- Install a Code42 server.
- Sign in to the administration console at:
https://<your.domain.com>:4285 - At Settings > Server > General > Website protocol, host and port, provide the same address:
https://<your.domain.com>:4285. - Press Save.
Step 3: Import your keystore to your Code42 server
- In the administration console, select Settings > Security > Keys.
- At SSL, check Require SSL to access console.
- Click Import Keystore.
- Select your keystore file, <your.domain.com.jks>, and provide
<yourpassword>. - Return to the Linux command line and stop and restart the Code42 server:
sudo /opt/proserver/bin/proserver stop

sudo /opt/proserver/bin/proserver start - Give the server several minutes to start up, then return the browser to the administration console sign in page:
https://<your.domain.com>:4285 - If the keystore import succeeds, your browser will show a secure connection
 rather than an exception warning.
Indicators vary by browser.

- If the keystore import succeeds on your test server, repeat these Step 3 instructions on your production Code42 server.
Troubleshooting
- Most problems with SSL certificates are related to key creation, signing, and conversion. We recommend that you:
- Carefully repeat the process described above.
- Check that your certificate and keystore files include the Subject Alternative Name (SAN) extension.
Convert your keystore or certificate to text, as described below. Look forX509v3 Subject Alternative Name - Consult with your CA to make sure you have the right intermediate certificates.
- Consult documentation for the tool you're using:
- For additional help, contact your Customer Success Manager (CSM).
Convert certificates and keystores to text files
Certificate and keystore files are in binary or base64 formats. You can make them easier to read by converting files to PEM format and then converting PEM files to text, as follows:
- Java keystore to PKCS
keytool -importkeystore -srckeystore <filename>.jks -destkeystore <filename>.p12 -srcstoretype jks -deststoretype pkcs12
- PKCS to PEM
openssl pkcs12 -in <filename>.p12 -out <filename>.crt
- PEM certificate to text
openssl x509 -text -in <filename>.crt > <filename>.crt.txt
- PEM CSR to text (certificate signing request)
openssl req -text -noout -in <filename>.csr > <filename>.csr.txt
A certificate in readable text
Certificate:
    Data:
        Version: 3 (0x2)
        Serial Number: 4096 (0x1000)
    Signature Algorithm: sha256WithRSAEncryption
        Issuer: C = US, ST = MN, O = CAsOrg, OU = CAsUnit, CN = CAsName The issuer is the CA who signed the certificate.
           Validity
            Not Before: Aug 15 13:50:25 2018 GMT
            Not After : Aug 15 13:50:25 2019 GMT This certificate's expiration date.
        Subject: C = US, ST = MN, L = YourTown, O = YourOrg, OU = YourUnit, CN = yourdomain.tld,
            emailAddress = you@yourcompany.tld Subject: You and the website this certificate validates.
        Subject Public Key Info: Your public key. Clients use it to encrypt messages.
            Public Key Algorithm: rsaEncryption
                Public-Key: (2048 bit)
                Modulus:
                    00:aa:a4:de:e3:e3:d4:b9:f3:3d:1c:1e:b7:1b:69:
                    4f:5b:22:08:4b:75:81:54:91:8f:63:57:a8:0e:bd:
                    ...
                    ab:a3:21:3f:c4:28:1c:9a:4e:e4:f0:81:a2:ab:73:
                    b3:83
                Exponent: 65537 (0x10001)
        X509v3 extensions:
            X509v3 Subject Alternative Name: Most browsers require the SAN extension.
                DNS:yourdomain.tld
            X509v3 Basic Constraints:
                CA:FALSE
            Netscape Cert Type:
                SSL Server
            Netscape Comment:
                OpenSSL Generated Server Certificate
            X509v3 Subject Key Identifier:
                12:E8:E1:E5:65:57:BB:2A:1C:CC:E3:61:E8:5C:79:34:CF:DD:E3:B1
            X509v3 Authority Key Identifier:
                keyid:F3:16:90:68:9A:B2:85:40:A8:1D:F3:2D:78:B2:6D:4E:82:0C:B0:32
                DirName:/CN=Vera/OU=Vera/O=VeraCA/L=Roseville/ST=MN/C=US
                serial:10:00
            X509v3 Key Usage: critical
                Digital Signature, Key Encipherment
            X509v3 Extended Key Usage:
                TLS Web Server Authentication
    Signature Algorithm: sha256WithRSAEncryption
         29:52:6f:5a:de:26:44:50:ad:e3:33:7b:8d:ba:2e:b5:cb:d9:
         35:21:75:0c:6b:ea:e0:f4:d0:e3:72:8e:5d:9e:3b:02:bf:8f:
         ...
         81:45:8f:1f:71:45:13:0a:ec:f1:0c:70:30:f2:6f:73:cd:5c:
         55:41:b6:b6:0a:fc:fb:c9
-----BEGIN CERTIFICATE-----
MIIFpTCCA42gAwIBAgICEAAwDQYJKoZIhvcNAQELBQAwWzELMAkGA1UEBhMCVVMx
CzAJBgNVBAgMAk1OMRUwEwYDVQQKDAxQaGlsTm9yY3Jvc3MxDTALBgNVBAsMBFZl
...
BeWBceJRAcqt2XtY/6HteHUxpxCbSPVcEZWw6dkrM4FFjx9xRRMK7PEMcDDyb3PN
XFVBtrYK/PvJ
-----END CERTIFICATE-----
External resources
Related topics
引用:
https://support.code42.com/Administrator/6/Configuring/Install_a_CA_signed_SSL_TLS_certificate_with_KeyStore_Explorer#Overview
https://www.cnblogs.com/ttltry-air/archive/2012/08/20/2647898.html
