以前写过一篇基于Springboot使用retry框架进行实现重试业务场景的文章:
https://blog.csdn.net/qq_35387940/article/details/99676114
前言:
重试这个需求场景在我们做项目的时候非常常见,实现这个场景的方法也是非常多,
定期轮询
ScheduledExecutorService 周期性线程池
消息队列
redis有序集合
Quartz,job等定时任务框架
Timer
delayQueue
等等,我们该篇介绍的是 异步Async+延迟队列delayQueue 。
进入正题:
一个简单的重试需求场景
我们服务端是个中间平台,
用户调用我们服务端下单成功,我们需要通知第三方平台发货。
但是这个通知发货有可能通知失败,我们允许最大失败次数是N次;
也就是说除了第一次通知发出后,我们需要进行额外的N次发货通知;
而且后面额外进行的N次发货通知是有延迟时间的, 每个之间的间隔都是动态设置的;
期间只要有一次通知成功了,那么我们就不再重新发送通知;
如果通知没发成功,就会根据我们设置的N次以及延迟时间,继续发送通知。
先创建一个异步线程池的配置类(如果你还不了解springboot使用异步线程的,可以先去看看我这篇文章:https://blog.csdn.net/qq_35387940/article/details/83991594),AsyncThreadConfig.class:
ps: 这里用的是spring提供的线程池
import org.springframework.context.annotation.Bean;
import org.springframework.context.annotation.ComponentScan;
import org.springframework.context.annotation.Configuration;
import org.springframework.scheduling.annotation.EnableAsync;
import org.springframework.scheduling.concurrent.ThreadPoolTaskExecutor;
import java.util.concurrent.Executor;
@Configuration
@ComponentScan("com.jc.mytest.async.service")
@EnableAsync
public class AsyncThreadConfig {
/**
* 执行需要依赖线程池,这里就来配置一个线程池
* @return
*/
// 当池子大小小于corePoolSize,就新建线程,并处理请求
// 当池子大小等于corePoolSize,把请求放入workQueue(QueueCapacity)中,池子里的空闲线程就去workQueue中取任务并处理
// 当workQueue放不下任务时,就新建线程入池,并处理请求,如果池子大小撑到了maximumPoolSize,就用RejectedExecutionHandler来做拒绝处理
// 当池子的线程数大于corePoolSize时,多余的线程会等待keepAliveTime长时间,如果无请求可处理就自行销毁
@Bean("getExecutor")
public Executor getExecutor() {
ThreadPoolTaskExecutor executor = new ThreadPoolTaskExecutor();
//设置核心线程数
executor.setCorePoolSize(10);
//设置最大线程数
executor.setMaxPoolSize(100);
//线程池所使用的缓冲队列
executor.setQueueCapacity(250);
//设置线程名
executor.setThreadNamePrefix("JcTest-Async");
//设置多余线程等待的时间,单位:秒
//executor.setKeepAliveSeconds();
// 初始化线程
executor.initialize();
return executor;
}
}
然后是异步执行方法的service,TestAsyncService.class:
import java.io.IOException;
/**
* @Author : JCccc
* @CreateTime : 2020/4/16
* @Description :
**/
public interface TestAsyncService {
String testNotice(int[] taskDelayMill) throws InterruptedException, IOException;
}
对应的实现类impl,TestAsyncServiceImpl.class:
import com.jc.mytest.async.service.TestAsyncService;
import com.jc.mytest.util.DelayElement;
import org.springframework.scheduling.annotation.Async;
import org.springframework.stereotype.Service;
import java.io.IOException;
import java.text.DateFormat;
import java.util.Date;
import java.util.concurrent.DelayQueue;
/**
* @Author : JCccc
* @CreateTime : 2020/4/16
* @Description :
**/
@Service
public class TestAsyncServiceImpl implements TestAsyncService {
@Async("getExecutor")
@Override
public String testNotice(int[] taskDelayMill) throws InterruptedException, IOException {
System.out.println(Thread.currentThread().getName() + " -------正在异步执行任务------" + new Date());
DelayQueue delayQueue = new DelayQueue();
//数组的length大小就是额外需要发送的通知数
int taskSum=taskDelayMill.length;
//将每一次发送通知的间隔时间都对应创建一个延迟设置类,放入延迟队列delayQueue里
for (int i=0;i<taskSum;i++){
delayQueue.put(new DelayElement(taskDelayMill[i]));
}
System.out.println("开始时间:" + DateFormat.getDateTimeInstance().format(new Date()));
while (!delayQueue.isEmpty()){
// 执行延迟任务
System.out.println("现在执行延迟任务,调用业务接口");
//模拟调用API,通知发货,得到发货结果 成功或失败
String result = getNoticeResult();
System.out.println("通知发货的结果是:"+result);
if (!result.equals("success")){
System.out.println("任务执行中:"+delayQueue.take());
}else {
break;
}
}
//查询订单结果
System.out.println("通知任务不需要再发,订单结果已经确定");
System.out.println("结束时间:" + DateFormat.getDateTimeInstance().format(new Date()));
return "success";
}
//模拟发货通知的结果
public String getNoticeResult() throws IOException {
//模拟调用通知发货API接口,获取返回结果
String[] strs={"success", "-error-", "--error--","-error--"};
return RandomStr(strs);
}
//随机返回字符串数组中的字符串
public static String RandomStr(String[] strs){
int random_index = (int) (Math.random()*strs.length);
return strs[random_index];
}
}
延迟队列需要的参数类,DelayElement.class:
import java.text.DateFormat;
import java.util.Date;
import java.util.concurrent.Delayed;
import java.util.concurrent.TimeUnit;
/**
* @Author : JCccc
* @CreateTime : 2020/4/17
* @Description :
**/
public class DelayElement implements Delayed {
// 延迟截止时间(单面:毫秒)
long delayTime = System.currentTimeMillis();
public DelayElement(long delayTime) {
this.delayTime = (this.delayTime + delayTime);
}
@Override
// 获取剩余时间
public long getDelay(TimeUnit unit) {
return unit.convert(delayTime - System.currentTimeMillis(), TimeUnit.MILLISECONDS);
}
@Override
// 队列里元素的排序依据
public int compareTo(Delayed o) {
if (this.getDelay(TimeUnit.MILLISECONDS) > o.getDelay(TimeUnit.MILLISECONDS)) {
return 1;
} else if (this.getDelay(TimeUnit.MILLISECONDS) < o.getDelay(TimeUnit.MILLISECONDS)) {
return -1;
} else {
return 0;
}
}
@Override
public String toString() {
return DateFormat.getDateTimeInstance().format(new Date(delayTime));
}
}
最后写个小接口来触发一下这个场景,TestController.class:
/**
* @Author : JCccc
* @CreateTime : 2020/4/8
* @Description :
**/
@RestController
public class TestController {
@Autowired
TestAsyncService testAsyncService;
@GetMapping("/testAsyncNotice")
public void testAsyncNotice() throws Exception {
System.out.println("发货通知调用开始!");
int[] taskArrays = new int[]{2000, 5000, 10000};
testAsyncService.testNotice(taskArrays);
System.out.println("已经开始通知,异步执行通知");
}
}
整个流程实现简单介绍
可以看到一直传递的接收参数是一个数组 taskArrays,
数组的元素就是每个通知任务发出的延迟时间, 可以看到我弄得是 2000,5000,10000 ;
那就是额外发3次,
结合我们的impl代码,
先判断队列里面的任务还有没有,有的话就回去执行。
第一次是延迟2秒发一次, 然后调用发货通知接口,得到返回状态;
如果是success,那么就是通知发货成功,可以直接结束;
如果不是success,我们继续调用 delayQueue.take() ,直到队列里面的任务都被执行完毕,也就是3次都发完。
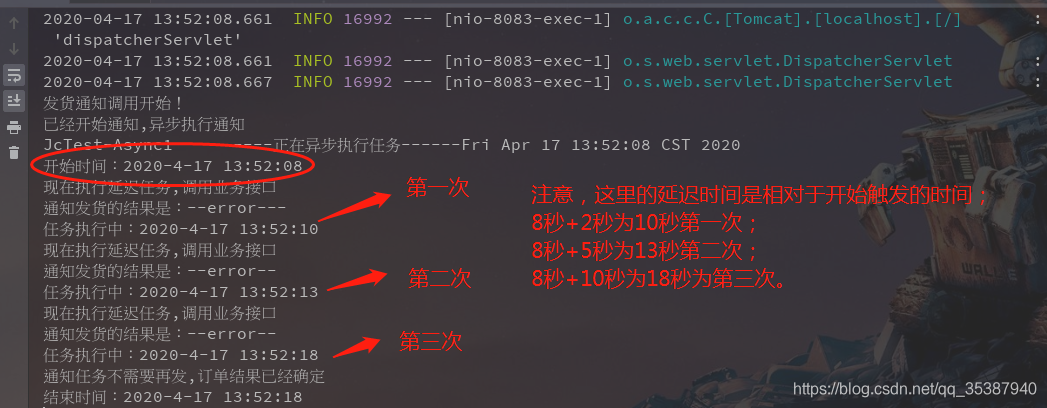
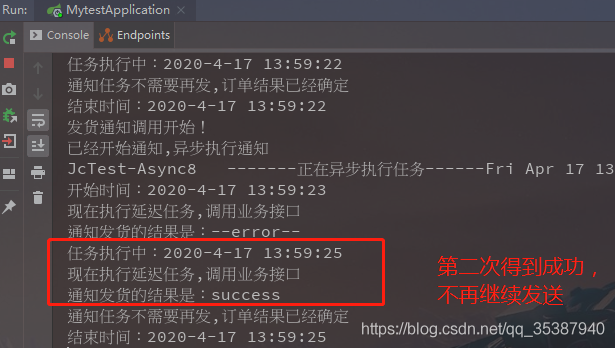
测试效果
三次发送通知都是得到失败的结果
第二次发送通知得到成功的结果
好了,该篇简单的应用介绍就到此。
最后,大家可以深入一下这个延迟队列,它不是个简单货,可以看看里面的实现代码哦(重入锁ReentrantLock,阻塞和通知的Condition等)
————————————————
版权声明:本文为CSDN博主「小目标青年」的原创文章,遵循CC 4.0 BY-SA版权协议,转载请附上原文出处链接及本声明。
原文链接:https://blog.csdn.net/qq_35387940/article/details/105578433