最近看了一些人脸识别的综述及几篇经典论文。这里简单记录下MTCNN论文及Tensorflow的复现过程。感觉人脸检测属于目标检测下的一个方向,不过由通用目标检测改为人脸检测,即多分类改为2分类,且为小目标检测。而且人脸检测还加上了关键点检测,可以依靠关键点增加召回率。主要思想还是依靠的通用目标检测,除了yolo和R-CNN系列,还多出的一个算法系列为级联网络结构,MTCNN为其中一个代表。以前讲过通用目标检测的两种方法,这次主要讲一下级联网络的MTCNN这一种方案。
附带一句我理解的阅读论文思路。首先看综述,梳理脉络。之后找到经典方法即有重大突破的几个节点,之后搜该方法的博客,明白大致意思。之后看论文,因为论文中细节更加丰富,之后结合论文,看源码,进行复现。源码是用的其他人的,非本人写的
主要参考博客https://blog.csdn.net/qq_41044525/article/details/80820255
https://zhuanlan.zhihu.com/p/31761796
MTCNN分为三个网络,P-net,R-Net,O-Net. 先来下预测部分总体流程图(我只复现了预测部分源码,不过会讲一下loss函数)。
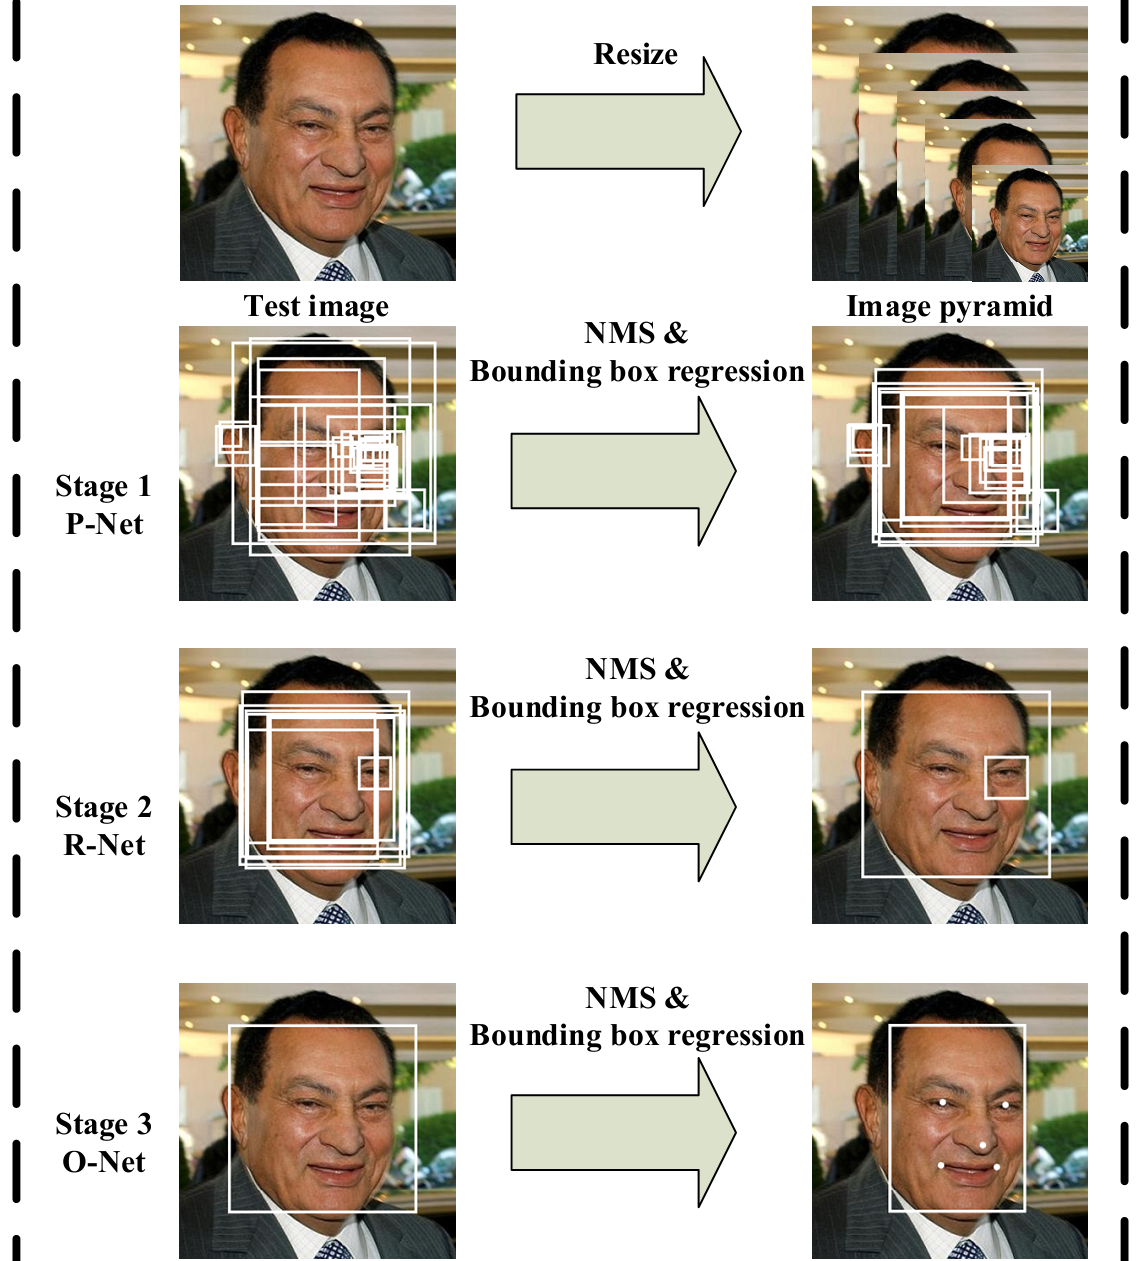
1. Stage 1
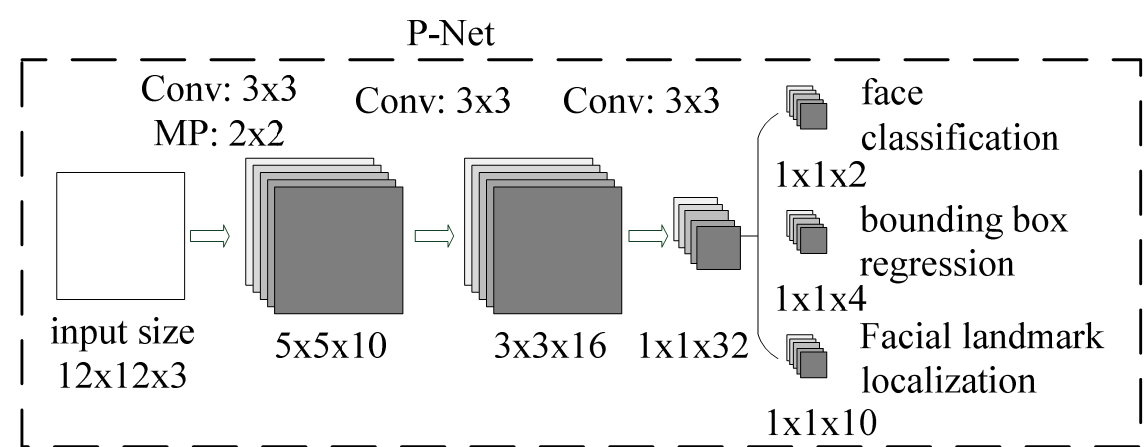
与训练时不同,单预测部分来说,输入图片非固定大小,而是将原图进行缩放,生成图像金字塔,即系列的图片,最小规格为12*12的。R-net网络结构如图,整体可看成将原图整图进行卷积(利用12*12,strides=2),之后生成预测的分类及位置偏移(无脸部关键点),网络输出中每一个1*1的方格映射到原图的感受野为12*12。由此生成系列的预测值,由此可认为输入为12*12大小。网络部分代码就不列出了,就一个网络结构,很好理解。预处理代码如下:
###作用是将原图整图输入,生成图像金字塔,输入网络中,以增加准确性。
    factor_count=0
    total_boxes=np.empty((0,9))
    points=[]
    h=img.shape[0]
    w=img.shape[1]
    minl=np.amin([h, w])
    m=12.0/minsize
    minl=minl*m
    # creat scale pyramid
    scales=[]
    while minl>=12:
        scales += [m*np.power(factor, factor_count)]
        minl = minl*factor
        factor_count += 1

    # first stage  ###将产生的最小为12*12系列的图片送入pnet网络中,获得输出的回归框。scale为缩放比例,可以用来推测在原图中的坐标
    for j in range(len(scales)):
        scale=scales[j]
        hs=int(np.ceil(h*scale))
        ws=int(np.ceil(w*scale))
        im_data = imresample(img, (hs, ws)) ###此时输入非12*12,而是每一个单元的感受野为12,这样每一块就生成了系列的预测框
        im_data = (im_data-127.5)*0.0078125
        img_x = np.expand_dims(im_data, 0)
        img_y = np.transpose(img_x, (0,2,1,3))
        out = pnet(img_y)  ###输入pnet网络中,获得输出
        out0 = np.transpose(out[0], (0,2,1,3))   ###二分类,即为人脸的概率
        out1 = np.transpose(out[1], (0,2,1,3))  ###预测框偏移回归  out0 size(1,H/12,W/12,2)
                                                                 out1 size(1,H/12,W/12,4)
##输出为第一层的预测框坐标合集,如何产生系列的预测框。
boxes, _ = generateBoundingBox(out1[0,:,:,1].copy(), out0[0,:,:,:].copy(), scale, threshold[0])
下面是genereteBoundingBox代码.函数最用为输出第一层每12*12大小的坐标,偏移,及预测得分
def generateBoundingBox(imap, reg, scale, t):   ###reg为偏移 imag为是否为正类 scal缩小的比例 t 为阈值
    # use heatmap to generate bounding boxes
    stride=2
    cellsize=12
    #### 转置计算很常见,目的只要为了方便比大小,做运算。通用目标检测中也常用,对位置坐标进行转置
    imap = np.transpose(imap)
    dx1 = np.transpose(reg[:,:,0])
    dy1 = np.transpose(reg[:,:,1])
    dx2 = np.transpose(reg[:,:,2])
    dy2 = np.transpose(reg[:,:,3])
    y, x = np.where(imap >= t)  ###筛选出大于阈值的坐标。因为每个小单元格有一个预测概率值,四个坐标偏移值 H/12,W/12,y,x可看成index
    if y.shape[0]==1:
        dx1 = np.flipud(dx1)
        dy1 = np.flipud(dy1)
        dx2 = np.flipud(dx2)
        dy2 = np.flipud(dy2)
    score = imap[(y,x)]  ###得分即为预测为人脸的概率,筛选大于阈值的预测框得分
    reg = np.transpose(np.vstack([ dx1[(y,x)], dy1[(y,x)], dx2[(y,x)], dy2[(y,x)] ])) ###预测为满足条件的人脸image预测框坐标偏移
    if reg.size==0:
        reg = np.empty((0,3))
    bb = np.transpose(np.vstack([y,x]))
    ###为何*2+1?应该为*2+4? q1,q2值应为在原图中每一个预测框的左上角,右下角坐标
    q1 = np.fix((stride*bb+1)/scale)
    q2 = np.fix((stride*bb+cellsize-1+1)/scale)
    boundingbox = np.hstack([q1, q2, np.expand_dims(score,1), reg])
    return boundingbox, reg  ##返回每一个12*12块大小的坐标及对应偏移及该块得分
之后对预测值进行修正,预修剪,产生proposal的坐标,将预测出的回归框部分提取出来,以便输入到第二个网络中。代码如下
 1        # inter-scale nms  对预测出的预测框进行nms,筛选预测框
 2         pick = nms(boxes.copy(), 0.5, 'Union')
 3         if boxes.size>0 and pick.size>0:
 4             boxes = boxes[pick,:]
 5             total_boxes = np.append(total_boxes, boxes, axis=0)
 6
 7     numbox = total_boxes.shape[0] ####筛选出的预测框个数
 8     if numbox>0:
 9         pick = nms(total_boxes.copy(), 0.7, 'Union') ###提高阈值,进一步进行nms
10         total_boxes = total_boxes[pick,:]
11         regw = total_boxes[:,2]-total_boxes[:,0]
12         regh = total_boxes[:,3]-total_boxes[:,1]
13         qq1 = total_boxes[:,0]+total_boxes[:,5]*regw
14         qq2 = total_boxes[:,1]+total_boxes[:,6]*regh
15         qq3 = total_boxes[:,2]+total_boxes[:,7]*regw
16         qq4 = total_boxes[:,3]+total_boxes[:,8]*regh
17         total_boxes = np.transpose(np.vstack([qq1, qq2, qq3, qq4, total_boxes[:,4]]))###依次为修正后的左上角,右下角坐标及该部分得分
18         total_boxes = rerec(total_boxes.copy())    ####使预测框变为正方形
19         total_boxes[:,0:4] = np.fix(total_boxes[:,0:4]).astype(np.int32) ##取整
20         dy, edy, dx, edx, y, ey, x, ex, tmpw, tmph = pad(total_boxes.copy(), w, h)  #####对坐标进行修剪,使其不超出图片大小
2. Stage 2
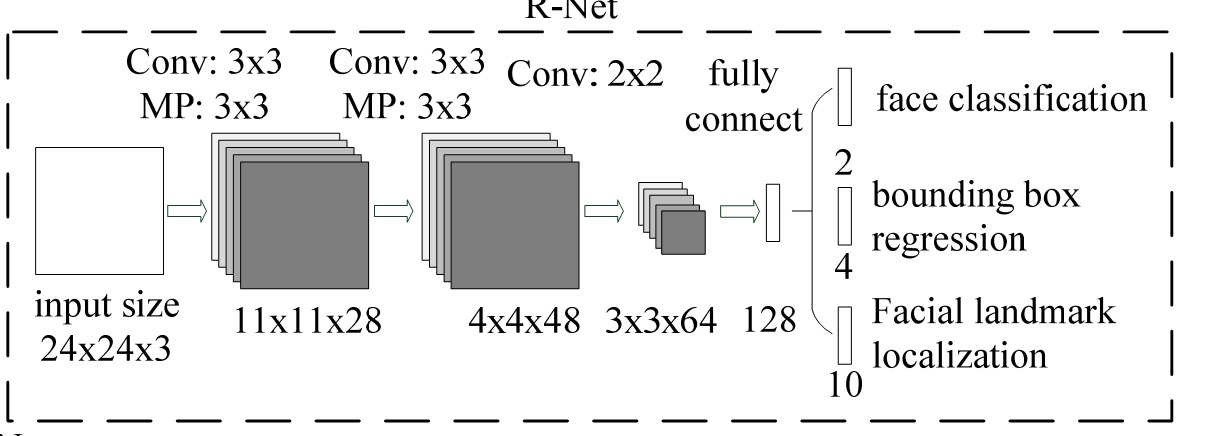
网络结构如图所示。此时的输入必须为24*24大小,输入的图像为stage1产生的porposals,抠出来,输入到stage2中。此处很像Faster-RCNN的第一步,初步筛选出纯图像,将不相关部分过滤掉。这也是级联的意义。注,预测网络输出同样只有得分与预测框坐标修正,无关键点信息。以下为代码,与第一步很相似。
 1 numbox = total_boxes.shape[0]
 2     if numbox>0: ###由第一步得出的预测框,在原图进行裁剪,resize,输入到第R-Net中
 3         # second stage
 4         tempimg = np.zeros((24,24,3,numbox))
 5         for k in range(0,numbox):
 6             tmp = np.zeros((int(tmph[k]),int(tmpw[k]),3))
 7             tmp[dy[k]-1:edy[k],dx[k]-1:edx[k],:] = img[y[k]-1:ey[k],x[k]-1:ex[k],:]
 8             if tmp.shape[0]>0 and tmp.shape[1]>0 or tmp.shape[0]==0 and tmp.shape[1]==0:
 9                 tempimg[:,:,:,k] = imresample(tmp, (24, 24))  ####将porposalsresize成24*24大小。
10             else:
11                 return np.empty()
12         tempimg = (tempimg-127.5)*0.0078125
13         tempimg1 = np.transpose(tempimg, (3,1,0,2))
14         out = rnet(tempimg1) ###输入到R-Net中得到输出
15         out0 = np.transpose(out[0])  ####预测框坐标偏置
16         out1 = np.transpose(out[1])   ######预测得分
17         score = out1[1,:]
18         ##第一步中筛选出的预测框坐标。此时的坐标为原图中的坐标偏移,并非resize之后的坐标偏置。即直接将偏移加到原图中坐标即可
19         ipass = np.where(score>threshold[1])
20         total_boxes = np.hstack([total_boxes[ipass[0],0:4].copy(), np.expand_dims(score[ipass].copy(),1)])
21         mv = out0[:,ipass[0]] ###第二步得出的偏移值
22         if total_boxes.shape[0]>0:
23             pick = nms(total_boxes, 0.7, 'Union')
24             total_boxes = total_boxes[pick,:] ###先nms,第一步中调高阈值
25             total_boxes = bbreg(total_boxes.copy(), np.transpose(mv[:,pick])) ####加偏移后的坐标
26             total_boxes = rerec(total_boxes.copy())###变为正方形
3. Stage 3
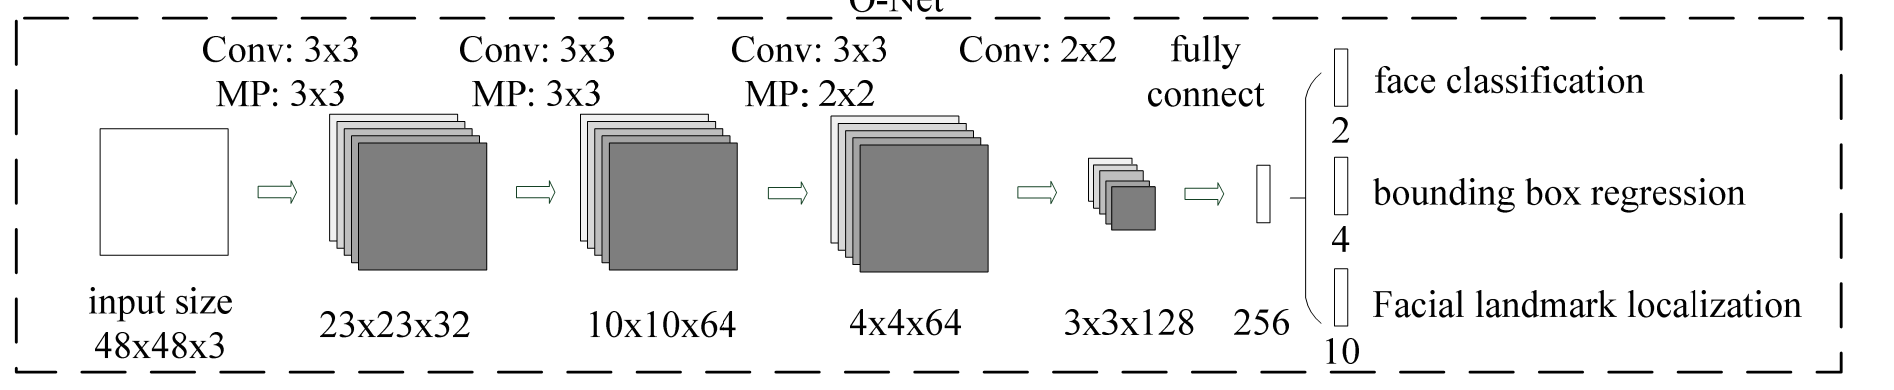
第三步网络没什么好说的,和第二步一样的流程。不过此时多了一个关键点预测。最后得到了结果。
 1 numbox = total_boxes.shape[0]
 2     if numbox>0:
 3         # third stage  ###仿照第二步,将第二步得出的预测图像输入到第三个网络中
 4         total_boxes = np.fix(total_boxes).astype(np.int32)
 5         dy, edy, dx, edx, y, ey, x, ex, tmpw, tmph = pad(total_boxes.copy(), w, h)
 6         tempimg = np.zeros((48,48,3,numbox))
 7         for k in range(0,numbox):
 8             tmp = np.zeros((int(tmph[k]),int(tmpw[k]),3))
 9             tmp[dy[k]-1:edy[k],dx[k]-1:edx[k],:] = img[y[k]-1:ey[k],x[k]-1:ex[k],:]
10             if tmp.shape[0]>0 and tmp.shape[1]>0 or tmp.shape[0]==0 and tmp.shape[1]==0:
11                 tempimg[:,:,:,k] = imresample(tmp, (48, 48))
12             else:
13                 return np.empty()
14         tempimg = (tempimg-127.5)*0.0078125
15         tempimg1 = np.transpose(tempimg, (3,1,0,2))
16         out = onet(tempimg1)
17         out0 = np.transpose(out[0])
18         out1 = np.transpose(out[1])
19         out2 = np.transpose(out[2])
20         score = out2[1,:]
21         points = out1
22         ipass = np.where(score>threshold[2])
23         points = points[:,ipass[0]]
24         total_boxes = np.hstack([total_boxes[ipass[0],0:4].copy(), np.expand_dims(score[ipass].copy(),1)])
25         mv = out0[:,ipass[0]]
26
27         w = total_boxes[:,2]-total_boxes[:,0]+1
28         h = total_boxes[:,3]-total_boxes[:,1]+1
29         points[0:5,:] = np.tile(w,(5, 1))*points[0:5,:] + np.tile(total_boxes[:,0],(5, 1))-1
30         points[5:10,:] = np.tile(h,(5, 1))*points[5:10,:] + np.tile(total_boxes[:,1],(5, 1))-1
31         if total_boxes.shape[0]>0:
32             total_boxes = bbreg(total_boxes.copy(), np.transpose(mv))
33             pick = nms(total_boxes.copy(), 0.7, 'Min')
34             total_boxes = total_boxes[pick,:]
35             points = points[:,pick]
36
37     return total_boxes, points  ####得出最终的预测值
此处只有预测部分的代码,在训练时,有一个与其他目标检测不同的地方在于,有5个人关键点检测,也计入了损失函数中,以此进行训练,可增加识别的准确性。
来勉强解读一下。。这部分看的很粗略。
1. 脸分类损失函数。交叉熵损失函数

2. 预测框损失函数。 平方损失
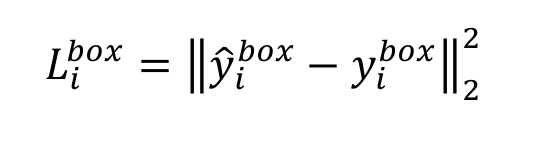
3. 关键点损失函数。同样为平方损失

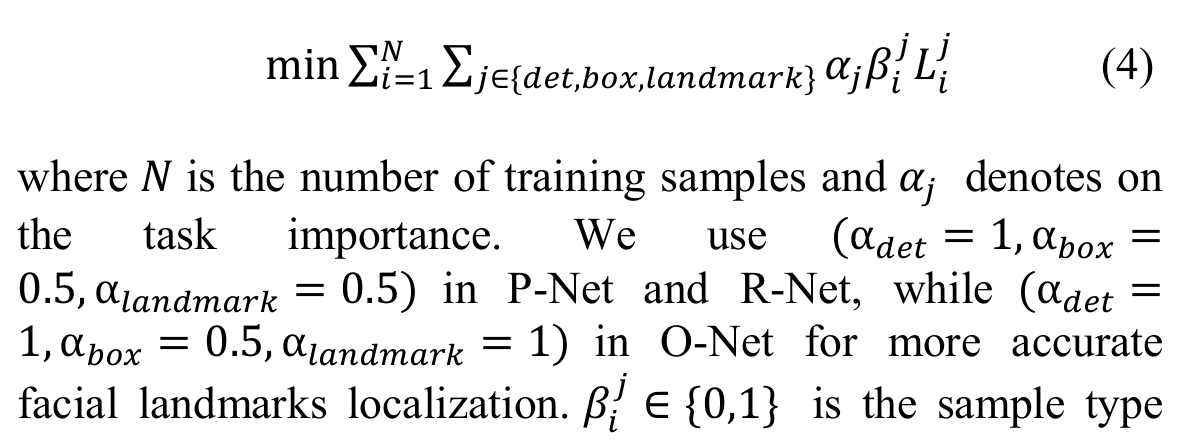
3. 综合训练,整体损失函数。每部分网络的权重不同。
最后再添加一部分内容,即人脸对齐与识别.看到一段别人代码,根据眼睛记性对齐。我不太理解为什么这么做,因为opencv就有原装函数可以做对齐,不知道为何还要用PIL丽丽的函数。具体过程就是通过使两个眼睛在一条水平线上,从而对图像进行仿射变换,还有进一步对图像进行裁剪。复代码
# -*- coding: utf-8 -*-
"""
Created on Thu Jan  1 16:09:32 2015
@author: crw
"""
# 参数含义:
#  CropFace(image, eye_left, eye_right, offset_pct, dest_sz)
# eye_left is the position of the left eye
# eye_right is the position of the right eye
# 比例的含义为:要保留的图像靠近眼镜的百分比,
# offset_pct is the percent of the image you want to keep next to the eyes (horizontal, vertical direction)
# 最后保留的图像的大小。
# dest_sz is the size of the output image
#
import sys,math,Image

 # 计算两个坐标的距离
def Distance(p1,p2):
      dx = p2[0]- p1[0]
      dy = p2[1]- p1[1]
      return math.sqrt(dx*dx+dy*dy)

 # 根据参数,求仿射变换矩阵和变换后的图像。
def ScaleRotateTranslate(image, angle, center =None, new_center =None, scale =None, resample=Image.BICUBIC):
      if (scale is None)and (center is None):
            return image.rotate(angle=angle, resample=resample)
      nx,ny = x,y = center
      sx=sy=1.0
      if new_center:
            (nx,ny) = new_center
      if scale:
            (sx,sy) = (scale, scale)
      cosine = math.cos(angle)
      sine = math.sin(angle)
      a = cosine/sx
      b = sine/sx
      c = x-nx*a-ny*b
      d =-sine/sy
      e = cosine/sy
      f = y-nx*d-ny*e
      return image.transform(image.size, Image.AFFINE, (a,b,c,d,e,f), resample=resample)
 # 根据所给的人脸图像,眼睛坐标位置,偏移比例,输出的大小,来进行裁剪。
def CropFace(image, eye_left=(0,0), eye_right=(0,0), offset_pct=(0.2,0.2), dest_sz = (70,70)):
      # calculate offsets in original image 计算在原始图像上的偏移。
      offset_h = math.floor(float(offset_pct[0])*dest_sz[0])
      offset_v = math.floor(float(offset_pct[1])*dest_sz[1])
      # get the direction  计算眼睛的方向。
      eye_direction = (eye_right[0]- eye_left[0], eye_right[1]- eye_left[1])
      # calc rotation angle in radians  计算旋转的方向弧度。
      rotation =-math.atan2(float(eye_direction[1]),float(eye_direction[0]))
      # distance between them  # 计算两眼之间的距离。
      dist = Distance(eye_left, eye_right)
      # calculate the reference eye-width    计算最后输出的图像两只眼睛之间的距离。
      reference = dest_sz[0]-2.0*offset_h
      # scale factor   # 计算尺度因子。
      scale =float(dist)/float(reference)
      # rotate original around the left eye  # 原图像绕着左眼的坐标旋转。
      image = ScaleRotateTranslate(image, center=eye_left, angle=rotation)
      # crop the rotated image  # 剪切
      crop_xy = (eye_left[0]- scale*offset_h, eye_left[1]- scale*offset_v)  # 起点
      crop_size = (dest_sz[0]*scale, dest_sz[1]*scale)   # 大小
      image = image.crop((int(crop_xy[0]),int(crop_xy[1]),int(crop_xy[0]+crop_size[0]),int(crop_xy[1]+crop_size[1])))
      # resize it 重置大小
      image = image.resize(dest_sz, Image.ANTIALIAS)
      return image

if __name__ =="__main__":
      image =  Image.open("/media/crw/DataCenter/Dataset/CAS-PEAL-R1/POSE/000001/MY_000001_IEU+00_PD-22_EN_A0_D0_T0_BB_M0_R1_S0.tif")
      leftx =117
      lefty=287
      rightx=187
      righty= 288
      CropFace(image, eye_left=(leftx,lefty), eye_right=(rightx,righty), offset_pct=(0.1,0.1), dest_sz=(200,200)).save("test_10_10_200_200.jpg")
      CropFace(image, eye_left=(leftx,lefty), eye_right=(rightx,righty), offset_pct=(0.2,0.2), dest_sz=(200,200)).save("test_20_20_200_200.jpg")
      CropFace(image, eye_left=(leftx,lefty), eye_right=(rightx,righty), offset_pct=(0.3,0.3), dest_sz=(200,200)).save("test_30_30_200_200.jpg")
      CropFace(image, eye_left=(leftx,lefty), eye_right=(rightx,righty), offset_pct=(0.4,0.4), dest_sz=(200,200)).save("test_40_40_200_200.jpg")
      CropFace(image, eye_left=(leftx,lefty), eye_right=(rightx,righty), offset_pct=(0.45,0.45), dest_sz=(200,200)).save("test_45_45_200_200.jpg")
      CropFace(image, eye_left=(leftx,lefty), eye_right=(rightx,righty), offset_pct=(0.2,0.2)).save("test_20_20_70_70.jpg")
---------------------
作者:RiweiChen
来源:CSDN
原文:https://blog.csdn.net/chenriwei2/article/details/42320021
版权声明:本文为博主原创文章,转载请附上博文链接!
图中较难理解的函数为image.transform用来做仿射变换的,如果不理解的话可参考这个https://stackoverflow.com/questions/17056209/python-pil-affine-transformation
附上opencv自带用来做仿射变换的函数 ,虽然粗糙,但应该够用了,不用上面那么麻烦的代码。封装好的函数好处就是可直接算出坐标变换矩阵。如何使用参考
https://blog.csdn.net/a352611/article/details/51418178
RotateMatrix = cv2.getRotationMatrix2D(center=(Img.shape[1]/2, Img.shape[0]/2), angle=90, scale=1)
RotImg = cv2.warpAffine(Img, RotateMatrix, (Img.shape[0]*2, Img.shape[1]*2))
最后,说一下人脸识别。 人脸识别即判断两个图片是不是同一个人。具体过程分三部分:
1. 采样,将图片输入到MTCNN中,得到人脸框,进行对齐,之后裁剪。
2. 将第一步裁剪出的图像输入到网络中,一般为Inception网络, 得到输出向量。
3.有两种处理结果方式,一种是三元损失函数,即 若 x1,x2为同一个人的,y为另一个人的,则 (x1-x2)-(x1-y)必然是小于0的,损失为0,可看成计算两个向量的相似度。这种方法大大减少了计算过程,需要的数据量也少。另为一种为聚类,也是通过计算两个向量之间的具体来计算损失的。一般采用第一种方法。
说到这里,我提下自己的理解。对于人脸对齐,和人脸识别,其实主要用到了矩阵变换的知识,这块要把矩阵的意义弄得比较明白。可参考西瓜书的聚类章节,对各种距离解释的很清楚,说到底就是矩阵变化,纯数学计算,没什么新内容。时间充裕可以看一下,不然会用那几个函数就行了,opencv及python库太多了