在上篇文章的最后,我们描述了CV(条件变量)的定义和使用方式,也曾说过Monitor事实上是基于CV的。那么,Monitor到底是怎样一种机制呢?
其实,与其说Monitor是一种机制,倒不如说它是一种风格(style),因为它并不是一种新的同步机制。Monitor所做的,就是把mutex和CV封装在一个对象里面,来保护这个对象的共有数据的访问,如下图所示:
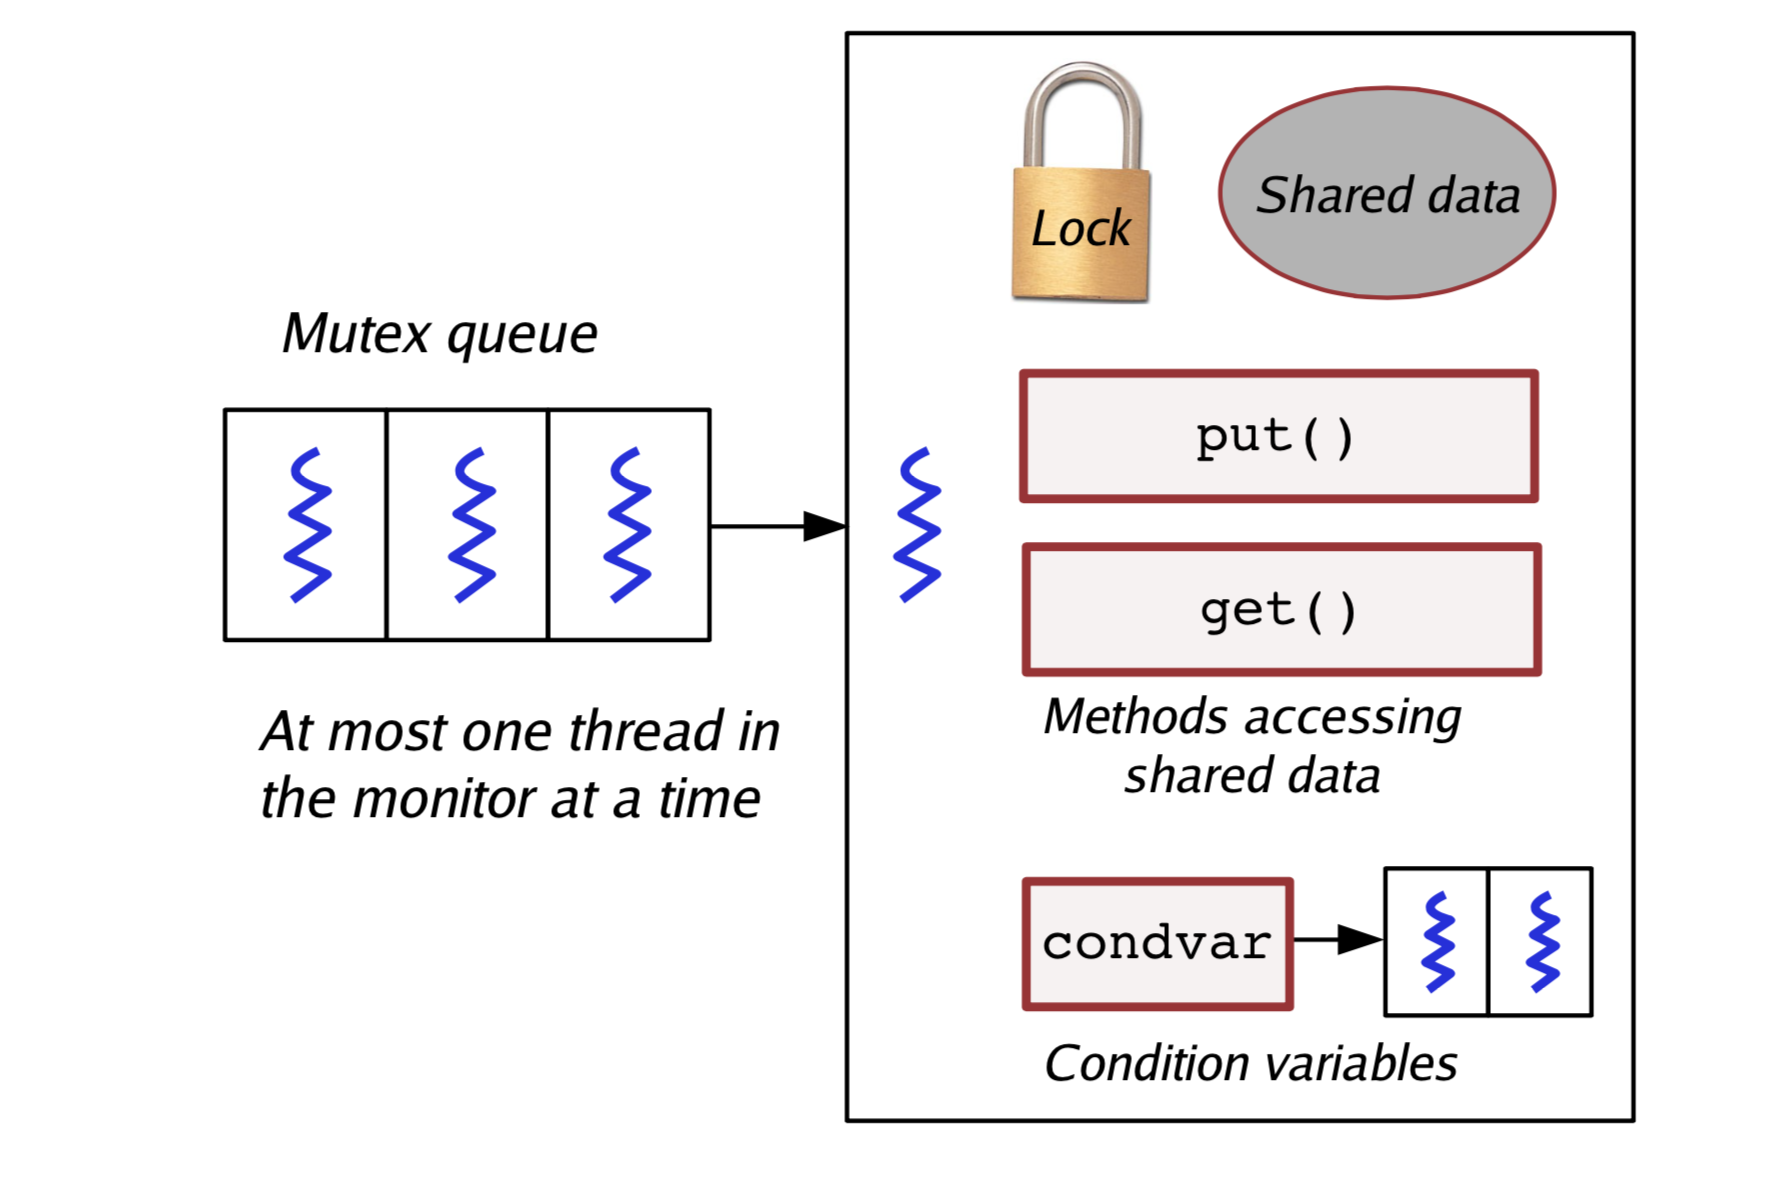
其中Lock控制线程的进入,保证只有一个对象能拿到锁;而CV负责线程的等待、唤醒等操作;put和get是对shared data的一组访问方法。这种形式就是Monitor。
看到这个模型,你可能马上就想到,这不就是Java里面 最常见的线程间同步机制么?没错,就是这样。Java在Object类提供了一套方法:wait/notify/notifyAll,并且通过在成员方法钱加synchronized方法来实现mutex,是典型的Monitor。而且,可以看出,Monitor是Java最推荐使用的线程同步方式(使用关键字的形式和把wait/signal/broadcast实现在Object中,相比之下,信号量类就放在java.util.concurrent包里)。
使用Monitor的好处在于,mutex和CV对用户都是透明的。用户只需知道,处于synchronized保护下的代码都是互斥的,而线程在对象上进行等待或着被唤醒。所以,我们可以很方便的改写前一篇文章中,使用pthread的C程序。
public class Counter {

    private int count;

    public Counter(int count) {
        this.count = count;
    }
    public int get() {
        return this.count;
    }
    public void incr() {
        this.count++;
    }
}

class Checker implements Runnable {

    private Counter counter;

    public Checker(Counter c) {
        this.counter = c;
    }

    @Override
    public void run() {

        synchronized (counter) {
            System.out.println("The Checker get the lock and the count is " + counter.get());
            while(counter.get() < 10)
            try {
                counter.wait();
                System.out.println("The Checker is notified and re-get the lock, now the count is " + counter.get());
            } catch (InterruptedException e) {
                e.printStackTrace();
            }
        }
    }
}

class Increaser implements Runnable {

    private Counter counter;

    public Increaser(Counter c) {
        this.counter = c;
    }
    @Override
    public void run() {

        while (counter.get() < 100) {
            synchronized (counter) {
                System.out.println("Increaser get the lock and the count is "+ counter.get());
                counter.incr();
                if (counter.get() >= 10) {
                    counter.notifyAll();
                }
            }
        }
    }
}
在main函数里面开启一个Checker和一个Increaser后运行,观察打印结果,会发现一个很有趣的现象,Checker的第二次打印,即在wait被唤醒之后打印的count并不是10,也就是说当Counter==10后,Increaser调用了notifyAll,但是Checker并没有恢复执行。为什么呢?原因我们在上篇文章中也提到过。notifyAll并不会释放锁,而是当Increaser离开synchronized代码块后才会释放,但是由于Increaser会循环执行(代码里是执行100次),它会和即将唤醒的Checker再次竞争mutex锁,所以并不能保证Checker会立即得到锁醒来,甚至,很多时候,Increaser更易得到mutex锁,使得checker醒来时counter远大于10。在我的实验中,有几次运行甚至是100,即Increaser执行完了,checker才得到mutex锁。
解决这个问题也很简单,就是在notifyAll后面加上break,这样,Increaser会跳出循环,并且释放锁。当然,这是一个比较特殊的例子。更多的时候,比如说Increaser需要在Checker做完之后再处理一些任务呢?显然,我们可以在Increaser调用notifyAll之后,调用wait,让其释放锁并等待,然后在Checker恢复执行后,再唤醒Increaser。如此往复下去,我们可以实现让线程交叉执行,甚至然照一个指定的序列执行。关于这方面,可以看下《Thinking in Java》中,线程那一章一个洗车抛光的例子。
讲到这里,相信大家对这三种机制已经有了一个大概的认识了,剩下的就得在实际工作中去体会和总结了,实践出真知嘛。