- 01-JQuery介绍
- 02-jQuery文件引入和加载的区别
- 03-jQuery的基础选择器
- 04-jQuery的层级选择器
- 05-jQuery的基本过滤选择器
- 06-jQuery的属性选择器
- 07-jQuery的筛选选择器
- 08-jQuery的对象和DOM对象的转换
- 09-jQuery效果-显示和隐藏
- 10-jQuery的效果-slide
- 11-jQuery的效果-fade
- 12-jQuery的效果-animate
- 13-右下角弹出小广告
- 14-jQuery的属性操作-attr和prop
- 15-jQuery的属性操作-class和值操作
- 16-操作input中的value值
- 17-jQuery文档操作-插入节点
- 18-jQuery文档操作-复制、替换和删除
- 19-jQuery的位置属性
- 20-仿淘宝导航栏案例
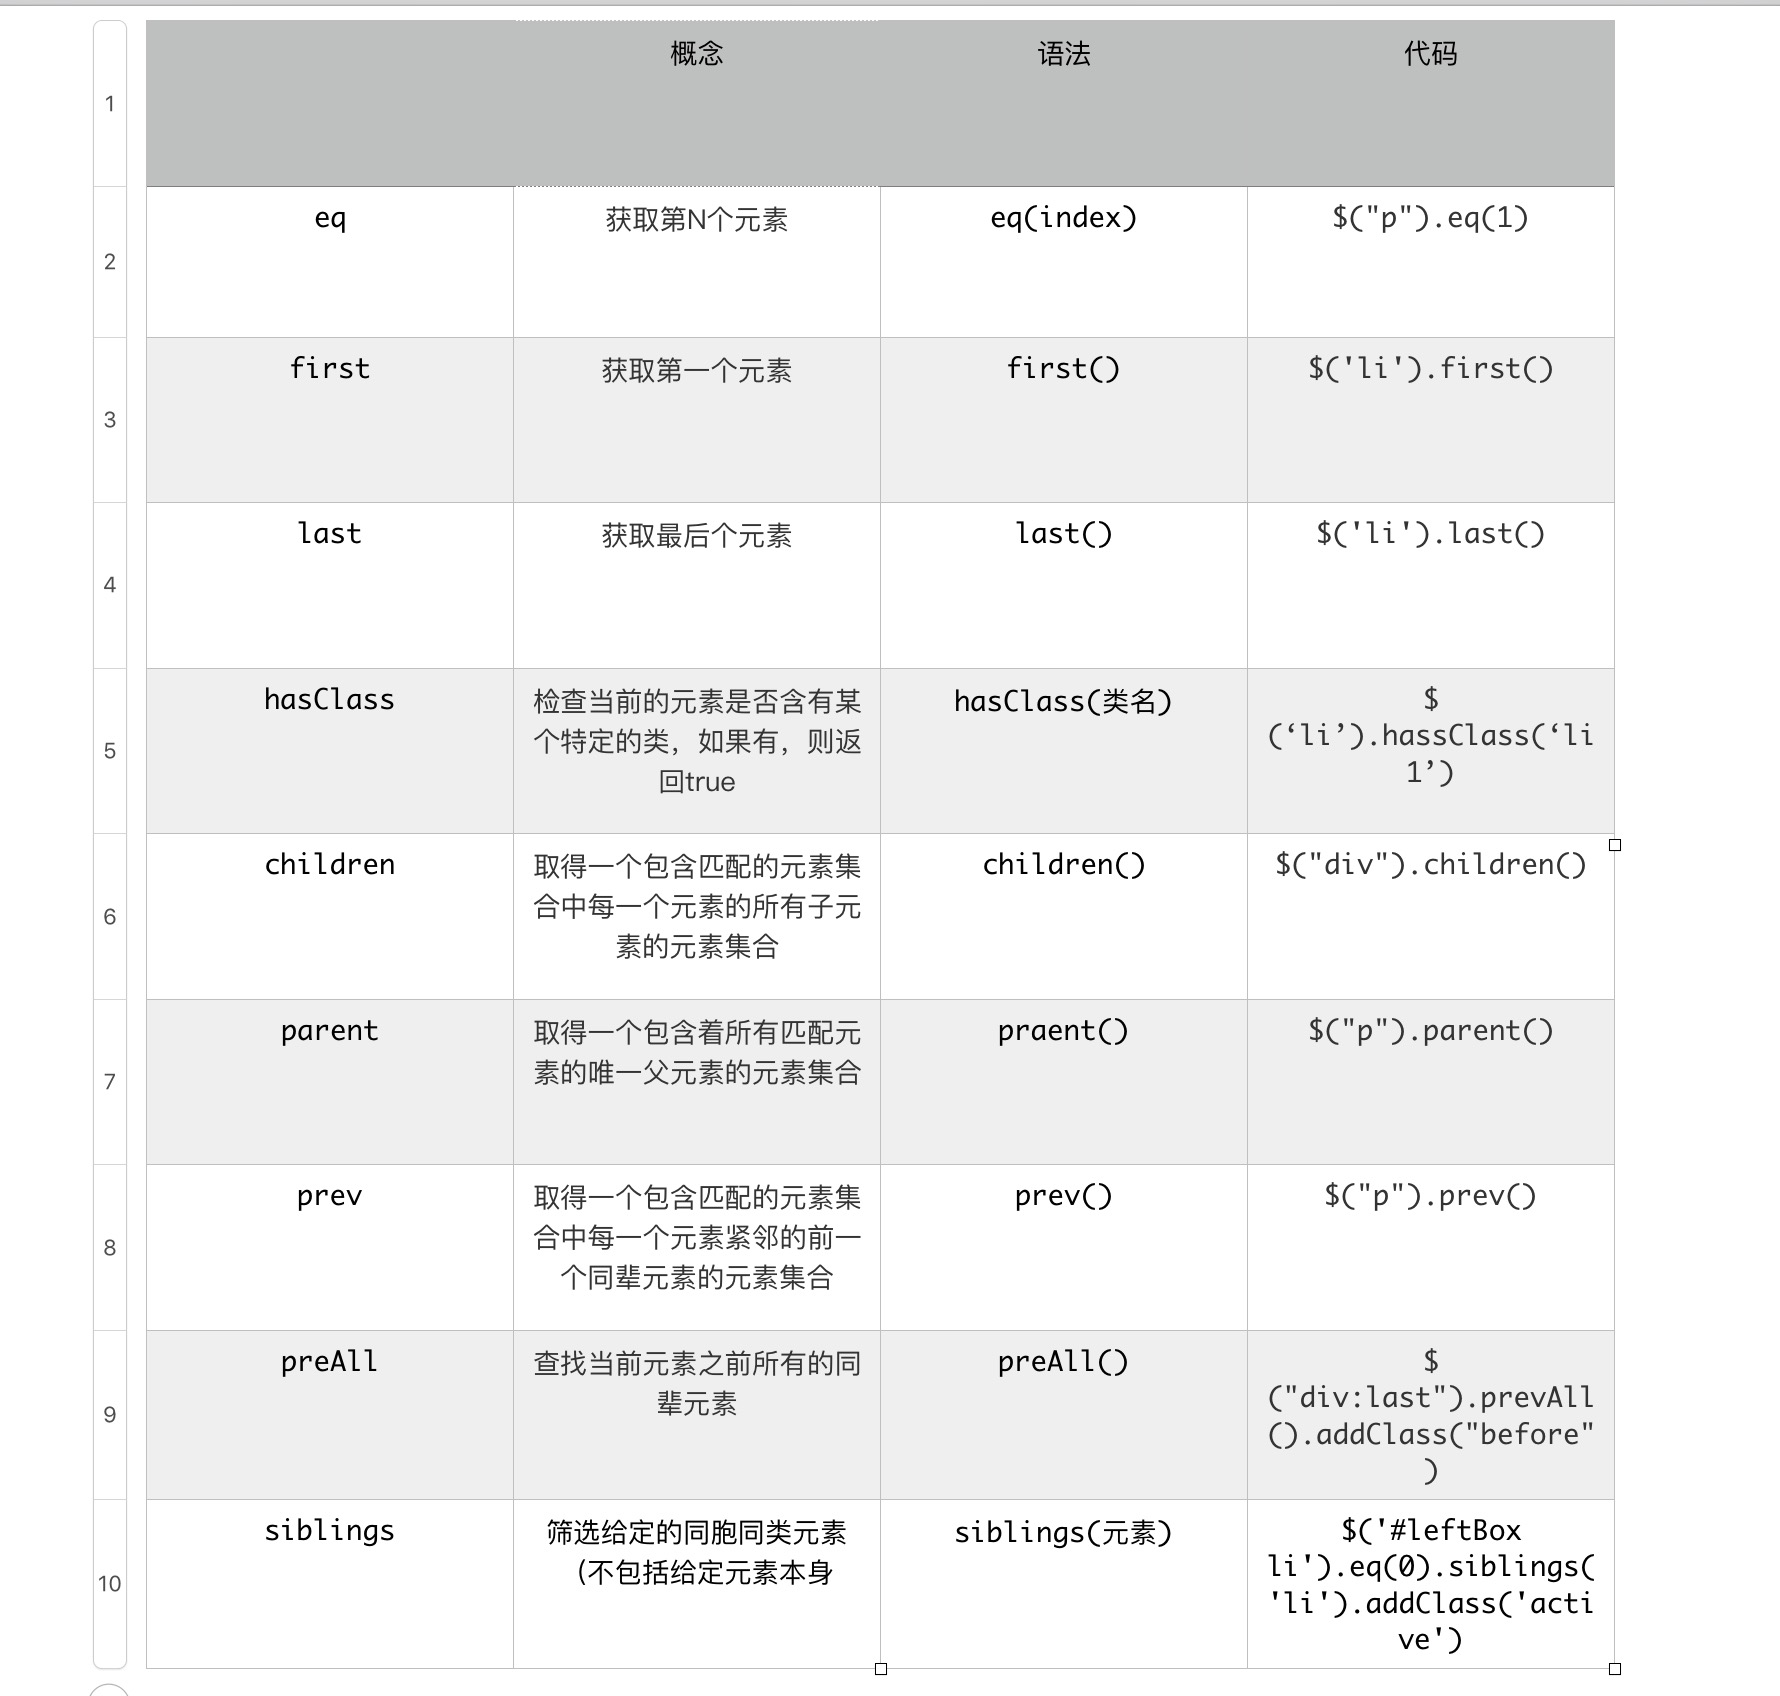
- 21-jQuery的筛选方法
- 22-选项卡嵌套
- 23-小米官方部分案例
- 24-焦点式轮播图
- 25-动态实现轮播图
- 26-事件流
- 27-jQuery事件对象和事件冒泡
- 28-jQuery事件的绑定和移除
- 29-自定义事件和事件代理
- 30-jQuery的鼠标事件一
- 31-jQuery的鼠标事件二
- 32-JQuery的表单事件
- 33-jQuery的ajax技术
- 34-Bootstrap介绍和引入
- 35-相应式原理
- 36-BootStrap的栅格系统介绍
- 37-BootStrap的栅格系统使用
- 38-BootStrap的css全局样式一
- 39-BootStrap的css全局样式二
- 40-BootStrap的组件使用一
- 41-BootStrap的组件使用二
- 42-BootStrap插件介绍
01-jQuery介绍
1、jQuery官网;
write less,do more;

<!DOCTYPE html>
<html lang="en">
<head>
    <meta charset="UTF-8">
    <title>01-jquery的介绍</title>
    <style type="text/css">
        div{
            width: 100%;
            height: 100px;
            margin: 10px 0px 0px 0px;
            display: none;
            background-color: red;
        }
    </style>
</head>
<body>
    <button id="btn">展示</button>
    <div></div>
    <div></div>
    <div></div>
    <div></div>
</body>
    <script src="http://libs.baidu.com/jquery/2.0.0/jquery.min.js">    </script>
    <script type="text/javascript">
            /*单独书写JavaScript的痛楚:
            1、书写繁琐,代码量大;
            2、代码复杂;
            3、动画,开启定时器,小心定时器的清除,各种操作和处理事件,不好实现;
            4、浏览器的兼容性;

            //jQuery解决了以上痛点;
            */
//            window.onload = function(){
//                var oBtn = document.getElementsByTagName('button')[0];
//                var ODivs = document.getElementsByTagName('div');
//
//                oBtn.onclick = function(){
//                    for(var i = 0;i < ODivs.length;i++){
//                        ODivs[i].style.display = 'block';
//                        ODivs[i].innerHTML = 'div展示了';
//                    }
//                }
//
//            }

            //jQuery实现;
            $(function(){
                $('#btn').click(function(){
                    $('div').css('display','block');
                    $('div').html('div展示了')
                })
            })
        </script>
</html>
02-jQuery文件引入和加载的区别
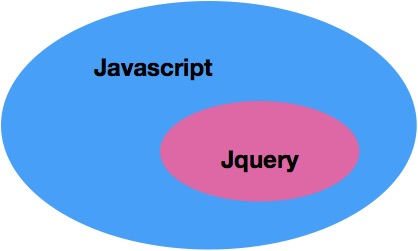
1、JavaScript和jQuery的区别;
- Javascript是一门编程语言,我们用它来编写客户端浏览器脚本;
- jQuery是javascript的一个库,包含多个可重用的函数,用来辅助我们简化javascript开发;
- jQuery能做的javascipt都能做到,而javascript能做的事情,jQuery不一定能做到;
注意:一般情况下,是库的文件,该库中都会抛出来构造函数或者对象,如果是构造函数,那么使用new关键字创建对象,如果是对象直接调用属性和方法;
2、DOM文档的加载步骤;
1、解析HTML结构;
2、加载外部脚本和样式表;
3、解析并执行脚本代码;
4、DOM树构建完成;
5、加载图片等外部文件;
6、页面加载完毕;
3、执行时间不同;
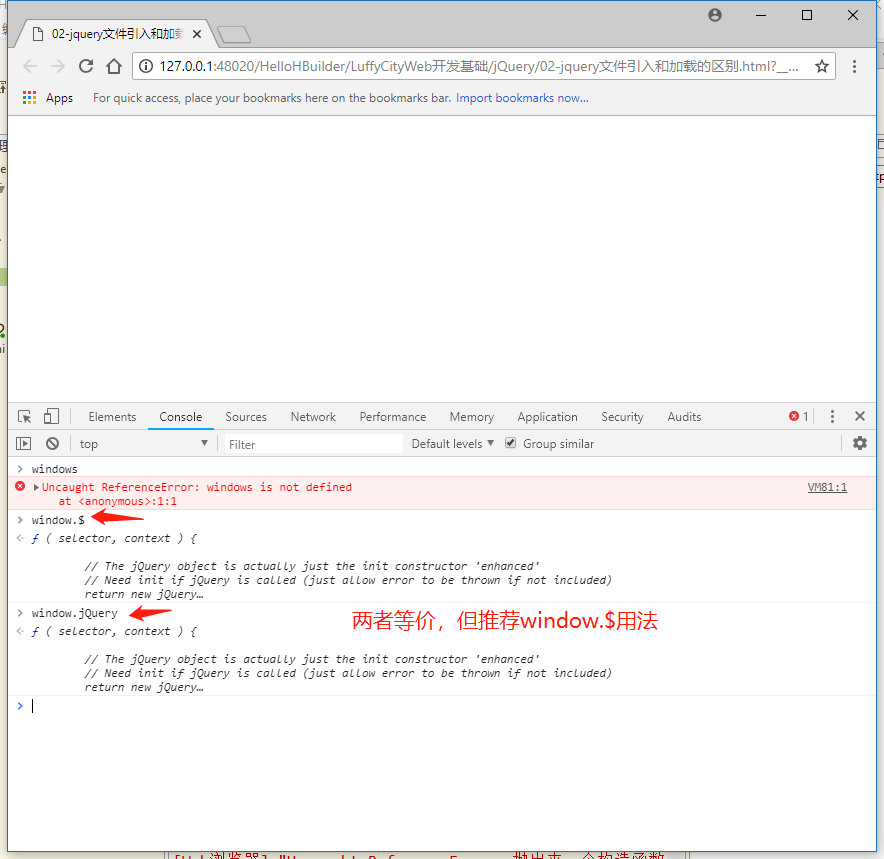
1、window.onload()必须等到页面内包括图片的所有元素加载完毕后才能执行;
2、$(document).ready()是DOM结构绘制完成后就执行,不必等到加载完毕;
4、编写个数不同;
1、window.onload不能同时编写多个,如果有多个window.onload方法,只会执行一个;
2、$(document).ready()可以同时编写多个,并且都可以得到执行;
5、简化写法不同;
1、window.onload没有简化写法;
2、$(document).ready(function(){})可以简化写成$(function(){});
<!DOCTYPE html>
<html lang="en">
<head>
    <meta charset="UTF-8">
    <title>02-jquery文件引入和加载的区别</title>
    <script type="text/javascript">
        //如果不书写window.onload()代码的执行顺序,是从上到下;
        window.onload = function(){
        var oDiv = document.getElementById('box');
        console.log(oDiv)
        }


    </script>
    <style type="text/css">

    </style>
</head>
<body>
    <div id="box">

    </div>
</body>
<!--引入jQuery库文件的方式-->
    //如果没有引入jQuery,就会报错:$ is not defined;
    <script src="jquery-3.3.1.js" type="text/javascript" charset="utf-8"></script>
    <script type="text/javascript">
        /*jQuery是js的一个库文件,既然是个库文件,那么就会
        抛出来一个构造函数或者对象;
        */

        //书写jQuery的方式:入口函数
        $(document).ready(function(){
            alert(111)
        })


        //jQuer的简便写法;
        $(function(){
            alert('cuixiaozhao')
        })
    </script>
</html>
03-jQuery的基础选择器
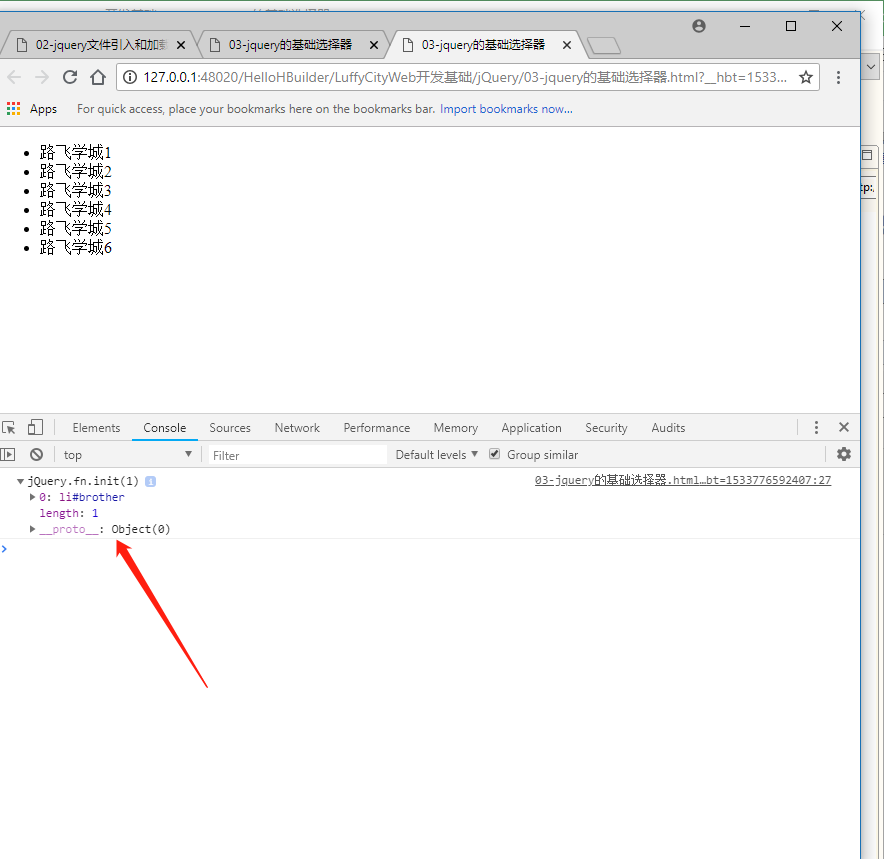
1、jQuery下常见选择器;
- ID选择器;
- 标签选择器;
- 类选择器;
- 通配符选择器;
<!DOCTYPE html>
<html lang="en">
<head>
    <meta charset="UTF-8">
    <title>03-jquery的基础选择器</title>
    <style type="text/css">
        /*
        #brother{
            color:red;
            font-size:24px;
        }
         */
    </style>
</head>
<body>
    <ul>
        <li id="brother">路飞学城1</li>
        <li><a href="https://www.luffycity.com">路飞学城2</a></li>
        <li class="li3">路飞学城3</li>
        <li>路飞学城4</li>
        <li>路飞学城5</li>
        <li>路飞学城6</li>
    </ul>
</body>
    <script src="jquery-3.3.1.js" type="text/javascript" charset="utf-8"></script>
    <script type="text/javascript">
        //注意:使用jQuery的时候,要有入口函数-回调函数

        $(document).ready(function(){
            //基础选择器;
            //1、id选择器;
            console.log($('#brother'))
        })
        $('#brother').css('color','yellow');

        //2、标签选择器;

        //设置一个值;
        $('a').css('color','green');
        //设置多个值的时候,使用key-value形式赋值;
        $('a').css({'color':'green','font-size':'24px'});

        //3、类选择器;
        $('.li3').css('background','pink');

        //4、通配符选择器;
        console.log($('*'));
        //清空整个界面的DOM元素;
//        $('*').html('')
    </script>
</html>
04-jQuery的层级选择器
1、jQuery中的层级选择器初识;
- 后代选择器;
- 子代选择器;
- 毗邻选择器;
- 兄弟选择器;
- :first 获取第一个元素;
- :last 获取最后一个元素;
- :eq(索引值) 通过索引值获取元素;
<!DOCTYPE html>
<html lang="en">
<head>
    <meta charset="UTF-8">
    <title>04-jquery的层级选择器</title>
    <style type="text/css">
        /*
        #brother{
            color:red;
            font-size:24px;
        }
         */
    </style>
</head>
<body>
    <ul>
        <li id="brother">路飞学城1</li>
        <li><a href="https://www.luffycity.com">路飞学城2</a></li>
        <li class="li3">路飞学城3</li>
        <li>路飞学城4</li>
        <li>路飞学城5</li>
        <li>路飞学城6</li>
    </ul>
    <div id="box">
        <p id="father">天王盖地虎</p>
        <p>我是你老母</p>
        <p>宝塔镇河妖</p>
        <p>蘑菇放辣椒</p>
        <div id="box2">
            <p>小鸡炖蘑菇</p>
        </div>
    </div>
</body>
    <script src="jquery-3.3.1.js" type="text/javascript" charset="utf-8"></script>
    <script type="text/javascript">
        //注意:使用jQuery的时候,要有入口函数-回调函数
        $(document).ready(function(){
            //1、后代选择器 div p;
            $('#box p').css('color','red');

            //2、子代选择器 div  P;
//            $('#box2>p ').css('color','purple');
            $('#box>p ').css('color','purple');

            //3、毗邻选择器 :匹配所有紧挨着选中元素的元素
//            $('#father+p').css('font-size','30px');
            $('#father+p').css({'font-size':'30px','color':'blue'});

            //4、兄弟选择器;
            $('#father~p').css('background','greenyellow');
            //5、获取第一个元素;
            $('li:first').css('font-size','20px');
            //6、获取最后一个元素;
            $('li:last').css('font-size','30px');
            //根据索引值选取;
            $('li:eq(3)').css('color','deeppink');
        })
    </script>
</html>
05-jQuery的基本过滤选择器
1、jQuery中的过滤选择器;
- :first;
- :last:
- odd;
- even;
- eq(1);
- lt(2);
- gt(3);
<!DOCTYPE html>
<html lang="en">
<head>
    <meta charset="UTF-8">
    <title>05-jquery的基本过滤选择器</title>
    <style type="text/css">
        /*
        #brother{
            color:red;
            font-size:24px;
        }
         */
    </style>
</head>
<body>
    <ul>
        <li id="brother">路飞学城1</li>
        <li><a href="https://www.luffycity.com">路飞学城2</a></li>
        <li class="li3">路飞学城3</li>
        <li>路飞学城4</li>
        <li>路飞学城5</li>
        <li>路飞学城6</li>
    </ul>
    <div id="box">
        <p id="father">天王盖地虎</p>
        <p>我是你老母</p>
        <p>宝塔镇河妖</p>
        <p>蘑菇放辣椒</p>
        <div id="box2">
            <p>小鸡炖蘑菇</p>
        </div>
    </div>
</body>
    <script src="jquery-3.3.1.js" type="text/javascript" charset="utf-8"></script>
    <script type="text/javascript">
        //注意:使用jQuery的时候,要有入口函数-回调函数
        $(document).ready(function(){
        //1、获取第一个:first;获取最后一个:last;

        //2、奇数
        $('li:odd').css('color','red');
        //3、偶数
        $('li:even').css('color','green');
        })

        //选中索引值为1的元******
        $('li:eq(1)').css('font-size','20px');
        //小于索引值2
        $('li:lt(2)').css('font-size','30px');
        //大于索引值3
        $('li:gt(3)').css('font-size','20px');
    </script>
</html>
06-jQuery的属性选择器
1、jQuery中的属性选择器;
<!DOCTYPE html>
<html lang="en">
<head>
    <meta charset="UTF-8">
    <title>06-jquery的属性选择器</title>
    <style type="text/css">

    </style>
</head>
    <div id="box">
        <h2 class="title">属性选择器</h2>
        <!--<p class="p1">我是一个段落</p>-->
        <ul>
            <li id="li1">分手应该体面</li>
            <li id="li2" class="what">分手应该体面</li>
            <li class="what">分手应该体面</li>
            <li class="what">分手应该体面</li>
        </ul>
        <form action="" method="post">
            <input name="username" type="text" value="1" checked="checked" />
            <input name="username111" type="text" value="1"/>
            <input name="username222" type="text" value="1"/>
            <input name="username333" type="text" value="1"/>

            <button class="btn-default">按钮1</button>
            <button class="btn-info">按钮2</button>
            <button class="btn-success">按钮3</button>
            <button class="btn-danger">按钮4</button>
        </form>
    </div>
<body>

</body>
    <script src="jquery-3.3.1.js" type="text/javascript" charset="utf-8"></script>
    <script type="text/javascript">
        $(function(){
            //1、标签名[属性名]查找所有含有id属性的该标签名的元素;
            $('li[id]').css('color','red');
            //2、匹配给定属性是what值的元素;
            $('li[class=what]').css('font-size','20px');
            //3、匹配给定属性不是what值的元素;
            $('li[class!=what]').css('font-size','10px');
            //4、匹配给定的属性值以某些值开始的元素;
            $('input[name^=username]').css('background','green');
            //5、匹配给定的属性值以某些值结尾的元素;
            $('input[name$=22]').css('background','blue');
            //6、匹配给定的属性包含某些值的属性;
            $('button[class*=btn]').css('background','gold');

        })
    </script>
</html>
07-jQuery的筛选选择器
1、jQuery的筛选选择器;
<!DOCTYPE html>
<html lang="en">
<head>
    <meta charset="UTF-8">
    <title>07-jquery的筛选选择器</title>
    <style type="text/css">

    </style>
</head>
<body>
    <div id="box">
        <p class="p1">
            <span>我是第1个span标签</span><br>
            <span>我是第2个span标签</span><br>
            <span>我是第3个span标签</span><br>
            <span>我是第4个span标签</span><br>
        </p>
        <button>按钮</button>
    </div>
    <ul>
        <li class="list">2</li>
        <li>3</li>
        <li>4</li>
        <li>5</li>
    </ul>
</body>
    <script src="jquery-3.3.1.js" type="text/javascript" charset="utf-8"></script>
    <script type="text/javascript">
        //获取第n个元素,数值从0开始;
        $('span').eq(1).css('color','red');

        //获取第1个元素,:first   :last;  点语法:包含get方法和set 方法;
        $('span').first().css('color','greenyellow');
        $('span').last().css('color','pink');
        //选取父级元素;
        $('span').parent('.p1').css({'300px',height:'300px',background:'black'});

        //.siblings()选取所有的兄弟元素;
        $('.list').siblings('li').css('color','red');
        //查找所有后代元素;
        $('div').find('button').css('background','yellow');
    </script>
</html>
08-jQuery的对象和DOM对象的转换
1、jQuery和DOM的相互转换;
<!DOCTYPE html>
<html lang="en">
<head>
    <meta charset="UTF-8">
    <title>08-jquery对象和DOM对象的转换</title>
    <style type="text/css">
        #box{
            width: 200px;
            height: 200px;
            background-color: red;
        }
    </style>
</head>
<body>
    <div id="box">
        天王盖地虎
    </div>
    <button>隐藏</button>
</body>
    <script src="jquery-3.3.1.js" type="text/javascript" charset="utf-8"></script>
    <script type="text/javascript">
        //DOM对象->jQuery对象;
        var oDiv = document.getElementById('box');
        console.log($(oDiv));

        $(oDiv).click(function(){
            alert(111);

        })
     //jQuery对象转化成DOM对象的方式;
        //第一种方式;
//        $('button')[0]
        console.log($('button')[0]);
        //第二种方式;
        console.log($('button').get(0));

        var isShow = true;

        $('button').get(0).onclick = function(){
            if(isShow){
                $('#box').hide();
                console.log($(this));
                $(this).text('显示');
                isShow = false;
            }else{
                $('#box').show();
                console.log($(this));
                $(this).text('隐藏');
                isShow = true;
            }
        }
    </script>
</html>
09-jQuery效果-显示和隐藏
1、jQuery之hide及show方法;
<!DOCTYPE html>
<html lang="en">
<head>
    <meta charset="UTF-8">
    <title>09-jquery效果-显示和隐藏</title>
    <style type="text/css">
        #box{
            width: 100px;
            height: 100px;
            border:1px solid red;
            display: none;
        }
    </style>
</head>
<body>
    <div id="box">

    </div>
    <button id="btn">隐藏</button>
</body>
    <script src="jquery-3.3.1.js" type="text/javascript" charset="utf-8"></script>
    <script type="text/javascript">
//        //.css
//        $('#btn').click(function(){
//            $('#box').css('display','block')
//        })

        //jQuery提供了一些方法:show()hide()控制元素显示隐藏;
        var isShow = true;
        $('#btn').click(function(){
            if(isShow){
                $('#box').show('slow',function(){
                    $(this).text('盒子出来了');
                    isShow = false;
                    $('#btn').text('显示');
                })
            }else{
                $('#box').hide(2000,function(){
                    $(this).text(' ')
                    isShow = true;
                    $('#btn').text('隐藏');
                })
            }
        })


        //toggle 开关,如果元素显示则隐藏,反之亦然;

        $('#btn').click(function(){
            $('#box').toggle(3000,function(){
                alert(123)
            })
        })
    </script>
</html>
10-jQuery的效果-slide
1、jQuery的常见动画效果;
1)show
概念:显示隐藏的匹配元素 语法:show(speed,callback) 参数:
- speed:三种预定速度之一的字符串('slow','normal','fast')或表示动画时长的毫秒值(如:1000毫秒==1秒);
- callback:在动画完成时执行的函数,每个元素执行一次;
2)hide
hide(speed,callback)跟show使用方法类似,表示隐藏显示的元素。
3)toggle
如果元素是可见的,切换为隐藏的;如果元素是隐藏的,切换为可见的。
4)slideDown
概念:通过高度变化(向下增大)来到动态地显示所有匹配的元素,在显示完成后触发一个回调函数;
5)slideUp
通过高度变化(向上减小)来动态地隐藏所有匹配的元素,在隐藏完成后可选地触发一个回调函数。
6)slideToggle
概念:通过高度变化来切换所有匹配元素的可见性,并在切换完成后可选地触发一个回调函数;
<!DOCTYPE html>
<html lang="en">
<head>
    <meta charset="UTF-8">
    <title>10-jquery的效果-slide</title>
    <style type="text/css">
        #box{
            width: 100px;
            height: 100px;
            border:1px solid red;
            display: none;
        }
    </style>
</head>
<body>
    <div id="box">

    </div>
    <button id="btn">隐藏</button>
</body>
    <script src="jquery-3.3.1.js" type="text/javascript" charset="utf-8"></script>
    <script type="text/javascript">
//        $(function(){
//
//
//            //自动上下移动;
//            $('#btn').hover(function(){
//                $('#box').slideDown(2000)
//            },function(){
//                $('#box').slideUp(2000);
//            })
//        })

        //鼠标点击,实现下拉变大,以及向上收拢;
        $('#btn').click(function(){
            $('#box').slideToggle('fast')
        })
    </script>
</html>
11-jQuery的效果-fade
1、jQuery的淡入淡出效果;
1)fadeIn
概念:通过不透明度的变化来实现所有匹配元素的淡入效果,并在动画完成后可选地触发一个回调函数。这个动画只调整元素的不透明度,也就是说所有匹配的元素的高度和宽度不会发生变化;
2)fadeOut
实现淡出效果;
3)fadeTo
实现调整到指定的透明度,透明度的范围0~1;
4)fadeToggle
实现淡入和淡出的效果;
<!DOCTYPE html>
<html lang="en">
<head>
    <meta charset="UTF-8">
    <title>11-jquery的效果-fade</title>
    <style type="text/css">
        #box{
            width: 100px;
            height: 100px;
            border:1px solid red;
            background-color: yellow;
            /*display: none;*/
        }
    </style>
</head>
<body>
    <div id="box">

    </div>
    <button id="btn">隐藏</button>
</body>
    <script src="jquery-3.3.1.js" type="text/javascript" charset="utf-8"></script>
    <script type="text/javascript">
        $(function(){
//            $('#btn').click(function(){
//                $('#box').fadeOut(2000);
//            })
//            $('#btn').click(function(){
//                $('#box').fadeIn(3000);
//            })
            $('#box').mouseover(function(){
                $('#box').fadeOut(2000);
            })
            $('#box').mouseout(function(){
                $('#box').fadeIn(2000);
            })
            $('#btn').mouseout(function(){
                $('box').fadeIn(2000);
                $('box').fadeTo(2000,0.3);
            })
            $('#btn').click(function(){
                $('#box').fadeToggle(3000);
            })
        })
    </script>
</html>
12-jQuery的效果-animate
1)animate
概念:用于创建自定义动画的函数;
2)stop
概念:停止所有在指定元素上正在运行的动画
3)delay
概念:用来做延迟的操作
1、jQuery的animate动画效果;
<!DOCTYPE html>
<html lang="en">
<head>
    <meta charset="UTF-8">
    <title>12-jQuery的效果-animate</title>
    <style type="text/css">
        #box{
            width: 100px;
            height: 100px;
            border: 1px solid red;
            background: yellow;
            position: absolute;
        }
    </style>
</head>
<body>
    <button id="btn">动画吧</button>
    <button id="stop">停止吧</button>
    <div id="box">
        Hello LuffyCity
    </div>
</body>
    <script src="jquery-3.3.1.js" type="text/javascript" charset="utf-8"></script>
    <script type="text/javascript">
        $(function(){
            $('#btn').click(function(){
                //控制宽度和高度;
//                $('#box').animate({
//                    '200px',
//                    height:'300px'
//                })
                //动画的效果;
//                $('#box').animate({left:'100px',top:'200px'})
                $('#box').animate({left:'100px'}).delay(3000).animate({top:'200px'})
//                $('#box').animate({left:'100px',top:'200px'},2000)

            })
            $('#stop').click(function(){
                //控制动画的停止;
                $('#box').stop();
            })
        })
    </script>
</html>
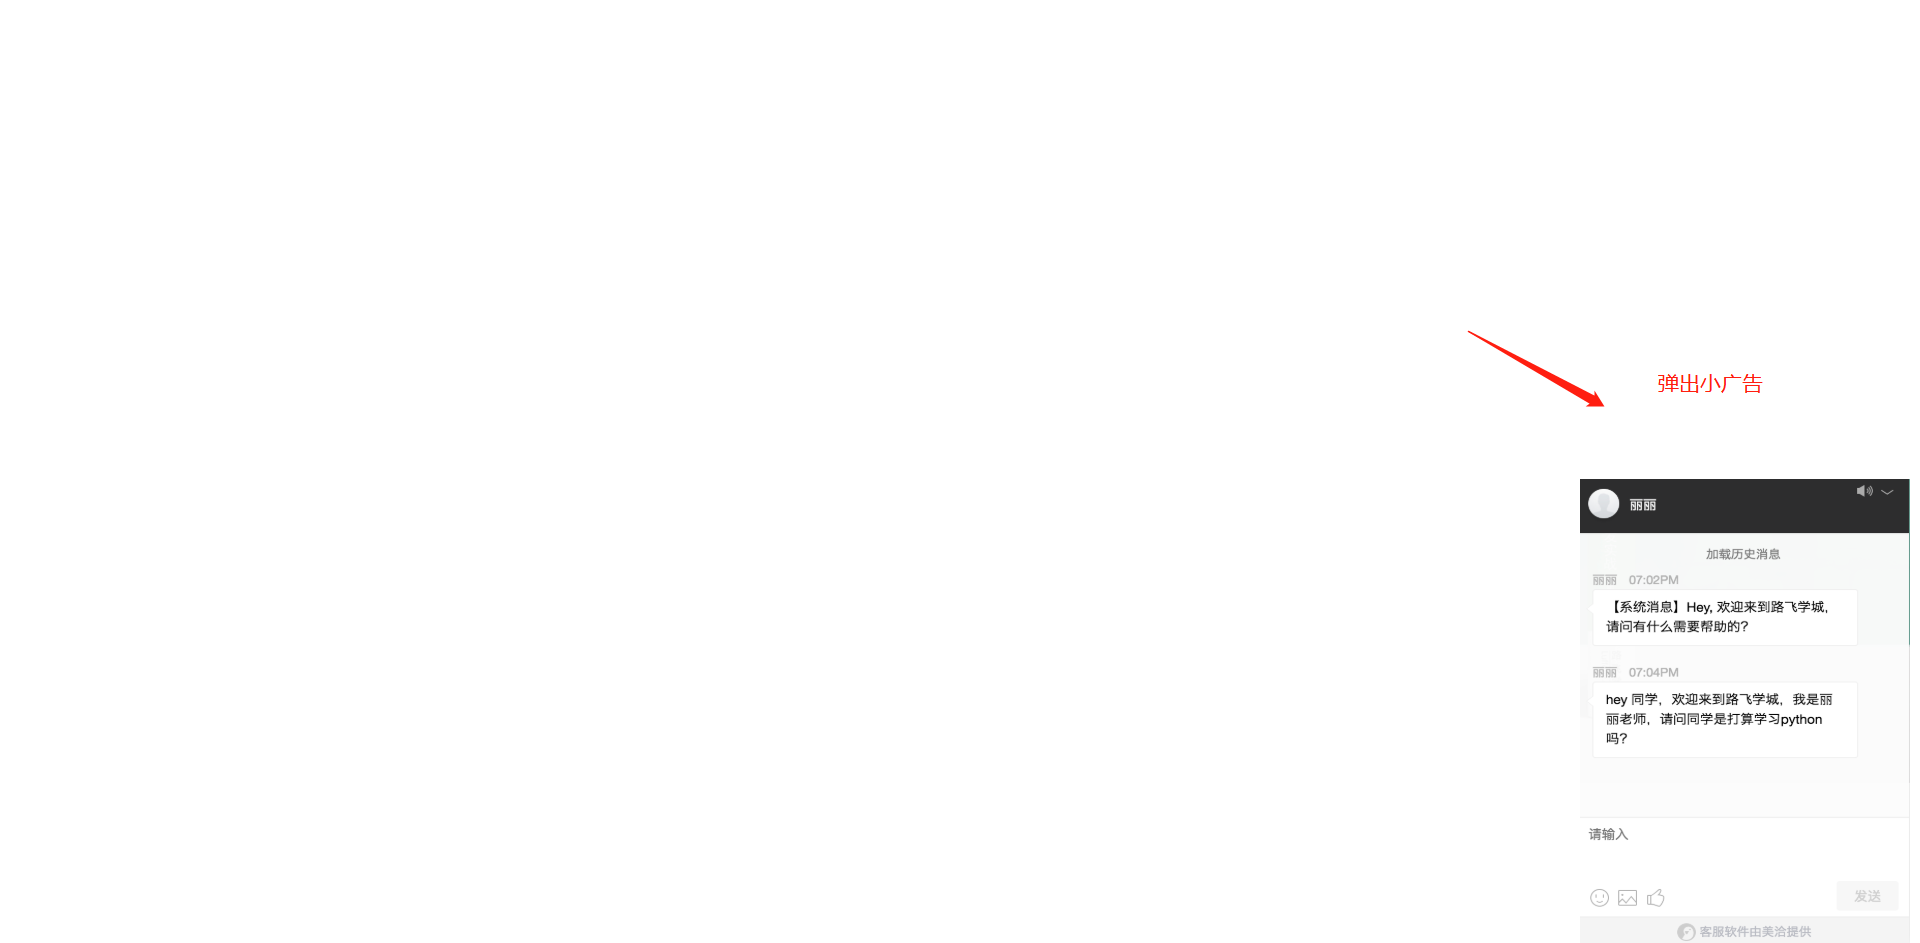
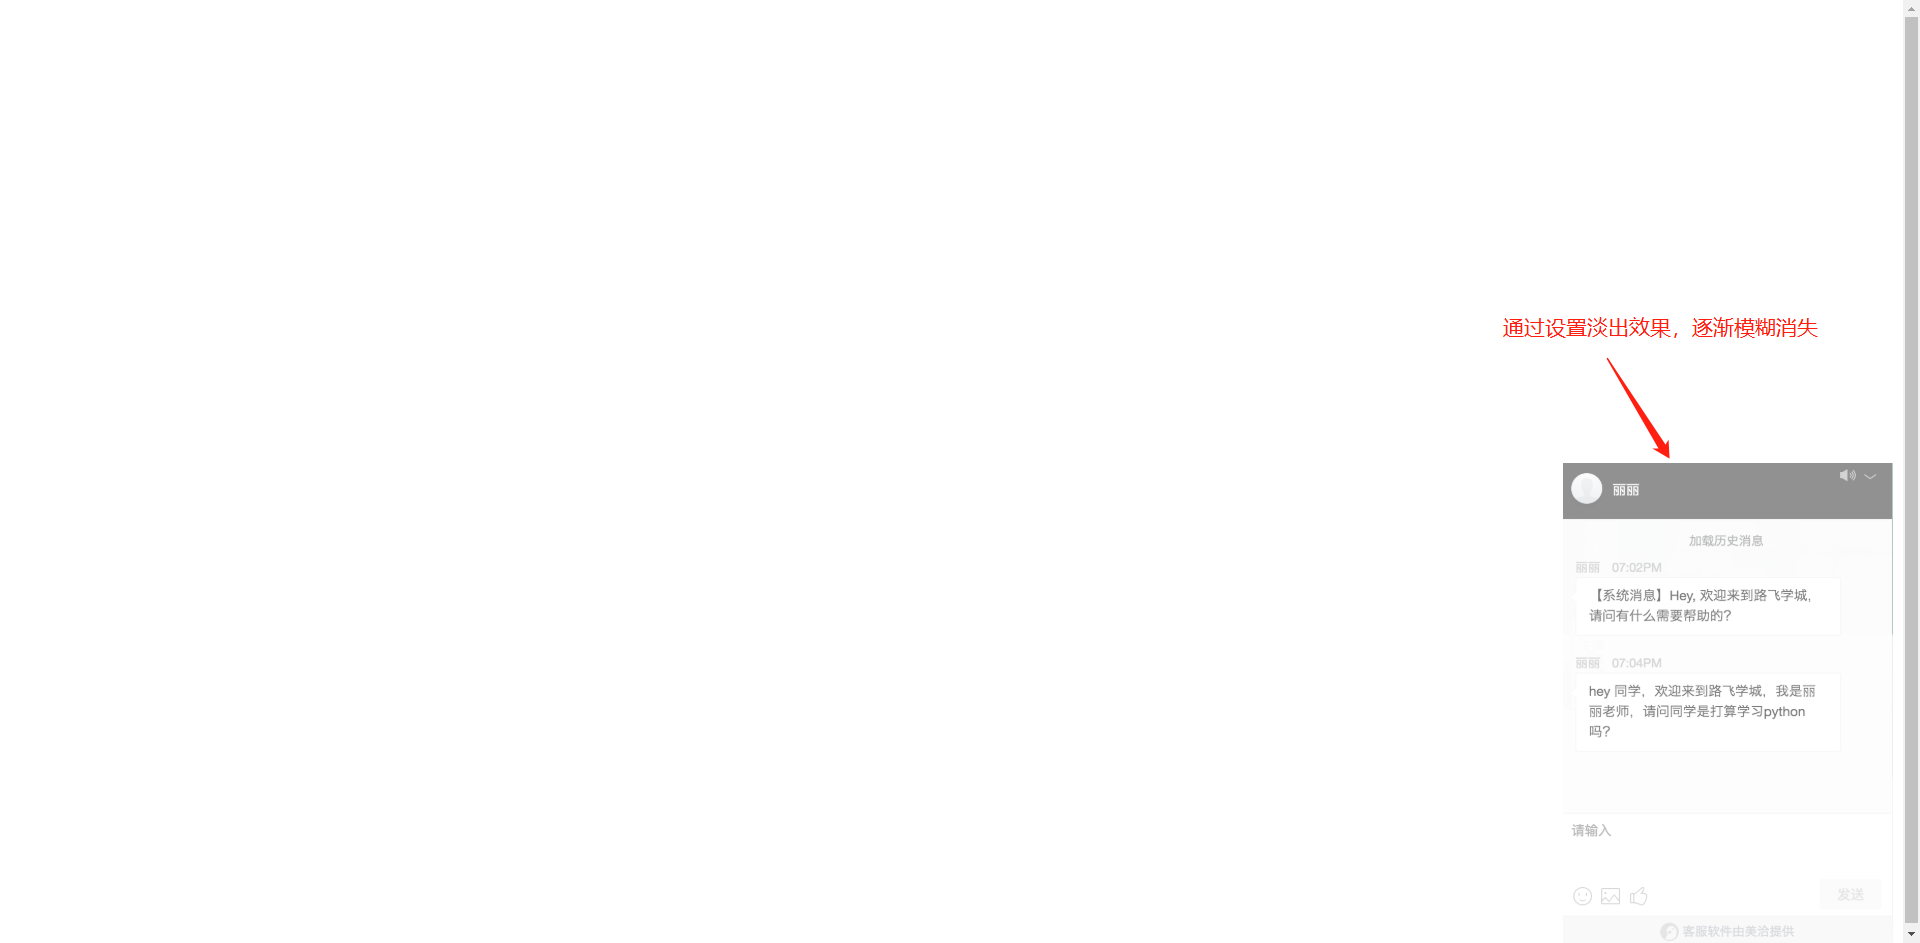
13-右下角弹出小广告
1、通过jQuery的链式调用,实现小广告的淡入淡出效果;
<!DOCTYPE html>
<html lang="en">
<head>
    <meta charset="UTF-8">
    <title>13-右下角弹出小广告</title>
    <style type="text/css">

    </style>
</head>
<body>
    <div id="box" style="330px;height: 480px;position: absolute;right: 10px;bottom: 0;display: none;" >
        <img src="广告.png" alt="" style="100%;height: 100%;" />
    </div>

</body>
    <script src="jquery-3.3.1.js" type="text/javascript" charset="utf-8"></script>
    <script type="text/javascript">
        $(function(){
            //图片先弹出,通过点击,实现淡出效果,代码逻辑:通过jQuery的链式调用;
            $('#box').slideDown('normal').fadeIn(1000).click(function(){
                $(this).fadeOut(1000);
            });

        })
    </script>
</html>
14-jQuery的属性操作-attr和prop
1、jQuery的属性操作;
jquery对象有它自己的属性和方法,我们先研究一下jquery的属性操作。
jquery的属性操作模块分为四个部分:html属性操作,dom属性操作,类样式操作和值操作
1、html属性操作:是对html文档中的属性进行读取,设置和移除操作。比如attr()、removeAttr()

2、DOM属性操作:对DOM元素的属性进行读取,设置和移除操作。比如prop()、removeProp()

3、类样式操作:是指对DOM属性className进行添加,移除操作。比如addClass()、removeClass()、toggleClass()

4、值操作:是对DOM属性value进行读取和设置操作。比如html()、text()、val()
2、jquery属性操作之attr和prop;
- attr概念:设置属性值或者 返回被选元素的属性值;removeAttr即删除;
- prop()获取在匹配的元素集中的第一个元素的属性值.它是对当前匹配到的dom对象设置属性;removeProp也是删除;
<!DOCTYPE html>
<html lang="en">
<head>
    <meta charset="UTF-8">
    <title>14-jquery的属性操作-attr和prop</title>
    <style type="text/css">

    </style>
</head>
<body>
    <div id="box">
        <p>路飞学城</p>

    </div>
    <button>获取</button>
    <ul>
        <li class="luffy">路飞</li>
        <li class="luffy">路飞2</li>
        <li class="luffy">路飞3</li>
        <li class="luffy">路飞4</li>
        <li class="luffy">路飞5</li>
    </ul>
</body>
    <script src="jquery-3.3.1.js" type="text/javascript" charset="utf-8"></script>
    <script type="text/javascript">
        $(function(){
            $('button').click(function(){
            //jQuery的属性操作,html属性操作attr()

            //attr如果有一个参数,表示获取值;
            $('#box p').text($('#box').attr('id'));
            })
            //attr如果设置两个值,表示设置属性;
            $('#box').attr('class','foo');
            //设置多个值,使用对象存储,如果设置多个类名,不能使用attr();
            $('#box').attr({'class':'foo2',name:'luffy'});


            //DOM属性操作;
            //获取的是第一个元素的class值;
            console.log($('li').prop('class'));
            //设置值;
            $('li').first().prop({'name':'app','name2':'app2'});
            console.log($('li').first());
            //removeAttr(),一次只删除一个属性;
            $('#box').removeAttr('name');
            $('#box').removeAttr('class');
//删除多个;
$('#box').removeAttr('class name');//class和name之间是空格
//删除DOM对象的name属性;
            $('li').first().removeProp('name');
            console.log($('li').prop('name'));

    })
    </script>
</html>
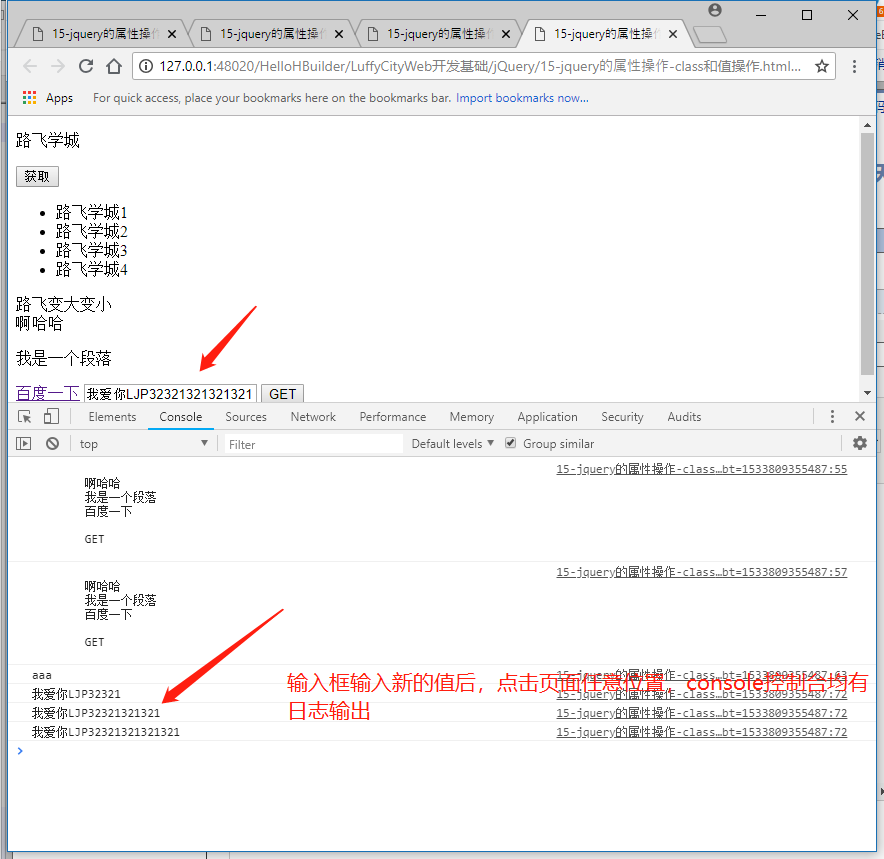
15-jQuery的属性操作-class和值操作
1、jQuery的属性值和class操作;
<!DOCTYPE html>
<html lang="en">
<head>
    <meta charset="UTF-8">
    <title>15-jquery的属性操作-class和值操作</title>
    <style type="text/css">
        span.active{
            font-size: 30px;
            color: greenyellow;
        }
    </style>
</head>
<body>
    <div id="box">
        <p>路飞学城</p>
    </div>
    <button>获取</button>
    <ul>
        <li class="luffy">路飞学城1</li>
        <li class="luffy">路飞学城2</li>
        <li class="luffy">路飞学城3</li>
        <li class="luffy">路飞学城4</li>
    </ul>
    <span class="span1">路飞变大变小</span>
    <div id="box2">
        啊哈哈
        <p>我是一个段落</p>
        <a href="">百度一下</a>
        <input type="text" value="aaa" name=""/>
        <button id="btn">GET</button>
    </div>

</body>
    <script src="jquery-3.3.1.js" type="text/javascript" charset="utf-8"></script>
    <script type="text/javascript">
        $(function(){
                //addClass() 以及removeClass(),添加类和删除类;
                $('span').addClass('span2 span3')
                //
                $('span').removeClass('span3')

                //
                var isBig = true;
                $('span').click(function(){
                    if(isBig){
                        $(this).addClass('active')
                        isBig = false;
                    }else{
                        $(this).removeClass('active');
                        isBig = true;
                    }

                })
                //值属性操作; text() html() val()
                console.log($('#box2').text())
                //获取的所有;
                console.log($('#box2').text())

                //设置值
//                $('#box2').text('<a>路飞学城</>')
//                $('#box2').html('<a href='#'>路飞学城</a>')
                //获取值
                console.log($('input').val())
                //设置值
                $('input').val('我爱你LJP')
                $('#btn').click(function(){
                    var val = $('input').val()
                    $('#box2').text(val);
                })
                //表单控件使用的一个方法,输入值后,单击任意位置,均有反应;
                $('input').change(function(){
                    console.log($(this).val())
                })
        })
    </script>
</html>
16-操作input中的value值
1、input中获取和设置元素值的方法;
<!DOCTYPE html>
<html>
<head>
    <meta charset="UTF-8">
    <title>16-操作input中的value值</title>
</head>
<body>
    <form action="">
        <input type="radio" name="sex" value="111" />男
        <input type="radio" name="sex" value="112" checked="" />女
        <input type="radio" name="sex" value="113" />gay

        <input type="checkbox" value="a" checked=""/>吃饭
        <input type="checkbox" value="b" checked=""/>睡觉
        <input type="checkbox" value="c" checked=""/>打豆豆

        <select name="timespan" id="timespan" class="Wdate" >
            <option value="1">8:00-8:30</option>
            <option value="2">8:30-9:00</option>
            <option value="3">9:00-9:30</option>
        </select>
        <input type="text" name="" id="" value="111" />
    </form>
</body>
    <script src="jquery-3.3.1.js" type="text/javascript" charset="utf-8"></script>
    <script type="text/javascript">
        $(function(){

        //1、获取单选框中的value值;
        console.log($('input[type=radio]:checked').val());
        })
        //2、获取复选框中的值;仅仅是获取了第一个值;
        console.log($('input[type=checkbox]:checked').val());

        //3、下拉列表;
        var obj = $('#timespan option:selected')
        console.log(obj.val());

        //设置单选、复选的值;
        $('input[type=radio]').val(['113']);
        $('input[type=checkbox]').val(['b','c']);

        //设置下拉列表中的值,必须要用select;
        $('select').val(['3','2','1'])

        //文本框
        console.log($("input[type=text]").val())//获取文本框中的值
        //设置值
        $('input[type=text]').val('试试就试试')
    </script>
</html>
17-jQuery文档操作-插入节点
1、插入操作;
一、父元素.append(子元素) 追加某元素 父元素中添加新的元素;
二、子元素.appendTo(父元素) 追加到某元素 子元素添加到父元素;
三、prepend() 前置添加, 添加到父元素的第一个位置;
四、prependTo 后置添加,第一个元素添加到父元素中;
五、父.after(子) 在匹配的元素之后插入内容 与 子.insertAfter(父);
六、父.before(子) 在匹配的元素之前插入内容 与 子.insertBefor(父);
<!DOCTYPE html>
<html lang="en">
<head>
    <meta charset="UTF-8">
    <title>17-jquery文档操作-插入节点</title>
    <style type="text/css">

    </style>
</head>
<body>
    <ul>

    </ul>
</body>
    <script src="jquery-3.3.1.js" type="text/javascript" charset="utf-8"></script>
    <script type="text/javascript">
        $(function(){
            var oLi = document.createElement('li');
            oLi.innerHTML = "路飞";
            $('ul').append(oLi)
            //
            $('ul').append('<li>LuffyCity</li>')
//            $('ul').append('<li><a href="#">LuffyCity</a></li>')
        //append方法的使用;
        $('ul').append($('span'))

        //appendTo()的用法;
        $('<a href="#">路飞2</a>').appendTo($('ul'));
        //pretend插入被选中元素的第一个位置;
        $('ul').prepend('<li>我是第一个元素</li>')
        $('<li>我是第0个元素</li>').prependTo($('ul'));

        //after、before;
        $('ul').before('<h3>我是一个2级标题</h3>');
        $('ul').after('<h2>我是一个2级标题</h2>');
        //insertAfter、insertBefore;
        $('<a href="#">第一个</a>').insertAfter($('ul'));
        $('<a href="#">第2个</a>').insertBefore($('ul'));


        })
    </script>
</html>
18-jQuery文档操作-复制、替换和删除
1、jQuery的clone、replaceWith、replaceAll、remove|detach|empty操作;
- 复制操作clone(false),有参数true、false;
- replaceWith():将所有匹配的元素替换成指定的HTML或DOM元素;
- replaceAll():用匹配的元素替换掉素有selector匹配到的元素;
- remove():删除节点后,事件也会删除(简言之,删除了整个标签);
- detach():删除节点后,事件会保留;
- empty():清空元素中的素有后代节点;
<!DOCTYPE html>
<html lang="en">
<head>
    <meta charset="UTF-8">
    <title>Title</title>
    <style type="text/css">

    </style>
</head>
<body>
    <h3>我是3级别标题</h3>
    <ul>
        <li>1</li><br>
        <li>2</li><br>
        <li>3</li><br>
    </ul>
    <button id="btn">按钮</button>
</body>
    <script src="jquery-3.3.1.js" type="text/javascript" charset="utf-8"></script>
    <script type="text/javascript">
        $(function(){
            $('button').click(function(){
                //clone里面的值可填写true、false,默认是false;
                $(this).clone(true).insertAfter($(this));
            })
            //替换
            $('h3').replaceWith('<button>替换的按钮</button>')
            //replaceall
            $('<a href="#">替换超链接</a>').replaceAll('li')
            //删除
            //1、empty(),清空,只是清空了被选择元素的内容
//            $('ul').empty()
            //2、remove()移除元素;
//            $('ul').remove()
            //detach()
             var $btn  = $('button').detach()
             console.log($btn[0]);

             $('ul').append($btn[0])
        })

    </script>

</html>
19-jQuery的位置属性
1、jQuery中的位置属性;
- position
- offset
- scrollTop
- scrollLeft
- innerHeight
- innerWidth
- outerWeight
- weight
- height
<!DOCTYPE html>
<html>
    <head>
        <meta charset="UTF-8">
        <title>19-jquery的位置属性</title>
        <style type="text/css">
            *{
                padding: 0;
                margin: 0;
            }
            #box{
                position: relative;
                width: 200px;
                height: 200px;
                border: 1px solid red;
                padding: 10px 5px;
            }
            p{
                position: absolute;
                left:30px;
                top: 30px;
            }
        </style>
    </head>
    <body style="height: 2000px;  2000px;">
        <div id="box">
            <p>我是一个段落标签</p>
        </div>

        <button id="btn">动画吧</button>

        <div style=" 200px;height: 200px;margin:  100px auto;border: 1px solid deepskyblue;"></div>

    </body>
    <script src="jquery-3.3.1.js" type="text/javascript" charset="utf-8"></script>
    <script type="text/javascript">


        $(function(){
            //1.获取匹配元素的相对父元素的偏移 position;

            console.log($('p').position().left);
            console.log($('p').position().top);

            var offsetTop = $('p').position().top + 50 + 'px';

            $('#btn').click(function(){
                $('p').animate({top:offsetTop},1000);
            })

            //2.获取匹配元素 相对滚动条卷起的位置信息  scrollTop scrollLeft

//            console.log($(document).scrollLeft());
//            console.log($(document).scrollTop());

            $(document).scroll(function(){
                console.log($(document).scrollLeft());
                console.log($(document).scrollTop());
            })

            //3、offset偏移量:  获取匹配元素在当前视口的相对偏移 相对于浏览器;

            console.log($('#box').offset());
            console.log($('p').offset().top);
            console.log($('p').offset().left);
            console.log($('#btn').offset().top);

            //获取元素的宽高

            console.log("宽"+$('#box').width());
            console.log("高"+$('#box').height());

            //设置宽高
            $('#box').width(400);

            //innerWidth / outerWidth

            //获取  width + 2*padding 不包括边框 获取匹配元素的内部宽度

            console.log($('#box').innerWidth()); //410

            // width + 2*padding + 2*border 获取匹配元素的外部宽度
            console.log($('#box').outerWidth());
        })
    </script>
</html>
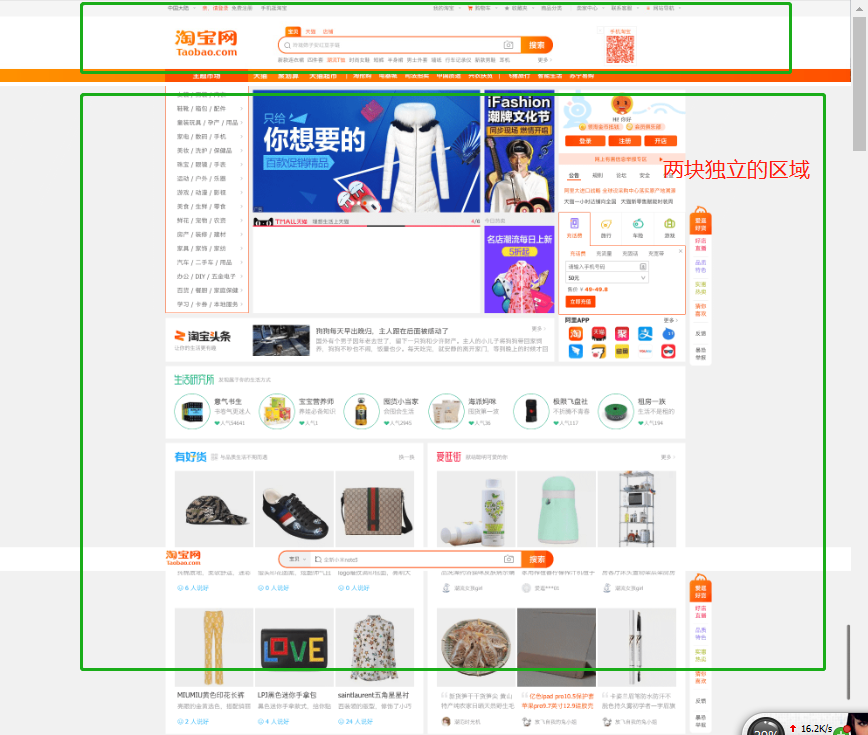
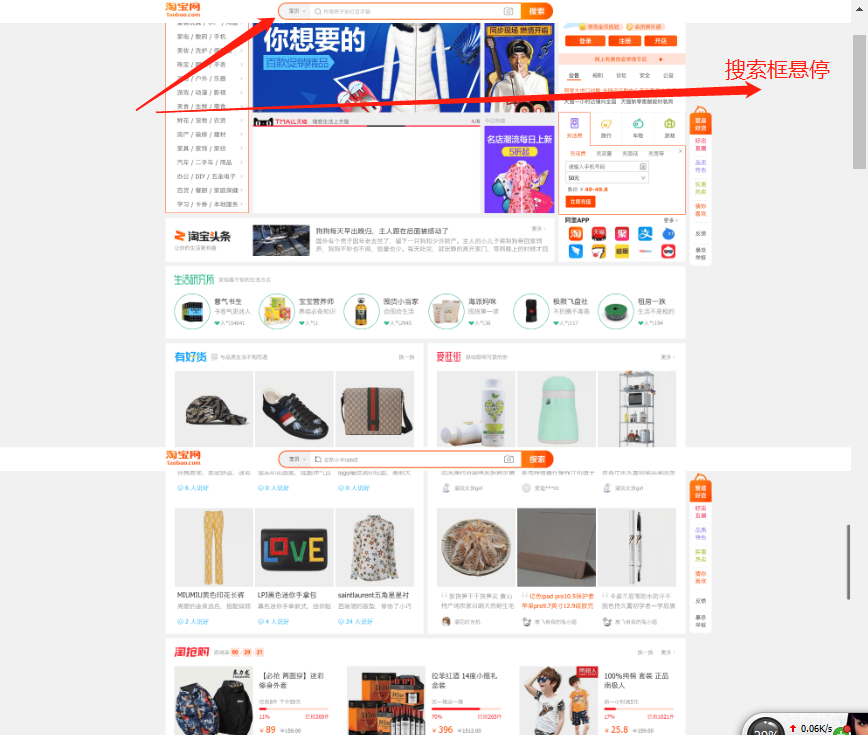
20-仿淘宝导航栏案例
1、仿淘宝导航悬停案例;
<!DOCTYPE html>
<html>
    <head>
        <meta charset="UTF-8">
        <title>20-仿淘宝导航栏案例</title>
        <style type="text/css">
            *{
                padding: 0;
                margin: 0;
            }
            div{width: 100%;}
            div img{width: 100%;}

            .nav{display: none;}

        </style>
    </head>
    <body>

        <div class="top">
            <img src="top.jpg" alt="" />

        </div>
        <div class="nav">
            <img src="nav.jpg"/>
        </div>
        <div class= 'taobao'>
            <img src="taobao1.png"/>
        </div>

        <!--引入js文件-->
        <script src="jquery-3.3.1.js" type="text/javascript" charset="utf-8"></script>
        <script type="text/javascript">

            $(function(){
                var h = $('.top').height();


                $(document).scroll(function(){
                    var scollTp = $(document).scrollTop();


                    if(h<scollTp){
                        $('.nav').css({display:'block',position:'fixed',top:0});
                    }else{
                        $('.nav').css({display:'none',position:'static',top:0});
                    }

                })

            })


        </script>
    </body>
</html>
21-jQuery的筛选方法
1、jQuery中的筛选方法;
<!DOCTYPE html>
<html lang="en">
<head>
    <meta charset="UTF-8">
    <title>21-jquery的筛选方法</title>
    <style type="text/css">
        li.active{
            font-size: 50px;
        }
    </style>
</head>
<body>
    <ul>
        <li class="danger">崔晓昭</li>
        <!--<li><a href="#">LuffyCity</a></li>-->
        <li>李静瓶</li>
        <li class="danger">崔青良</li>
        <li>高志粉</li>
        <a href="#">百度</a>
        <a href="#" id="anchor">新浪</a>
    </ul>
</body>
    <script src="jquery-3.3.1.js" type="text/javascript" charset="utf-8"></script>
    <script type="text/javascript">
        $(function(){
            console.log($('li'));
        //jQuery中遍历元素的方法,.each();
            $('ul').children().each(function(index,ele){
    //            console.log(index);
    //            console.log(ele);
                var isDanger = $(this).hasClass('danger');
    //            console.log(isDanger)
                if(isDanger){
                    $(this).css('color','red')
                }else{
    //                $(this).css('font-size','20px')
                }
            })
            console.log($('ul').children('.danger'));
            console.log('li');
            //父级元素,仅表示相邻;
            console.log($('a').parent())
            console.log($('li').last().prev())
            console.log($('li').last().prevAll())
            //sliblings
            console.log($('#anchor').siblings('a'))
            $('li').hover(function(){
                $(this).addClass('active').siblings('li').removeClass('active');
            })
        })
    </script>
</html>
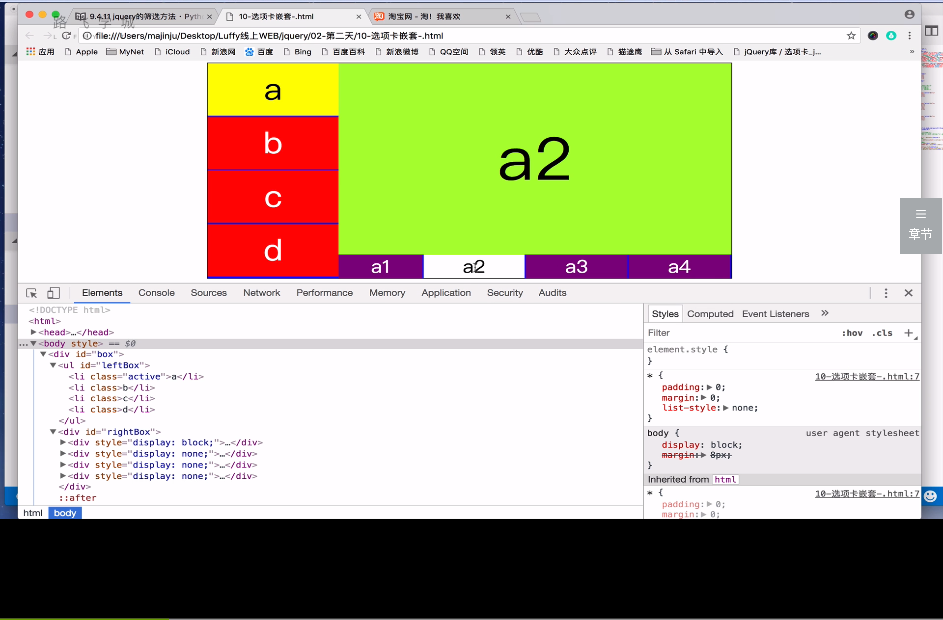
22-选项卡嵌套
1、选项卡的嵌套及效果;
<!DOCTYPE html>
<html>
    <head>
        <meta charset="UTF-8">
        <title></title>
        <style type="text/css">
            *{padding: 0;margin: 0;}
            ul{
                list-style: none;
            }
            /*清除浮动产生的问题*/
            #box:after{
                content: "";
                display: block;
                clear: both;
            }
            #box{width: 800px;border: 1px solid black;margin: 20px auto;background: blue;}
            #leftBox{width: 200px;float: left;}
            #leftBox li{width: 200px;height: 89px;background: red;margin-bottom: 2px;color: white;font: 50px/89px "黑体";  text-align: center;}
            #rightBox div{display: none;float: left; width: 600px;}
            #rightBox p{width:100%;height: 325px;font: 100px/325px "黑体";text-align: center;background: greenyellow }

            /*父元素设置display:table使它成为一个块级表格元素

             * 子元素设置display:table-cell使子元素成为表格单元格,就好比是在表格中一样*/
            #rightBox ul{width: 600px;display: table;}

             #rightBox li{display: table-cell;background: purple;height: 40px;border-right: 2px solid blue;font: 30px/40px "黑体";text-align: center;color: white;}
             #leftBox .active{background: yellow;color: black;}
                #rightBox .active{background: white;color: black;}

        </style>
    </head>
    <body>
        <div id="box">
            <ul id="leftBox">
                <li>a</li>
                <li>b</li>
                <li>c</li>
                <li>d</li>
            </ul>
            <div id="rightBox">
            <div style="display: block">
                <p>a1</p>
                <ul>
                    <li class="active">a1</li>
                    <li>a2</li>
                    <li>a3</li>
                    <li>a4</li>
                </ul>
            </div>
            <div>
                <p>b1</p>
                <ul>
                    <li class="active">b1</li>
                    <li>b2</li>
                    <li>b3</li>
                    <li>b4</li>
                </ul>
            </div>
            <div>
                <p>c1</p>
                <ul>
                    <li class="active">c1</li>
                    <li>c2</li>
                    <li>c3</li>
                    <li>c4</li>
                    <li>c5</li>
                    <li>c6</li>
                </ul>
            </div>
            <div>
                <p>d1</p>
                <ul>
                    <li class="active">d1</li>
                    <li>d2</li>
                    <li>d3</li>
                    <li>d4</li>
                </ul>
            </div>
            </div>
        </div>

    </body>
    <script src="jquery-3.2.1.js"></script>
    <script type="text/javascript">
        $(function(){
            //鼠标移入的时候
            $('#leftBox li').mouseover(function(){
                //修改自己的样式
                $(this).addClass('active').siblings('li').removeClass('active');

                //修改右边的div

                console.log($(this).index())
                $('#rightBox div').eq($(this).index()).show().siblings('div').hide();

            })

            $('#rightBox li').click(function(){
                $(this).addClass('active').siblings('li').removeClass('active');

                var liValue  = $(this).html();

                $(this).parent().prev().html(liValue);


            })


        })

    </script>
</html>
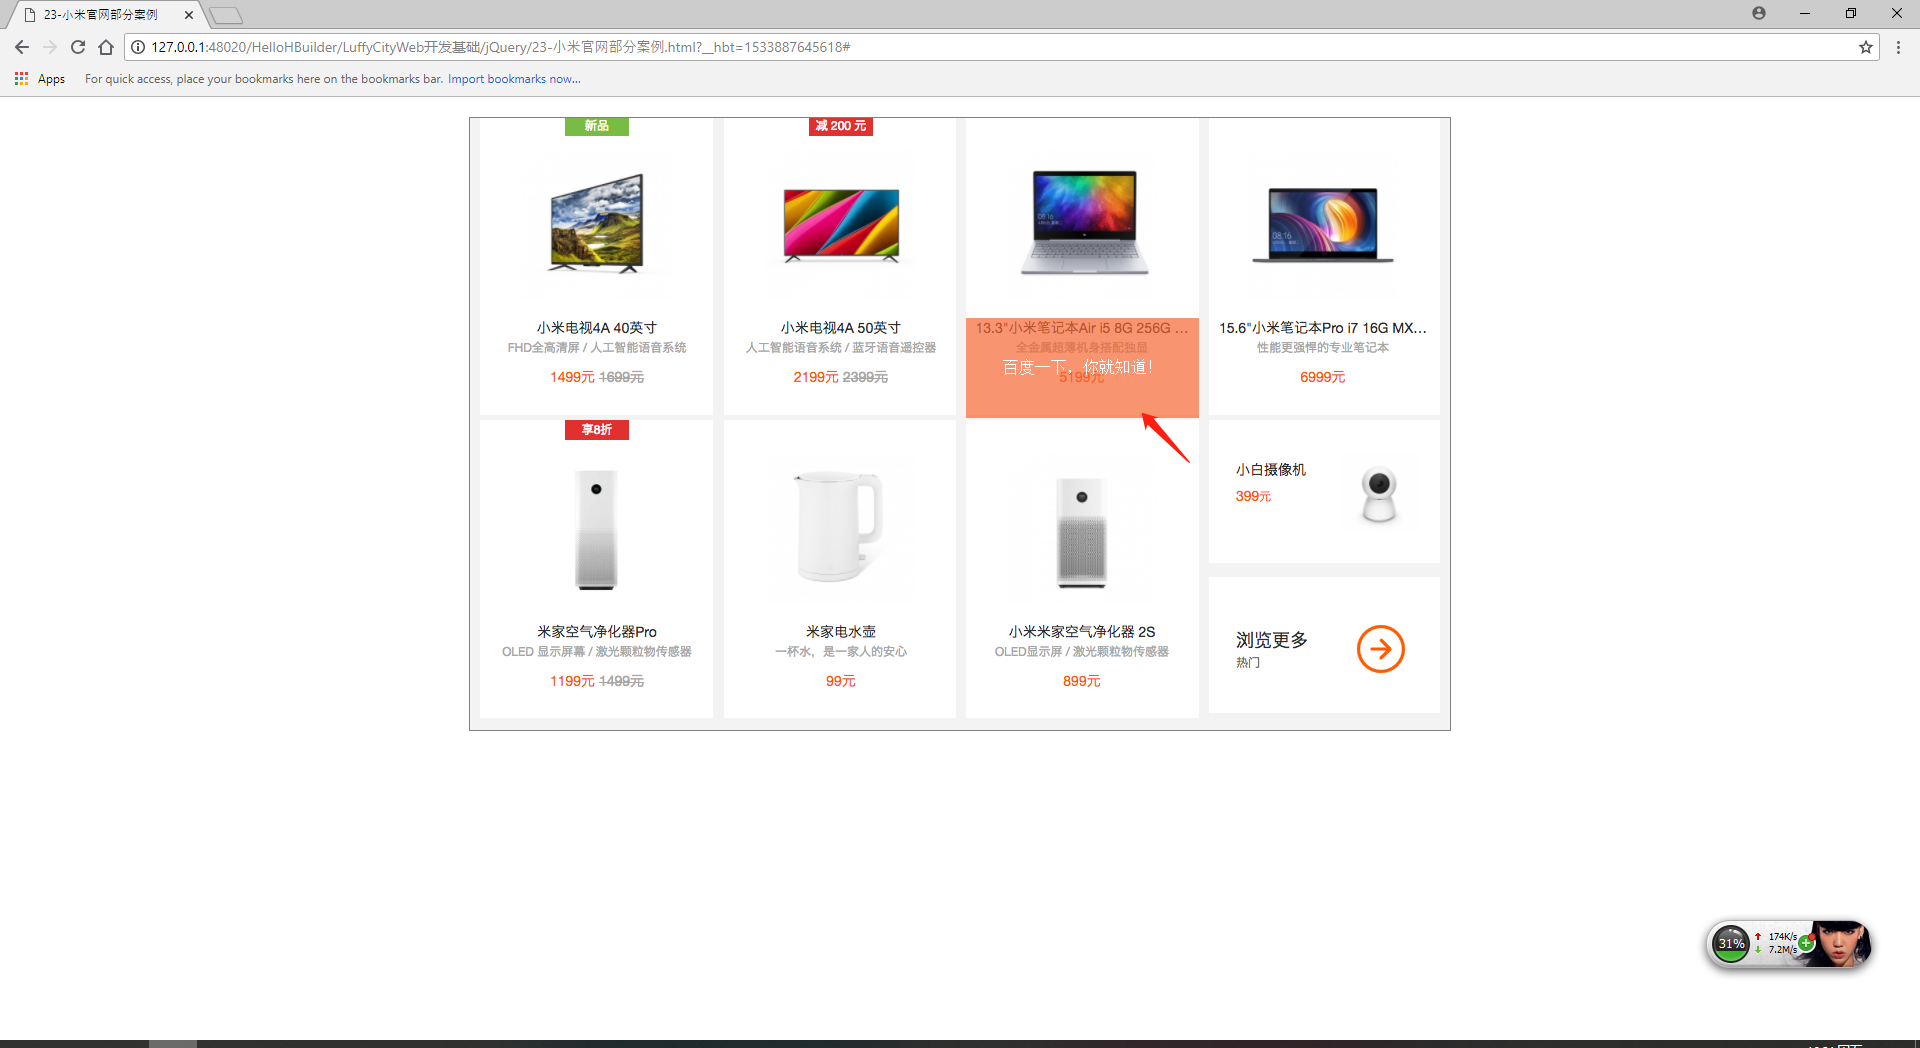
23-小米官方部分案例
1、小米官网部分练习;
<!DOCTYPE html>
<html lang="en">
<head>
    <meta charset="UTF-8">
    <title>23-小米官网部分案例</title>
    <style type="text/css">
        *{
            padding: 0;
            margin: 0;
        }
        ul{
            list-style: none;
        }
        .wrap{
            width: 980px;
            height: 612px;
            margin: 20px auto 0;
            background-color: #f4f3f4;
            border: 1px solid gray;
        }
        ul li{
            float: left;
            margin-left: 10px;
            position: relative;
            overflow: hidden;
            width: 233px;
            height: 300px;
        }
        ul li p{
            width: 233px;
            height: 100px;
            background: rgba(245,102,51,0.7);
            position: absolute;
            bottom: -100px;
            text-align: center;
            color: white;
            line-height: 100px;
        }


    </style>
</head>
<body>
    <div class="wrap">
        <ul>
            <li><a href="#"><img src="xiaomi_01.png" alt="" /></a><p>百度一下,你就知道!</p></li>
            <li><a href="#"><img src="xiaomi_02.png" alt="" /></a><p>百度一下,你就知道!</p></li>
            <li><a href="#"><img src="xiaomi_03.png" alt="" /></a><p>百度一下,你就知道!</p></li>
            <li><a href="#"><img src="xiaomi_04.png" alt="" /></a><p>百度一下,你就知道!</p></li>
            <li><a href="#"><img src="xiaomi_05.png" alt="" /></a><p>百度一下,你就知道!</p></li>
            <li><a href="#"><img src="xiaomi_07.png" alt="" /></a><p>百度一下,你就知道!</p></li>
            <li><a href="#"><img src="xiaomi_08.png" alt="" /></a><p>百度一下,你就知道!</p></li>
            <li><a href="#"><img src="xiaomi_09.png" alt="" /></a><p>百度一下,你就知道!</p><span></span></li>
        </ul>
    </div>
</body>
    <script src="jquery-3.3.1.js" type="text/javascript" charset="utf-8"></script>
    <script type="text/javascript">
        //mouseenter进入;mouseleave离开;
        $('.wrap li').hover(function(){
            $(this).children('p').stop(true).animate({bottom:0},100);
        },function(){
            $(this).children('p').stop(true).animate({bottom:-100},100);
        })
    </script>
</html>
24-焦点式轮播图
1、焦点式轮播图代码;
<!DOCTYPE html>
<html lang="en">
<head>
    <meta charset="UTF-8">
    <title>24-焦点式轮播图</title>
    <style type="text/css">
        *{
            padding: 0;
            margin: 0;
        }
        ul,ol{
            list-style: none;
        }
        #wrap{
            width: 650px;
            height: 250px;
            margin: 100px auto 0;
            background: red;
            overflow: hidden;
            position: relative;
        }
        /*#wrap img{display: block;}*/
        #wrap ul{
            height: 250px;
            position: relative;
            z-index: 1;
        }
        #wrap ol{
            height: 30px;
            position: absolute;
            z-index: 2;
            bottom: 0;
            right: 0;
        }
        #wrap>ul>li{
            position: absolute;
            top: 0;
            left: 0;
        }
        #wrap>ol>li{
            float: left;
            width: 20px;
            height: 20px;
            text-align: center;
            line-height: 20px;
            border: 1px solid white;
            background: gray;
            margin-right: 5px;
        }
        #wrap>ol>li:hover{
            /*设置鼠标形状*/
            cursor: pointer;
        }
        #wrap li.active{
            padding: 2xp;
            color: orange;
            margin-top: -4px;
            border: 1px solid orange;
        }
    </style>
</head>
<body>
    <div id="wrap">
        <ul>
            <!--设置绝对定位之后,脱离标准流 最后一个盒子层级提升了-->
            <li style="z-index:1;"><a href="#"><img src="01.jpg" alt="" /></a></li>
            <li><a href="#"><img src="02.jpg" alt="" /></a></li>
            <li><a href="#"><img src="03.jpg" alt="" /></a></li>
            <li><a href="#"><img src="04.jpg" alt="" /></a></li>
            <li><a href="#"><img src="05.jpg" alt="" /></a></li>
        </ul>
        <ol>
            <li class="active">1</li>
            <li>2</li>
            <li>3</li>
            <li>4</li>
            <li>5</li>
        </ol>
    </div>
</body>
    <script src="jquery-3.3.1.js" type="text/javascript" charset="utf-8"></script>
    <script type="text/javascript">
        //控制层级关系的索引;
        var index = 0;
        $('#wrap>ol>li').mouseover(function(){
            index ++;
            //修改下标的class;
            $(this).addClass('active').siblings('li').removeClass('active');
            //修改图片;
            $('#wrap>ul>li').eq($(this).index()).css({left:650,'z-index':index}).animate({
                left:0
            },1000)
        })
    </script>
</html>
25-动态实现轮播图
1、动态实现轮播图;
<!DOCTYPE html>
<html lang="en">
<head>
    <meta charset="UTF-8">
    <title>25-动态实现轮播图</title>
    <style type="text/css">
        *{
            padding: 0;
            margin: 0;
        }
        ul{
            list-style: none;
        }
        #box{
            /*图片的宽高 240px 180px*/
            width: 240px;
            height: 180px;
            position: relative;
            margin: 50px auto;
            overflow: hidden;
        }
        ul{
            width: 960px;
            position: absolute;

        }
        ul li{
            float: left;
        }
        p{
            position: absolute;
            left: 80px;
            bottom: 30px;
        }
        p span{
            color: red;
            display: inline-block;
            width: 20px;
            height: 20px;
            text-align: center;
            cursor: pointer;
        }
        p span.active{
            color:white;
            background: greenyellow;
        }

    </style>
</head>
<body>
    <div id="box">
        <ul>
            <!--显示轮播图的图片-->
            <!--<li><img src="11.jpg" alt="" /></li>
            <li><img src="12.jpg" alt="" /></li>
            <li><img src="13.jpg" alt="" /></li>
            <li><img src="14.jpg" alt="" /></li>-->
        </ul>
        <p>
            <!--显示索引-->
        </p>
    </div>
    <button id="play">轮播吧!</button>
    <button id="play">暂停!</button>
</body>
    <script src="jquery-3.3.1.js" type="text/javascript" charset="utf-8"></script>
    <script type="text/javascript">
        //1、获取本地的图片数据,后面课程中,这些图片的数据会从后端服务器获取出来;
        var imgArr = ['11.jpg','12.jpg','13.jpg','14.jpg'];
        //2、动态生成,即向ul中循环追加每张图片;
        for(var i = 0;i<imgArr.length;i++){
            $('ul').append("<li><img src="+imgArr[i]+"  /></li>")
        }
        //3、生成索引;
        var str = "";
        $('li').each(function(i,ele){
            str += "<span>"+(i+1)+"</span>"

        })
        console.log(str);
        $('p').html(str);
        //默认设置索引的第一个active;
        $('span:first').addClass('active');
        //5、点击索引
        $('span').click(function(){
            $(this).addClass('active').siblings('span').removeClass('active');
            //获取我们当前点击的索引值;
             var index = $(this).index()
//            $('ul').css('left',-240*index);
            $('ul').animate({
                left:-240*index
            },100)
        })
            var timer = null;
            $('#play').click(function(){
                //开启定时器;1、索引跟着走;2、图片跟着走;
                timer = setInterval(next,1000)


                function next(){

                    if(index == $('li').length-1){
                        //图片到了,得到第四张;
                        index = 0;
                        //修改3个span标签的active
                        $('p span').eq(index).addClass('active').siblings('span').removeClass('active');

                        //修改ul的样式;
                        $('ul').css('left',0);
                    }else{
                        index ++;
                        console.log(index);
                        $('p span').eq(index).addClass('active').siblings('span').removeClass('active');
                        $('ul').css('left',-240*index);

                    }
                }
        })
    </script>
</html>
26-事件流
1、事件流概念初识;
HTML中与javascript交互是通过事件驱动来实现的,例如鼠标点击事件、页面的滚动事件onscroll等等,可以向文档或者文档中的元素添加事件侦听器来预订事件。
2、什么是事件流;
事件流描述的是从页面中接收事件的顺序。
1)DOM事件流;
- 事件捕获阶段
- 处于目标阶段
- 事件冒泡阶段
3、事件流相关知识点初识;
1)addEventListener
addEventListener 是DOM2 级事件新增的指定事件处理程序的操作,这个方法接收3个参数:要处理的事件名、作为事件处理程序的函数和一个布尔值。最后这个布尔值参数如果是true,表示在捕获阶段调用事件处理程序;如果是false,表示在冒泡阶段调用事件处理程序。
2)document、documentElement和document.body三者之间的关系:
- document代表的是整个html页面;
- document.documentElement代表的是<html>标签;
- document.body代表的是<body>标签;
在标准的“DOM2级事件”中规定,事件流首先是经过事件捕获阶段,接着是处于目标阶段,最后是事件冒泡阶段。这里可以画个图示意一下:
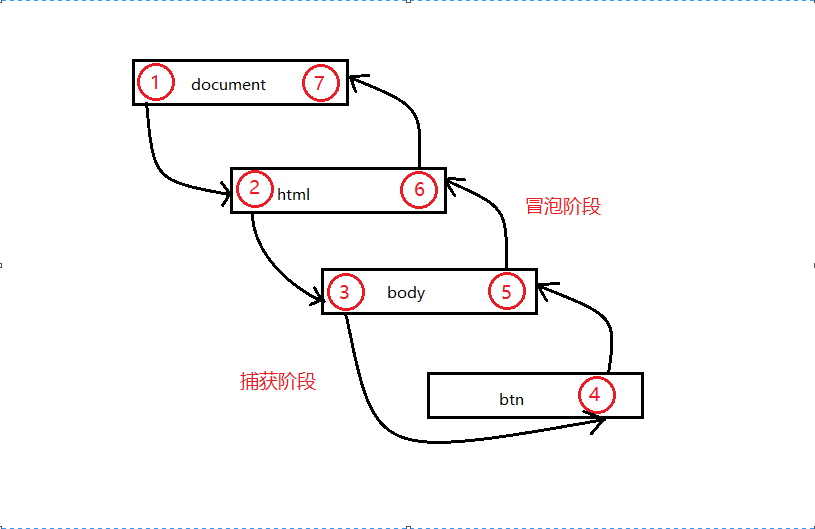
首先在事件捕获过程中,document对象首先接收到click事件,然后事件沿着DOM树依次向下,一直传播到事件的实际目标,就是id为btn的a标签。
接着在事件冒泡过程中,事件开始时由最具体的元素(a标签)接收,然后逐级向上传播到较为不具体的节点(document)。
需要注意的点:由于老版本的浏览器不支持事件捕获,因此在实际开发中需要使用事件冒泡,在由特殊需要时再使用事件捕获。
补充:
1、IE中的事件流只支持“事件冒泡”,但是版本到了IE9+以后,实现了“DOM2级事件”,也就是说IE9+以后也可以在捕获阶段对元素进行相应的操作。
2、在DOM事件流中,实际的目标在“捕获阶段”不会接收到事件。而是在“处于目标阶段”被触发,并在事件处理中被看成“冒泡阶段”的一部分。然后,“冒泡阶段”发生,事件又传播回文档。
4、jQuery中常见的事件;
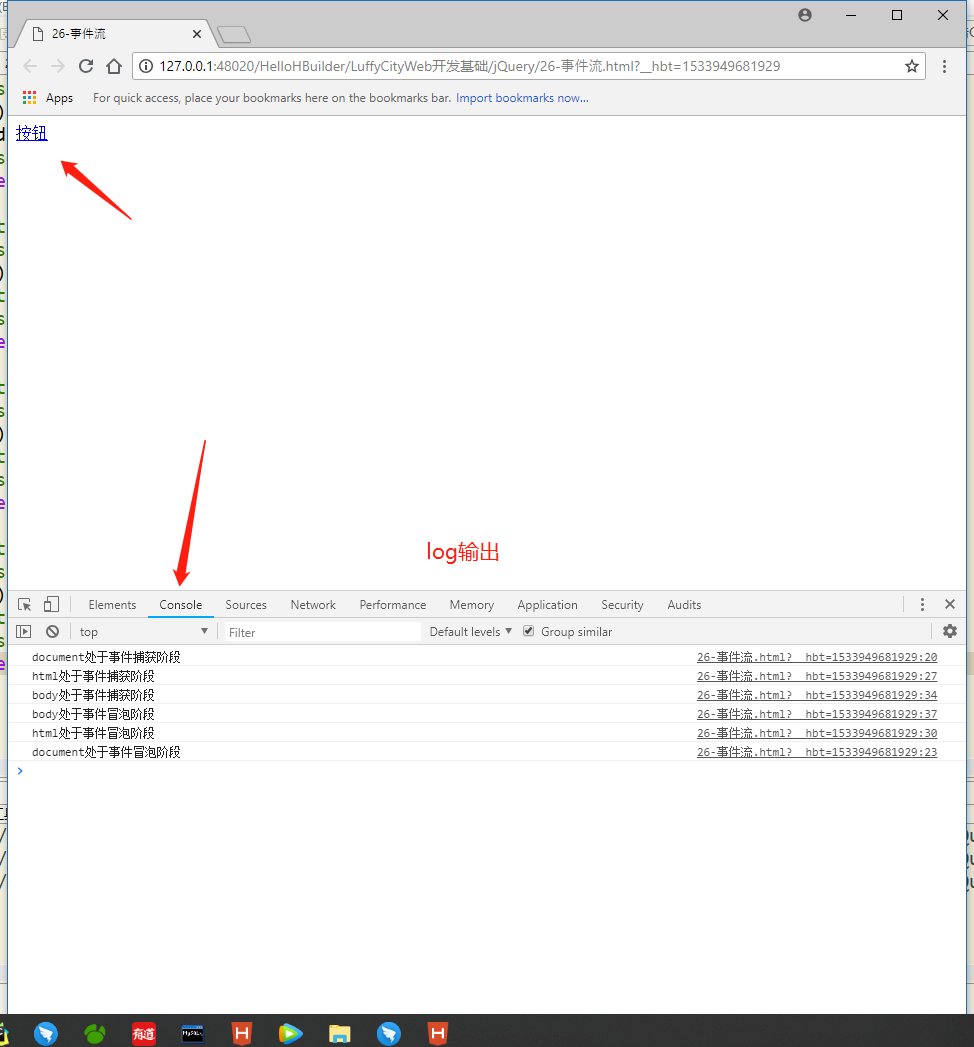
<!DOCTYPE html>
<html lang="en">
<head>
    <meta charset="UTF-8">
    <title>26-事件流</title>
    <script>

    window.onload = function(){

        var oBtn = document.getElementById('btn');

        oBtn.addEventListener('click',function(){
            console.log('btn处于事件捕获阶段');
        }, true);
        oBtn.addEventListener('click',function(){
            console.log('btn处于事件冒泡阶段');
        }, false);

        document.addEventListener('click',function(){
            console.log('document处于事件捕获阶段');
        }, true);
        document.addEventListener('click',function(){
            console.log('document处于事件冒泡阶段');
        }, false);

        document.documentElement.addEventListener('click',function(){
            console.log('html处于事件捕获阶段');
        }, true);
        document.documentElement.addEventListener('click',function(){
            console.log('html处于事件冒泡阶段');
        }, false);

        document.body.addEventListener('click',function(){
            console.log('body处于事件捕获阶段');
        }, true);
        document.body.addEventListener('click',function(){
            console.log('body处于事件冒泡阶段');
        }, false);

    };

    </script>
</head>
<body>
    <a href="javascript:;" id="btn">按钮</a>
</body>
</html>
27-jQuery事件对象和事件冒泡
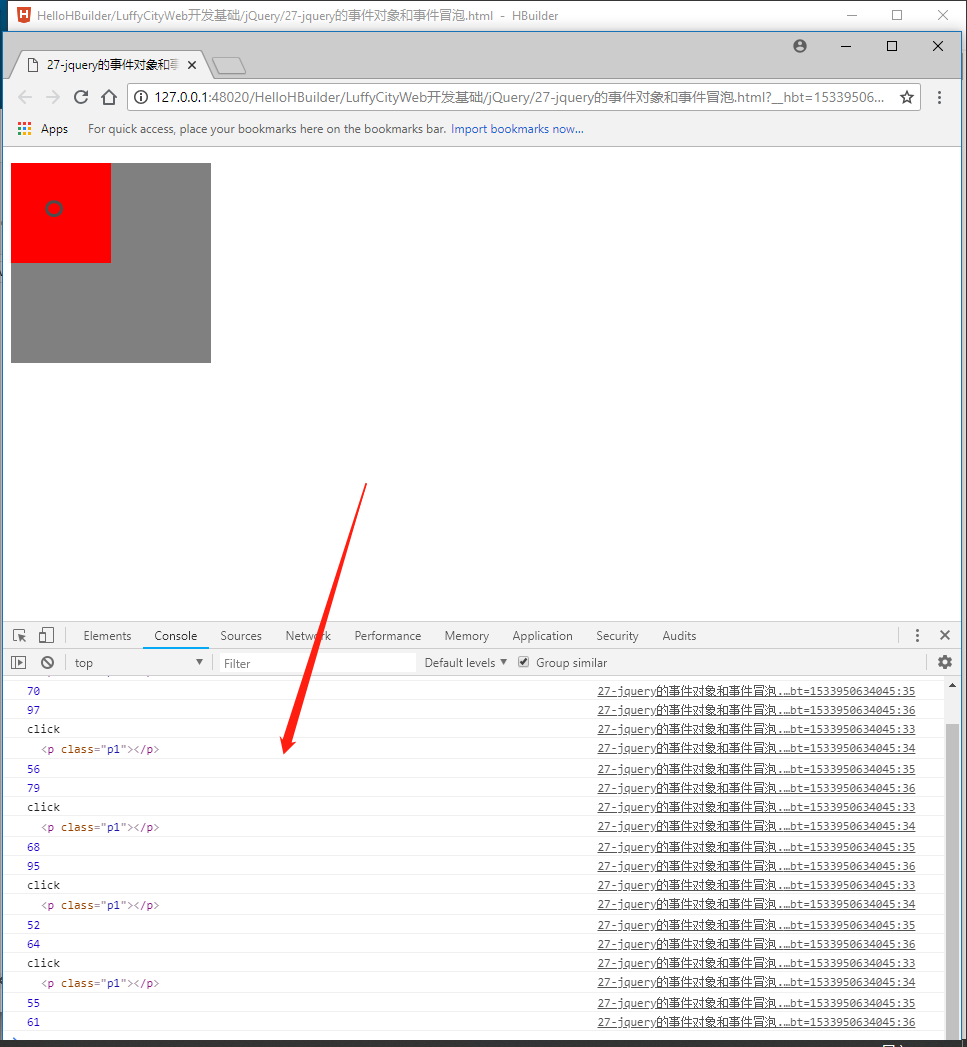
1、jQuery事件对象和事件冒泡;
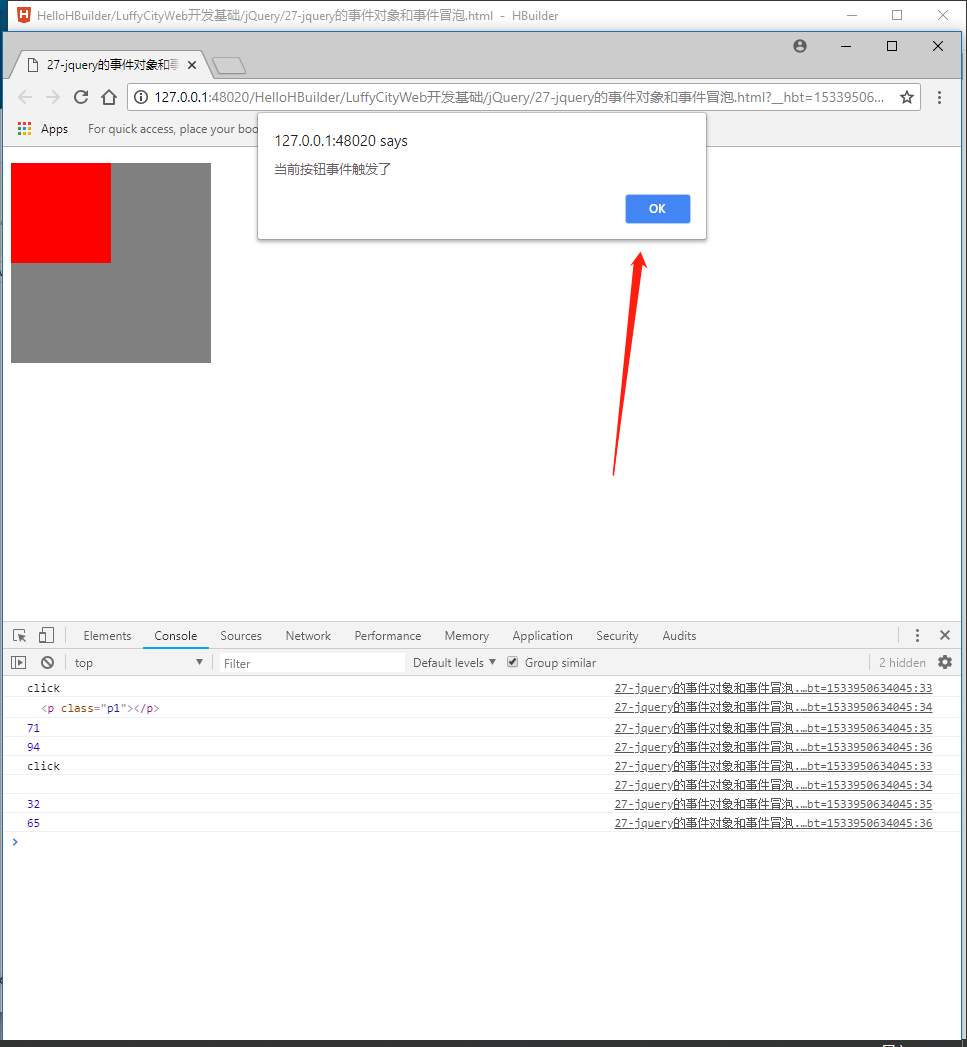
<!DOCTYPE html>
<html lang="en">
<head>
    <meta charset="UTF-8">
    <title>27-jquery的事件对象和事件冒泡</title>
    <style type="text/css">
        #box{
            width: 200px;
            height: 200px;
            background: gray;
        }
        p{
            width: 100px;
            height: 100px;
            background: red;
        }

    </style>
</head>
<body>
    <div id="box">
        <p class="p1"></p>
        <a href="https://www.luffycity.com">LuffyCity</a>
    </div>
</body>
    <script src="jquery-3.3.1.js" type="text/javascript" charset="utf-8"></script>
    <script type="text/javascript">
        //入口函数事件;
        $(function(){
            $('.p1').click(function(ev){
//            $('.p1').mouseover(function(ev){
//            $('.p1').hover(function(ev){
                //事件的类型以及事件的属性;
                console.log(ev.type);
                console.log(ev.target);

                console.log(ev.pageX);
                console.log(ev.pageY);
                alert('当前按钮事件触发了')


            //常用的事件方法:1、阻止事件冒泡;2、阻止默认事件;
                //1、阻止事件冒泡;
                ev.stopPropagation();
            })
            $('#box').click(function(){
                alert('#box盒子事件触发了!')

            })

            $('a').click(function(ev){
                //阻止a标签的默认事件;
//                ev.preventDefault();
//                ev.stopPropagation();
                //2、阻止默认事件,比如a标签;
                alert('阻止了a标签的超链接跳转事件');
                return false;//等价于以上两行被注释的代码;
            })
        })
    </script>
</html>
28-jQuery事件的绑定和移除
1、jQuery事件的绑定和移除;
<!DOCTYPE html>
<html lang="en">
<head>
    <meta charset="UTF-8">
    <title>28-jquery事件的绑定和移除</title>
    <style type="text/css">
        #box{
            width: 200px;
            height: 200px;
            background: red;
        }

    </style>
</head>
<body>
    <div id="box">

    </div>
    <button>按钮</button>
</body>
    <script src="jquery-3.3.1.js" type="text/javascript" charset="utf-8"></script>
    <script type="text/javascript">
        $(function(){
//事件的绑定
//            $('#box').click(fn)
        //给当前的DOM元素绑定事件;
        //语法:1、jQuery对象.bind('事件类型',fn);
//        $('#box').bind('click mouseenter',function(){
//            alert('事件被绑定了');
//        })
        //
        function add(){
            console.log('click');
        }
        function add2(){
            console.log('over');
        }
        $('#box').bind({
            'click':add,
            'mouseenter':add2
        })
//        $('#box').bind({
//            'click':function(){
//                console.log('click')
//            },
//            'mouseenter':function(){
//                console.log('mouseenter')
//            }
//        })

        //给当前的DOM元素解除绑定事件;
        //语法:1、jQuery对象.unbind('事件类型');
        //如果没有参数,表示移除所有事件;
        setTimeout(function(){
//            $('#box').unbind()
            $('#box').unbind('click')
        },3000)


        //注意:添加的事件不能发生在未来==》动态生成的元素不能直接添加对象,里面的事件不能发生=》事件代理
        $('body').append('<div style="200px;height:300px;background: yellow;">哈哈哈</div>')
        //补充内容:绑定自定义的事件
        $('button').bind('myClick',function(ev,a,b,c){
            alert(111);
            alert(a);
            alert(b);
        })


        //触发自定义的事件
        $('button').trigger('myClick',[1,2,3])

        })

    </script>
</html>
29-自定义事件和事件代理
1、自定义事件和事件代理;
<!DOCTYPE html>
<html lang="en">
<head>
    <meta charset="UTF-8">
    <title>29-自定义事件和事件代理</title>
    <style type="text/css">

    </style>
</head>
<body>
    <ul>
        <li>路飞学城</li>
        <li>路飞学城</li>
        <li>路飞学城</li>
        <li>路飞学城</li>
    </ul>
</body>
    <script src="jquery-3.3.1.js" type="text/javascript" charset="utf-8"></script>
    <script type="text/javascript">
        $(document).ready(function(){
            //先点击;
            $('ul>li').bind('click',function(){
                console.log($(this))
            })

            //事件代理;自身完成不了当前的点击事件,交给父级元素来做这件事件;
            //语法:父级.on('事件名字','点击当前的标签元素',fn)
            $('ul').on('click','li',function(){
                console.log(this);
            })
            //后来添加的;
        $('ul').append('<li>娜美</li>')
        })
    </script>
</html>
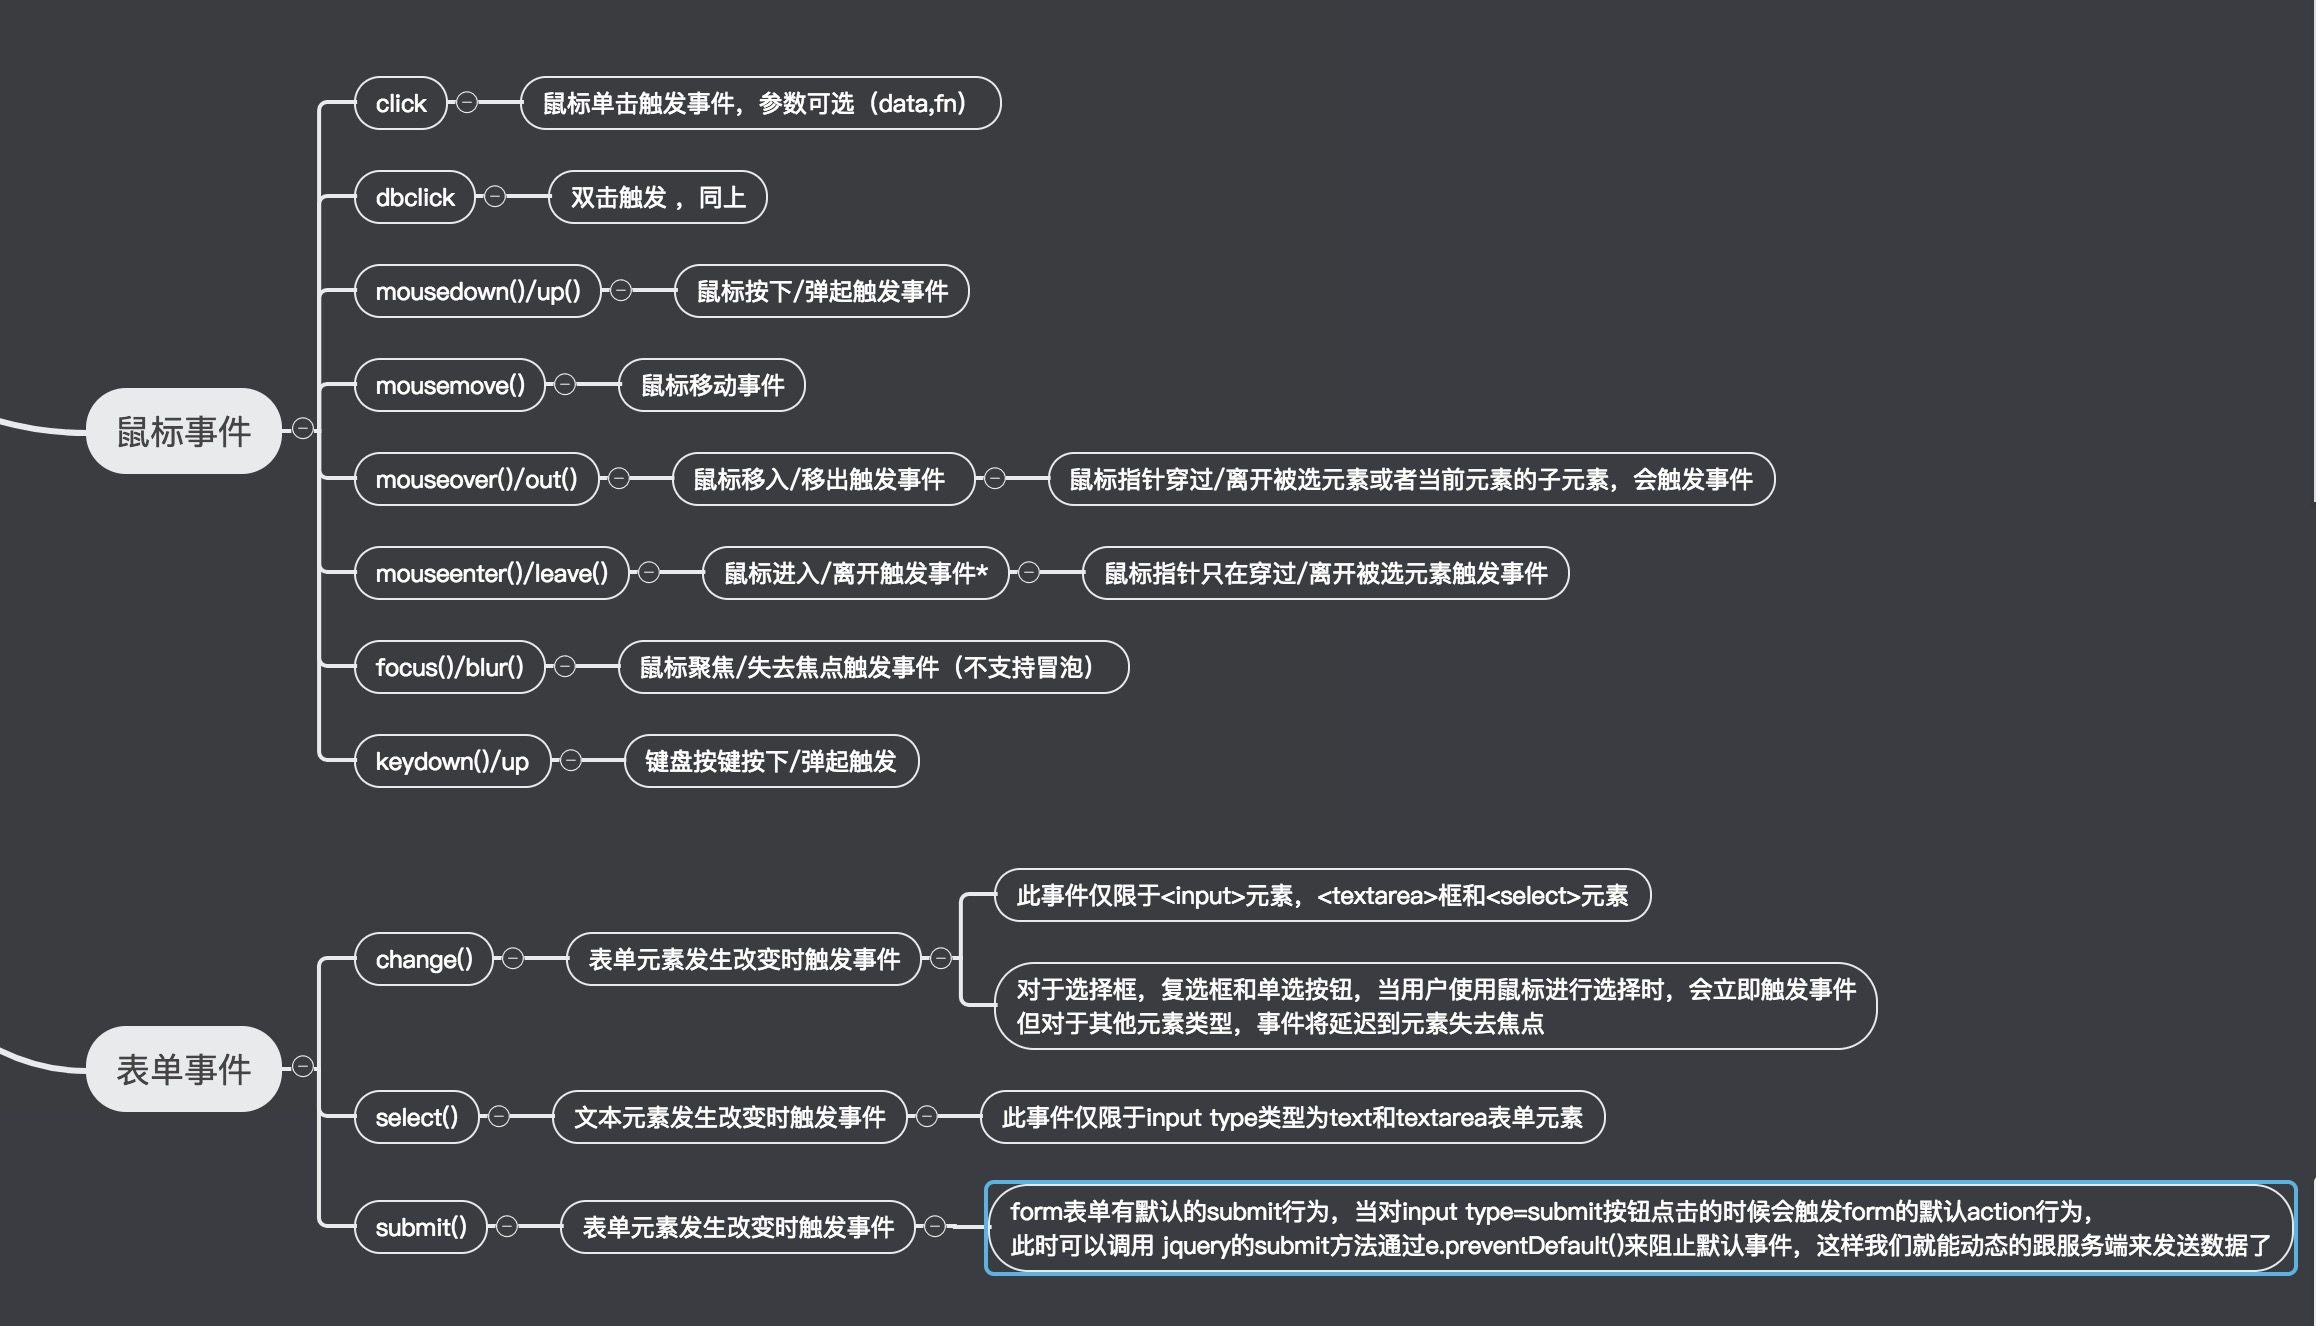
30-jQuery的鼠标事件一
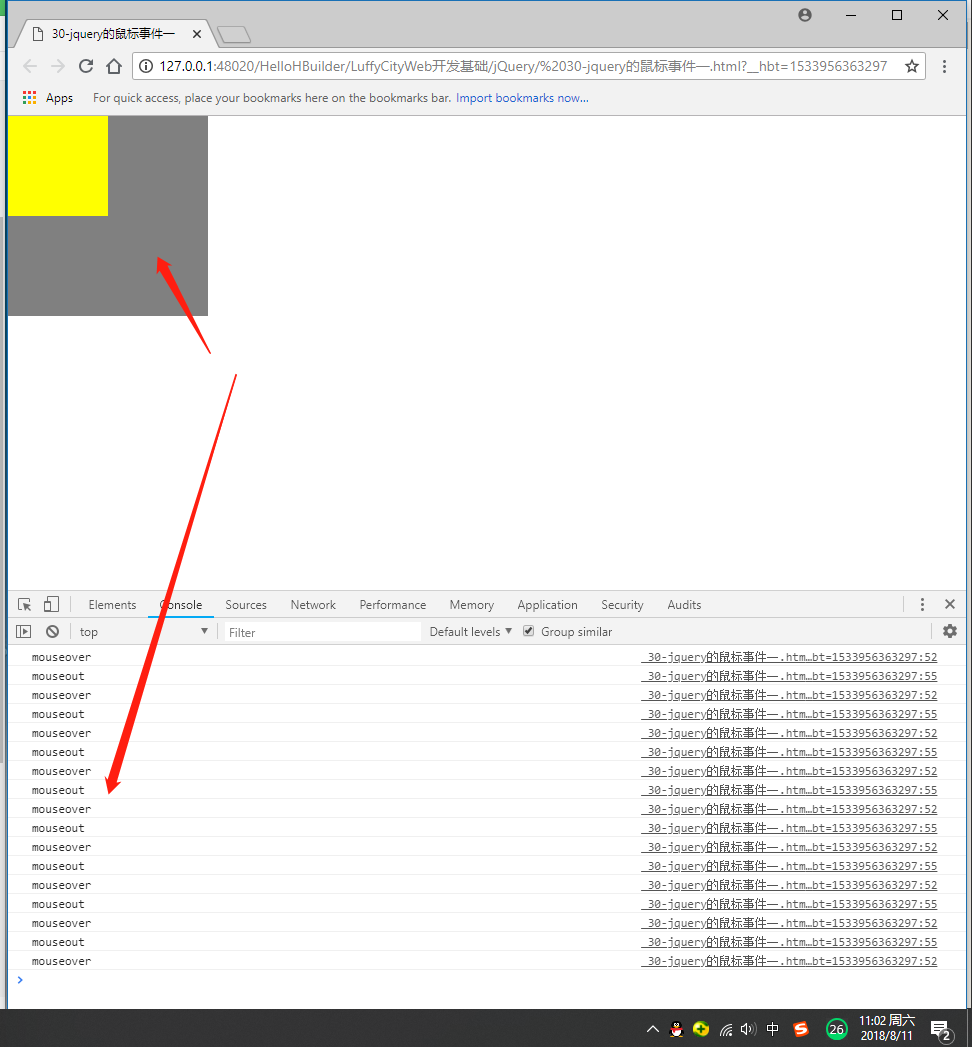
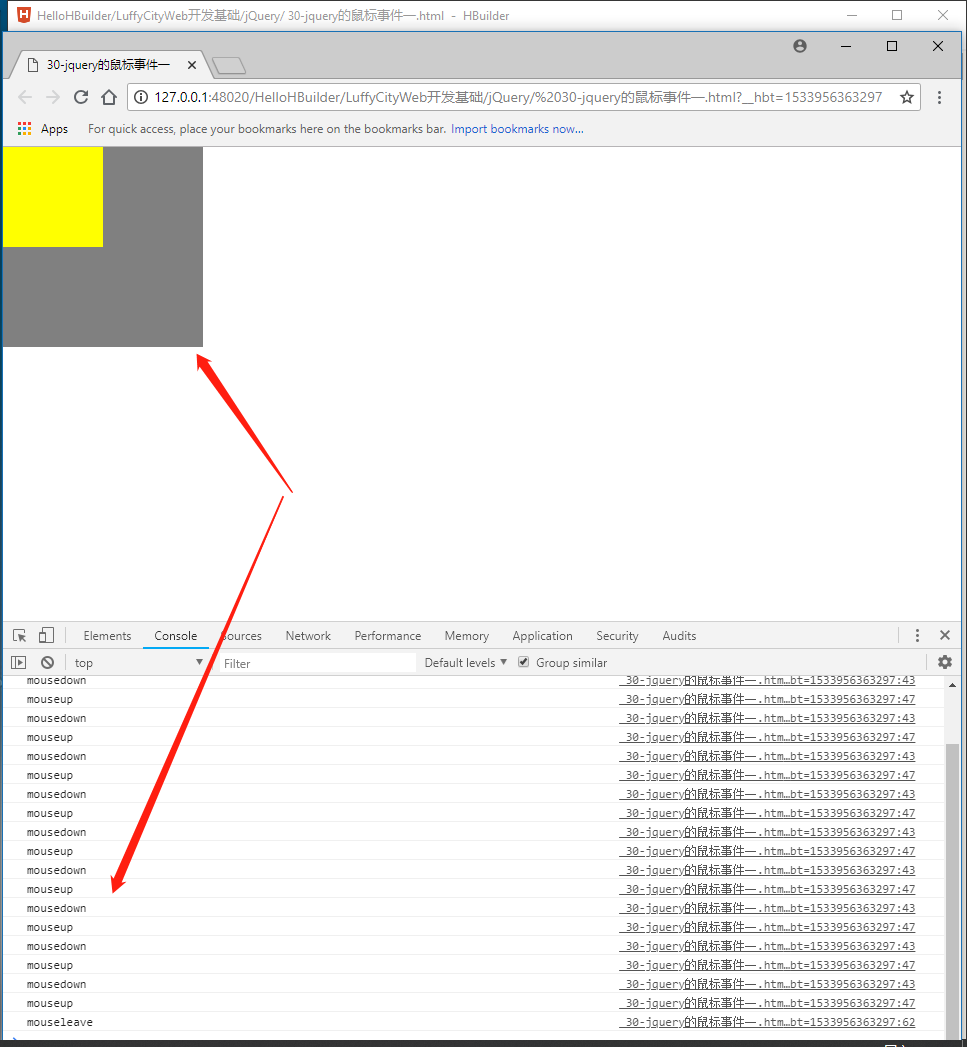
1、jQuery的鼠标事件之mousedownmouseupmouseovermouseoutmouseentermouseleave;
<!DOCTYPE html>
<html lang="en">
<head>
    <meta charset="UTF-8">
    <title> 30-jquery的鼠标事件一</title>
    <style type="text/css">
        *{
            padding: 0;
            margin: 0;
        }
        #box{
            width: 200px;
            height: 200px;
            background: gray;
        }
        #child{
            width: 100px;
            height: 100px;
            background: yellow;
        }
    </style>
</head>
<body>
    <div id="box">
        <div id="child">

        </div>
    </div>
</body>
    <script src="jquery-3.3.1.js" type="text/javascript" charset="utf-8"></script>
    <script type="text/javascript">
        $(document).ready(function(){
//            //点击事件;
//            $('#box').click(function(){
//                console.log('click')
//            })
//            //双击事件,使用的少;
//            $('#box').dblclick(function(){
//                console.log('dblclick')
//            })
        //鼠标按下不松开;
        $('#box').mousedown(function(){
            console.log('mousedown')
        })
        //鼠标松开;
        $('#box').mouseup(function(){
            console.log('mouseup')
        })

//        //被选元素和子元素;被选中时候,会触发;
//        $('#box').mouseover(function(){
//            console.log('mouseover');
//        })
//        $('#box').mouseout(function(){
//            console.log('mouseout');
//        })
        //只有被选元素移入的时候,才会触发;
        $('#box').mouseenter(function(){
            console.log('mouseenter');
        })
        $('#box').mouseleave(function(){
            console.log('mouseleave');
        })


        })
    </script>
</html>
31-jQuery的鼠标事件二
1、jQuery的鼠标事件二;
<!DOCTYPE html>
<html lang="en">
<head>
    <meta charset="UTF-8">
    <title>31-jquery的鼠标事件二</title>
    <style type="text/css">
        *{
            padding: 0;
            margin: 0;
        }
        #box{
            width: 200px;
            height: 200px;
            background: gray;
        }
        #child{
            width: 100px;
            height: 100px;
            background: yellow;
        }
    </style>
</head>
<body>
    <div id="box">
        <div id="child">

        </div>
        <input type="text" name="" id="" value="123" />
        <br />
        <input type="password"  value="" />
    </div>
</body>
    <script src="jquery-3.3.1.js" type="text/javascript" charset="utf-8"></script>
    <script type="text/javascript">
        $(document).ready(function(){
//            //点击事件;
//            $('#box').click(function(){
//                console.log('click')
//            })
//            //双击事件,使用的少;
//            $('#box').dblclick(function(){
//                console.log('dblclick')
//            })
        //鼠标按下不松开;
        $('#box').mousedown(function(){
            console.log('mousedown')
        })
        //鼠标松开;
        $('#box').mouseup(function(){
            console.log('mouseup')
        })

//        //被选元素和子元素;被选中时候,会触发;
//        $('#box').mouseover(function(){
//            console.log('mouseover');
//        })
//        $('#box').mouseout(function(){
//            console.log('mouseout');
//        })
        //只有被选元素移入的时候,才会触发;
//        $('#box').mouseenter(function(){
//            console.log('mouseenter');
//        })
//        $('#box').mouseleave(function(){
//            console.log('mouseleave');
//        })
        $('input[type=text]').focus(function(){
            console.log($(this).val());
        })
        $('input[type=text]').blur(function(){
            console.log($(this).val());
        })
        $('input[type=password]').keydown(function(e){
            console.log(e.keyCode);
            if(e.keyCode ==13){
                console.log('Enter被按下了')
            }
            console.log($(this).val())
        })
        $('input[type=password]').keyup(function(){
            console.log($(this).val())
        })
        })
    </script>
</html>

32-JQuery的表单事件
1、JQuery的表单事件初识;
<!DOCTYPE html>
<html lang="en">
<head>
    <meta charset="UTF-8">
    <title>32-jquery的表单事件</title>
    <style type="text/css">
        .show{
            color: red;
            width: 100px;
            height: 100px;
            background: red;
        }
    </style>
</head>
<body>
    <form action="https://www.luffycity.com">
        <select name="sweets" id="" multiple="">
            <option value="">巧克力</option>
            <option value="" selected="">糖果</option>
            <option value="">焦糖</option>
            <option value="" selected="">曲奇饼</option>
            <option value="">烧饼</option>
            <option value="">麦香饼</option>
            <option value="">曲奇饼1</option>
        </select><br />

        <input type="text" value="hello" id="target" />
        <input type="submit" value="Luffy" />
        <input type="button" name="" id="" value="按钮" />
    </form>
    <div id="other">
        Trigger the handler
    </div>
    <div class="show">

    </div>
</body>
    <script src="jquery-3.3.1.js" type="text/javascript" charset="utf-8"></script>
    <script type="text/javascript">
        $(function(){
            //change()事件
            //此事件仅限于input元素textarea select
            $('select').change(function(){
                console.log($('select option:selected'));
                $('.show').text($('select option:selected').text());
            })
            //select()方法仅限于用在input type=text textarea
            $('#other').select(function(){
                console.log($(this).text());
            })
            $('form').submit(function(e){
//                alert(111)
                //阻止默认事件;跟服务端一起做,有很大挂钩!
                e.preventDefault();
                alert(111)
            })
        })
    </script>
</html>
33-jQuery的ajax技术
1、JQuery中的ajax技术初识;
AJAX = 异步的javascript和XML(Asynchronous Javascript and XML)简言之,在不重载整网页的情况下,AJAX通过后台加载数据,并在网页上进行显示。
通过 jQuery AJAX 方法,您能够使用 HTTP Get 和 HTTP Post 从远程服务器上请求文本、HTML、XML 或 JSON - 同时您能够把这些外部数据直接载入网页的被选元素中。
2、jQuery中的load()方法;
jQuery load()方法是简单但强大的AJAX方法。load()方法从服务器加载数据,并把返回的数据放入被选元素中。
注意:load函数最好在服务器网页中应用,也就是说要在服务器上运行,本地调试需要搭建后端本地环境。$("selector").load(url,data,callback);
3、jQuery中的getJSON方法;
jQuery的AJAX中使用getJSON()方法异步加载JSON格式数据。获取服务器中的数据,并对数据进行解析,显示到页面中
语法: $.getJSON(url,[data],[callback])
4、jQuery中的$.get()方法;
· $.get() 方法通过 HTTP GET 请求从服务器上请求数据
语法:$.get(URL,callback);
5、jQuery中的post()方法;
与get()方法相比,post()方法多用于以POST方式向服务器发送数据,服务器接收到数据之后,进行处理,并将处理结果返回页面;
语法:$.post(URL,data,callback);
6、jQuery中的$.ajax()方法;
1.url: 要求为String类型的参数,(默认为当前页地址)发送请求的地址。

2.type: 要求为String类型的参数,请求方式(post或get)默认为get。注意其他http请求方法,例如put和delete也可以使用,但仅部分浏览器支持。

3.timeout: 要求为Number类型的参数,设置请求超时时间(毫秒)。此设置将覆盖$.ajaxSetup()方法的全局设置。

4.async: 要求为Boolean类型的参数,默认设置为true,所有请求均为异步请求。如果需要发送同步请求,请将此选项设置为false。注意,同步请求将锁住浏览器,用户其他操作必须等待请求完成才可以执行。

5.cache: 要求为Boolean类型的参数,默认为true(当dataType为script时,默认为false),设置为false将不会从浏览器缓存中加载请求信息。

6.data: 要求为Object或String类型的参数,发送到服务器的数据。如果已经不是字符串,将自动转换为字符串格式。get请求中将附加在url后。防止这种自动转换,可以查看  processData选项。对象必须为key/value格式,例如{foo1:"bar1",foo2:"bar2"}转换为&foo1=bar1&foo2=bar2。如果是数组,JQuery将自动为不同值对应同一个名称。例如{foo:["bar1","bar2"]}转换为&foo=bar1&foo=bar2。

7.dataType: 要求为String类型的参数,预期服务器返回的数据类型。如果不指定,JQuery将自动根据http包mime信息返回responseXML或responseText,并作为回调函数参数传递。可用的类型如下: xml:返回XML文档,可用JQuery处理。 html:返回纯文本HTML信息;包含的script标签会在插入DOM时执行。 script:返回纯文本JavaScript代码。不会自动缓存结果。除非设置了cache参数。注意在远程请求时(不在同一个域下),所有post请求都将转为get请求。 json:返回JSON数据。 jsonp:JSONP格式。使用SONP形式调用函数时,例如myurl?callback=?,JQuery将自动替换后一个“?”为正确的函数名,以执行回调函数。 text:返回纯文本字符串。

8.beforeSend:要求为Function类型的参数,发送请求前可以修改XMLHttpRequest对象的函数,例如添加自定义HTTP头。在beforeSend中如果返回false可以取消本次ajax请求。XMLHttpRequest对象是惟一的参数。 function(XMLHttpRequest){ this; //调用本次ajax请求时传递的options参数 }

9.complete:要求为Function类型的参数,请求完成后调用的回调函数(请求成功或失败时均调用)。参数:XMLHttpRequest对象和一个描述成功请求类型的字符串。 function(XMLHttpRequest, textStatus){ this; //调用本次ajax请求时传递的options参数 }

10.success:要求为Function类型的参数,请求成功后调用的回调函数,有两个参数。 (1)由服务器返回,并根据dataType参数进行处理后的数据。 (2)描述状态的字符串。 function(data, textStatus){ //data可能是xmlDoc、jsonObj、html、text等等 this; //调用本次ajax请求时传递的options参数 }

11.error: 要求为Function类型的参数,请求失败时被调用的函数。该函数有3个参数,即XMLHttpRequest对象、错误信息、捕获的错误对象(可选)。ajax事件函数如下: function(XMLHttpRequest, textStatus, errorThrown){ //通常情况下textStatus和errorThrown只有其中一个包含信息 this; //调用本次ajax请求时传递的options参数 }

12.contentType:要求为String类型的参数,当发送信息至服务器时,内容编码类型默认为"application/x-www-form-urlencoded"。该默认值适合大多数应用场合。

13.dataFilter: 要求为Function类型的参数,给Ajax返回的原始数据进行预处理的函数。提供data和type两个参数。data是Ajax返回的原始数据,type是调用jQuery.ajax时提供的dataType参数。函数返回的值将由jQuery进一步处理。 function(data, type){ //返回处理后的数据 return data; }

14.dataFilter: 要求为Function类型的参数,给Ajax返回的原始数据进行预处理的函数。提供data和type两个参数。data是Ajax返回的原始数据,type是调用jQuery.ajax时提供的dataType参数。函数返回的值将由jQuery进一步处理。 function(data, type){ //返回处理后的数据 return data; }

15.global: 要求为Boolean类型的参数,默认为true。表示是否触发全局ajax事件。设置为false将不会触发全局ajax事件,ajaxStart或ajaxStop可用于控制各种ajax事件。

16.ifModified: 要求为Boolean类型的参数,默认为false。仅在服务器数据改变时获取新数据。服务器数据改变判断的依据是Last-Modified头信息。默认值是false,即忽略头信息。

17.jsonp: 要求为String类型的参数,在一个jsonp请求中重写回调函数的名字。该值用来替代在"callback=?"这种GET或POST请求中URL参数里的"callback"部分,例如{jsonp:'onJsonPLoad'}会导致将"onJsonPLoad=?"传给服务器。

18.username: 要求为String类型的参数,用于响应HTTP访问认证请求的用户名。

19.password: 要求为String类型的参数,用于响应HTTP访问认证请求的密码。

20.processData: 要求为Boolean类型的参数,默认为true。默认情况下,发送的数据将被转换为对象(从技术角度来讲并非字符串)以配合默认内容类型"application/x-www-form-urlencoded"。如果要发送DOM树信息或者其他不希望转换的信息,请设置为false。

21.scriptCharset: 要求为String类型的参数,只有当请求时dataType为"jsonp"或者"script",并且type是GET时才会用于强制修改字符集(charset)。通常在本地和远程的内容编码不同时使用
演示代码如下:
<!DOCTYPE html>
<html lang="en">
<head>
    <meta charset="UTF-8">
    <title>33-jquery的ajax技术</title>
    <style type="text/css">

    </style>
</head>
<body>
    <button id="btn">演示</button>
    <div id="box">

    </div>
</body>
    <script src="jquery-3.3.1.js" type="text/javascript" charset="utf-8"></script>
    <script type="text/javascript">
        $(document).ready(function(){
//            $('#btn').click(function(){
//                //只传一个url,导入的index.html文件含有多个传递参数,类似于:index/html?name="张三"
////                $('#box').load('./text.html',{name:"张三"});
//                $('#box').load('./text.html');
//            })

        //get请求
        $.ajax({
            url:"./data.json",
            type:'get',
//            dataType:'json',
            success:function(data){
                console.log(data);
            },
            error:function(){

            }
        })

        //post按时无法演示,django可以演示;
        $.ajax({
            url:"/course",
            type:"post",
            data:{
                username:'cxz19930911',
                password:'Ab123'
            },
            sucess:function(data){
                if(data.state == "ok" &&data.status =="200"){
                    //登录成功!
                }
            },
            error:function(err){
                console.log(err);
            }
        })
        //
        })
    </script>

</html>
34-Bootstrap介绍和引入
1、BootStrap的介绍和引入;
凡是使用过Bootstrap的开发者,都不在乎做这么两件事情:复制and粘贴。哈哈~,是的使用Bootstrap非常简单,但是在复制粘贴之前,需要先对Bootstrap的用法一一熟悉之后我们才开始干活!
Bootstrap,来自 Twitter,是目前最受欢迎的前端框架。Bootstrap 是基于 HTML、CSS、javascript 的,它简洁灵活,使得 Web 开发更加快捷。
它用于开发响应式布局、移动设备优先的 WEB 项目!
首先要知道,我们为什么要写自适应的页面(也叫做响应式页面)?
众所周知,电脑、平板、手机的屏幕是差距很大的,假如在电脑上写好了一个页面,在电脑上看起来不错,但是如果放到手机上的话,那可能就会乱的一塌糊涂,这时候怎么解决呢?以前,可以再专门为手机定制一个页面,当用户访问的时候,判断设备是手机还是电脑,如果是手机就跳转到相应的手机页面,例如百度的就是,手机访问www.baidu.com就会跳转到m.baidu.com,这样做简直就是费力不讨好的活,所以聪明的程序员开发了一种自适应写法,即一次开发,处处显示!这到底是一个什么样的神器东西呢,接下来就揭晓它的神秘面纱。
简洁、直观、强悍的前端开发框架,让web开发更迅速、简单。
Bootstrap中文网:http://www.bootcss.com/
2、插件和组件的区别;
组件、插件、控件的区别
- 控件:是编程中用到的,按钮就算是一个控件,窗口也是等等
- 组件:是软件的一部分.软件的组成部分.
- 插件:网页中用到的,flash插件,没有它浏览器不能播放flash.
见优秀的博文吧!
https://blog.csdn.net/zhangyunfei_happy/article/details/47256245
https://blog.csdn.net/haiross/article/details/22662635
3、Bootstrap使用起步;
https://v3.bootcss.com/getting-started/
模板:
https://v3.bootcss.com/getting-started/#template
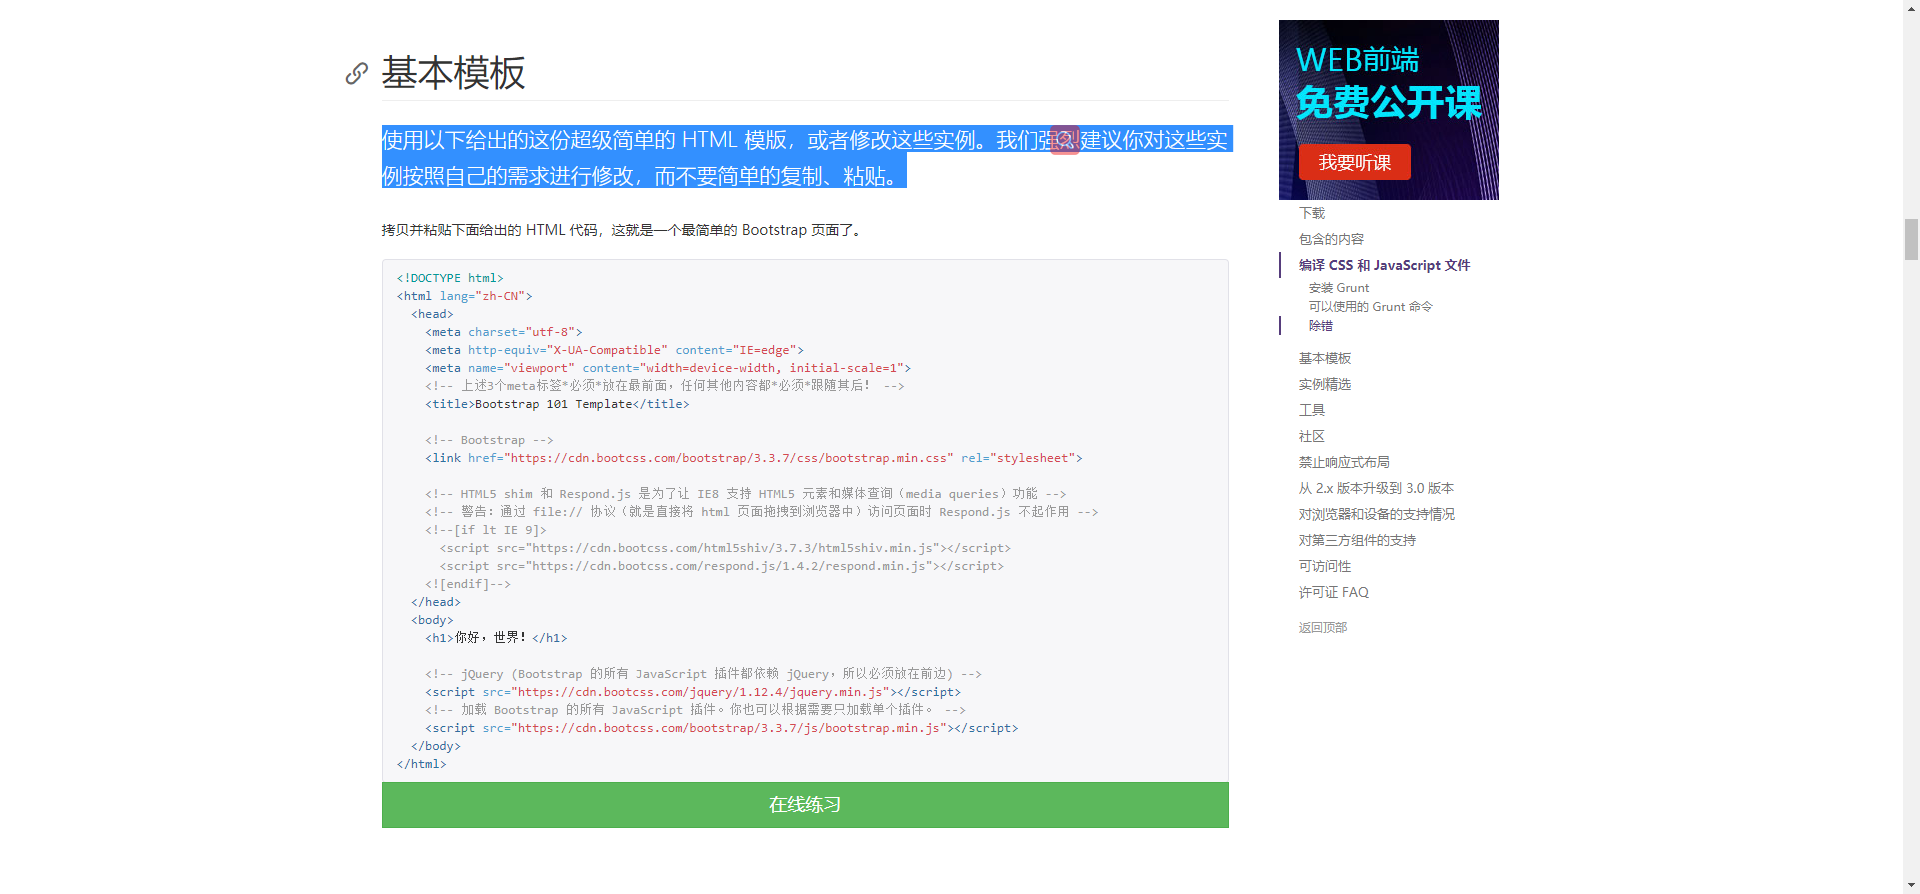
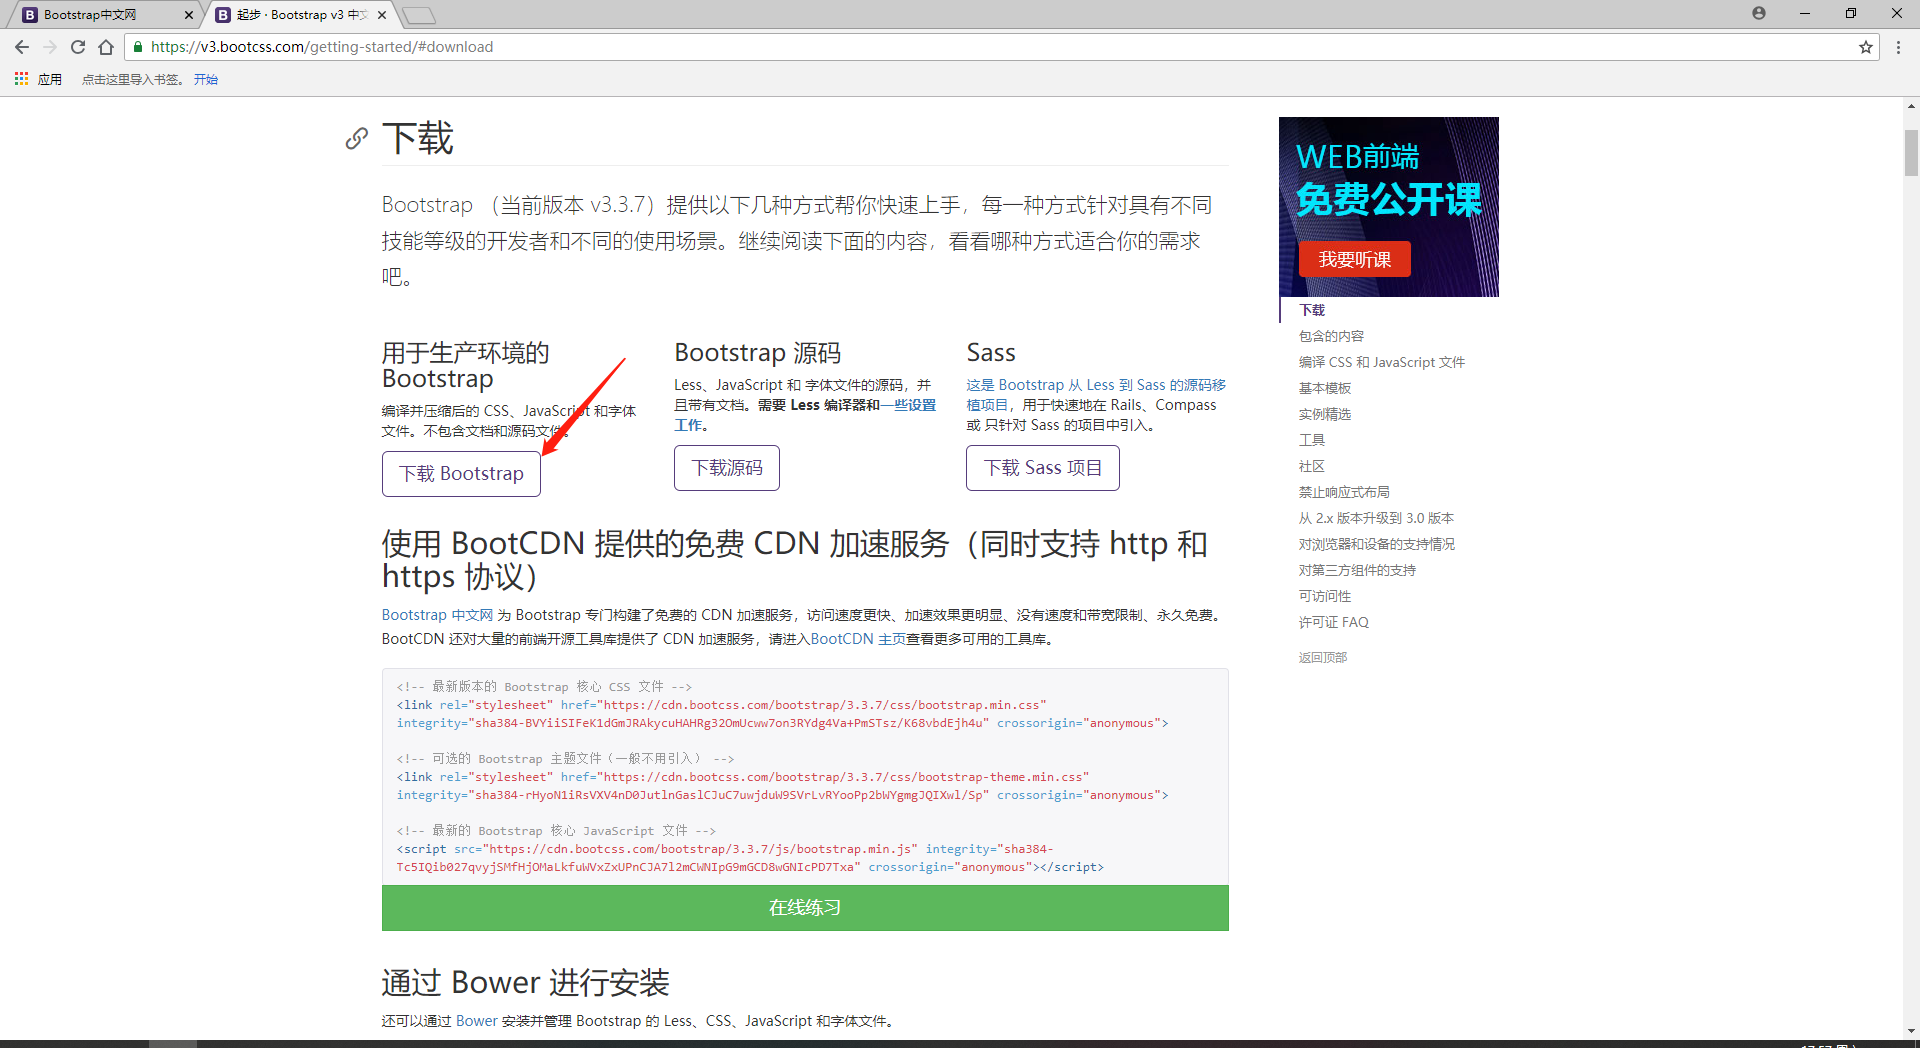
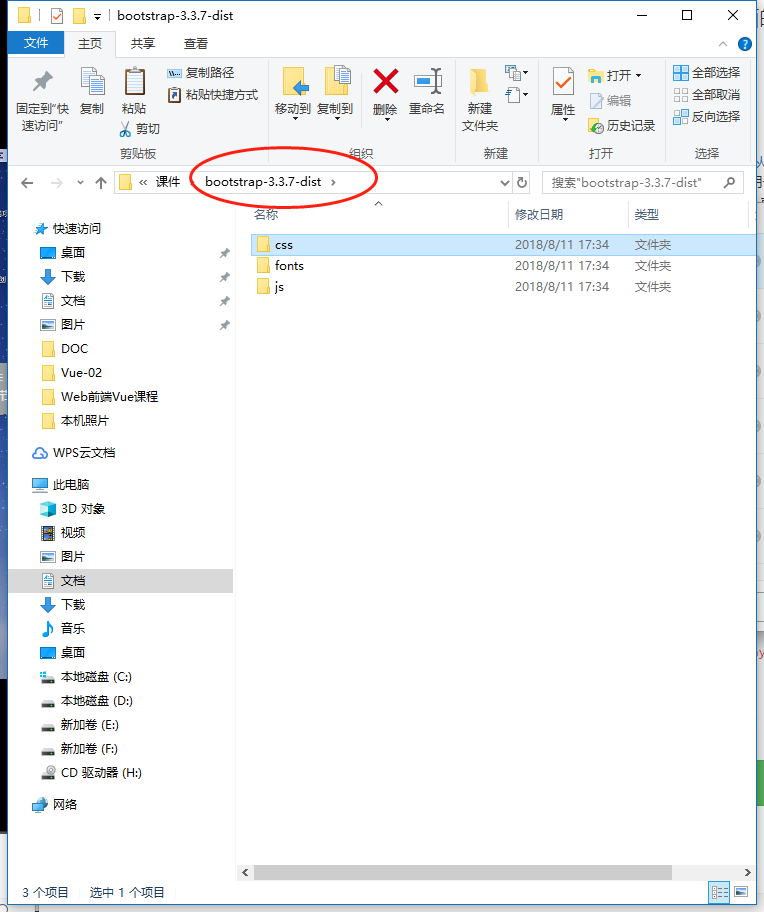
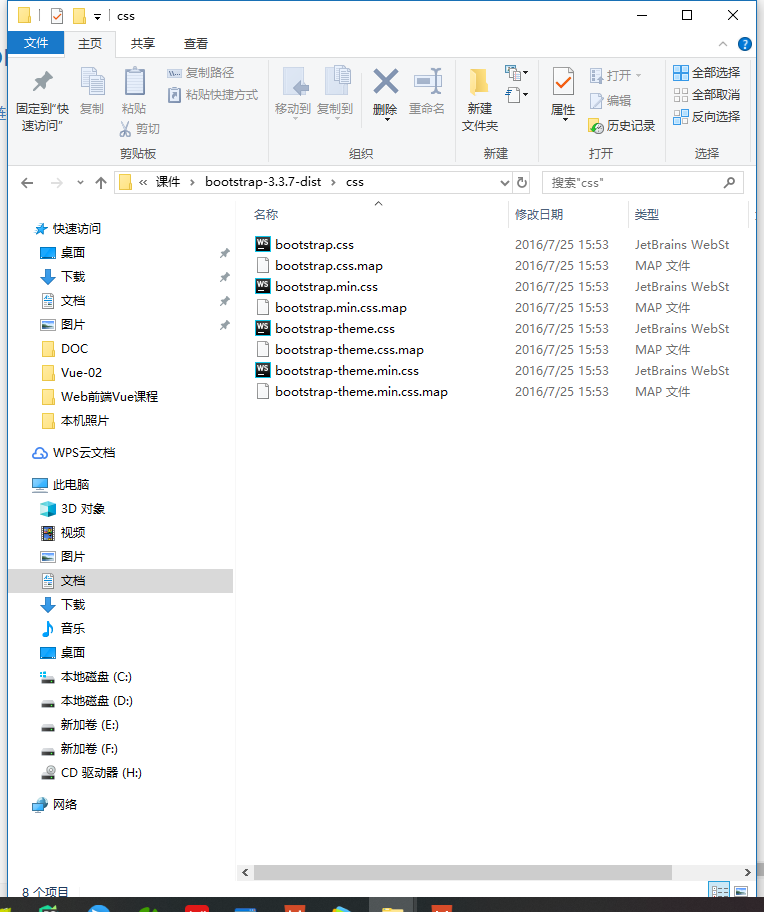
<!DOCTYPE html>
<html lang="zh-CN">
  <head>
    <meta charset="utf-8">
    <!--以最高的IE浏览器渲染-->
    <meta http-equiv="X-UA-Compatible" content="IE=edge">
    <!--视口的设置:BootStrap移动设备优先,支持移动端,在多个设备上适应,PC iphone 安卓-->
    <meta name="viewport" content="width=device-width, initial-scale=1">
    <!-- 上述3个meta标签*必须*放在最前面,任何其他内容都*必须*跟随其后! -->
    <!--<title>Bootstrap 101 Template</title>-->
    <title>LuffyCity</title>

    <!-- Bootstrap必须先引入Bootstrap -->
    <!--<link href="https://cdn.bootcss.com/bootstrap/3.3.7/css/bootstrap.min.css" rel="stylesheet">-->
    <link rel="stylesheet" type="text/css" href="bootstrap-3.3.7-dist/css/bootstrap.min.css" />

    <!-- HTML5 shim 和 Respond.js 是为了让 IE8 支持 HTML5 元素和媒体查询(media queries)功能 -->
    <!-- 警告:通过 file:// 协议(就是直接将 html 页面拖拽到浏览器中)访问页面时 Respond.js 不起作用 -->
    <!--[if lt IE 9]>
      <script src="https://cdn.bootcss.com/html5shiv/3.7.3/html5shiv.min.js"></script>
      <script src="https://cdn.bootcss.com/respond.js/1.4.2/respond.min.js"></script>
    <![endif]-->
  </head>
  <body>
    <h1>你好,世界!</h1>

    <!-- jQuery (Bootstrap 的所有 JavaScript 插件都依赖 jQuery,所以必须放在前边) -->
    <!--<script src="https://cdn.bootcss.com/jquery/1.12.4/jquery.min.js"></script>-->
    <!-- 加载 Bootstrap 的所有 JavaScript 插件。你也可以根据需要只加载单个插件。 -->
    <!--<script src="https://cdn.bootcss.com/bootstrap/3.3.7/js/bootstrap.min.js"></script>-->
  </body>
</html>
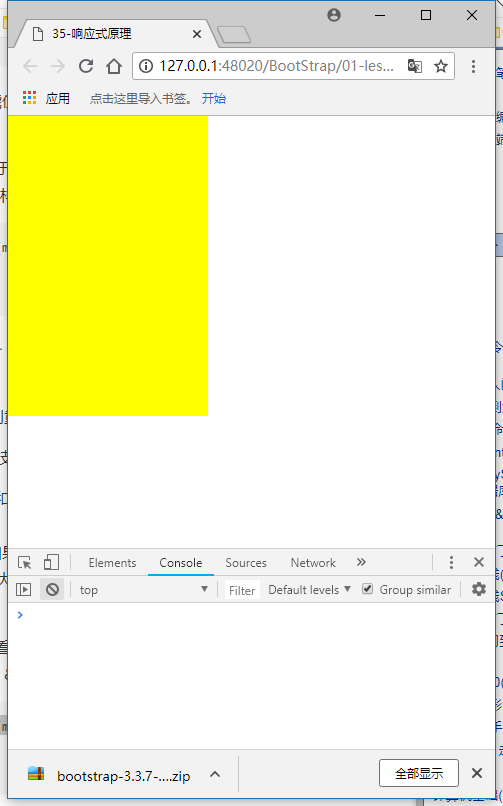
35-相应式原理
1、首先要知道,我们为什么要写自适应的页面(响应式页面);
2、CSS3 的 @media 查询;
使用 @media 查询,你可以针对不同的屏幕大小定义不同的样式。 @media 可以针对不同的屏幕尺寸设置不同的样式,特别是如果你需要设置设计响应式的页面,@media 是非常有用的。 当你重置浏览器大小的过程中,页面也会根据浏览器的宽度和高度重新渲染页面,这对调试来说是一个极大的便利。
CSS语法:
@media mediaType and|not|only (media feature) {
     /*CSS-Code;*/
}
Step1:首先我们在使用 @media 的时候需要先设置下面这段代码,来兼容移动设备的展示效果:
<meta name="viewport" content="width=device-width, initial-scale=1.0, user-scalable=no">
Step2:加载兼容JS文件;
<!--[if lt IE 9]>
  <script src="https://oss.maxcdn.com/libs/html5shiv/3.7.0/html5shiv.js"></script>
  <script src="https://oss.maxcdn.com/libs/respond.js/1.3.0/respond.min.js"></script>
<![endif]-->
Step3:设置IE渲染方式默认为最高(可选);
现在有很多人的IE浏览器都升级到IE9以上了,所以这个时候就有又很多诡异的事情发生了,例如现在是IE9的浏览器,但是浏览器的文档模式却是IE8 为了防止这种情况,我们需要下面这段代码来让IE的文档渲染模式永远都是最新的
<meta http-equiv="X-UA-Compatible" content="IE=Edge,chrome=1">
1、通过灵活应用以上技巧,开发出一个响应式页面,还不是近在咫尺的感觉;
2、不要被 min-width 和 max-width 所迷惑,初学者很容易误以为 min-width 的意思是小于xxx的时候才应用,然而这就陷入误区了,其实它的意思是:当设置了 min-width 的时候,文档的宽度如果小于设置的值,就不会应用这个区块里的CSS样式,所以 min-width 它才能实现大于等于设置的值得时候,才会应用区块里的CSS样式,max-width 也是如此;
3、或者这样想想,先看代码,这句代码的意思是宽度大于等于 300px ,小于等于 500px ( width >=300 && width <=500)的时候应用样式;
@media screen and (min-300px) and (max-500px) {
    /* CSS 代码 */
}
<!DOCTYPE html>
<html lang="en">
<head>
    <meta charset="UTF-8">
    <title>35-响应式原理</title>
    <!--使用@media查询必须使用如下操作:-->
    <meta name="viewport" content="width=device-width, initial-scale=1.0, user-scalable=no">
    <style type="text/css">
        *{
            padding: 0;
            margin: 0;
        }
        @media  screen and (max- 500px) {
            .box{
                width: 200px;
                height: 300px;
                background: yellow;
            }
        }
        /*300px~600px之间显示的样式*/
        @media  screen and (min- 500px) and (max- 800px) {
        .box{
            width: 200px;
            height: 300px;
            background: red;
        }
        }
        @media  screen and (min- 800px) {
            .box{
                width: 200px;
                height: 300px;
                background: green;
            }
        }

    </style>
</head>
<body>
    <div class="box"></div>
</body>
</html>
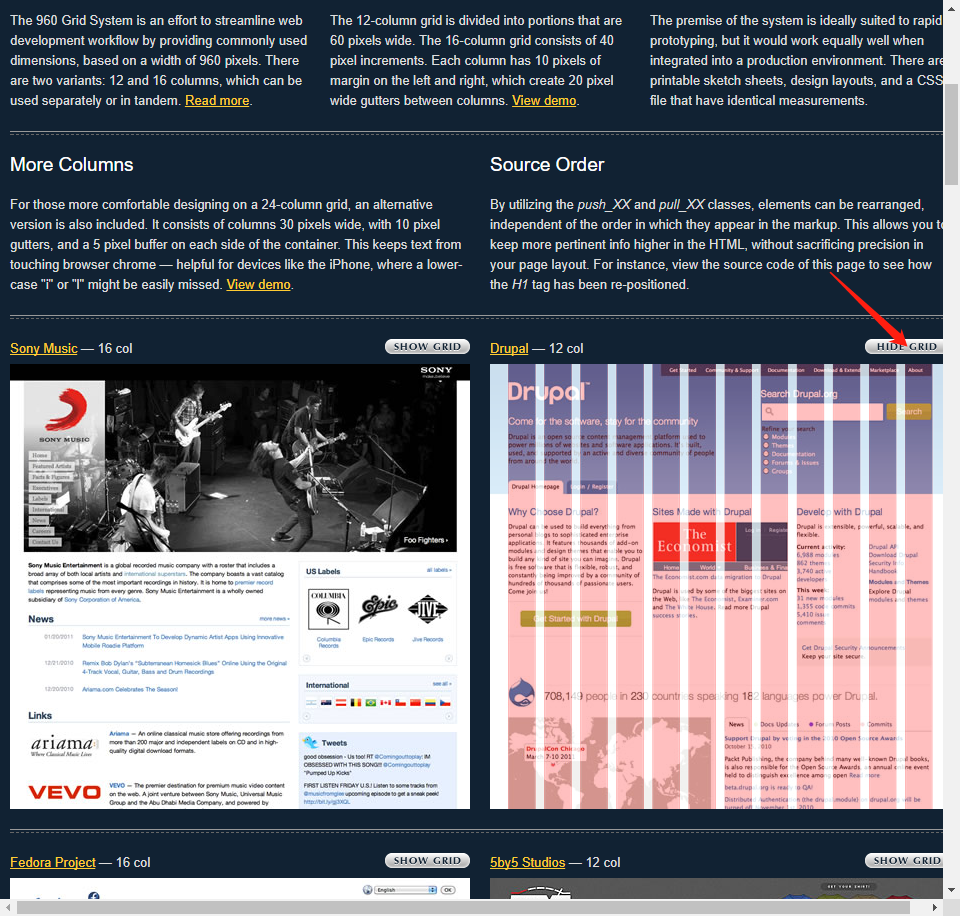
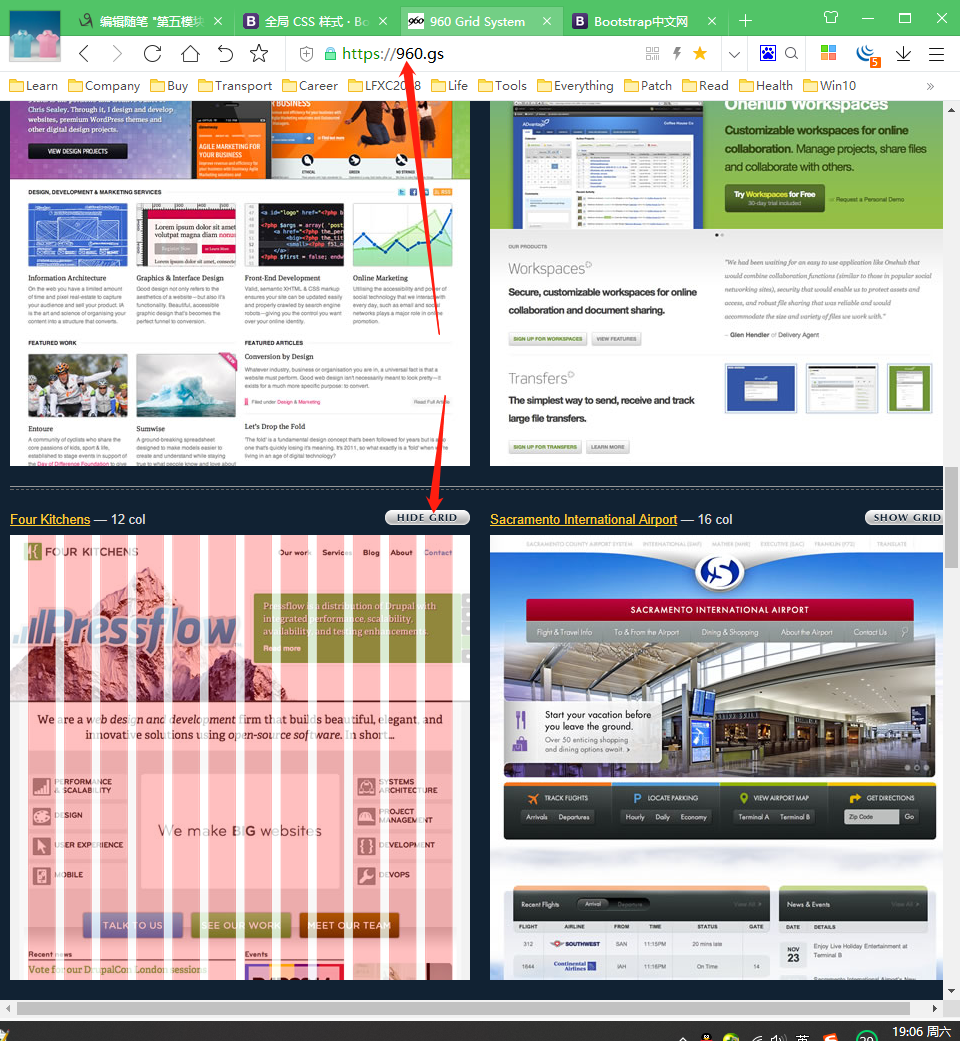
36-BootStrap的栅格系统介绍
1、Bootstrap全局CSS样式初识;
设置全局 CSS 样式;基本的 HTML 元素均可以通过 class 设置样式并得到增强效果;还有先进的栅格系统。
Bootstrap 提供了一套响应式、移动设备优先的流式栅格系统,随着屏幕或视口(viewport)尺寸的增加,系统会自动分为最多12列。它包含了易于使用的预定义类,还有强大的mixin 用于生成更具语义的布局。
Bootstrap鼻祖;https://960.gs/
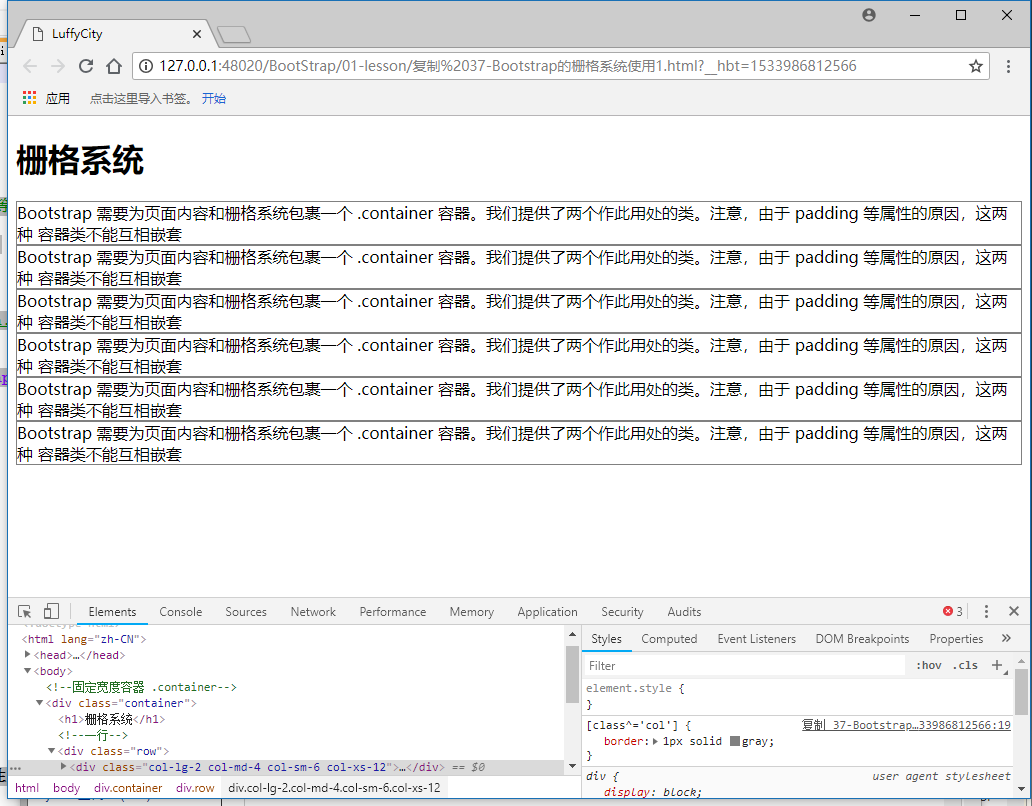
37-BootStrap的栅格系统使用
1、Bootstrap中格栅系统的使用;
<!DOCTYPE html>
<html lang="zh-CN">
  <head>
    <meta charset="utf-8">
    <!--以最高的ie浏览器渲染-->
    <meta http-equiv="X-UA-Compatible" content="IE=edge">

    <!--视口的设置  移动设备优先 支持移动端 在多个设备上适应  PC iphone 安卓等-->
    <meta name="viewport" content="width=device-width, initial-scale=1">
    <!-- 上述3个meta标签*必须*放在最前面,任何其他内容都*必须*跟随其后! -->
    <title>LuffyCity</title>

    <!-- Bootstrap 必须引入Bootstrap -->
    <!--<link href="https://cdn.bootcss.com/bootstrap/3.3.7/css/bootstrap.min.css" rel="stylesheet">-->

    <link rel="stylesheet" type="text/css" href="bootstrap-3.3.7/css/bootstrap.min.css"/>
    <style type="text/css">
        /*不要随意修改Bootstrap提供出来的系统类*/
            [class^='col']{
                border: 1px solid gray;
            }
    </style>

  </head>
  <body>


      <!--固定宽度容器 .container-->

      <div class="container">
          <h1>栅格系统</h1>

          <!--一行-->
          <div class="row">
              <div class="col-lg-2 col-md-4 col-sm-6 col-xs-12">
                  Bootstrap 需要为页面内容和栅格系统包裹一个 .container 容器。我们提供了两个作此用处的类。注意,由于 padding 等属性的原因,这两种 容器类不能互相嵌套
              </div>
              <div class="col-lg-2 col-md-4 col-sm-6 col-xs-12">
                  Bootstrap 需要为页面内容和栅格系统包裹一个 .container 容器。我们提供了两个作此用处的类。注意,由于 padding 等属性的原因,这两种 容器类不能互相嵌套
              </div>
              <div class="col-lg-2 col-md-4 col-sm-6 col-xs-12">
                  Bootstrap 需要为页面内容和栅格系统包裹一个 .container 容器。我们提供了两个作此用处的类。注意,由于 padding 等属性的原因,这两种 容器类不能互相嵌套
              </div>
              <div class="col-lg-2 col-md-4 col-sm-6 col-xs-12">
                  Bootstrap 需要为页面内容和栅格系统包裹一个 .container 容器。我们提供了两个作此用处的类。注意,由于 padding 等属性的原因,这两种 容器类不能互相嵌套
              </div>
              <div class="col-lg-2 col-md-4 col-sm-6 col-xs-12">
                  Bootstrap 需要为页面内容和栅格系统包裹一个 .container 容器。我们提供了两个作此用处的类。注意,由于 padding 等属性的原因,这两种 容器类不能互相嵌套
              </div>
              <div class="col-lg-2 col-md-4 col-sm-6 col-xs-12">
                  Bootstrap 需要为页面内容和栅格系统包裹一个 .container 容器。我们提供了两个作此用处的类。注意,由于 padding 等属性的原因,这两种 容器类不能互相嵌套
              </div>

          </div>


      </div>

  </body>
</html>
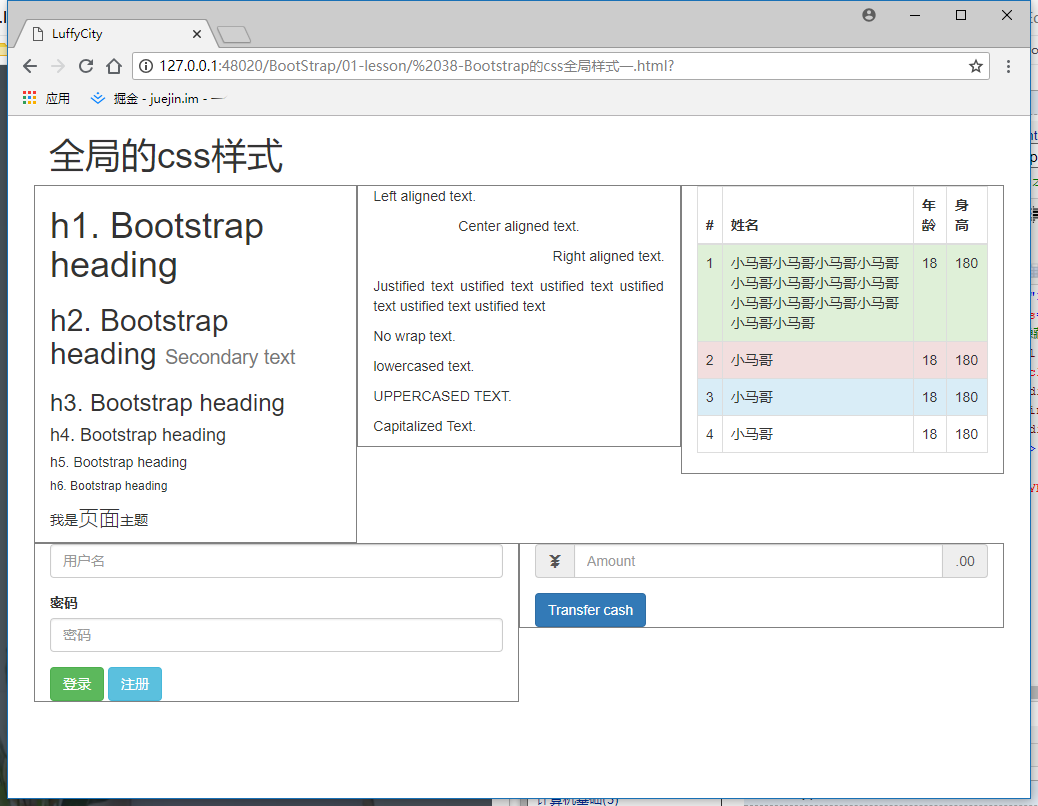
38-BootStrap的css全局样式一
1、Bootstrap的CSS全局样式展示;
<!DOCTYPE html>
<html lang="zh-CN">

    <head>
        <meta charset="utf-8">
        <!--以最高的ie浏览器渲染-->
        <meta http-equiv="X-UA-Compatible" content="IE=edge">

        <!--视口的设置  移动设备优先 支持移动端 在多个设备上适应  PC iphone 安卓等-->
        <meta name="viewport" content="width=device-width, initial-scale=1">
        <!-- 上述3个meta标签*必须*放在最前面,任何其他内容都*必须*跟随其后! -->
        <title>LuffyCity</title>

        <!-- Bootstrap 必须引入Bootstrap -->
        <!--<link href="https://cdn.bootcss.com/bootstrap/3.3.7/css/bootstrap.min.css" rel="stylesheet">-->

        <link rel="stylesheet" type="text/css" href="bootstrap-3.3.7-dist/css/bootstrap.min.css" />
        <style type="text/css">
            /*不要随意修改Bootstrap提供出来的系统类*/

            [class^='col'] {
                border: 1px solid gray;
            }
        </style>

    </head>

    <body>

        <!--固定宽度容器 .container-->

        <div class="container">
            <h1>全局的css样式</h1>

            <!--一行-->
            <div class="row">
                <div class="col-md-4">
                    <h1>h1. Bootstrap heading</h1>
                    <h2>h2. Bootstrap heading <small>Secondary text</small></h2>
                    <h3>h3. Bootstrap heading</h3>
                    <h4>h4. Bootstrap heading</h4>
                    <h5>h5. Bootstrap heading</h5>
                    <h6>h6. Bootstrap heading</h6>

                    <p>我是<span class="lead">页面</span>主题</p>
                </div>
                <div class="col-md-4">
                    <p class="text-left">Left aligned text.</p>
                    <p class="text-center">Center aligned text.</p>
                    <p class="text-right">Right aligned text.</p>
                    <p class="text-justify">Justified text ustified text ustified text ustified text ustified text ustified text</p>
                    <p class="text-nowrap">No wrap text.</p>

                    <p class="text-lowercase">Lowercased text.</p>
                    <p class="text-uppercase">Uppercased text.</p>
                    <p class="text-capitalize">capitalized text.</p>

                </div>

                <div class="col-md-4">

                    <!--响应式的表格-->
                    <div class="table-responsive">

                        <table class="table table-striped table-bordered table-hover">
                            <thead>
                                <tr>
                                    <th>#</th>
                                    <th>姓名</th>
                                    <th>年龄</th>
                                    <th>身高</th>

                                </tr>
                            </thead>
                            <tbody>
                                <tr class="success">
                                    <td>1</td>
                                    <td>小马哥小马哥小马哥小马哥小马哥小马哥小马哥小马哥小马哥小马哥小马哥小马哥小马哥小马哥</td>
                                    <td>18</td>
                                    <td>180</td>
                                </tr>
                                <tr class="danger">
                                    <td>2</td>
                                    <td>小马哥</td>
                                    <td>18</td>
                                    <td>180</td>
                                </tr>
                                <tr class="info">
                                    <td>3</td>
                                    <td>小马哥</td>
                                    <td>18</td>
                                    <td>180</td>
                                </tr>
                                <tr>
                                    <td>4</td>
                                    <td>小马哥</td>
                                    <td>18</td>
                                    <td>180</td>
                                </tr>
                            </tbody>
                        </table>
                    </div>
                </div>

            </div>

            <div class="row">
                <div class="col-md-6">
                    <form>
                        <div class="form-group">
                            <!--隐藏当前元素-->
                            <label for="username" class="sr-only">用户名</label>
                            <input type="text" class="form-control" id="username" placeholder="用户名">
                        </div>
                        <div class="form-group">
                            <label for="pwd">密码</label>
                            <input type="password" class="form-control" id="pwd" placeholder="密码">
                        </div>

                        <button type="submit" class="btn btn-success">登录</button>
                        <button type="submit" class="btn btn-info">注册</button>
                    </form>
                </div>
                <div class="col-md-6">
                    <form class="">
                        <div class="form-group">
                            <!--隐藏-->
                            <label class="sr-only" for="exampleInputAmount">Amount (in dollars)</label>
                            <div class="input-group">
                                <div class="input-group-addon"><span class="glyphicon glyphicon-yen"></span></div>
                                <input type="text" class="form-control" id="exampleInputAmount" placeholder="Amount">
                                <div class="input-group-addon">.00</div>
                            </div>
                        </div>
                        <button type="submit" class="btn btn-primary">Transfer cash</button>
                    </form>
                </div>
            </div>

        </div>

    </body>

</html>
39-BootStrap的css全局样式二
学习Bootstrap最好的方式就是去官网将所有的样例练习一遍,然后进行修改,再次查看效果,就能记住啦!
40-BootStrap的组件使用一
41-BootStrap的组件使用二
无数可复用的组件,包括字体图标、下拉菜单、导航、警告框、弹出框等更多功能。
https://v3.bootcss.com/components/
42-BootStrap插件介绍
1、JavaScript插件:https://v3.bootcss.com/javascript/
2、jQuery的内容补充;
jQuery除了咱们上面讲解的常用知识点之外,还有jQuery 插件、jQueryUI知识点
jQueryUI 官网:https://jqueryui.com/
jQueryUI 中文网:http://www.jqueryui.org.cn/
https://www.oschina.net/project/tag/273/jquery