官方API:ViewFlipper:http://androiddoc.qiniudn.com/reference/android/widget/ViewFlipper.html
2.常用的一些方法
setInAnimation:设置View进入屏幕时使用的动画
setOutAnimation:设置View退出屏幕时使用的动画
showNext:调用该方法来显示ViewFlipper里的下一个View
showPrevious:调用该方法来显示ViewFlipper的上一个View
setFilpInterval:设置View之间切换的时间间隔
setFlipping:使用上面设置的时间间隔来开始切换所有的View,切换会循环进行
stopFlipping:停止View切换

实现代码:
每个页面的布局都是一个简单的ImageView,这里就不贴了~先贴下两个进入以及 离开的动画:
right_in.xml:
<?xml version="1.0" encoding="utf-8"?>
<set xmlns:android="http://schemas.android.com/apk/res/android">
<translate
android:duration="2000"
android:fromXDelta="100%p"
android:toXDelta="0" />
</set>
right_out.xml:
<?xml version="1.0" encoding="utf-8"?>
<set xmlns:android="http://schemas.android.com/apk/res/android" >
<translate
android:duration="2000"
android:fromXDelta="0"
android:toXDelta="-100%p" />
</set>
然后是activity_main.xml布局文件:
<RelativeLayout xmlns:android="http://schemas.android.com/apk/res/android"
xmlns:tools="http://schemas.android.com/tools"
android:layout_width="match_parent"
android:layout_height="match_parent"
tools:context=".MainActivity">
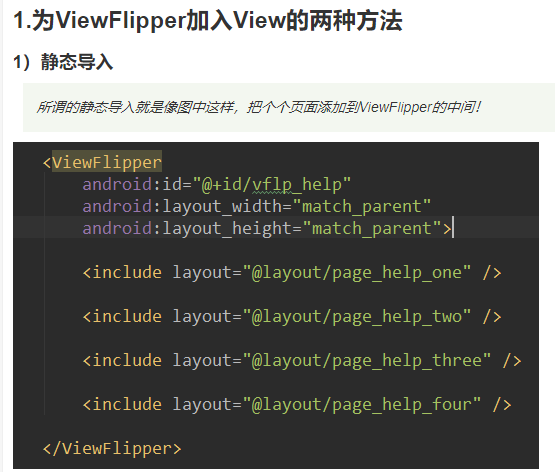
<ViewFlipper
android:id="@+id/vflp_help"
android:layout_width="match_parent"
android:layout_height="match_parent"
android:inAnimation="@anim/right_in"
android:outAnimation="@anim/right_out"
android:flipInterval="3000">
<include layout="@layout/page_help_one" />
<include layout="@layout/page_help_two" />
<include layout="@layout/page_help_three" />
<include layout="@layout/page_help_four" />
</ViewFlipper>
</RelativeLayout>
这里我们设置了flipInterval = 3000,即每隔3000ms切还一个~ 最后我们只需在MainActivity.java中调用ViewFlipper的startFlipping()方法开始滑动!
MainActivity.java:
public class MainActivity extends AppCompatActivity {
private ViewFlipper vflp_help;
@Override
protected void onCreate(Bundle savedInstanceState) {
super.onCreate(savedInstanceState);
setContentView(R.layout.activity_main);
vflp_help = (ViewFlipper) findViewById(R.id.vflp_help);
vflp_help.startFlipping();
}
}

代码实现:
因为我们分为进入上一页,进入下一页,所以除了上面的两个动画外,我们再添加两个动画:
left_in.xml:
<?xml version="1.0" encoding="utf-8"?>
<set xmlns:android="http://schemas.android.com/apk/res/android" >
<translate
android:duration="500"
android:fromXDelta="-100%p"
android:toXDelta="0" />
</set>
left_out.xml:
<?xml version="1.0" encoding="utf-8"?>
<set xmlns:android="http://schemas.android.com/apk/res/android">
<translate
android:duration="500"
android:fromXDelta="0"
android:toXDelta="100%p" />
</set>
MainActivity.java:
public class MainActivity extends AppCompatActivity {
private Context mContext;
private ViewFlipper vflp_help;
private int[] resId = {R.mipmap.ic_help_view_1,R.mipmap.ic_help_view_2,
R.mipmap.ic_help_view_3,R.mipmap.ic_help_view_4};
private final static int MIN_MOVE = 200; //最小距离
private MyGestureListener mgListener;
private GestureDetector mDetector;
@Override
protected void onCreate(Bundle savedInstanceState) {
super.onCreate(savedInstanceState);
setContentView(R.layout.activity_main);
mContext = MainActivity.this;
//实例化SimpleOnGestureListener与GestureDetector对象
mgListener = new MyGestureListener();
mDetector = new GestureDetector(this, mgListener);
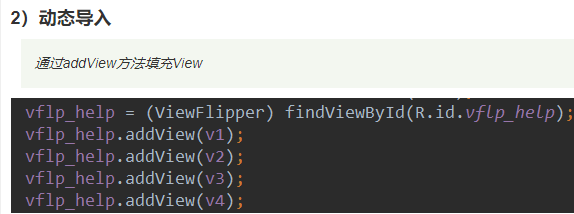
vflp_help = (ViewFlipper) findViewById(R.id.vflp_help);
//动态导入添加子View
for(int i = 0;i < resId.length;i++){
vflp_help.addView(getImageView(resId[i]));
}
}
//重写onTouchEvent触发MyGestureListener里的方法
@Override
public boolean onTouchEvent(MotionEvent event) {
return mDetector.onTouchEvent(event);
}
//自定义一个GestureListener,这个是View类下的,别写错哦!!!
private class MyGestureListener extends GestureDetector.SimpleOnGestureListener {
@Override
public boolean onFling(MotionEvent e1, MotionEvent e2, float v, float v1) {
if(e1.getX() - e2.getX() > MIN_MOVE){
vflp_help.setInAnimation(mContext,R.anim.right_in);
vflp_help.setOutAnimation(mContext, R.anim.right_out);
vflp_help.showNext();
}else if(e2.getX() - e1.getX() > MIN_MOVE){
vflp_help.setInAnimation(mContext,R.anim.left_in);
vflp_help.setOutAnimation(mContext, R.anim.left_out);
vflp_help.showPrevious();
}
return true;
}
}
private ImageView getImageView(int resId){
ImageView img = new ImageView(this);
img.setBackgroundResource(resId);
return img;
}
}