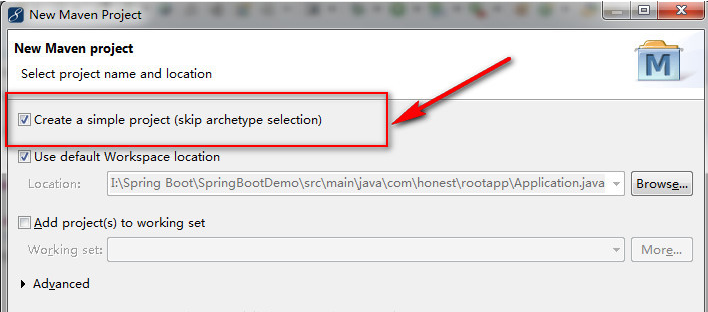
第一步:File-New-Other创建maven项目:

第二步:注意勾选create a simple project(skip archetype selection)//创建一个简单的项目跳过原型选择
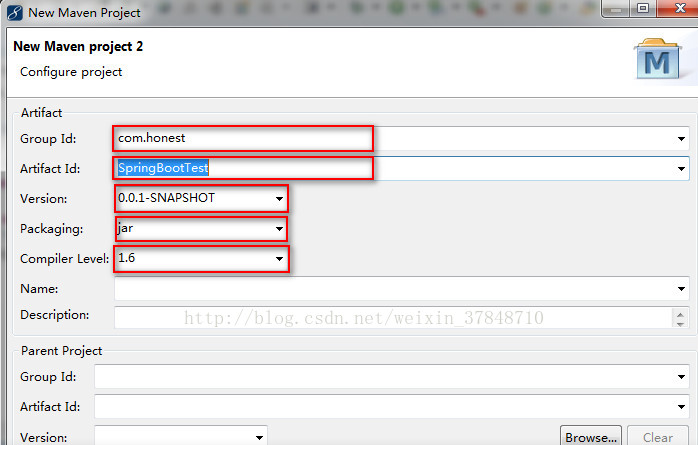
第三步:

Group Id : 公司名称,com.tszr

Artifact Id : 项目的名称

Version:版本号,GroupId+ArtifactId+Packaging+Version构成项目的唯一标识。

Packaging:打包类型,jar/war/rar/ear/pom等,选择jar。

Compiler Level : 选择jdk版本
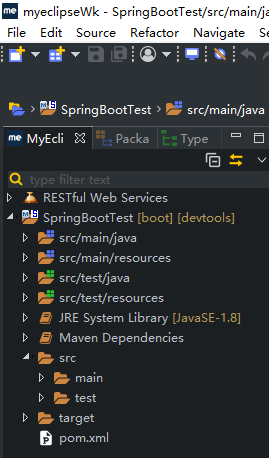
目录结构如图。

Src/main/java。编写代码存放的目录。

Src/main/resources。资源文件存放目录。
Src/test/java。测试代码存放目录。
第五步:配置pom.xml文件

对于配置pom.xml文件我们要做三步操作:

1、设置spring boot的parent(继承父包):在pom.xml中引入spring-boot-starter-parent,spring官方的叫stater poms,它可以提供dependency management,也就是依赖管理,引入以后在声明其它dependency的时候就不需要version了。
<!-- 1、设置Spring boot的parent -->
<parent>
    <groupId>org.springframework.boot</groupId>
    <artifactId>spring-boot-starter-parent</artifactId>
    <version>1.5.6.RELEASE</version>
</parent>
2、导入spring boot的web支持:需要在pom.xml中引入spring-boot-starter-web,spring官方解释spring-boot-starter-web包含了spring webmvc和tomcat等web开发的特性。

<!-- 2、导入Spring boot的web支持 -->
<dependencies>
    <dependency>
        <groupId>org.springframework.boot</groupId>
        <artifactId>spring-boot-starter-web</artifactId>
    </dependency>
</dependencies>
3、添加Spring boot的插件:如果我们要直接Main启动spring,那么以下plugin必须要添加,否则是无法启动的。如果使用maven的spring-boot:run的话就不需要此配置。

<!-- 3、添加Spring boot的插件 -->
<plugin>
      <groupId>org.springframework.boot</groupId>
      <artifactId>spring-boot-maven-plugin</artifactId>
</plugin>
以上三步均配置完毕后得完整的pom.xml文件如下:

<project xmlns="http://maven.apache.org/POM/4.0.0"
    xmlns:xsi="http://www.w3.org/2001/XMLSchema-instance"
    xsi:schemaLocation="http://maven.apache.org/POM/4.0.0 http://maven.apache.org/xsd/maven-4.0.0.xsd">
    <modelVersion>4.0.0</modelVersion>
    <groupId>com.tszr</groupId>
    <artifactId>SpringBootTest</artifactId>
    <version>0.0.1-SNAPSHOT</version>

    <parent>
        <!-- 依赖管理,引入以后在声明其它dependency的时候就不需要version -->
        <groupId>org.springframework.boot</groupId>
        <artifactId>spring-boot-starter-parent</artifactId>
        <version>1.3.0.RELEASE</version>
        <relativePath />
    </parent>

    <properties>
        <!-- 声明项目配置依赖编码格式为 utf-8 -->
        <project.build.sourceEncoding>UTF-8</project.build.sourceEncoding>
        <project.reporting.outputEncoding>UTF-8</project.reporting.outputEncoding>
        <fastjson.version>1.2.24</fastjson.version>
    </properties>

    <dependencies>
        <!-- 对web开发的支持,包含了spring webmvc和tomcat等web开发的特性 -->
        <dependency>
            <groupId>org.springframework.boot</groupId>
            <artifactId>spring-boot-starter-web</artifactId>
        </dependency>
        <!-- spring boot核心,包括自动配置支持,日志和YAML -->
        <dependency>
            <groupId>org.springframework.boot</groupId>
            <artifactId>spring-boot-starter</artifactId>
        </dependency>
        <dependency>
            <groupId>org.springframework.boot</groupId>
            <artifactId>spring-boot-starter-test</artifactId>
        </dependency>
        <!-- DevTools in Spring Boot 项目热部署 -->
        <dependency>
            <groupId>org.springframework.boot</groupId>
            <artifactId>spring-boot-devtools</artifactId>
        </dependency>
    </dependencies>

    <build>
        <plugins>
            <plugin>
                <artifactId>maven-compiler-plugin</artifactId>
                <configuration>
                    <source>1.8</source>
                    <target>1.8</target>
                </configuration>
            </plugin>
            <!-- 如果我们要直接Main启动spring,那么以下plugin必须要添加,否则是无法启动的。 -->
            <!-- 如果使用maven的spring-boot:run的话就不需要此配置 -->
            <plugin>
                <groupId>org.springframework.boot</groupId>
                <artifactId>spring-boot-maven-plugin</artifactId>
            </plugin>
        </plugins>
    </build>

</project>
注意:在配置完pom.xml文件后可能会报红叉:

解决办法:项目右键-Maven4MyEclipse-update project
第六步:编写启动类:两种写法。

   方法1:Application类+controller类 (注意Application类放到controller层)
import org.springframework.boot.SpringApplication;
import org.springframework.boot.autoconfigure.SpringBootApplication;
/**
 * 注解@SpringBootApplication指定项目为springboot,由此类当作程序入口,自动装配 web 依赖的环境;
 * @author admin
 *
 */
@SpringBootApplication
public class Application {
    // 在main方法中启动一个应用,即:这个应用的入口
    public static void main(String[] args) {
        // TODO Auto-generated method stub
        SpringApplication.run(Application.class, args);
    }
}
import org.springframework.web.bind.annotation.RequestMapping;
import org.springframework.web.bind.annotation.RestController;

@RestController //是spring4里的新注解,是@ResponseBody和@Controller的缩写
public class HelloSpringBoot {

    @RequestMapping("/hello")
    public String hello(){
        return "this is Spring boot demo!";
    }
}
方法2:在controller层

package hello;

import org.springframework.boot.SpringApplication;
import org.springframework.boot.autoconfigure.SpringBootApplication;
import org.springframework.stereotype.Controller;
import org.springframework.web.bind.annotation.RequestMapping;
import org.springframework.web.bind.annotation.ResponseBody;

//Spring Boot项目的核心注解,主要目的是开启自动配置
@SpringBootApplication
//标明这是一个SpringMVC的Controller控制器
@Controller

public class HelloApplication {
    @RequestMapping("/hello")
    @ResponseBody
    public String hello() {
        return "hello world";
    }

    // 在main方法中启动一个应用,即:这个应用的入口
    public static void main(String[] args) {
        SpringApplication.run(HelloApplication.class, args);
    }
}
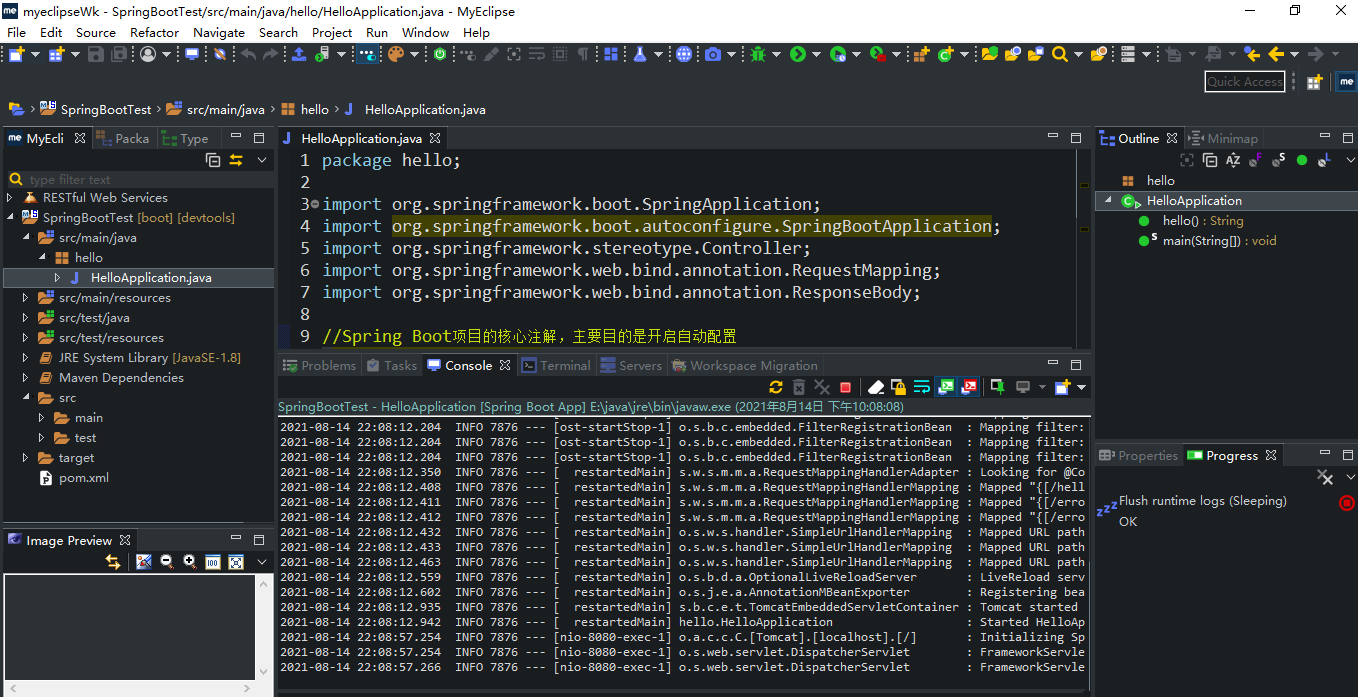
第七步:第六步两种写法均是Run as执行main函数,成功启动如下:
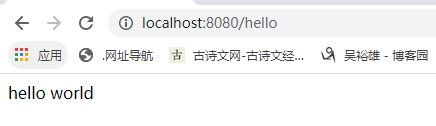
在浏览器访问:http://localhost:8080/hello成功如下: