HTML5
一个最简单的html5页面模版如下:
<!DOCTYPE html>
<html>
<head>
<meta charset="UTF-8">
<title>Title of the document</title>
</head>

<body>
Content of the document......
</body>

</html>
HTML5新元素
- 新增的语义化的标签:<header>, <footer>, <article>, and <section......
- 新的元素属性:number, date, time, calendar, and range......
- 新的绘图元素:<svg> and <canvas>
- 新的多媒体元素:<audio> and <video>
HTML5新API
- HTML Geolocation
- HTML Drag and Drop
- HTML Local Storage
- HTML Application Cache
- HTML Web Workers
- HTML SSE
语义化的标签
什么是语义化的标签?
一个语义化的元素清楚地描述了它对浏览器和开发者的意义。
无语义化的元素:<div>,<span>和其所包含的内容并没有关系。
语义化的元素:<form>, <table>,<article>清楚的定义了其所包含的内容。
为什么提倡使用语义化的标签?
在HTML4时代,开发者们使用自己的id选择器或者类名选择器来定义元素的样式,这使得搜索引擎无法正确识别网页内容。
通过使用HTML5提供的语义化的标签元素,搜索引擎可以更加简单的识别网页内容。
According to the W3C, a Semantic Web: "Allows data to be shared and reused across applications, enterprises, and communities."
HTML5新增的语义化标签链接:
https://www.w3schools.com/html/html5_semantic_elements.asp
HTML5 Canvas
什么是Canvas?
Canvas是HTML5新增的一个用于绘图的元素,Canvas使用JavaScript来绘制图像。
Canvas参考链接:
https://www.w3schools.com/graphics/canvas_intro.asp
HTML5 SVG
What is SVG?
- SVG stands for Scalable Vector Graphics
- SVG is used to define graphics for the Web
- SVG is a W3C recommendation
SVG参考链接:
https://www.w3schools.com/graphics/svg_intro.asp
Differences Between SVG and Canvas
SVG is a language for describing 2D graphics in XML.
Canvas draws 2D graphics, on the fly (with a JavaScript).
SVG is XML based, which means that every element is available within the SVG DOM. You can attach JavaScript event handlers for an element.
In SVG, each drawn shape is remembered as an object. If attributes of an SVG object are changed, the browser can automatically re-render the shape.
Canvas is rendered pixel by pixel. In canvas, once the graphic is drawn, it is forgotten by the browser. If its position should be changed, the entire scene needs to be redrawn, including any objects that might have been covered by the graphic.
Comparison of Canvas and SVG
The table below shows some important differences between Canvas and SVG:
| Canvas | SVG |
|---|---|
|
|
HTML5多媒体元素:<video>和<audio>
1.<video>
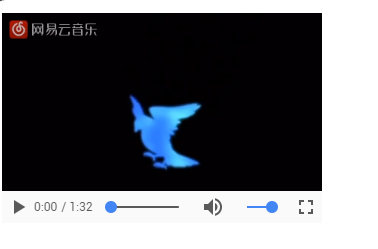
在video出现之前,要在网页上播放视频,必须要安装相应的插件(like flash),<video>定义了一套标准的方法来解决这个问题。
一个简单的<video>的使用例子如下:
<video width="320" height="240" controls autoplay>
    <source src="青鸟.mp4" type="video/mp4">
    <source src="青鸟.ogg" type="video/ogg">
    Your browser does not support the video tag.
</video>
我们定义了一个<video>标签,标签里边包含的<source>标签是用来指定要播放的文件的路径和类型,浏览器会使用第一个支持的文件类型,如果所有的文件类型都不支持,就会显示文字提示。
这在Google浏览器当中显示如下:
来分析一下<video>的属性作用:
- controls:控制栏(也就是底部的播放/暂停按钮,进度条,音量,全屏)是否显示
- autoplay:是否自动播放
当然,经常上网看视频的我们也会发现,许多网站的播放器和上面原生的不太一样呀?
其实video也提供了许多接口给开发者使用,通过这些接口可以自定义自己的video样式。
- play():开始播放视频,通过play()和pause()可以自定义播放按钮。
- pause():暂停播放视频。
- load():重新播放视频。
- currentTime:返回或者设置当前的播放进度,通过currentTime和duration可以自定义进度条。
- duration:返回视频时长。
- volume:返回或者设置当前音量,通过这个属性可以自定义音量控件。
- playbackRate:设置或者返回当前的播放速率,通过这个属性可以控制播放速度
以上是一些常用的方法和属性,详细请参考:
https://www.w3schools.com/tags/ref_av_dom.asp
2.<audio>
audio用法与video类似
<audio controls>
  <source src="horse.ogg" type="audio/ogg">
  <source src="horse.mp3" type="audio/mpeg">
Your browser does not support the audio element.
</audio>
其API与video一模一样
HTML5新API
1.HTML Geolocation
此API可以用来获取用户的地理位置,用法如下:
 (function getLocation() {
        if (navigator.geolocation) {
            navigator.geolocation.getCurrentPosition(function (position, error) {
                console.log(position)
            });
        } else {
            console.log("Geolocation is not supported by this browser.")
        }
    })();
首先检查浏览器是否支持navigator.geolocation,该对象有一个getCurrentPosition函数,此函数接受一个回调函数作为参数,
此回调函数的参数有两个,第一个为获取的地理位置信息,第二个为错误类型
我们看一下控制台的打印信息:
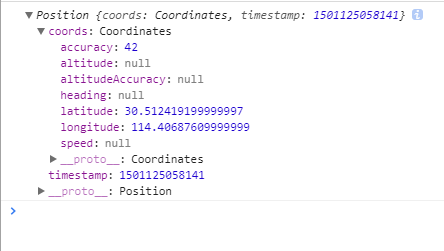
返回了一个Position对象:
| Property | Returns |
|---|---|
| coords.latitude | The latitude as a decimal number (always returned) |
| coords.longitude | The longitude as a decimal number (always returned) |
| coords.accuracy | The accuracy of position (always returned) |
| coords.altitude | The altitude in meters above the mean sea level (returned if available) |
| coords.altitudeAccuracy | The altitude accuracy of position (returned if available) |
| coords.heading | The heading as degrees clockwise from North (returned if available) |
| coords.speed | The speed in meters per second (returned if available) |
| timestamp | The date/time of the response (returned if available) |
2.HTML Drag and Drop
一个例子
<!DOCTYPE HTML>
<html>
<head>
<script>
function allowDrop(ev) {
    ev.preventDefault();
}

function drag(ev) {
    ev.dataTransfer.setData("text", ev.target.id);
}

function drop(ev) {
    ev.preventDefault();
    var data = ev.dataTransfer.getData("text");
    ev.target.appendChild(document.getElementById(data));
}
</script>
</head>
<body>

<div id="div1" ondrop="drop(event)" ondragover="allowDrop(event)"></div>

<img id="drag1" src="img_logo.gif" draggable="true"
ondragstart="drag(event)" width="336" height="69">

</body>
</html>
首先,要知道不是所有的元素都可以被拖动,要使一个元素可以被拖动,需要设置其
draggable="true"
,这样元素就可以被拖动了。
其次,并不是所有的位置都可以drop,ondragOver指定那些位置可以drop。
我们还需要阻止默认的ondragOver事件
function allowDrop(ev) {
    ev.preventDefault();
}
ondrop会在元素被释放后触发。
相信平时我们上网时也会接触到一种新奇的场景——文件拖拽上传,那么这是如何实现的呢?demo如下:
http://luyufeng.wang/demos/HTML5%E6%8B%96%E6%8B%BD%E4%B8%8A%E4%BC%A0/
其中最重要的是dataTransfer.files属性,这是一个FileList对象,上传文件的信息全在这里。
接着就可以使用HTML5的FileReader()对象做进一步处理,FileReader()对象的初步使用可以参考:
http://www.cnblogs.com/txwslyf/p/7249872.html
3.HTML Local Storage
- 要使用localStorage,第一步需要判断浏览器是否支持localStorage:
if(!window.localStorage){ alert("浏览器不支持localstorage"); return false; }else{ //主逻辑业务 } - 第二步需要判断所需要存储的localStorage是否已经存在:
if (!window.localStorage) { alert("浏览器支持localstorage"); return false; } else { if (!window.localStorage.recipes) { window.localStorage.setItem('recipes', '[]'); else { //主逻辑业务 } } } - localStorage常用的几种方法:
- 保存一个键值对:localStorage.setItem('key', 'value')
- 删除一个键值对:localStorage.removeItem('key', 'value')
- 获取一个键值对:localStorage.getItem('key')
- 删除所有的localStorage:localStorage.clear()
- 获取所有的localStorage的键值:
var storage=window.localStorage;
            storage.a=1;
            storage.setItem("c",3);
            for(var i=0;i<storage.length;i++){
                var key=storage.key(i);
                console.log(key);
            }
localStorage只可以储存String类型的值,所以使用时一般是采用JSON格式的数据。
4.HTML Web Workers
看下面代码:
<!DOCTYPE html>
<html>
<body>

<p>Count numbers: <output id="result"></output></p>
<button onclick="startWorker()">Start Worker</button>
<button onclick="stopWorker()">Stop Worker</button>

<script>
var w;

function startWorker() {
    if(typeof(Worker) !== "undefined") {
        if(typeof(w) == "undefined") {
            w = new Worker("demo_workers.js");
        }
        w.onmessage = function(event) {
            document.getElementById("result").innerHTML = event.data;
        };
    } else {
        document.getElementById("result").innerHTML = "Sorry! No Web Worker support.";
    }
}

function stopWorker() {
    w.terminate();
    w = undefined;
}
</script>

</body>
</html>
其中"demo_workers.js"文件内容如下:
var i = 0;

function timedCount() {
    i = i + 1;
    postMessage(i);
    setTimeout("timedCount()",500);
}

timedCount();
The important part of the code above is the postMessage() method - which is used to post a message back to the HTML page。
5.HTML SSE
SSE(Server-Sent Events),允许web页面响应服务器触发的事件。
看下面一段代码:
<!DOCTYPE html>
<html>
<body>

<h1>Getting server updates</h1>
<div id="result"></div>

<script>
//检验当前浏览器是否支持SSE
if(typeof(EventSource) !== "undefined") {
//指定服务器脚本位置
    var source = new EventSource("demo_sse.php");
//创建回调函数,指定获得服务器数据之后所要做的事
    source.onmessage = function(event) {
        document.getElementById("result").innerHTML += event.data + "<br>";
    };
} else {
    document.getElementById("result").innerHTML = "Sorry, your browser does not support server-sent events...";
}
</script>

</body>
</html>