鼠标事件监控:
对于鼠标时间监控的相关操作,我们在简历工程的时候需要选择的是QWidget基类,不选择QMainWindow基类,如下所示:
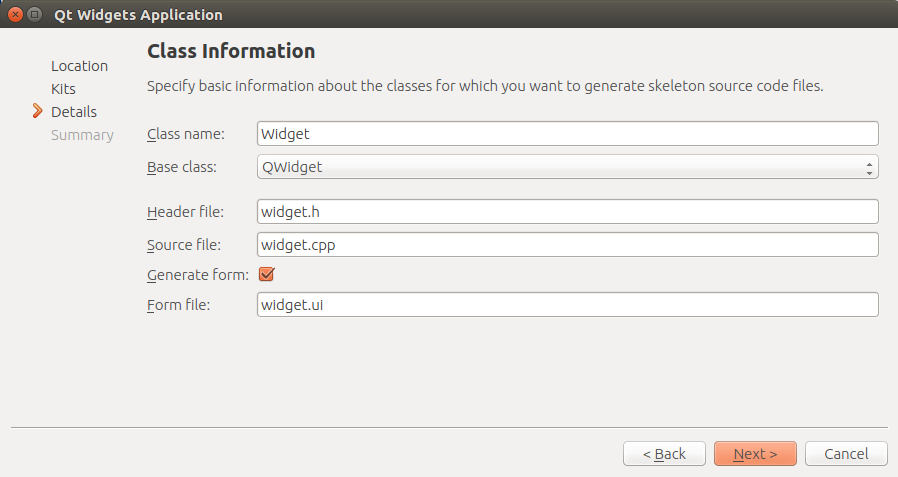 Base class:QWidget
Step1:我们首先定义的是整个Qt软件界面的UI设计:
根据设计的情况,Qt Creator自动帮我们生成了如下的HTML脚本:


<?xml version="1.0" encoding="UTF-8"?>
<ui version="4.0">
 <class>Widget</class>
 <widget class="QWidget" name="Widget">
  <property name="geometry">
   <rect>
    <x>0</x>
    <y>0</y>
    <width>400</width>
    <height>300</height>
   </rect>
  </property>
  <property name="windowTitle">
   <string>Widget</string>
  </property>
  <widget class="QPushButton" name="pushButton">
   <property name="geometry">
    <rect>
     <x>190</x>
     <y>230</y>
     <width>101</width>
     <height>27</height>
    </rect>
   </property>
   <property name="text">
    <string>PushButton</string>
   </property>
  </widget>
  <widget class="QLabel" name="label">
   <property name="geometry">
    <rect>
     <x>-10</x>
     <y>200</y>
     <width>171</width>
     <height>17</height>
    </rect>
   </property>
   <property name="font">
    <font>
     <italic>true</italic>
     <strikeout>false</strikeout>
    </font>
   </property>
   <property name="text">
    <string>     PressMove-axisEvent</string>
   </property>
  </widget>
  <widget class="QLabel" name="label_2">
   <property name="geometry">
    <rect>
     <x>0</x>
     <y>256</y>
     <width>171</width>
     <height>31</height>
    </rect>
   </property>
   <property name="font">
    <font>
     <italic>true</italic>
     <strikeout>false</strikeout>
    </font>
   </property>
   <property name="text">
    <string>  ReleaseMouse-axisEvent</string>
   </property>
  </widget>
  <widget class="QPushButton" name="pushButton_2">
   <property name="geometry">
    <rect>
     <x>190</x>
     <y>200</y>
     <width>98</width>
     <height>27</height>
    </rect>
   </property>
   <property name="text">
    <string>PushButton</string>
   </property>
  </widget>
  <widget class="QPushButton" name="pushButton_3">
   <property name="geometry">
    <rect>
     <x>190</x>
     <y>260</y>
     <width>98</width>
     <height>27</height>
    </rect>
   </property>
   <property name="text">
    <string>PushButton</string>
   </property>
  </widget>
  <widget class="QLabel" name="label_3">
   <property name="geometry">
    <rect>
     <x>0</x>
     <y>226</y>
     <width>171</width>
     <height>31</height>
    </rect>
   </property>
   <property name="font">
    <font>
     <italic>true</italic>
     <strikeout>false</strikeout>
    </font>
   </property>
   <property name="text">
    <string>  PressMouse-axisEvent</string>
   </property>
  </widget>
  <widget class="QLabel" name="label_4">
   <property name="geometry">
    <rect>
     <x>0</x>
     <y>60</y>
     <width>211</width>
     <height>51</height>
    </rect>
   </property>
   <property name="font">
    <font>
     <pointsize>22</pointsize>
     <italic>true</italic>
     <underline>false</underline>
     <strikeout>false</strikeout>
    </font>
   </property>
   <property name="cursor">
    <cursorShape>BlankCursor</cursorShape>
   </property>
   <property name="text">
    <string>Mouse Monitor</string>
   </property>
   <property name="alignment">
    <set>Qt::AlignCenter</set>
   </property>
  </widget>
  <widget class="QLabel" name="label_5">
   <property name="geometry">
    <rect>
     <x>20</x>
     <y>120</y>
     <width>171</width>
     <height>21</height>
    </rect>
   </property>
   <property name="font">
    <font>
     <pointsize>10</pointsize>
     <italic>true</italic>
     <underline>false</underline>
     <strikeout>false</strikeout>
    </font>
   </property>
   <property name="cursor">
    <cursorShape>BlankCursor</cursorShape>
   </property>
   <property name="text">
    <string>Designed by : mm1994uestc</string>
   </property>
   <property name="alignment">
    <set>Qt::AlignCenter</set>
   </property>
  </widget>
  <widget class="QLabel" name="label_6">
   <property name="geometry">
    <rect>
     <x>0</x>
     <y>10</y>
     <width>321</width>
     <height>51</height>
    </rect>
   </property>
   <property name="font">
    <font>
     <pointsize>28</pointsize>
     <italic>true</italic>
     <underline>false</underline>
     <strikeout>false</strikeout>
    </font>
   </property>
   <property name="cursor">
    <cursorShape>BlankCursor</cursorShape>
   </property>
   <property name="text">
    <string>Qt interface Demo!</string>
   </property>
   <property name="alignment">
    <set>Qt::AlignCenter</set>
   </property>
  </widget>
 </widget>
 <layoutdefault spacing="6" margin="11"/>
 <resources/>
 <connections/>
</ui>
实际的界面的效果如下所示:

Step2:我们根据设计的实际情况对每一个界面上的Button进行相关的触发机制:
a)我们需要包含Mouse鼠标相关的头文件进来
#include <QMouseEvent>
b)鼠标事件的相关函数都封装在Widget基类当中,针对上面的三类事件Event,我们将列举如下:
void Widget::mousePressEvent(QMouseEvent *e)
void Widget::mouseMoveEvent(QMouseEvent *e)
void Widget::mouseReleaseEvent(QMouseEvent *e)
c)这里我们需要在widget.cpp文件中对每一个事件函数进行实现:(具体实现如下所示)
void Widget::mousePressEvent(QMouseEvent *e)
{
    qDebug() << "  X , Y"; // 输出X Y字符串
    qDebug() << tr("%1,%2").arg(e->x()).arg(e->y()); // e是我们取得的鼠标对象,我们在对象中取得鼠标对象的相关参数,如x坐标和y坐标
    ui->pushButton->setText(tr("(%1,%2)").arg(e->x()).arg(e->y())); // 我们将取得的xy的坐标更新到我们的Button的内容当中
}
void Widget::mouseMoveEvent(QMouseEvent *e)
{
    ui->pushButton_2->setText(tr("%1,%2").arg(e->x()).arg(e->y())); // 与上同理
}
void Widget::mouseReleaseEvent(QMouseEvent *e)
{
    ui->pushButton_3->setText(tr("%1,%2").arg(e->x()).arg(e->y())); // 与上同理
}
d)我们需要在头文件widget.h文件当中声明我们实现的鼠标的相关函数:
protected:
    void mousePressEvent(QMouseEvent *);

    void mouseMoveEvent(QMouseEvent *);

    void mouseReleaseEvent(QMouseEvent *);
以上就基本完成了整个程序的所有功能,详细的工程代码请参考我博客园文件中的内容(文件名称MouseMonitor.tar.gz):https://i.cnblogs.com/Files.aspx