摘要:
在这篇文章中,我将继续完成SportsStore应用程序,让站点管理者可以管理产品列表。我将添加创建、修改和删除产品功能。
本篇文章将分模块的方式,逐个介绍SportsStore站点管理功能的开发过程。
数据管理部分
修改IProductRepository.cs接口代码文件。
 1 using SportsStore.Domain.Entities;
 2 using System.Collections.Generic;
 3
 4 namespace SportsStore.Domain.Abstract
 5 {
 6     public interface IProductRepository
 7     {
 8         IEnumerable<Product> Products { get; }
 9
10         void SaveProduct(Product product);
11
12         Product DeleteProduct(int productID);
13     }
14 }
添加了两个接口方法SaveProduct和DeleteProduct。
修改EFProductRepository.cs代码文件,添加这两个新添加的接口的实现。
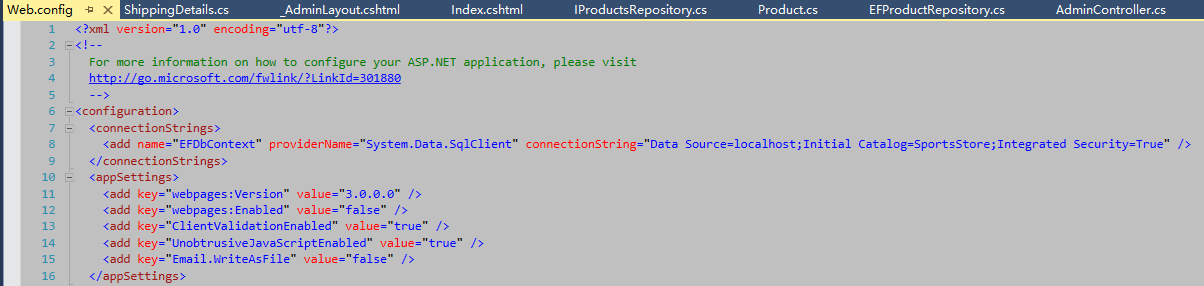
 1 using SportsStore.Domain.Abstract;
 2 using SportsStore.Domain.Entities;
 3 using System.Collections.Generic;
 4
 5 namespace SportsStore.Domain.Concrete
 6 {
 7     public class EFProductRepository : IProductRepository
 8     {
 9         private EFDbContext context = new EFDbContext();
10         public IEnumerable<Product> Products
11         {
12             get
13             {
14                 try
15                 {
16                     return context.Products;
17                 }
18                 catch (System.Exception e)
19                 {
20                     return null;
21                 }
22             }
23         }
24
25         public void SaveProduct(Product product)
26         {
27             if (product.ProductID == 0)
28             {
29                 context.Products.Add(product);
30             }
31             else
32             {
33                 Product dbEntry = context.Products.Find(product.ProductID);
34                 if (dbEntry != null)
35                 {
36                     dbEntry.Name = product.Name;
37                     dbEntry.Description = product.Description;
38                     dbEntry.Price = product.Price;
39                     dbEntry.Category = product.Category;
40                 }
41             }
42             context.SaveChanges();
43         }
44
45         public Product DeleteProduct(int productID)
46         {
47             Product dbEntry = context.Products.Find(productID);
48             if (dbEntry != null)
49             {
50                 context.Products.Remove(dbEntry);
51                 context.SaveChanges();
52             }
53             return dbEntry;
54         }
55     }
56 }
这两个方法SaveProduct和方法DeleteProduct,调用EntifyFramework,实现了保存(添加和修改)和删除产品功能。
产品管理控制器
添加控制器AdminController,此控制器区别于只用于显示产品的网站首页控制器ProductController,实现了增删改Action方法。
 1 using SportsStore.Domain.Abstract;
 2 using SportsStore.Domain.Entities;
 3 using System.Linq;
 4 using System.Web.Mvc;
 5
 6 namespace SportsStore.WebUI.Controllers
 7 {
 8     public class AdminController : Controller
 9     {
10         private IProductRepository repository;
11
12         public AdminController(IProductRepository repo)
13         {
14             repository = repo;
15         }
16
17         public ViewResult Index()
18         {
19             return View(repository.Products);
20         }
21
22         public ViewResult Edit(int productId)
23         {
24             Product product = repository.Products.FirstOrDefault(p => p.ProductID == productId);
25             return View(product);
26         }
27
28         [HttpPost]
29         public ActionResult Edit(Product product)
30         {
31             if (ModelState.IsValid)
32             {
33                 repository.SaveProduct(product);
34                 TempData["message"] = string.Format("{0} has been saved", product.Name);
35                 return RedirectToAction("Index");
36             }
37             else
38             {
39                 // there is something wrong with the data values
40                 return View(product);
41             }
42         }
43
44         public ViewResult Create()
45         {
46             return View("Edit", new Product());
47         }
48
49         [HttpPost]
50         public ActionResult Delete(int productId)
51         {
52             Product deletedProduct = repository.DeleteProduct(productId);
53             if (deletedProduct != null)
54             {
55                 TempData["message"] = string.Format("{0} was deleted", deletedProduct.Name);
56             }
57             return RedirectToAction("Index");
58         }
59     }
60 }
- 以Ninject构造函数注入方式生成属性IProductRepository repository。
- Index方法Action:返回产品列表
- Edit方法Action(Get方式):传入productId参数,返回带有这个产品信息的Edit视图。Edit视图的视图模型类是Product类型。
- Edit方法Action(Post方式):从视图上通过模型绑定返回产品product参数,如果绑定的模型验证结果返回的ModelState.IsValid为true,则保存修改后的product信息,使用Temp对象在页面上显示保存成功字符串,并返回产品列表视图。否则,返回原视图(Edit视图),并向视图传入正在编辑的产品对象,用户可以继续编辑该产品。
- Create方法Action:重用了Edit方法Action。返回Edit方法对应的视图,使用new Product()传入一个初始化的产品对象。
- Delete方法Action:使用了Post特性修饰,表示只能通过Post方式调用该Action,比Get方式更加安全。删除成功后,使用Temp对象在页面上显示删除成功字符串。
- 使用Temp对象保存和显示操作成功的字符串,而不能使用ViewData,因为ViewData只能在当前Action上使用。这里使用了RedirectToAction跳转到了另一个视图。
视图
在Shared文件夹中,添加_AdminLayout.cshtml视图。
 1 <!DOCTYPE html>
 2
 3 <html>
 4 <head>
 5     <meta name="viewport" content="width=device-width" />
 6     <link href="~/Content/bootstrap.css" rel="stylesheet" />
 7     <link href="~/Content/bootstrap-theme.css" rel="stylesheet" />
 8     <title>@ViewBag.Title</title>
 9 </head>
10 <body>
11     <div class="navbar navbar-inverse" role="navigation">
12         <a class="navbar-brand" href="#">
13             <span class="hidden-xs">SPORTS STORE</span>
14             <div class="visible-xs">SPORTS</div>
15             <div class="visible-xs">STORE</div>
16         </a>
17     </div>
18     <div>
19         @if (TempData["message"] != null)
20         {
21             <div class="alert alert-success">@TempData["message"]</div>
22         }
23         @RenderBody()
24     </div>
25 </body>
26 </html>
_AdminLayout.cshtml的页面布局跟网站首页的布局类似。只是在Body的上部增加了显示操作成功的字符串的DIV元素。
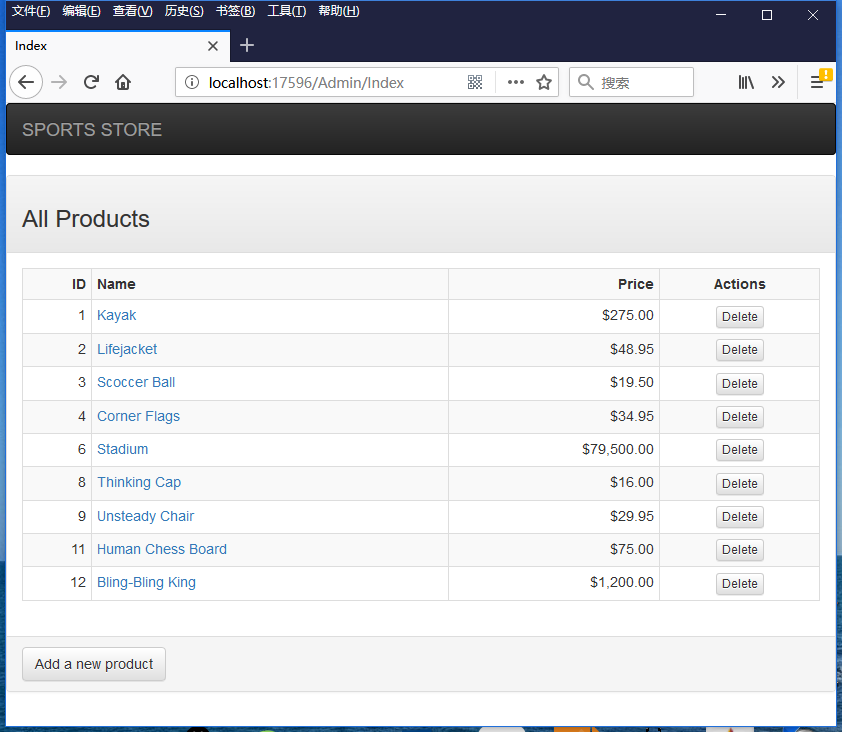
产品管理的Index.cshtml视图
 1 @model IEnumerable<SportsStore.Domain.Entities.Product>
 2
 3 @{
 4     ViewBag.Title = "Index";
 5     Layout = "~/Views/Shared/_AdminLayout.cshtml";
 6 }
 7
 8 <div class="panel panel-default">
 9     <div class="panel-heading">
10         <h3>All Products</h3>
11     </div>
12     <div class="panel-body">
13         <table class="table table-striped table-condensed table-bordered">
14             <tr>
15                 <th class="text-right">ID</th>
16                 <th>Name</th>
17                 <th class="text-right">Price</th>
18                 <th class="text-center">Actions</th>
19             </tr>
20             @foreach (var item in Model)
21             {
22                 <tr>
23                     <td class="text-right">@item.ProductID</td>
24                     <td>
25                         @Html.ActionLink(item.Name, "Edit", new
26                         {
27                             item.ProductID
28                         })
29                     </td>
30                     <td class="text-right">@item.Price.ToString("c")</td>
31                     <td class="text-center">
32                         @using (Html.BeginForm("Delete", "Admin"))
33                         {
34                             @Html.Hidden("ProductID", item.ProductID)
35                             <input type="submit" class="btn btn-default btn-xs" value="Delete" />
36                         }
37                     </td>
38                 </tr>
39             }
40         </table>
41     </div>
42     <div class="panel-footer">
43         @Html.ActionLink("Add a new product", "Create", null, new { @class = "btn btn-default" })
44     </div>
45 </div>
- 该视图通过语句:Layout = "~/Views/Shared/_AdminLayout.cshtml";,指定它的布局视图是刚才创建的_AdminLayout.cshtml。
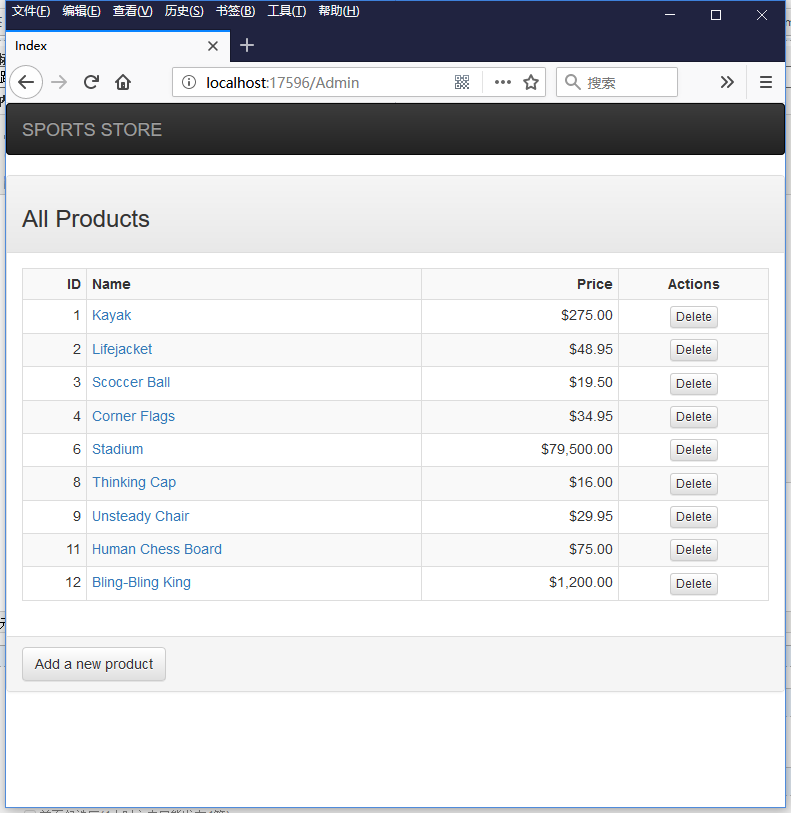
- 该视图通过表格的形式呈现了产品列表。显示产品名称的列是一个指向Edit方法Action的链接。每一行的最后一列放置一个删除产品的表单,表达内容是一个保存ProductID信息的隐藏元素和一个删除按钮。
- 页面底部显示一个创建产品的超链接,该链接通过css样式呈现成按钮样式。
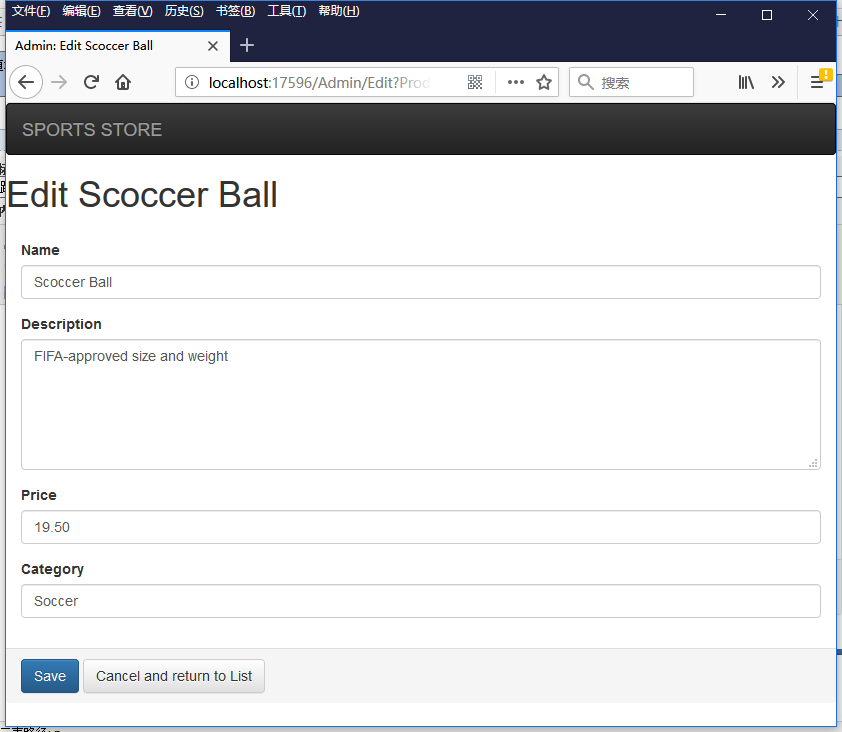
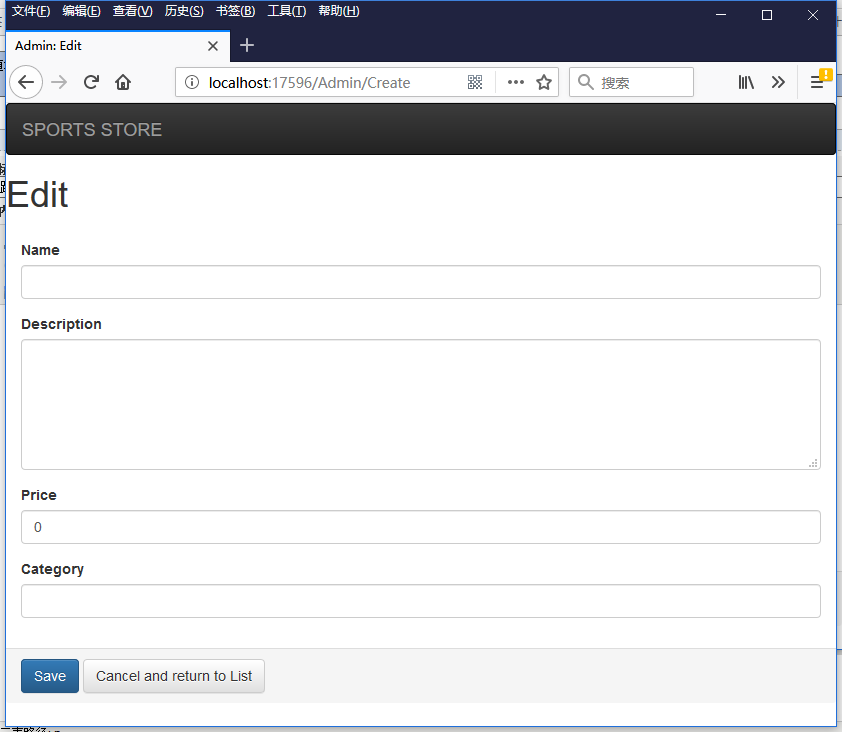
最后是Edit.cshtml视图
 1 @model SportsStore.Domain.Entities.Product
 2
 3 @{
 4     ViewBag.Title = "Admin: Edit " + @Model.Name;
 5     Layout = "~/Views/Shared/_AdminLayout.cshtml";
 6 }
 7
 8 <h1>Edit @Model.Name</h1>
 9 @using (Html.BeginForm("Edit", "Admin", FormMethod.Post))
10 {
11     <div class="panel-body">
12         @Html.HiddenFor(m => m.ProductID)
13         @foreach (var property in ViewData.ModelMetadata.Properties)
14         {
15             switch (property.PropertyName)
16             {
17                 case "ProductID":
18                     break;
19                 default:
20                     <div class="form-group">
21                         <label>
22                             @(property.DisplayName ?? property.PropertyName)
23                         </label>
24                         @if (property.PropertyName == "Description")
25                         {
26                             @Html.TextArea(property.PropertyName, null, new { @class = "form-control", rows = 5 })
27                         }
28                         else
29                         {
30                             @Html.TextBox(property.PropertyName, null, new { @class = "form-control" })
31                         }
32                     </div>
33                     break;
34             }
35         }
36     </div>
37     <div class="panel-footer">
38         <input type="submit" value="Save" class="btn btn-primary" />
39         @Html.ActionLink("Cancel and return to List", "Index", null, new { @class = "btn btn-default" })
40     </div>
41 }
- 首先使用@Html.HiddenFor(m => m.ProductID)向页面发送保存有ProductID信息的隐藏元素。
- 使用ViewData.ModelMetadata.Properties,返回视图绑定类的所有属性。这里是Product类的所有属性。
- 如果该属性名是ProductID(ProductID属性),则不生成表单HTML元素。如果该属性是Description属性,则显示成一个TextArea,通过@class指定他的行数。否则,只显示成一个普通的text输入框。
- @(property.DisplayName ?? property.PropertyName)用于显示输入元素前面的Label元素。如果属性使用了Display特性指定了属性显示在页面上的字符串,则显示这个字符串。否则,只显示这个属性名。这个对于使用了多语言的系统非常有用。
运行程序,得到运行结果。
点击任意一个产品的链接,返回Edit视图。
如果点击按钮Add a new product,返回Create视图。
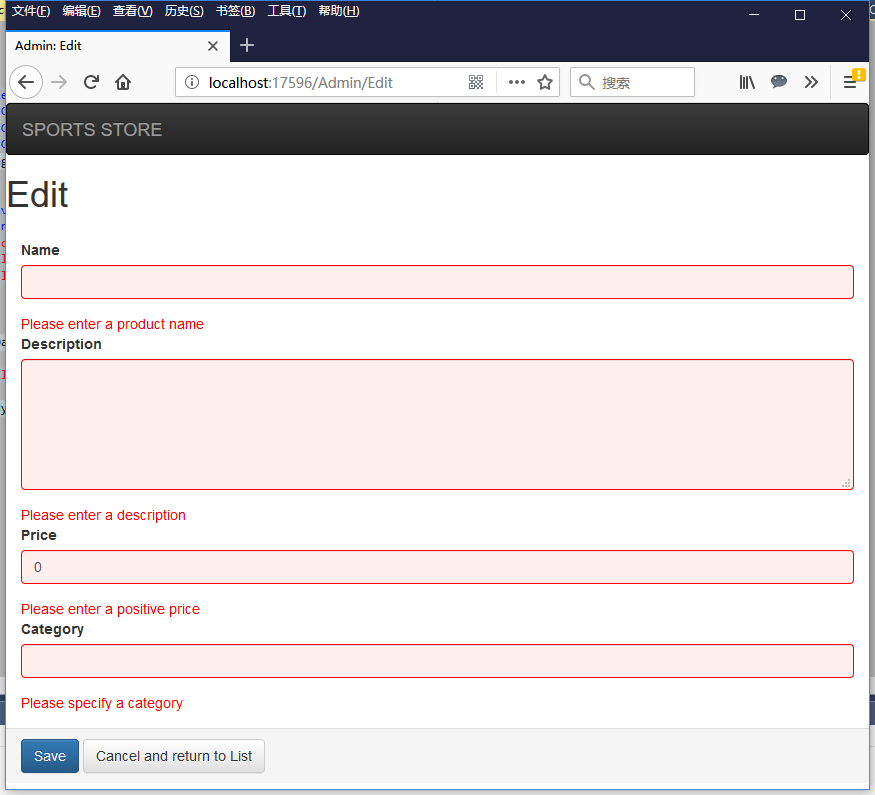
添加视图模型验证
修改Product.cs类。
 1 using System.ComponentModel.DataAnnotations;
 2
 3 namespace SportsStore.Domain.Entities
 4 {
 5     public class Product
 6     {
 7         public int ProductID { get; set; }
 8         [Required(ErrorMessage = "Please enter a product name")]
 9         public string Name { get; set; }
10         [Required(ErrorMessage = "Please enter a description")]
11         public string Description { get; set; }
12         [Required]
13         [Range(0.01, double.MaxValue, ErrorMessage = "Please enter a positive price")]
14         public decimal Price { get; set; }
15         [Required(ErrorMessage = "Please specify a category")]
16         public string Category { get; set; }
17     }
18 }
需要引入名称空间System.ComponentModel.DataAnnotations;。该名称空间下包含了数量庞大的模型验证特性类。这里只使用了Required和Range。
继续编辑Edit.cshtml视图,将验证结果字符串显示在视图页面上。
 1 @model SportsStore.Domain.Entities.Product
 2
 3 @{
 4     ViewBag.Title = "Admin: Edit " + @Model.Name;
 5     Layout = "~/Views/Shared/_AdminLayout.cshtml";
 6 }
 7
 8 <h1>Edit @Model.Name</h1>
 9 @using (Html.BeginForm("Edit", "Admin", FormMethod.Post))
10 {
11     <div class="panel-body">
12         @Html.HiddenFor(m => m.ProductID)
13         @foreach (var property in ViewData.ModelMetadata.Properties)
14         {
15             switch (property.PropertyName)
16             {
17                 case "ProductID":
18                     break;
19                 default:
20                     <div class="form-group">
21                         <label>
22                             @(property.DisplayName ?? property.PropertyName)
23                         </label>
24                         @if (property.PropertyName == "Description")
25                         {
26                             @Html.TextArea(property.PropertyName, null, new { @class = "form-control", rows = 5 })
27                         }
28                         else
29                         {
30                             @Html.TextBox(property.PropertyName, null, new { @class = "form-control" })
31                         }
32                     </div>
33                     @Html.ValidationMessage(property.PropertyName)
34                     break;
35             }
36         }
37     </div>
38     <div class="panel-footer">
39         <input type="submit" value="Save" class="btn btn-primary" />
40         @Html.ActionLink("Cancel and return to List", "Index", null, new { @class = "btn btn-default" })
41     </div>
42 }
这里通过在每个表单元素所在的DIV下面,使用语句@Html.ValidationMessage(property.PropertyName)返回表单验证结果。
还要修改_AdminLayout.cshtml,引入验证出现错误时所用的CSS样式表。
 1 <!DOCTYPE html>
 2
 3 <html>
 4 <head>
 5     <meta name="viewport" content="width=device-width" />
 6     <link href="~/Content/bootstrap.css" rel="stylesheet" />
 7     <link href="~/Content/bootstrap-theme.css" rel="stylesheet" />
 8     <link href="~/Content/ErrorStyles.css" rel="stylesheet" />
 9     <title>@ViewBag.Title</title>
10 </head>
11 <body>
12     <div class="navbar navbar-inverse" role="navigation">
13         <a class="navbar-brand" href="#">
14             <span class="hidden-xs">SPORTS STORE</span>
15             <div class="visible-xs">SPORTS</div>
16             <div class="visible-xs">STORE</div>
17         </a>
18     </div>
19     <div>
20         @if (TempData["message"] != null)
21         {
22             <div class="alert alert-success">@TempData["message"]</div>
23         }
24         @RenderBody()
25     </div>
26 </body>
27 </html>
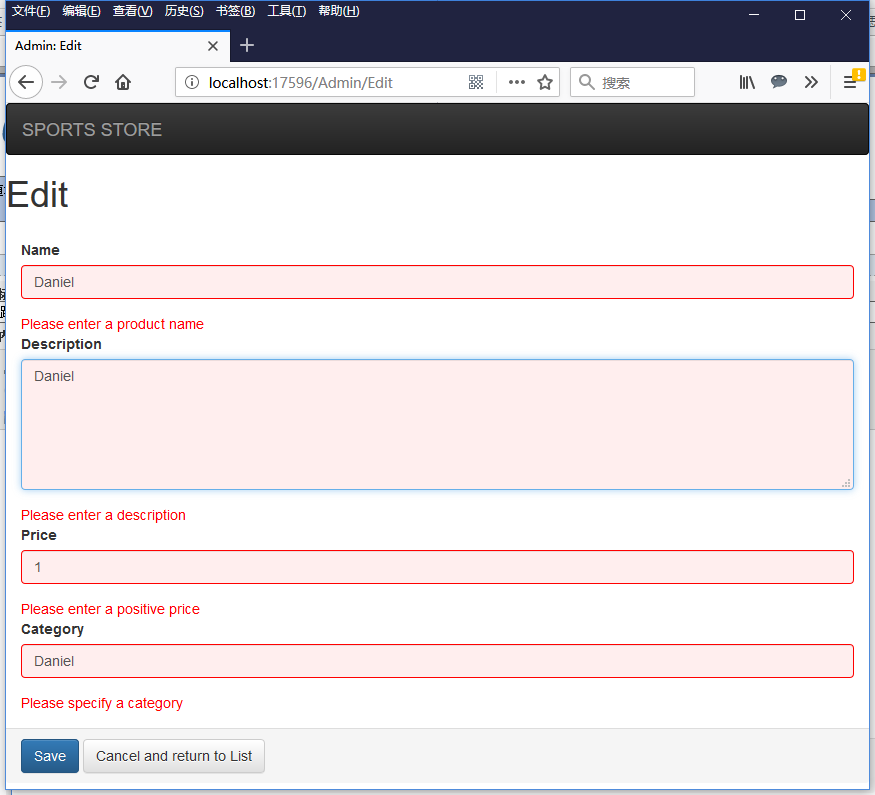
运行程序,访问/Admin/Edit视图。如果清空表单元素,则返回验证失败的Edit视图。错误消息显示在每个表单元素的下面。
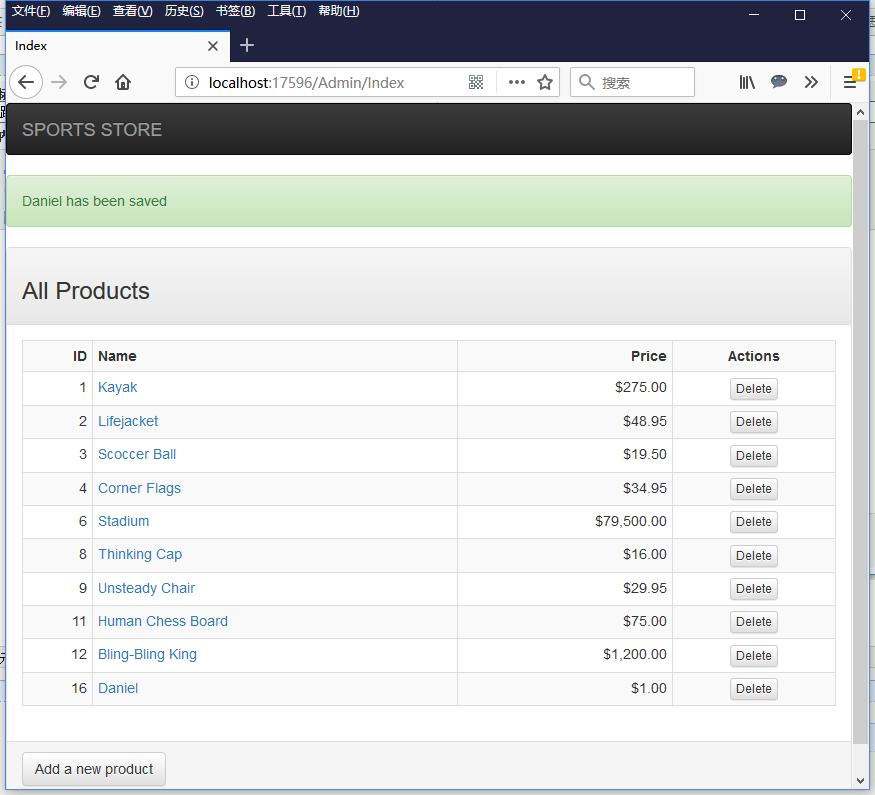
如果表单元素填写正确
点击Save按钮,则保存成功。并返回Index视图,在Index视图上看到新创建的产品。在产品列表上部,显示保存成功的字符串。
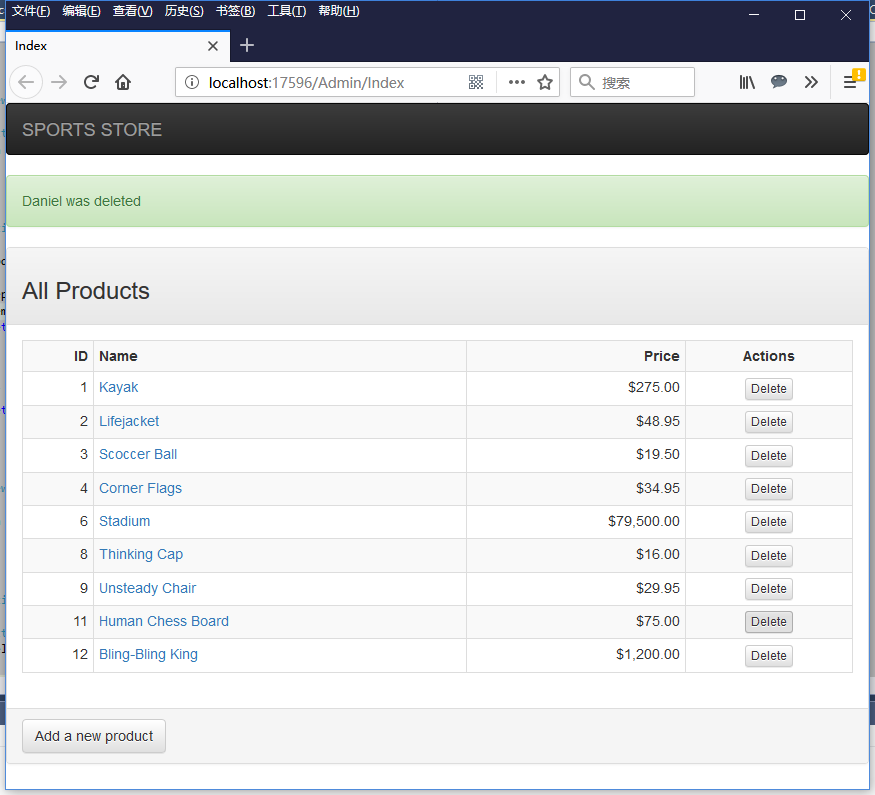
如果在Index视图上,删除Daniel这个产品。删除成功后,返回Index视图。
为表单添加客户端验证
现在使用的是服务器端验证。也就是说验证必须是发送到服务器端完成的。可以使用客户端验证方式,加快页面的访问速度。
首先使用NutGet向SportsStore.WebUI工程,添加javascript包Microsoft.jQuery.Unobtrusive.Validation 。
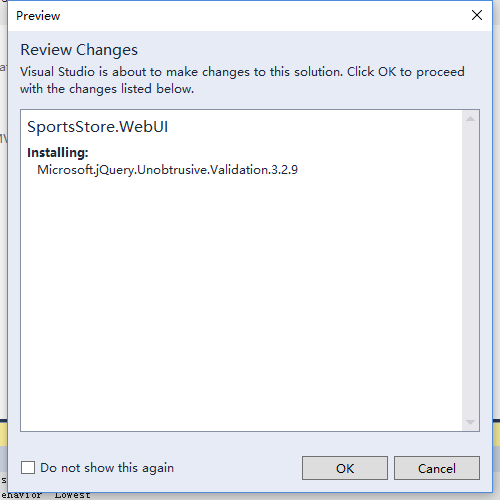
它将同时安装jquery.validate和jquery.validate.unobtrusive。
安装完成后的scrips文件夹内容是这样的。
修改_AdminLayout.cshtml视图,添加对新的JavaScript引用。
 1 <!DOCTYPE html>
 2
 3 <html>
 4 <head>
 5     <meta name="viewport" content="width=device-width" />
 6     <link href="~/Content/bootstrap.css" rel="stylesheet" />
 7     <link href="~/Content/bootstrap-theme.css" rel="stylesheet" />
 8     <link href="~/Content/ErrorStyles.css" rel="stylesheet" />
 9     <script src="~/Scripts/jquery-1.9.1.js"></script>
10     <script src="~/Scripts/jquery.validate.js"></script>
11     <script src="~/Scripts/jquery.validate.unobtrusive.js"></script>
12     <title>@ViewBag.Title</title>
13 </head>
14 <body>
15     <div class="navbar navbar-inverse" role="navigation">
16         <a class="navbar-brand" href="#">
17             <span class="hidden-xs">SPORTS STORE</span>
18             <div class="visible-xs">SPORTS</div>
19             <div class="visible-xs">STORE</div>
20         </a>
21     </div>
22     <div>
23         @if (TempData["message"] != null)
24         {
25             <div class="alert alert-success">@TempData["message"]</div>
26         }
27         @RenderBody()
28     </div>
29 </body>
30 </html>
运行程序,在/Admin/Create视图上,在空的表单元素页面上点击Save按钮,发现新的表达验证直接在客户端完成了。
你也可以修改Web.config文件里的ClientValidationEnabled属性和UnobtrusiveJavaScriptEnabled属性,将他们都改为false(默认值都为true),来禁用客户端验证(变成服务器端验证)。
添加Admin路由规则
这时候,如果我们访问URL:/Admin,将继续返回Product控制器的List视图,将Admin字符串作为category参数传入List方法Action。而此时,我们希望访问/Admin/Index视图。
此时我们需要修改RouteConfig.cs代码文件的方法RegisterRoutes,向路由表头部插入新的路由规则(新的路由规则代码放在第二个位置)。
 1 using System;
 2 using System.Collections.Generic;
 3 using System.Linq;
 4 using System.Web;
 5 using System.Web.Mvc;
 6 using System.Web.Routing;
 7
 8 namespace SportsStore
 9 {
10     public class RouteConfig
11     {
12         public static void RegisterRoutes(RouteCollection routes)
13         {
14             routes.IgnoreRoute("{resource}.axd/{*pathInfo}");
15
16             routes.MapRoute(
17                 name: null,
18                 url: "",
19                 defaults: new { controller = "Product", action = "List", category = (string)null, page = 1 }
20             );
21
22             routes.MapRoute(
23                 name: null,
24                 url: "Admin",
25                 defaults: new { controller = "Admin", action = "Index" }
26          );
27
28             routes.MapRoute(
29                 name: null,
30                 url: "Page{page}",
31                 defaults: new { controller = "Product", action = "List", category = (string)null },
32                 constraints: new { page = @"d+" }
33             );
34
35             routes.MapRoute(
36                 name: null,
37                 url: "{category}",
38                 defaults: new { controller = "Product", action = "List", page = 1 }
39             );
40
41             routes.MapRoute(
42                 name: null,
43                 url: "{category}/Page{page}",
44                 defaults: new { controller = "Product", action = "List" },
45                 constraints: new { page = @"d+" }
46             );
47
48             routes.MapRoute(
49                 name: "Default",
50                 url: "{controller}/{action}/{id}",
51                 defaults: new { controller = "Product", action = "List", id = UrlParameter.Optional }
52             );
53         }
54     }
55 }
新的路由规则的url是Admin,控制器是AdminController,Action是Index方法。
这时运行程序,访问/Admin页面,将得到/Admin/Index视图。
而其他的路由规则均不受影响。