众所周知,ListView是安卓最为频繁使用的控件,但是,随着人们审美观的提高,一些初级的ListView已经满足不了需求了,于是,我们必须为自己定制一套专属的ListView,这就需要用到适配器,ArrayAdapter可以满足大部分需求,在自己定制适配器的过程中,我遇到了许许多多的问题,希望把我的心得交给大家,免得大家再重蹈覆辙,下面进入实战。
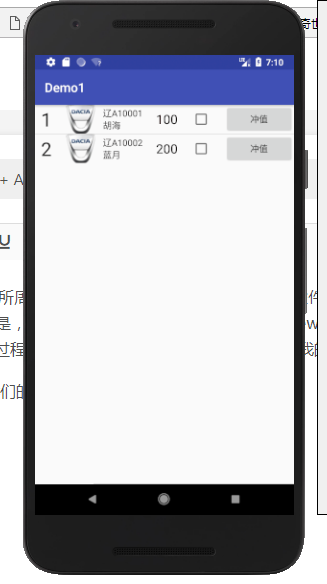
我们的终极界面是这样的:
此图是静态截面图
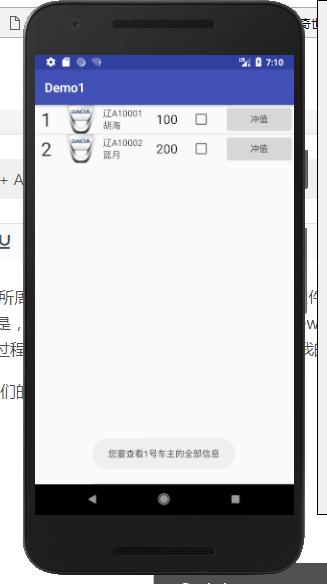
此图是点击ID为1的整行信息后的效果图
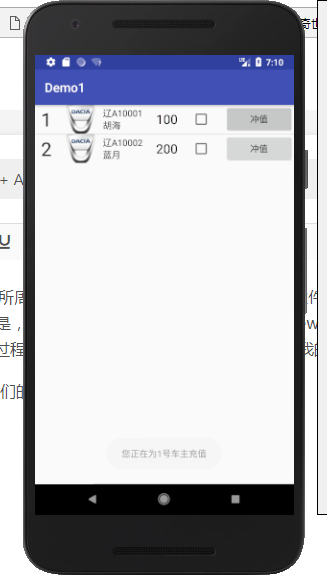
此图是点击ID为1中的按钮后的效果图
下面开始步入正题
完成这整个项目需要完成以下条目:
1.为每个ListView中的元素编写一个通用界面。
2.为每个元素写一个通用适配器。
3.在主界面中添加一个ListView。
4.实例化元素并与ArrayAdapter绑定,并添加全局和内部点击事件。
1.开始编写元素布局(这里叫Node)
<?xml version="1.0" encoding="utf-8"?>
<LinearLayout xmlns:android="http://schemas.android.com/apk/res/android"
    android:layout_width="match_parent"
    android:layout_height="120px"
    android:orientation="horizontal"
    android:descendantFocusability="blocksDescendants">            //如果不写这句代码,会使最外层元素点击无效

    <TextView
        android:id="@+id/order"
        android:layout_width="wrap_content"
        android:layout_height="match_parent"
        android:layout_weight="1"
        android:layout_gravity="center"
        android:textSize="30dp"
        android:textColor="@color/theme"
        android:gravity="center"
        />

    <ImageView
        android:id="@+id/logo"
        android:layout_width="wrap_content"
        android:layout_height="match_parent"
        android:layout_weight="1"
        android:layout_gravity="center"
        />

    <LinearLayout
        android:id="@+id/info"
        android:layout_width="wrap_content"
        android:layout_height="match_parent"
        android:layout_weight="1"
        android:gravity="center_vertical"
        android:layout_gravity="center"
        android:orientation="vertical">

        <TextView
            android:id="@+id/car_order"
            android:layout_width="wrap_content"
            android:layout_height="wrap_content"
            android:textColor="@color/theme"
            />

        <TextView
            android:id="@+id/name"
            android:layout_width="wrap_content"
            android:layout_height="wrap_content"
            android:textColor="@color/theme"
            />

    </LinearLayout>

    <TextView
        android:id="@+id/money"
        android:layout_width="wrap_content"
        android:layout_height="match_parent"
        android:layout_weight="1"
        android:gravity="center_vertical"
        android:textColor="@color/black"
        android:textSize="20dp"
        />

    <CheckBox
        android:id="@+id/jud"
        android:layout_width="wrap_content"
        android:layout_height="match_parent"
        android:layout_weight="1"
        android:layout_gravity="center"
        />

    <Button
        android:id="@+id/delta"
        android:layout_width="wrap_content"
        android:layout_height="match_parent"
        android:layout_weight="1"
        android:layout_gravity="center"
        android:text="冲值"/>

</LinearLayout>
需要在values的布局下的colors布局界面中添加如下代码:
<color name="black">#080000</color>
<color name="theme">#282626</color>
还需要在drawble目录下放一张50 * 50(推荐大小)的名为Logo.png的图片
2.为元素写一个管理类(Node类)。
public class Node {

    private int order;
    private int logo;
    private String car_order;
    private String name;
    private int money;
    private CheckBox jud;
    private Button delta;

    public Node(int order,int logo,String name,int money){

        this.order = order;
        this.logo = logo;
        this.car_order = "辽A1000" + order;
        this.name = name;
        this.money = money;

    }

    public int getorder(){

        return order;
    }

    public String getcar_order(){

        return car_order;
    }

    public int getlogoID(){

        return logo;
    }

    public String getname(){

        return name;
    }

    public int getmoney(){

        return money;
    }

}
2.为元素写一个适配器.
public class NodeAdapter extends ArrayAdapter<Node>{

    private int resourceId;

    public NodeAdapter(Context context, int resourceId, List<Node> objects){

        super(context,resourceId,objects);
        this.resourceId = resourceId;
    }

    @Override
    public View getView(final int position, View convertView, ViewGroup parent) {

        Node node = getItem(position);
        //View view = LayoutInflater.from(getContext()).inflate(resourceId, null);
        View view;
        ViewHolder holder;

        if(convertView == null){

            view = LayoutInflater.from(getContext()).inflate(resourceId,parent,false);
            holder = new ViewHolder();
            holder.order = (TextView)view.findViewById(R.id.order);
            holder.logo = (ImageView)view.findViewById(R.id.logo);
            holder.car_order = (TextView)view.findViewById(R.id.car_order);
            holder.name = (TextView)view.findViewById(R.id.name);
            holder.money = (TextView)view.findViewById(R.id.money);
            holder.jud = (CheckBox)view.findViewById(R.id.jud);
            holder.delta = (Button)view.findViewById(R.id.delta);

            view.setTag(holder);
        }else{

            view = convertView;
            holder = (ViewHolder)view.getTag();
        }

        holder.order.setText(node.getorder() + "");
        holder.logo.setImageResource(node.getlogoID());
        holder.car_order.setText(node.getcar_order());
        holder.name.setText(node.getname() + "");
        holder.money.setText(node.getmoney() + "");

        holder.jud.setTag(position);
        holder.delta.setTag(position);

        holder.delta.setOnClickListener(new View.OnClickListener() {
            @Override
            public void onClick(View v) {

                itemSelect.seleId(position);
            }
        });

        return view;
    }

    public interface onItemSelect{                //回调接口

        void seleId(int i);
    }

    private onItemSelect itemSelect;

    public void setOnItemSelectListener(onItemSelect listener){

        this.itemSelect = listener;
    }

    class ViewHolder{

        TextView order;
        ImageView logo;
        TextView car_order;
        TextView name;
        TextView money;
        CheckBox jud;
        Button delta;

    }

}
3,写主界面布局代码:
<?xml version="1.0" encoding="utf-8"?>
<LinearLayout xmlns:android="http://schemas.android.com/apk/res/android"
    android:orientation="vertical"
    android:layout_width="match_parent"
    android:layout_height="match_parent">

    <ListView
        android:id="@+id/nodeview"
        android:layout_width="match_parent"
        android:layout_height="wrap_content" />

</LinearLayout>
4.为主界面完成代码。
public class MainActivity extends AppCompatActivity {

    private List<Node> nodeList = new ArrayList<Node>();
    private ListView nodeview;

    @Override
    protected void onCreate(Bundle savedInstanceState) {
        super.onCreate(savedInstanceState);
        setContentView(R.layout.activity_main);

        initNode();

        NodeAdapter adapter = new NodeAdapter(getApplicationContext(),R.layout.node,nodeList);
        nodeview.setAdapter(adapter);

        nodeview.setOnItemClickListener(new AdapterView.OnItemClickListener() {
            @Override
            public void onItemClick(AdapterView<?> parent, View view, int position, long id) {

                Node node = nodeList.get(position);
                Toast.makeText(getApplicationContext(),"您要查看" + node.getorder() + "号车主的全部信息",Toast.LENGTH_SHORT).show();
            }
        });

        adapter.setOnItemSelectListener(new NodeAdapter.onItemSelect() {
            @Override
            public void seleId(int i) {

                int order = i + 1;
                Toast.makeText(getApplicationContext(),"您正在为" + order + "号车主充值",Toast.LENGTH_SHORT).show();
            }
        });
    }

    private void initNode(){

        nodeview = (ListView)findViewById(R.id.nodeview);
        Node node1 = new Node(1,R.drawable.logo,"胡海",100);
        Node node2 = new Node(2,R.drawable.logo,"蓝月",200);
        nodeList.add(node1);
        nodeList.add(node2);
    }
}
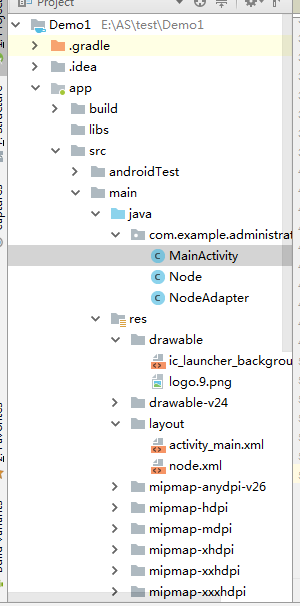
5.整个项目框架如下:
到此,这个项目就完成了.效果上面已经有图了。


